1. හැඳින්වීම
This manual provides detailed instructions for the safe and efficient use of your Hoco HC3 Bounce Sports Wireless Speaker. Please read this manual thoroughly before operating the device and retain it for future reference. The Hoco HC3 is a versatile portable speaker supporting Bluetooth, FM radio, TF card, USB, AUX, and TWS modes.

Figure 1: Hoco HC3 Bounce Sports Wireless Speaker. This image displays the speaker in a vertical orientation, showcasing its black mesh grille, the 'hoco' logo at the bottom right, and a braided carrying strap attached to the top left side. The control buttons are visible on the side panel.
2. පැකේජ අන්තර්ගතය
පෙට්ටියෙන් ඉවත් කිරීමේදී සියලුම අයිතම ඇති බවට වග බලා ගන්න:
- Hoco HC3 Bounce Sports Wireless Speaker
- USB ආරෝපණ කේබලය
- පරිශීලක අත්පොත (මෙම ලේඛනය)
- AUX Audio Cable (if included with your model)
3. නිෂ්පාදන අවසන්view
3.1 ස්පීකර් සංරචක

Figure 2: Rear panel of the Hoco HC3 speaker. This image highlights the various input ports and control buttons located on the back of the speaker. Visible elements include the power switch, USB port, TF card slot, AUX input, and LED indicator.
කථිකයාගේ පාලන සහ තොට පිළිබඳව ඔබව හුරු කර ගන්න:
- බල බොත්තම: Long press to power on/off. Short press to switch modes.
- වාදනය/විරාම බොත්තම: ශ්රව්ය වාදනය කරන්න හෝ විරාම කරන්න. ඇමතුම්වලට පිළිතුරු දෙන්න/අවසන් කරන්න.
- ශබ්දය වැඩි කරන්න / ඊළඟ ධාවන පථ බොත්තම: ඊළඟ ධාවන පථය සඳහා කෙටි ඔබන්න, ශබ්දය වැඩි කිරීමට දිගු ඔබන්න.
- ශබ්දය අඩු කරන්න / පෙර ධාවන පථ බොත්තම: පෙර ධාවන පථය සඳහා කෙටි ඔබන්න, ශබ්දය අඩු කිරීමට දිගු ඔබන්න.
- මාදිලි බොත්තම (M): Short press to cycle through Bluetooth, FM, TF card, USB, and AUX modes.
- USB Port: USB ධාවක නැවත ධාවනය සඳහා.
- TF කාඩ් පත: TF (MicroSD) කාඩ්පත් නැවත ධාවනය සඳහා.
- AUX ආදානය: රැහැන්ගත ශ්රව්ය සම්බන්ධතාවය සඳහා 3.5mm ජැක්.
- ආරෝපණ වරාය: Micro USB port for charging the speaker.
- LED දර්ශකය: Displays charging status and operating mode.
3.2 ප්රධාන ලක්ෂණ
- බ්ලූටූත් V5.0: Provides stable and efficient wireless connectivity.
- බහු පසුධාවන ක්රම: Supports Bluetooth, FM radio, TF card, USB drive, and AUX input.
- සැබෑ රැහැන් රහිත ස්ටීරියෝ (TWS): Allows two HC3 speakers to connect wirelessly for a stereo sound experience.
- දිගු බැටරි ආයු කාලය: 2400mAh battery capacity offers up to 5 hours of music playback.
- ද්විත්ව කථිකයින්: Equipped with two 45mm speaker units, each with 5W power output.
- සංයුක්ත සහ අතේ ගෙන යා හැකි: Dimensions of 202*60*60mm and weight of 561g for easy transport.
4. පිහිටුවීම
4.1 කථිකයා ආරෝපණය කිරීම
- සපයා ඇති USB ආරෝපණ කේබලය ස්පීකරයේ ආරෝපණ තොටට සම්බන්ධ කරන්න.
- USB කේබලයේ අනෙක් කෙළවර 5V USB බල ඇඩැප්ටරයකට (ඇතුළත් කර නැත) හෝ පරිගණකයේ USB පෝට් එකකට සම්බන්ධ කරන්න.
- The LED indicator will illuminate to show charging status. It typically takes about 3 hours for a full charge.
- Once fully charged, the LED indicator will change or turn off (refer to specific LED behavior in the troubleshooting section if unsure).
Note: For optimal battery life, fully charge the speaker before first use.
4.2 බල ගැන්වීම සක්රිය / අක්රිය කිරීම
- බල ගැන්වීමට: Long press the Power button until you hear an audible prompt and the LED indicator lights up.
- බලය අක්රිය කිරීමට: Long press the Power button again until you hear an audible prompt and the LED indicator turns off.
5. මෙහෙයුම් උපදෙස්
5.1 බ්ලූටූත් යුගල කිරීම
- Ensure the speaker is powered on and in Bluetooth mode (the LED indicator will typically flash blue, indicating it's ready for pairing). If not, short press the Mode (M) button to switch to Bluetooth mode.
- Enable Bluetooth on your mobile device (smartphone, tablet, computer).
- ඒ සඳහා සොයන්න available Bluetooth devices. You should see "HC3" or "Hoco HC3" in the list.
- Select "HC3" to connect. Once paired, the speaker will emit an audible confirmation, and the LED indicator will stop flashing and remain solid blue.
- දැන් ඔබට ඔබේ උපාංගයෙන් ස්පීකරය හරහා ශ්රව්ය වාදනය කළ හැක.
Note: The speaker will automatically attempt to reconnect to the last paired device when powered on, if that device's Bluetooth is active and within range.
5.2 FM රේඩියෝ මාදිලිය
- කථිකයාට බලය.
- Short press the Mode (M) button repeatedly until you enter FM radio mode.
- To auto-scan and save available FM stations, short press the Play/Pause button. The speaker will scan and store stations.
- Use the Volume Up / Next Track and Volume Down / Previous Track buttons to navigate between saved stations.
5.3 TF කාඩ්පත / USB නැවත ධාවනය
- කථිකයාට බලය.
- Insert a TF (MicroSD) card into the TF card slot or a USB flash drive into the USB port.
- The speaker should automatically switch to TF card or USB mode and begin playing audio files. If not, short press the Mode (M) button to select the correct mode.
- Use the Play/Pause, Volume Up / Next Track, and Volume Down / Previous Track buttons to control playback.
Note: Ensure your TF card or USB drive contains compatible audio files (e.g., MP3 format).
5.4 AUX මාදිලිය
- කථිකයාට බලය.
- Connect one end of a 3.5mm audio cable (if included) to the speaker's AUX input port.
- Connect the other end of the audio cable to the audio output jack of your external device (e.g., MP3 player, computer).
- The speaker should automatically switch to AUX mode. If not, short press the Mode (M) button to select AUX mode.
- Control playback from your external device. Volume can be adjusted on both the speaker and the external device.
5.5 TWS (සත්ය රැහැන් රහිත ස්ටීරියෝ) ක්රියාකාරිත්වය
The TWS function allows you to pair two Hoco HC3 speakers together for a true stereo sound experience.
- Ensure both HC3 speakers are powered off.
- Power on both speakers simultaneously. They should both enter Bluetooth pairing mode.
- On එකක් of the speakers (this will become the primary speaker), long press the Mode (M) button or a dedicated TWS button (if present, otherwise try the Play/Pause button for 3-5 seconds) until you hear a pairing tone. The speakers will attempt to connect to each other.
- Once successfully paired, you will hear a confirmation tone, and one speaker's LED will indicate it's the primary (e.g., flashing slowly), while the other's LED will be solid.
- Now, connect your mobile device to the ප්රාථමික speaker via Bluetooth as described in section 5.1.
- දැන් ස්පීකර් දෙකම හරහා ශ්රව්ය ස්ටීරියෝ ආකාරයෙන් වාදනය වේ.
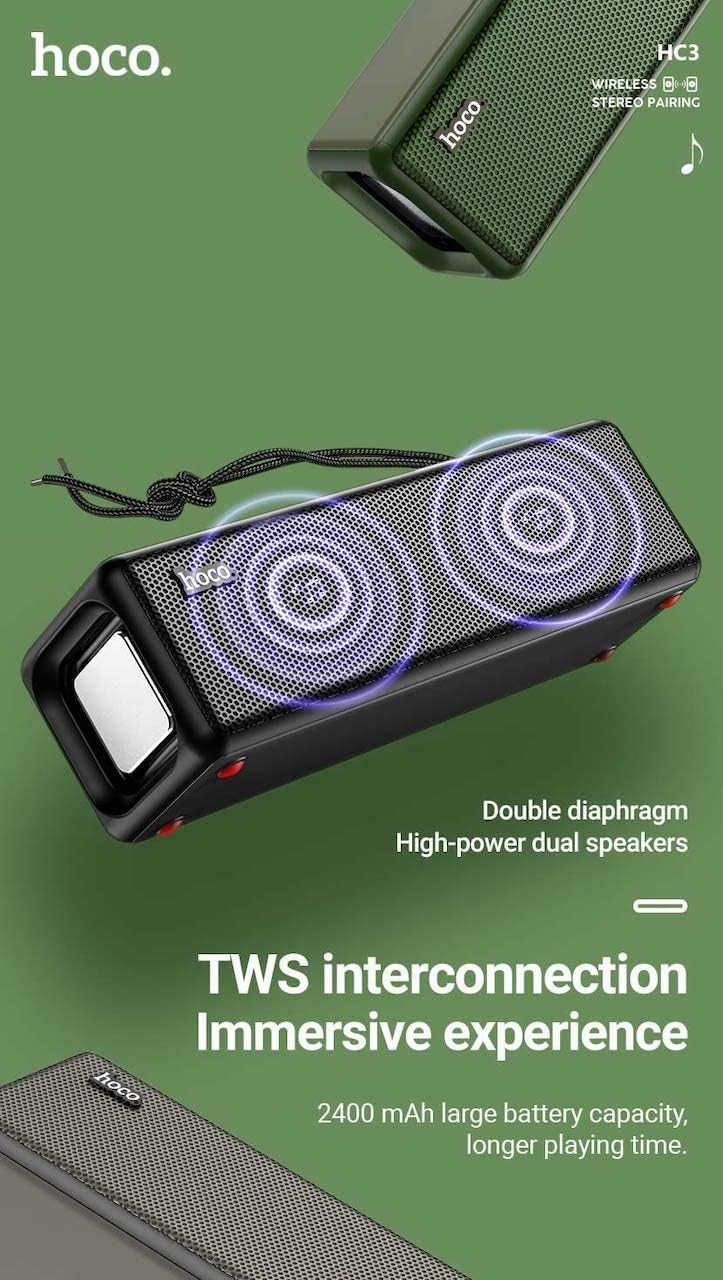
Figure 3: TWS Interconnection. This image illustrates the concept of two Hoco HC3 speakers wirelessly connected to provide a stereo audio experience, highlighting the dual speaker setup and the 2400 mAh battery capacity.
5.6 ඇමතුම් හැසිරවීම
බ්ලූටූත් හරහා ස්මාර්ට් ජංගම දුරකථනයකට සම්බන්ධ වූ විට:
- පිළිතුරු ඇමතුම: Play/Pause බොත්තම කෙටි ඔබන්න.
- ඇමතුම අවසන් කරන්න: ඇමතුමක් අතරතුර Play/Pause බොත්තම කෙටියෙන් ඔබන්න.
- ඇමතුම ප්රතික්ෂේප කරන්න: එන ඇමතුමක් නාද වන විට Play/Pause බොත්තම දිගු වේලාවක් ඔබන්න.
- අවසාන අංකය නැවත අමතන්න: Play/Pause බොත්තම දෙවරක් ඔබන්න.
6. නඩත්තු කිරීම
- පිරිසිදු කිරීම: Use a soft, dry cloth to clean the speaker's surface. Do not use abrasive cleaners, alcohol, or other chemical solvents.
- ගබඩා: සෘජු හිරු එළියෙන් සහ අධික උෂ්ණත්වයන්ගෙන් ඈත්ව සිසිල් වියළි ස්ථානයක ස්පීකරය ගබඩා කරන්න.
- බැටරි සත්කාර: To prolong battery life, charge the speaker regularly, even if not in use for extended periods (e.g., once every 3 months). Avoid fully discharging the battery frequently.
- ජල ප්රතිරෝධය: While designed for sports, avoid submerging the speaker in water. Refer to product specifications for any IP rating.
- බලපෑමෙන් වළකින්න: Protect the speaker from drops and strong impacts.
7. දෝශ නිරාකරණය
If you encounter issues with your Hoco HC3 speaker, refer to the following table for common problems and solutions:
| ගැටලුව | විය හැකි හේතුව | විසඳුම |
|---|---|---|
| ස්පීකරය ක්රියාත්මක නොවේ. | අඩු බැටරි. | අවම වශයෙන් විනාඩි 30ක්වත් ස්පීකරය ආරෝපණය කරන්න. |
| බ්ලූටූත් හරහා යුගල කළ නොහැක. | උපාංගයේ බ්ලූටූත් සබල කර නැත; ස්පීකරය යුගල කිරීමේ ප්රකාරයේ නැත; උපාංගයෙන් ඉතා දුරින්. | Ensure Bluetooth is on, speaker is in pairing mode (flashing blue LED), and devices are within 10 meters. Forget "HC3" on your device and try pairing again. |
| ශබ්දයක් නැත. | ශබ්දය ඉතා අඩුයි; වැරදි ප්රකාරය තෝරා ඇත; උපාංගය ශ්රව්ය වාදනය නොකරයි. | Increase volume on both speaker and connected device. Verify correct mode (Bluetooth, AUX, TF, USB). Ensure audio is playing on the source device. |
| FM රේඩියෝ පිළිගැනීම දුර්වලයි. | දුර්වල සංඥාව; පාරිසරික බාධා. | Move the speaker to a location with better reception. Re-scan for stations. |
| TF කාඩ්පත/USB නැවත ධාවනය ක්රියා නොකරයි. | Card/drive not inserted correctly; incompatible file ආකෘතිය; දූෂිතයි files. | Ensure card/drive is fully inserted. Check file formats (MP3 recommended). Try another card/drive. |
| TWS යුගලනය අසාර්ථකයි. | TWS යුගල කිරීමේ මාදිලියේ නොමැති ස්පීකර්; ඉතා දුරින්. | Ensure both speakers are powered on and in TWS pairing mode. Keep them close during pairing. Refer to section 5.5. |
8. පිරිවිතර
| විශේෂාංගය | විස්තර |
|---|---|
| ආකෘතිය | HC3 |
| මානයන් | 202 x 60 x 60 මි.මී |
| බර | 561 ග්රෑම් |
| බ්ලූටූත් අනුවාදය | V5.0 (Chip: JLAC6928B) |
| බැටරි ධාරිතාව | 2400mAh |
| ආරෝපණ කාලය | ආසන්න වශයෙන් පැය 3 කි |
| කතා/සංගීත කාලය | පැය 5 දක්වා |
| කථානායක ඒකකය | 45mm * 2 |
| කථානායක බල ප්රතිදානය | 5W*2 |
| සම්බන්ධතා මාතයන් | Bluetooth, FM, TF card, USB, AUX, TWS |
| ශ්රව්ය ප්රතිදාන ප්රකාරය | වටකරගන්න |
| නිෂ්පාදකයා | Hoco |
| මුල් රට | චීනය |
9. වගකීම් සහ සහාය
Hoco products are manufactured to high quality standards. For information regarding warranty coverage, please refer to the warranty card included with your purchase or contact your local Hoco distributor or retailer. Keep your proof of purchase for any warranty claims.
For technical support or further assistance, please visit the official Hoco website or contact their customer service department. Contact details are typically available on the product packaging or the official webඅඩවිය.