
Gioteck SC3
Gioteck SC3 Wireless Pro Controller User Manual
For Nintendo Switch, PC, and Mobile Devices
හැඳින්වීම
This manual provides detailed instructions for the setup, operation, and maintenance of your Gioteck SC3 Wireless Pro Controller. Designed for use with Nintendo Switch, PC, and mobile devices, this controller features programmable back buttons, customizable RGB lighting, and changeable magnetic thumb sticks for an enhanced gaming experience.
1. පිහිටුවීම
1.1 පැකේජයේ අන්තර්ගතය
- Gioteck SC3 Wireless Pro Controller
- USB ආරෝපණ කේබලය
- Additional Magnetic Thumb Sticks (if included)
- පරිශීලක අත්පොත (මෙම ලේඛනය)
1.2 පාලකය ආරෝපණය කිරීම
Before initial use, fully charge the controller. Connect the supplied USB charging cable to the controller's charging port and the other end to a USB power source (e.g., Nintendo Switch dock, PC USB port, or USB wall adapter).
- LED දර්ශකය ආරෝපණ තත්ත්වය පෙන්වයි.
- සම්පූර්ණ ආරෝපණයක් සාමාන්යයෙන් පැය 2-3 ක් පමණ ගතවේ.
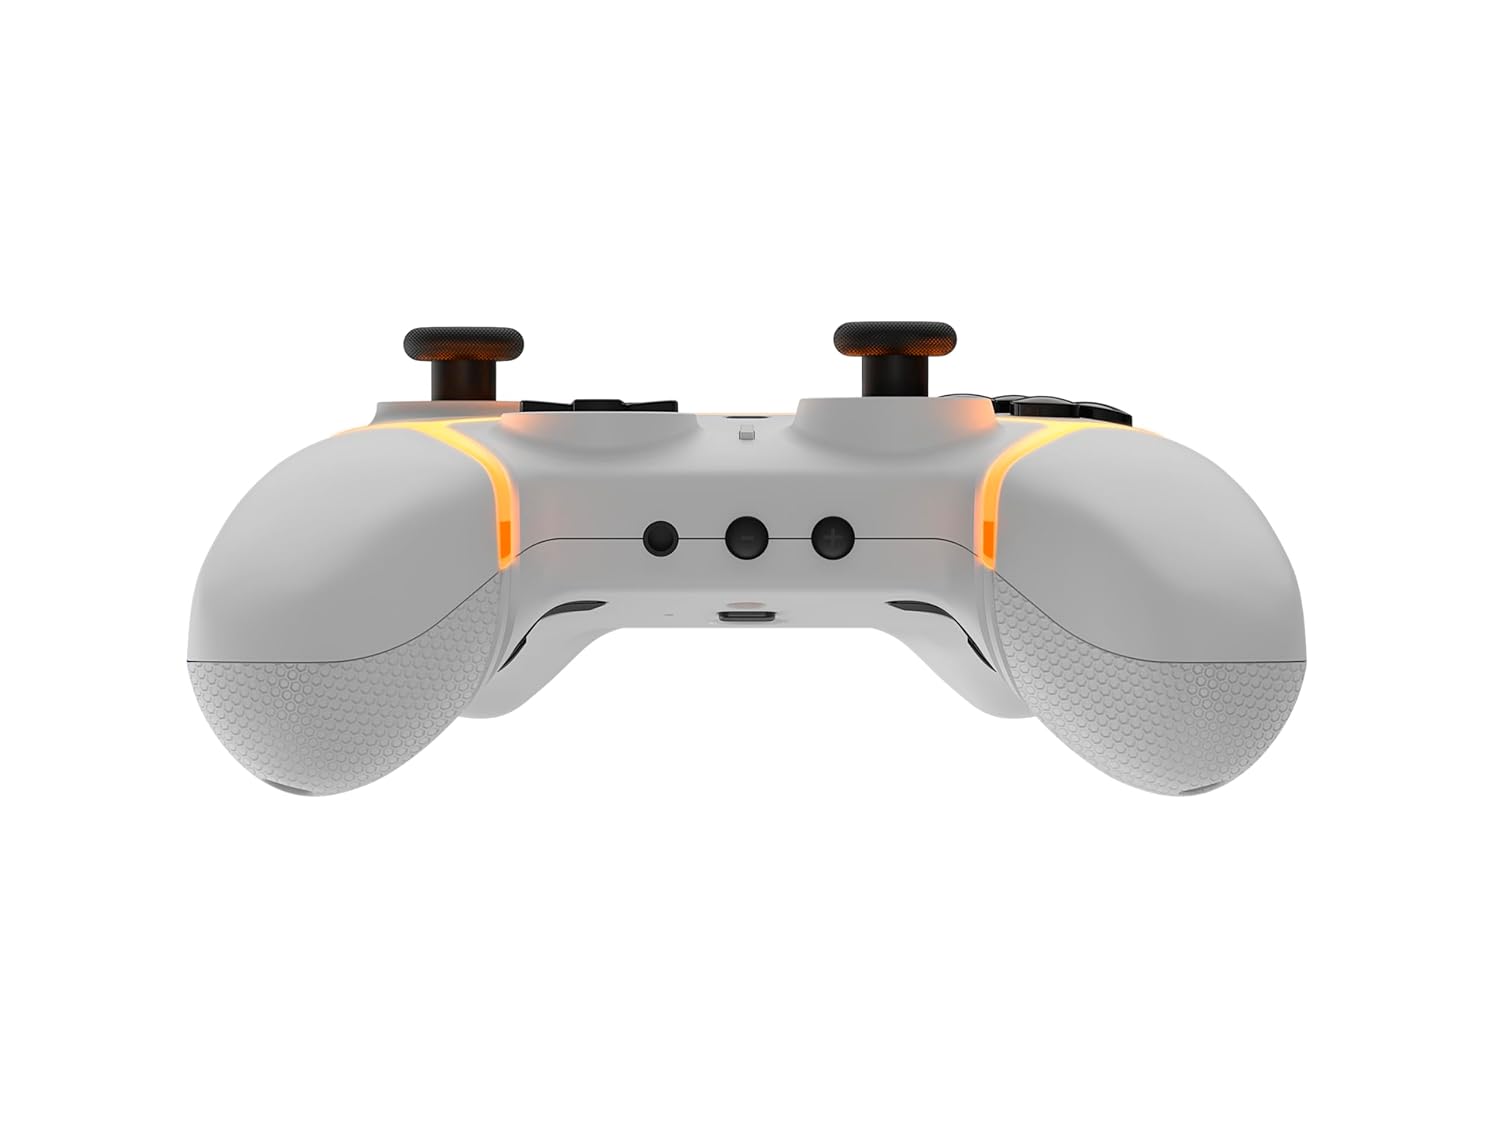
රූපය: පහළ view of the Gioteck SC3 controller, highlighting the USB-C charging port located between the two textured grips.
1.3 නින්ටෙන්ඩෝ ස්විචය සමඟ යුගල කිරීම
- Nintendo Switch HOME මෙනුවෙන්, තෝරන්න පාලකයන්, පසුව ග්රහණය/ඇණවුම වෙනස් කරන්න.
- On the SC3 controller, press and hold the යුගල කිරීමේ බොත්තම (usually a small button on the top or back) for a few seconds until the LED indicators begin to flash rapidly.
- Once the controller is recognized by the Switch, the player LED(s) on the controller will illuminate solid, indicating successful pairing.
- ඔබන්න බොත්තමක් තහවුරු කිරීමට.
Note: For subsequent uses, the controller should automatically reconnect to the last paired Switch console when powered on.
1.4 Connecting to PC/Mobile (Bluetooth)
- Ensure Bluetooth is enabled on your PC or mobile device.
- On the SC3 controller, press and hold the යුගල කිරීමේ බොත්තම for a few seconds until the LED indicators flash rapidly.
- On your PC/mobile device, navigate to Bluetooth settings and search for new devices.
- Select "Gioteck SC3" or similar from the list of available devices to pair.
- The controller's LED will become solid upon successful connection.
1.5 Installing Magnetic Thumb Sticks
The SC3 controller features changeable magnetic thumb sticks. To replace them:
- Gently pull the existing thumb stick straight up to remove it.
- Align the desired magnetic thumb stick with the base and gently push it down until it snaps into place.

රූපය: ඉදිරිපස view of the Gioteck SC3 controller, showcasing the magnetic thumb sticks and button layout.
2. මෙහෙයුම් උපදෙස්
2.1 බොත්තම් පිරිසැලසුම
The SC3 controller features a traditional button layout. Refer to the image below for button identification.

රූපය: කෝණික ඉදිරිපස view of the Gioteck SC3 controller, displaying the full button layout including face buttons, D-pad, analog sticks, and shoulder buttons.
- වම්/දකුණු ඇනලොග් කූරු: චලනය සහ කැමරා පාලනය සඳහා.
- D-Pad: දිශානුගත ආදානය.
- A/B/X/Y බොත්තම්: ක්රියා බොත්තම්.
- L/R/ZL/ZR බොත්තම්: උරහිස් සහ ප්රේරක බොත්තම්.
- +/- බොත්තම්: Start/Select equivalents.
- මුල් පිටුව බොත්තම: Returns to the console's home menu.
- ග්රහණ බොත්තම: Takes screenshots.
2.2 වැඩසටහන්ගත කළ හැකි පසුපස බොත්තම්
The SC3 controller includes programmable back buttons (M1, M2, M3, M4) for custom assignments.

රූපය: පසුපස view of the Gioteck SC3 controller, clearly showing the four programmable back buttons (M1, M2, M3, M4) and textured grips.
ක්රමලේඛන පියවර:
- ඔබා අල්ලාගෙන සිටින්න වැඩසටහන් බොත්තම (refer to diagram if available, usually a small button on the back) until the LED indicator flashes.
- ඔබන්න ආපසු බොත්තම (M1, M2, M3, or M4) you wish to program. The LED will flash slowly.
- ඔබන්න ආදාන බොත්තම (e.g., A, B, X, Y, L, R, ZL, ZR, D-pad direction) you want to assign to the back button.
- ඔබන්න වැඩසටහන් බොත්තම again to save the assignment. The LED will stop flashing.
- Repeat for other back buttons as desired.
To clear a programmed button, follow steps 1-2, then press the Program Button again without pressing an input button.
2.3 RGB ආලෝකකරණ අභිරුචිකරණය
The controller features customizable RGB lighting. Specific instructions for changing colors or effects are typically found in the product's quick start guide or by pressing a dedicated button combination (e.g., Function + R3).
Consult the quick start guide included with your controller for precise button combinations to adjust RGB lighting.
2.4 චලන පාලන
The SC3 controller supports motion controls, allowing for immersive gameplay in compatible Nintendo Switch titles. No special setup is usually required; motion controls activate automatically when supported by the game.
2.5 Audio Headset Jack
A 3.5mm audio headset jack is located on the controller for connecting compatible headsets. It includes dedicated mute and volume control buttons.
- ශබ්දය වැඩි/පහළ: ශ්රව්ය ප්රතිදානය සකසන්න.
- නිශ්ශබ්ද බොත්තම: Mute/unmute microphone input.

රූපය: ඉහළට view of the Gioteck SC3 controller, highlighting the 3.5mm audio jack, volume controls, and mute button.
3. නඩත්තු කිරීම
3.1 පිරිසිදු කිරීම
ඔබේ පාලකය පිරිසිදු කිරීමට මෘදු වියළි රෙද්දක් භාවිතා කරන්න. මුරණ්ඩු අපිරිසිදුකම සඳහා, තරමක් dampen the cloth with water. Avoid using harsh chemicals, abrasive cleaners, or solvents, as these can damage the controller's finish and internal components.
- Do not immerse the controller in water or any other liquid.
- Ensure all ports are dry before charging or connecting devices.
3.2 ගබඩා කිරීම
Store the controller in a cool, dry place away from direct sunlight and extreme temperatures. Avoid placing heavy objects on the controller to prevent damage.
3.3 බැටරි සත්කාර
The controller contains a rechargeable battery. To prolong battery life:
- බැටරිය නිතර නිතර සම්පූර්ණයෙන්ම විසර්ජනය කිරීමෙන් වළකින්න.
- Charge the controller regularly, even if not in use for extended periods (e.g., once every 3-6 months).
- Do not expose the controller to temperatures above 60°C (140°F).
4. දෝශ නිරාකරණය
4.1 පාලකය සම්බන්ධ නොවීම/යුගල කිරීම
- බැටරිය පරීක්ෂා කරන්න: පාලකය ප්රමාණවත් ලෙස ආරෝපණය කර ඇති බවට වග බලා ගන්න.
- අලුත්වැඩියා කරනවා: Follow the pairing instructions in Section 1.3 or 1.4.
- බාධා කිරීම්: Move closer to the console/device and away from potential sources of wireless interference (e.g., Wi-Fi routers, other Bluetooth devices).
- පාලකය නැවත සකසන්න: Locate a small reset button (often a pinhole) on the back of the controller. Use a paperclip to press and hold it for a few seconds. Then attempt to re-pair.
- Update Console/Device Software: Ensure your Nintendo Switch, PC, or mobile device's operating system is up to date.
4.2 Buttons/Sticks Not Responding
- නැවත සමමුහුර්ත කරන්න: පාලකය විසන්ධි කර නැවත සම්බන්ධ කරන්න.
- පිරිසිදු: බොත්තම් හෝ කූරු වටා කිසිදු සුන්බුන් සිරවී නොමැති බවට වග බලා ගන්න.
- Test in another game/menu: Determine if the issue is specific to a game or system-wide.
- පාලකය නැවත සකසන්න: Perform a hard reset as described above.
4.3 චලන පාලන ක්රියා නොකරයි
- ක්රීඩා ගැළපුම: Verify that the game you are playing supports motion controls.
- නැවත ක්රමාංකනය කරන්න: On Nintendo Switch, you can recalibrate motion controls in the system settings.
- පාලකය නැවත සකසන්න: දෘඪ යළි පිහිටුවීමක් සිදු කරන්න.
5. පිරිවිතර
| ආකෘතිය: | Gioteck SC3 Wireless Pro Controller |
| ගැළපුම: | Nintendo Switch (Original, Lite, OLED), PC, Mobile Devices |
| සම්බන්ධතාවය: | බ්ලූටූත් රැහැන් රහිත |
| මානයන් (ආසන්න වශයෙන්): | 2.87 x 5.35 x 6.34 අඟල් (7.29 x 13.59 x 16.1 cm) |
| බර (ආසන්න වශයෙන්): | අවුන්ස 10.6 (ග්රෑම් 300) |
| ශ්රව්ය ජැක්: | 3.5mm with mute and volume controls |
| විශේෂ ලක්ෂණ: | Programmable back buttons, Magnetic thumb sticks, RGB lighting, Motion controls |
6. වගකීම් තොරතුරු
The Gioteck SC3 Wireless Pro Controller comes with a manufacturer's warranty. For specific details regarding warranty coverage, duration, and claims process, please refer to the warranty card included with your product or visit the official Gioteck webඅඩවිය.
වගකීම් අරමුණු සඳහා කරුණාකර ඔබේ මිලදී ගැනීමේ සාක්ෂි තබා ගන්න.
7. පාරිභෝගික සහාය
If you encounter any issues or have questions not covered in this manual, please contact Gioteck customer support. Contact information can typically be found on the product packaging or the official Gioteck webඅඩවිය.
Gioteck Official Webඅඩවිය: www.gioteck.com
Ask a question about this manual
Ask about setup, troubleshooting, compatibility, parts, safety, or missing instructions. Manuals+ will review the question and use this page’s manual context to help answer it.