
1. හැඳින්වීම
Thank you for choosing the Nureva NPSi-1 Home Theatre Projector. This manual provides essential information for the safe and efficient operation of your projector. Please read it thoroughly before use and retain it for future reference. The NPSi-1 is designed to deliver a high-quality viewing experience with Full HD 1080p resolution and versatile connectivity options.
2. වැදගත් ආරක්ෂක තොරතුරු
- විදුලි ආරක්ෂාව: Always connect the projector to a grounded power outlet. Do not expose the projector to rain or moisture. Disconnect power during lightning storms or when unused for long periods.
- තාපය සහ වාතාශ්රය: Ensure adequate ventilation around the projector. Do not block ventilation openings. Avoid placing the projector on soft surfaces that may block airflow.
- Lamp ආරක්ෂාව: ප්රක්ෂේපක එල්amp operates at high temperatures. Allow the projector to cool down before moving it or performing maintenance. Never look directly into the projector lens when the lamp is on, as it can cause eye damage.
- හැසිරවීම: ප්රොජෙක්ටරය පරිස්සමෙන් හසුරුවන්න. බිම හෙළීමෙන් හෝ දැඩි බලපෑම්වලට ලක් කිරීමෙන් වළකින්න.
- පිරිසිදු කිරීම: Use a soft, dry cloth for cleaning. For the lens, use a lens cleaning cloth and solution specifically designed for optical surfaces.
3. පැකේජ අන්තර්ගතය
කරුණාකර සියලුම අයිතම තිබේදැයි සහ හොඳ තත්ත්වයේ තිබේදැයි පරීක්ෂා කරන්න:
- Nureva NPSi-1 Projector
- දුරස්ථ පාලකය
- HDMI කේබලය
- විදුලි රැහැන්
- පරිශීලක අත්පොත (මෙම ලේඛනය)
4. නිෂ්පාදන අවසන්view
4.1 ඉදිරිපස සහ ඉහළ View

රූපය 4.1: ඉහළ view of the Nureva NPSi-1 projector, showing the lens assembly on the left and the integrated control panel on the top surface. The control panel includes navigation buttons and indicator lights.

රූපය 4.2: ඉදිරිපස view of the Nureva NPSi-1 projector, highlighting the projection lens. This view shows the primary output component of the projector.
The top surface features an intuitive control panel for direct operation, including power, menu navigation, and input selection buttons. The front houses the projection lens, which can be adjusted for focus and zoom.
4.2 පසුපස පැනලය සහ සම්බන්ධතාවය
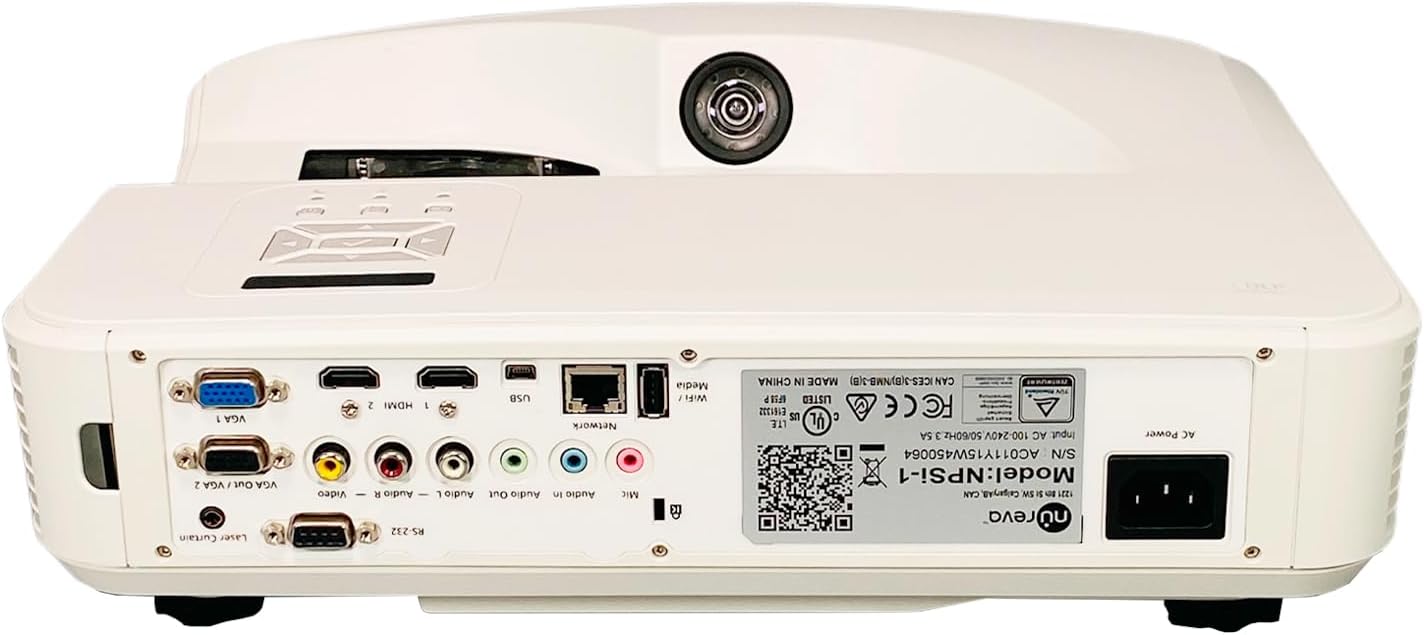
රූපය 4.3: Rear panel of the Nureva NPSi-1 projector, displaying a comprehensive array of connectivity ports including HDMI, VGA, USB, audio inputs/outputs, and network connections.

රූපය 4.4: Detailed close-up of the Nureva NPSi-1 projector's rear connectivity panel, showing individual ports such as VGA 1, HDMI 1, HDMI 2, USB, Network (RJ45), Audio In/Out, Composite Video, and RS-232.
The rear panel provides extensive connectivity options for various devices:
- HDMI 1 / HDMI 2: For connecting high-definition digital sources like Blu-ray players, gaming consoles, or computers.
- VGA 1 / VGA Out / VGA 2: For connecting computers or other analog video sources.
- USB: මාධ්ය නැවත ධාවනය හෝ ස්ථිරාංග යාවත්කාලීන කිරීම් සඳහා.
- ජාලය (RJ45): ජාල පාලනය සහ අධීක්ෂණය සඳහා.
- Audio In / Audio Out: බාහිර ශ්රව්ය උපාංග සම්බන්ධ කිරීම සඳහා.
- සංයුක්ත වීඩියෝ (RCA): සම්මත විභේදන වීඩියෝ මූලාශ්ර සඳහා.
- ආර්එස් -232: අනුක්රමික පාලනය සඳහා.
- AC බලය: විදුලි රැහැන සම්බන්ධ කිරීම සඳහා.
4.3 නිෂ්පාදන ලේබලය

රූපය 4.5: සමීප රූපය view of the product label on the Nureva NPSi-1 projector, showing the model number (NPSi-1), serial number (AC011Y15W450064), and input power requirements (AC 100-240V, 50/60Hz, 3.5A). This label also includes regulatory compliance marks.
The product label, typically located on the underside or rear of the projector, contains important information such as the model number, serial number, and electrical specifications. For support, please refer to the model number NPSi-1 and serial number AC011Y15W450064.
4.4 පැත්ත සහ පහළ Views

රූපය 4.6: පැත්ත view of the Nureva NPSi-1 projector, showing the extensive ventilation grilles necessary for heat dissipation during operation.
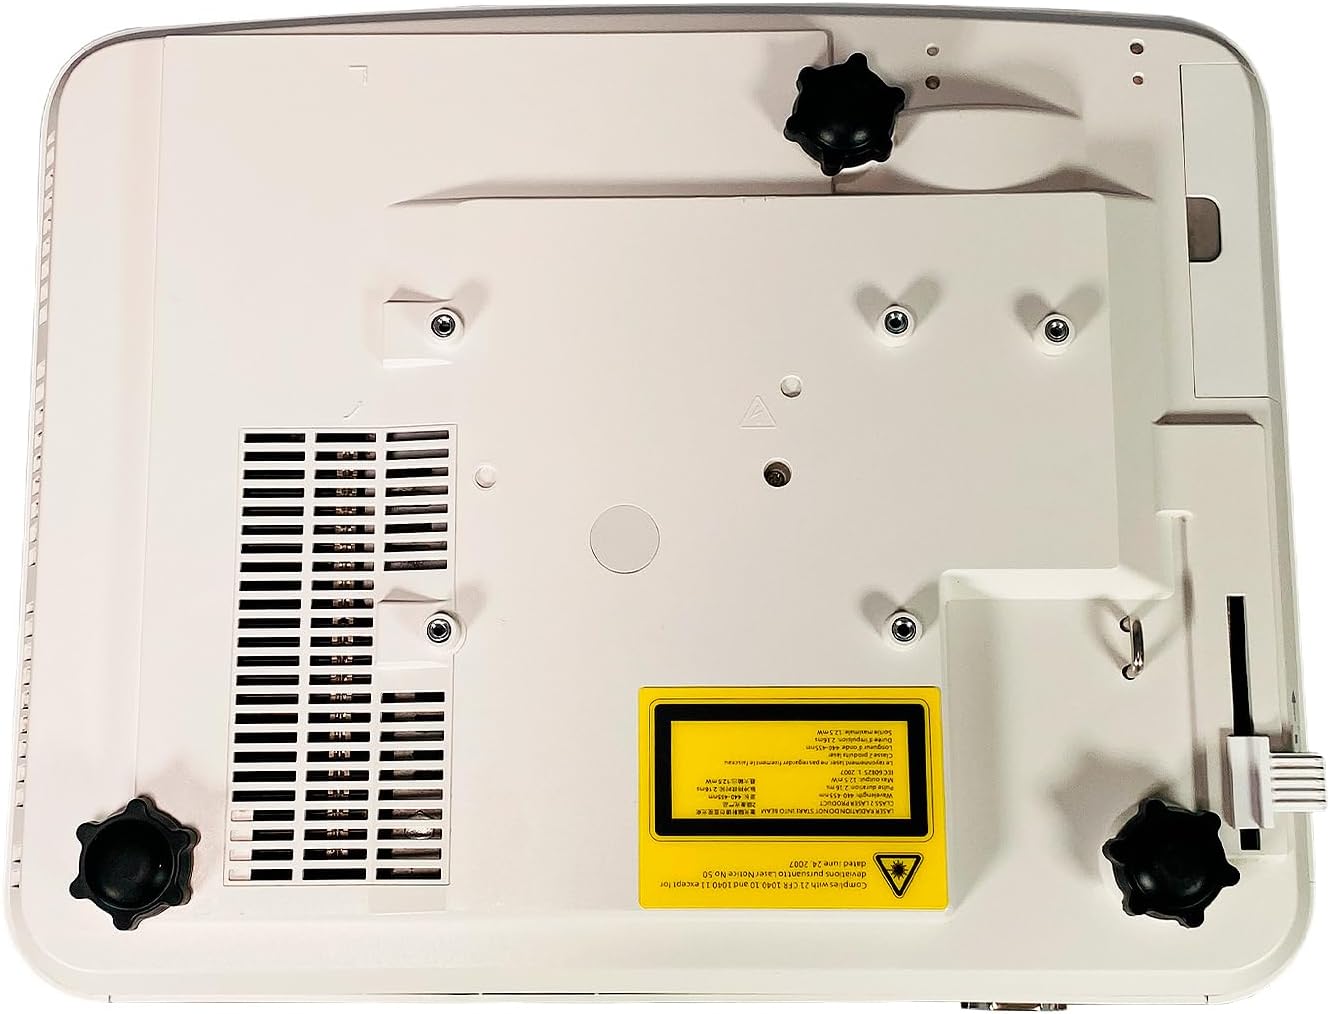
රූපය 4.7: පහළ view of the Nureva NPSi-1 projector, featuring adjustable feet for leveling and stability, along with mounting points for ceiling installation.
The sides of the projector feature ventilation grilles to ensure proper airflow and prevent overheating. The bottom panel includes adjustable feet for precise leveling and mounting points for ceiling or rear projection setups.
5. පිහිටුවීම
5.1 ස්ථානගත කිරීම
Consider the following when placing your projector:
- ප්රක්ෂේපණ මතුපිට: Project onto a flat, white, or light-colored surface for best results. A dedicated projector screen is recommended.
- දුර: Adjust the projector's distance from the screen to achieve the desired image size. Refer to the projection distance chart (not provided, consult product specifications for typical throw ratios).
- කෝණය: Position the projector as perpendicular to the screen as possible to minimize keystone distortion.
- වාතාශ්රය: ප්රොජෙක්ටරයේ වාතාශ්රය විවරයන් වටා අවම වශයෙන් සෙන්ටිමීටර 30 (අඟල් 12) ක පැහැදිලි ඉඩක් ඇති බවට වග බලා ගන්න.
- සවි කිරීම: The projector supports Table Top, Ceiling Projection, and Rear Projection. Use appropriate mounting hardware for ceiling installations.
5.2 සම්බන්ධක බලය
- Connect the supplied power cord to the AC Power inlet on the rear of the projector.
- විදුලි රැහැනේ අනෙක් කෙළවර බිම්ගත විදුලි අලෙවිසැලකට සම්බන්ධ කරන්න.
5.3 ආදාන මූලාශ්ර සම්බන්ධ කිරීම
Connect your video and audio sources to the appropriate ports on the rear panel (refer to Figure 4.3 and 4.4).
- HDMI: Use the provided HDMI cable to connect your source device (e.g., Blu-ray player, laptop) to either HDMI 1 or HDMI 2 port.
- VGA: Connect a computer to the VGA 1 or VGA 2 port using a VGA cable.
- USB: Insert a USB drive for media playback into the USB port.
- ශ්රව්ය: If using analog video inputs (VGA, Composite), connect separate audio cables to the Audio In ports. Use Audio Out to connect to external speakers.
6. මෙහෙයුම් උපදෙස්
6.1 බල ගැන්වීම සක්රිය / අක්රිය කිරීම
- බල ගැන්වීමට, ඔබන්න බලය button on the projector's control panel or the remote control. The power indicator light will change.
- බලය අක්රිය කිරීමට, ඔබන්න බලය button again. A confirmation message may appear. Confirm to shut down. Allow the projector to cool down before unplugging.
6.2 රූප ගැලපීම
- නාද නාභිගත කිරීම: රූපය තියුණු කිරීම සඳහා කාචය වටා නාභිගත වළල්ල කරකවන්න.
- විශාලන මුද්ද: Rotate the zoom ring (if available) to adjust the image size without moving the projector.
- යතුරු ගල් නිවැරදි කිරීම: If the image appears trapezoidal, use the keystone correction function (usually found in the OSD menu or via dedicated buttons on the remote) to square the image.
- Projection Tilt: Use the adjustable feet on the bottom of the projector to fine-tune the vertical angle.
- වර්ණ නිවැරදි කිරීම: Access the OSD menu to adjust color settings such as brightness, contrast, saturation, and color temperature.
6.3 ආදාන මූලාශ්ර තේරීම
ඔබන්න මූලාශ්රය or ආදානය button on the projector or remote control to cycle through available input sources (HDMI 1, HDMI 2, VGA 1, VGA 2, USB, Composite Video, etc.).
6.4 තිරය මත සංදර්ශක (OSD) මෙනුව
ඔබන්න මෙනුව button on the projector or remote to access the OSD menu. Use the navigation buttons (up, down, left, right) to browse options and the OK or ඇතුල් කරන්න තේරීමට බොත්තම. ඔබන්න මෙනුව නැවතත් හෝ පිටවෙන්න මෙනුව වසා දැමීමට.
7. නඩත්තු කිරීම
7.1 ප්රොජෙක්ටරය පිරිසිදු කිරීම
- බාහිර: ප්රොජෙක්ටරය පිස දමන්න casing with a soft, lint-free cloth. For stubborn marks, dampen the cloth slightly with water, then wipe dry. Avoid abrasive cleaners or solvents.
- කාච: Gently clean the lens with a professional lens cleaning cloth and lens cleaning fluid. Do not use abrasive materials or excessive force, as this can scratch the lens.
- වායු වාතාශ්රය: Use a soft brush or a can of compressed air to remove dust from the air intake and exhaust vents. Ensure the projector is off and unplugged before cleaning vents.
7.2 Lamp ආදේශ කිරීම
ප්රක්ෂේපක එල්amp සීමිත ආයු කාලයක් ඇත. l විටamp life indicator appears or the image brightness significantly decreases, the lamp may need replacement. Refer to the specific lamp replacement instructions provided with your replacement lamp or consult a qualified service technician. Always ensure the projector is unplugged and completely cooled down before attempting lamp ආදේශ කිරීම.
8. දෝශ නිරාකරණය
| ගැටලුව | විය හැකි හේතුව | විසඳුම |
|---|---|---|
| තිරයේ රූපයක් නොමැත |
|
|
| රූපය බොඳ වී ඇත |
|
|
| Image is trapezoidal (keystone effect) |
|
|
| ශ්රව්ය නැත |
|
|
9. පිරිවිතර
| විශේෂාංගය | විස්තර |
|---|---|
| වෙළඳ නාමය | නුරේවා |
| ආකෘතිය | NPSi-1 |
| දීප්තිය | 3000 ANSI ලුමෙන්ස් |
| පරස්පර අනුපාතය | 1800:1 |
| දේශීය විභේදනය | 1920x720 (සම්පූර්ණ HD 1080p අනුකූල) |
| සම්බන්ධතා තාක්ෂණය | HDMI, USB, VGA In (Dsub-15pin), Composite (RCA), RS232 (DB-9pin), USB B, Composite video, RS232C, RJ45, LAN |
| විශේෂ ලක්ෂණ | Built-in Speakers, Ceiling Projection, Color Correction, HD Ready, Projection Tilt, Rear Projection, Table Top Projection, Portable |
| නිර්දේශිත භාවිතයන් | ගෘහ සිනමාව |
| ආදාන බලය | AC 100-240V, 50/60Hz, 3.5A |
10. වගකීම් සහ සහාය
For warranty information, technical support, or service inquiries, please refer to the documentation provided at the time of purchase or visit the official Nureva website. When contacting support, please have your model number (NPSi-1) and serial number (AC011Y15W450064) readily available.
You can find more information about Nureva products and support at www.nureva.com