
1. වැදගත් ආරක්ෂක තොරතුරු
Please read all instructions carefully before using the EVTSCAN Projection Clock. Keep this manual for future reference.
- උපාංගය අධික උෂ්ණත්වයන්ට, සෘජු හිරු එළියට හෝ අධික ආර්ද්රතාවයට නිරාවරණය නොකරන්න.
- Avoid dropping or subjecting the clock to strong impacts.
- උපාංගය ඔබම විසුරුවා හැරීමට හෝ අලුත්වැඩියා කිරීමට උත්සාහ නොකරන්න. සුදුසුකම් ලත් සේවා නිලධාරීන් අමතන්න.
- Use only the specified power adapter (DC 5.0V, 1.2A) or appropriate batteries (2xAAA, not included).
- දරුවන්ට ළඟා විය නොහැකි ලෙස තබා ගන්න.
2. නිෂ්පාදන අවසන්view
The EVTSCAN Projection Clock is a versatile digital alarm clock featuring a 3-inch backlit LCD screen that displays time, date, day of the week, temperature, and humidity. It includes a projection function to display time and temperature on a wall or ceiling, dual alarms with snooze, and a USB port for charging mobile phones.
ප්රධාන ලක්ෂණ:
- 12/24-hour time format display.
- Date and day of the week display (7 languages for week).
- Temperature detection (-9℃ to +50℃) and humidity detection (20% to 95%).
- Projection function with 180-degree rotation for time and temperature.
- Dual alarm clocks with slowly increasing පරිමාව.
- 5-minute snooze function.
- USB charging port for mobile devices.
- Adjustable backlight with 4 levels (high, medium, low, off).

රූපය 2.1: ඉදිරිපස view of the EVTSCAN Projection Clock, showing the LCD display and projection lens.
3. පැකේජ අන්තර්ගතය
ඇසුරුම් ඉවත් කිරීමෙන් පසු, පහත ලැයිස්තුගත කර ඇති සියලුම අයිතම පවතින බවත් හොඳ තත්ත්වයේ පවතින බවත් සහතික කර ගන්න:
- 1 x EVTSCAN Projection Clock
- 1 x USB කේබලය
- 1 x ඉංග්රීසි පරිශීලක අත්පොත
Note: 2xAAA batteries are required for battery power and are not included in the package.
4. පිහිටුවීම
4.1 උපාංගය බල ගැන්වීම
The EVTSCAN Projection Clock can be powered by either AAA batteries or via the included USB cable.
4.1.1 බැටරි ස්ථාපනය
- ඔරලෝසුවේ පිටුපස බැටරි මැදිරි කවරය සොයා ගන්න.
- Slide open the cover.
- නිවැරදි ධ්රැවීයතාව (+/-) සහතික කරමින්, (2) AAA බැටරි දෙකක් ඇතුළු කරන්න.
- බැටරි මැදිරි කවරය ආරක්ෂිතව වසා දමන්න.
Note: When powered by batteries, the backlight will only light up for 8 seconds when activated to conserve power. The projection lamp will also light up for 8 seconds.
4.1.2 USB Power Connection
- Connect the small end of the provided USB cable to the DC 5.0V 1.2A input port on the back of the clock.
- Connect the larger end of the USB cable to a compatible USB power adapter (not included) or a powered USB port.
Note: When powered by USB, the backlight and projection lamp can remain continuously on, with adjustable brightness for the backlight.
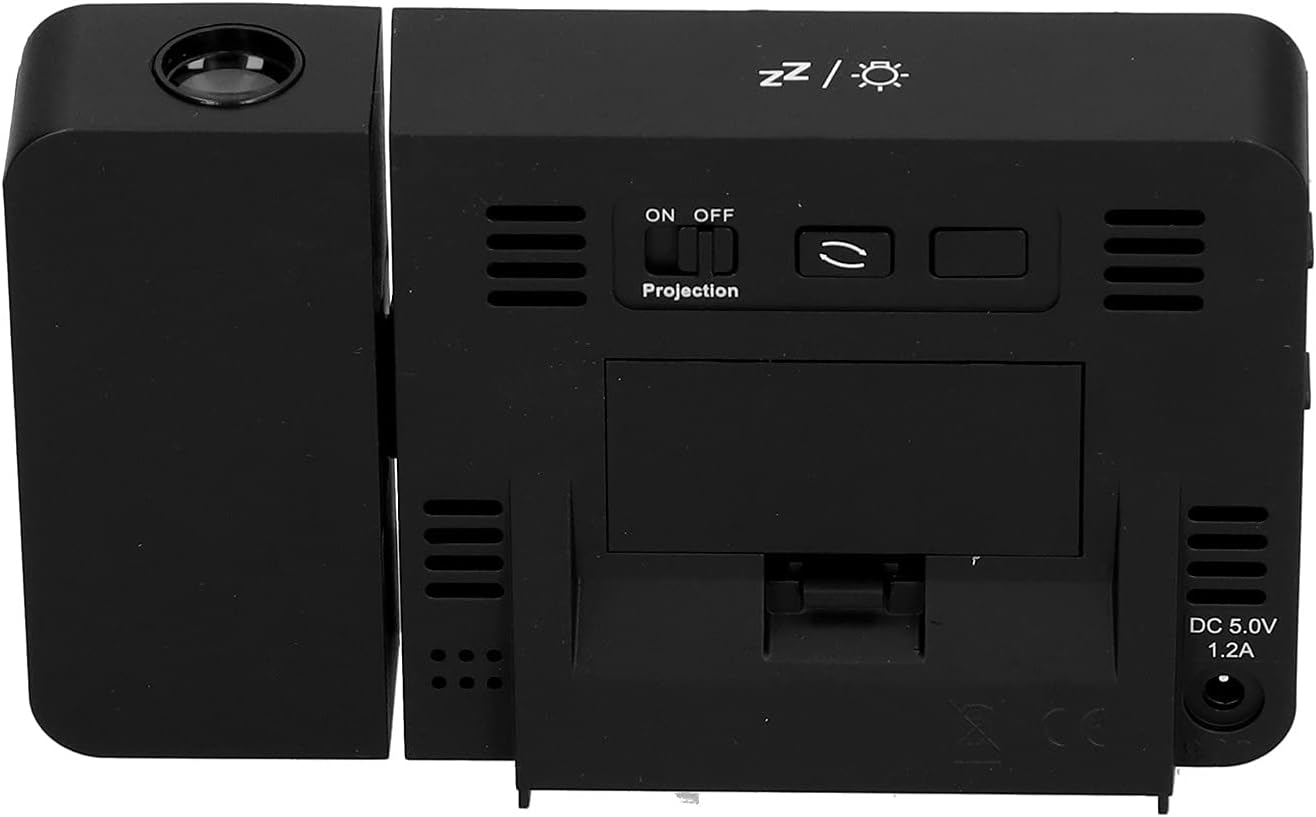
රූපය 4.1: පසුපස view of the clock, indicating the battery compartment and DC 5.0V 1.2A power input.
5. මෙහෙයුම් උපදෙස්
5.1 බොත්තම් කාර්යයන්
Familiarize yourself with the control buttons located on the front and sides of the clock:
- වේලාව: කාල සැකසුම් මාදිලියට ඇතුළු වේ.
- අනතුරු ඇඟවීම: අනතුරු ඇඟවීමේ සැකසුම් මාදිලියට ඇතුළු වේ.
- +: Increases values, switches 12/24HR format, adjusts backlight.
- -: Decreases values, switches temperature units (℃/℉).
- Projection ON/OFF Switch: Activates or deactivates the projection. (Located on the back/side)
- Alarm 1 ON/OFF Switch: Activates or deactivates Alarm 1. (Located on the side)
- Alarm 2 ON/OFF Switch: Activates or deactivates Alarm 2. (Located on the side)
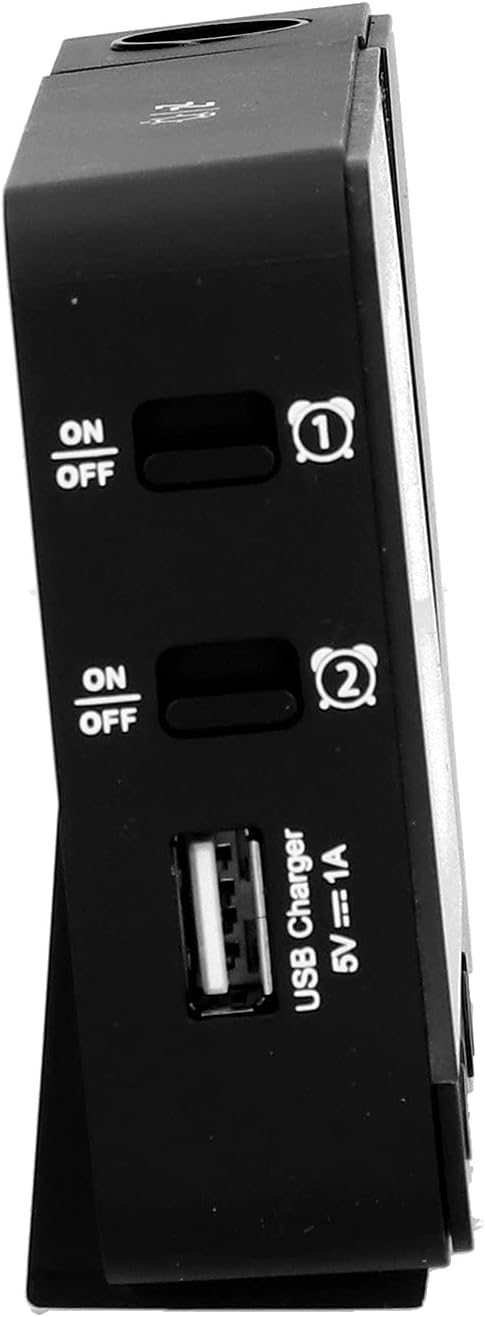
රූපය 5.1: පැත්ත view showing Alarm 1 and Alarm 2 ON/OFF switches, and the USB charging port.
5.2 වේලාව සහ දිනය සැකසීම
- ඔබා අල්ලාගෙන සිටින්න TIME button to enter time setting mode. The hour display will flash.
- භාවිතා කරන්න + or - පැය සකස් කිරීමට බොත්තම්.
- ඔබන්න TIME පැය තහවුරු කර මිනිත්තු සැකසුම වෙත යාමට නැවතත්. සමඟ සකසන්න + or -.
- දිගටම ඔබන්න TIME to cycle through setting year, month, and day. Adjust each with + or -.
- After setting the day, press TIME සැකසුම් ප්රකාරයෙන් ඉවත් වීමට අවසන් වරට.
- පැය 12 සහ පැය 24 ආකෘතිය අතර මාරු වීමට, ඔබන්න + button during normal time display.
- To switch between Celsius (℃) and Fahrenheit (℉) for temperature, press the - button during normal time display.
5.3 අනතුරු ඇඟවීම් සැකසීම
The clock features two independent alarms (Alarm 1 and Alarm 2).
- ඔබා අල්ලාගෙන සිටින්න අනතුරු ඇඟවීම button to enter Alarm 1 setting mode. The Alarm 1 hour display will flash.
- භාවිතා කරන්න + or - අනතුරු ඇඟවීමේ වේලාව සකස් කිරීමට බොත්තම්.
- ඔබන්න අනතුරු ඇඟවීම again to confirm the hour and move to Alarm 1 minute setting. Adjust with + or -.
- ඔබන්න අනතුරු ඇඟවීම again to move to Alarm 2 hour setting, and repeat the process for Alarm 2.
- After setting Alarm 2 minutes, press අනතුරු ඇඟවීම සැකසුම් ප්රකාරයෙන් ඉවත් වීමට අවසන් වරට.
- To activate or deactivate an alarm, use the corresponding එලාමය 1 ක්රියාත්මක/අක්රිය or එලාමය 2 ක්රියාත්මක/අක්රිය switch on the side of the clock. An alarm icon will appear on the display when active.
5.3.1 ස්නූස් කිරීමේ ක්රියාවලිය
When an alarm sounds, press any button (except the alarm ON/OFF switch) to activate the 5-minute snooze function. The alarm will sound again after 5 minutes. To turn off the alarm completely, slide the corresponding alarm ON/OFF switch to OFF.
5.4 Projection Function
The clock can project the time and temperature onto a wall or ceiling.
- සොයා ගන්න ප්රක්ෂේපණය සක්රිය / අක්රිය switch on the back of the clock. Slide it to ON to activate the projection.
- Adjust the angle of the projection arm (the part with the lens) to direct the projection as desired. The arm can rotate nearly 180 degrees.
- The projection will display the current time and temperature in a soft red color.

රූපය 5.2: පැත්ත view showing the projection arm extended and ready for use.

රූපය 5.3: The clock projecting time and temperature onto a wall in a bedroom setting.
5.5 පසුතල ගැලපීම
When the clock is powered by USB, the backlight can be adjusted to four levels: high, medium, low, or off. Repeatedly press the + button during normal time display to cycle through the brightness levels.
When powered by batteries, the backlight will illuminate for 8 seconds when any button is pressed, then turn off to conserve power.
5.6 USB ආරෝපණ වරාය
The clock features a USB charging port (5V=1A) on its side. You can use this port to charge your mobile phone or other small electronic devices while the clock is connected to USB power.
Note: The USB charging port only functions when the clock is powered via the USB cable. It does not work when the clock is running on battery power.
6. නඩත්තු කිරීම
6.1 පිරිසිදු කිරීම
- Wipe the clock's surface with a soft, dry cloth.
- Do not use abrasive cleaners, solvents, or chemical sprays, as these may damage the finish or electronic components.
- Keep the projection lens clean for clear projection. Use a soft, lint-free cloth.
6.2 බැටරි ප්රතිස්ථාපනය
When the display becomes dim or the clock functions erratically while on battery power, it's time to replace the AAA batteries. Refer to Section 4.1.1 for battery installation instructions. Always replace both batteries at the same time with new ones.
7. දෝශ නිරාකරණය
| ගැටලුව | විය හැකි හේතුව | විසඳුම |
|---|---|---|
| ඔරලෝසු සංදර්ශකය හිස් හෝ අඳුරුයි. | No power, low batteries, or USB cable not connected. | Check battery installation and replace if necessary. Ensure USB cable is securely connected to a power source. |
| Projection is unclear or not visible. | Projection switch is OFF, lens is dirty, or projection distance is too far/close. | Ensure Projection switch is ON. Clean the projection lens. Adjust the clock's distance from the projection surface. |
| එලාම් එක නාද වෙන්නේ නැහැ. | Alarm is not set or is deactivated. | Verify alarm time is set correctly. Ensure the corresponding Alarm ON/OFF switch is in the ON position. |
| USB ආරෝපණ තොට ක්රියා නොකරයි. | Clock is running on battery power, or USB cable is not connected to a power source. | Ensure the clock is powered via the USB cable and connected to a functional power adapter. |
| වැරදි වේලාව/දිනය. | වේලාව/දිනය නිවැරදිව සකසා නොමැත. | Refer to Section 5.2 to reset the time and date. |
8. පිරිවිතර
| ආකෘතිය: | B0CLGDFCGX |
| වෙළඳ නාමය: | EVTSCAN (ඊවීටීඑස්කෑන්) |
| ද්රව්ය: | ABS (Acrylonitrile Butadiene Styrene) |
| නිෂ්පාදන මානයන්: | දළ වශයෙන්. 13.5 x 8 x 2.5 සෙ.මී. (5.3 x 3.1 x 1.0 අඟල්) |
| බර: | ආසන්න වශයෙන්. 242g (අවුන්ස 8.5) |
| සංදර්ශක වර්ගය: | පසුතල ආලෝකය සහිත ඩිජිටල් LCD |
| බලශක්ති ප්රභවය: | 2xAAA batteries (not included) or DC 5.0V 1.2A via USB cable |
| USB අයකිරීමේ ප්රතිදානය: | 5V=1A |
| උෂ්ණත්වය හඳුනාගැනීමේ පරාසය: | -9℃ to +50℃ (1℃ resolution) |
| ආර්ද්රතාවය හඳුනාගැනීමේ පරාසය: | 20% to 95% (1% resolution) |
| Temperature/Humidity Calibration Time: | තත්පර 30 යි |
| පසුබිම් ආලෝක මට්ටම්: | 4 levels (High, Medium, Low, Off) when USB powered; 8s illumination when battery powered. |
| ප්රක්ෂේපණය එල්amp: | Always on when USB powered; 8s illumination when battery powered. |

රූපය 8.1: Product dimensions: 5.3 inches wide by 3.1 inches high.
9. වගකීම් සහ සහාය
EVTSCAN products are manufactured to high quality standards. For specific warranty information, please refer to the warranty card included with your purchase or contact your retailer.
If you encounter any issues or have questions regarding your EVTSCAN Projection Clock, please contact the seller or EVTSCAN customer support for assistance. Please have your model number (B0CLGDFCGX) ready when contacting support.
වැඩිදුර සහාය සඳහා, ඔබට පිවිසිය හැක්කේ Amazon හි EVTSCAN වෙළඳසැල.