
1 ආරක්ෂිත තොරතුරු
Please read all safety instructions carefully before using this product. Failure to follow these instructions may result in electric shock, fire, or other hazards.
- ගින්න හෝ විදුලි කම්පනය වැළැක්වීම සඳහා ප්රොජෙක්ටරය වර්ෂාවට හෝ තෙතමනයට නිරාවරණය නොකරන්න.
- ප්රොජෙක්ටරය විවෘත නොකරන්න casinඋ. ඇතුළත පරිශීලක-සේවා කළ හැකි කොටස් නොමැත. සියලුම සේවා සුදුසුකම් ලත් සේවා පුද්ගලයින් වෙත යොමු කරන්න.
- නිසි වාතාශ්රය සහතික කරන්න. වාතාශ්රය විවරයන් අවහිර නොකරන්න.
- ප්රොජෙක්ටරය සමඟ සපයා ඇති බල ඇඩැප්ටරය පමණක් භාවිතා කරන්න.
- l ක්රියාත්මක වන විට ප්රොජෙක්ටර් කාචයට ඇස් සෘජුව නිරාවරණය වීමෙන් වළකින්න.amp මත වේ.
- ප්රොජෙක්ටරය තාප ප්රභවයන්ගෙන් සහ සෘජු හිරු එළියෙන් ඈත් කර තබන්න.
2. පැකේජ අන්තර්ගතය
පහත ලැයිස්තුගත කර ඇති සියලුම අයිතම ඔබේ පැකේජයට ඇතුළත් කර ඇති බව තහවුරු කරගන්න:
- 1 x Jectse Mini LED Projector
- 1 x Remote Control (2 AAA batteries not included)
- 1 x AV Line (3-in-1 RCA cable)
- 1 x උපදෙස් අත්පොත
- 1 x බල ඇඩැප්ටරය

Figure 2.1: Contents of the Jectse Mini LED Projector package.
3. නිෂ්පාදන අවසන්view
The Jectse Mini LED Projector is a compact and portable device designed for various multimedia applications. It features a 1080P resolution, LED light source, and multiple connectivity options.

රූපය 3.1: ඉදිරිපස සහ ඉහළ view of the Jectse Mini LED Projector.
3.1 ප්රක්ෂේපක සංරචක

Figure 3.2: Top panel controls of the Jectse Mini LED Projector.
- කාච: රූපය තිරය මතට ප්රක්ෂේපණය කරයි.
- වාතාශ්රය ග්රිල්: සිසිලනය සඳහා නිසි වායු ප්රවාහය සහතික කරයි.
- පාලන බොත්තම්: (Refer to Figure 3.2) For basic navigation and power control.
- නාභිගත රෝදය: රූපයේ පැහැදිලි බව සීරුමාරු කරයි.
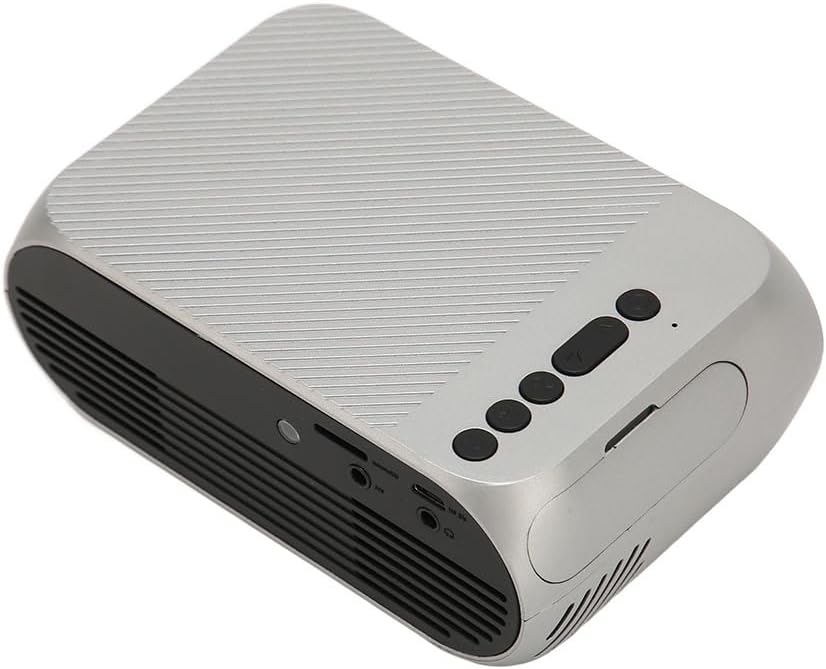
රූපය 3.3: පසුපස සහ පැත්ත view ආදාන/ප්රතිදාන වරායන් සමඟ.
3.2 ආදාන/ප්රතිදාන වරායන්
- HD Multimedia Interface (HDMI): For connecting devices like laptops, gaming consoles, and media players.
- AV තොට: For connecting older devices using the included AV cable.
- USB Port: මාධ්ය වාදනය කිරීමට USB ධාවක සම්බන්ධ කිරීම සඳහා fileසෘජුවම.
- බල ආදානය: බල ඇඩැප්ටරය සම්බන්ධ කිරීම සඳහා.
- Audio Output (3.5mm Jack): බාහිර කථිකයන් හෝ හෙඩ්ෆෝන් සම්බන්ධ කිරීම සඳහා.
4. පිහිටුවීම
4.1 ස්ථානගත කිරීම
Place the projector on a stable, flat surface. Ensure there is adequate space around the projector for ventilation. The ideal projection distance is between 1.5 to 2 meters for optimal image size and clarity.

Figure 4.1: Recommended projection distance and screen sizes.
4.2 බල සම්බන්ධතාවය
- බල ඇඩැප්ටරය ප්රොජෙක්ටරයේ බල ආදාන තොටට සම්බන්ධ කරන්න.
- බල ඇඩැප්ටරය සුදුසු විදුලි අලෙවිසැලකට (100-240V) සම්බන්ධ කරන්න.
4.3 ආදාන මූලාශ්ර සම්බන්ධ කිරීම
The projector supports HD Multimedia Interface, AV, and USB inputs.

Figure 4.2: Projector compatibility with various devices.
- HD Multimedia Interface: Connect an HD Multimedia Interface cable from your source device (e.g., laptop, game console) to the projector's HD Multimedia Interface port.
- වල: Connect the included AV cable to the projector's AV port and the corresponding audio/video output ports on your source device.
- USB: Insert a USB flash drive into the projector's USB port.
4.4 අවධානය යොමු කිරීම
After powering on the projector, rotate the focus wheel (usually located near the lens) until the projected image appears clear and sharp.
5. මෙහෙයුම් උපදෙස්
5.1 බල ගැන්වීම සක්රිය / අක්රිය කිරීම
- බල ගැන්වීමට: Press the Power Switch button on the projector or the power button on the remote control.
- බලය අක්රිය කිරීමට: Press the Power Switch button again. The projector will shut down.
5.2 මූලාශ්ර තේරීම
After powering on, use the "Signal Source Button" on the projector or the "Source" button on the remote control to cycle through available input sources (HD Multimedia Interface, AV, USB).
5.3 මෙනු සංචලනය
Use the Direction Buttons and Confirm Button on the projector or the arrow keys and OK button on the remote control to navigate through the projector's on-screen menu for settings adjustments (e.g., picture mode, aspect ratio, sound settings).
5.4 දුරස්ථ පාලක භාවිතය
Insert two AAA batteries (not included) into the remote control. Point the remote control towards the projector's IR receiver to operate functions such as power, source selection, volume, and menu navigation.
6. නඩත්තු කිරීම
6.1 කාච පිරිසිදු කිරීම
ප්රොජෙක්ටර් කාචය මෘදු ලෙස පිස දැමීම සඳහා දෘශ්ය කාච සඳහා විශේෂයෙන් නිර්මාණය කර ඇති මෘදු, ලින්ට් රහිත රෙද්දක් භාවිතා කරන්න. උල්ෙල්ඛ පිරිසිදු කරන්නන් හෝ අධික බලයක් භාවිතා නොකරන්න, මන්ද මෙය කාචය සීරීමට හේතු විය හැක.
6.2 සාමාන්ය පිරිසිදු කිරීම
Wipe the exterior of the projector with a soft, dry cloth. Do not use liquid cleaners or solvents. Ensure the ventilation grilles are free from dust and debris to maintain optimal cooling.
7. දෝශ නිරාකරණය
| ගැටලුව | විය හැකි හේතුව | විසඳුම |
|---|---|---|
| රූපයක් ප්රක්ෂේපණය කර නැත |
|
|
| රූපය බොඳ වී ඇත |
|
|
| ශබ්දයක් නැත |
|
|
| දුරස්ථ පාලකය ක්රියා නොකරයි |
|
|
8. පිරිවිතර
| විශේෂාංගය | විස්තර |
|---|---|
| වෙළඳ නාමය | ජෙක්ට්සේ |
| ආදර්ශ අංකය | Jectse3giz17bkpy |
| විභේදනය | 1920*1080p |
| ආලෝක ප්රභවය | LED |
| LED ජීවිතය | පැය 3000 යි |
| ප්රක්ෂේපණ දුර | මීටර් 1.5-2 |
| ප්රක්ෂේපණ අනුපාතය | 1.6:1 |
| දර්ශන අනුපාතය | 16:9 |
| බල ආදානය | 100-240V |
| නිෂ්පාදන ප්රමාණය | 13 x 8.5 x 5 සෙ.මී. (ආසන්න වශයෙන් 5.1 x 3.3 x 2 අඟල්) |
| අයිතමයේ බර | රාත්තල් 1.1 කි |
| සම්බන්ධතා තාක්ෂණය | HD Multimedia Interface, AV, USB |
| විශේෂ ලක්ෂණ | Adjustable, Portable Design |
9. වගකීම් සහ සහාය
For warranty information or technical support, please refer to the contact details provided with your purchase or visit the official Jectse webවෙබ් අඩවිය. වගකීම් හිමිකම් සඳහා ඔබේ මිලදී ගැනීමේ සාක්ෂි තබා ගන්න.