1. හැඳින්වීම
This manual provides essential instructions for the proper use, setup, and maintenance of your Herda K1 2-Pin Noise Reduction Walkie Talkie Earpiece. Please read this manual thoroughly before using the product to ensure optimal performance and safety.
2 ආරක්ෂිත තොරතුරු
- Do not expose the earpiece to extreme temperatures, moisture, or direct sunlight.
- Avoid dropping or subjecting the earpiece to severe impact.
- දරුවන්ට ළඟා විය නොහැකි ලෙස තබා ගන්න.
- Use only the provided Type-C cable for charging the noise reduction microphone.
- Ensure the K1 2-pin connector is correctly aligned before inserting it into your radio to prevent damage.
3. පැකේජ අන්තර්ගතය
ඔබගේ පැකේජයේ සියලුම අයිතම ඇති බව තහවුරු කරගන්න:
- Herda K1 2-Pin Noise Reduction Walkie Talkie Earpiece × 1
4. නිෂ්පාදන අවසන්view
The Herda K1 2-Pin Noise Reduction Walkie Talkie Earpiece is designed for clear communication in various environments. It features a G-shaped earhook for comfortable wear and an active noise reduction microphone.

රූපය 4.1: ඉවරයිview of the Herda K1 2-Pin Noise Reduction Walkie Talkie Earpiece components.
4.1 ප්රධාන ලක්ෂණ
- Active Noise Reduction Microphone: Equipped with an integrated chip to filter out background noise, ensuring clear voice transmission.
- කල් පවතින ඉදිකිරීම්: TPU cable with high-strength fiber for flexibility and wear resistance.
- සුවපහසු නිර්මාණය: G-shaped earhook earpiece designed for long-term wear, fitting either ear.
- නැවත ආරෝපණය කළ හැකි: Type-C charging port for the noise reduction microphone, offering approximately 60 hours of battery life.
- K1 2-Pin Connector: Compatible with a wide range of two-way radios.

රූපය 4.2: Active Noise Reduction Microphone functionality. Note: The earpiece itself does not have Active Noise Cancelling (ANC) functionality.

රූපය 4.3: Features of the microphone unit, including PTT button and charging port.
5. ගැළපුම
The Herda K1 2-Pin Earpiece is designed with a K1 2-pin connector, making it compatible with many two-way radio models from various brands. It is crucial to verify your radio's connector type before use.

රූපය 5.1: K1 2-Pin Connector dimensions for compatibility verification.
5.1 Compatible Brands and Models (Partial List)
This earpiece is compatible with many radios from brands such as:
- Baofeng/Pofung/BTech/BaofengTech: BF Series (e.g., BF-A5, BF-F8HP, BF-888S), UV Series (e.g., UV-5R, UV-82), A Series, GT Series, DM Series.
- කෙන්වුඩ්: KPG Series, Nexedge Series (e.g., NX-220), TK Series (e.g., TK-208, TK-2100, TK-3107), TH Series (e.g., TH-D7, TH-F6, TH-K2).
- Retevis: H Series (e.g., H-777), R Series, RA Series, RB Series, RT Series (e.g., RT1, RT3S, RT5, RT22).
- Hytera/HYT: TC Series (e.g., TC268, TC368).
- Linton: LT Series (e.g., LT-2188, LT-3288).
- Wouxun: KG Series (e.g., KG-639, KG-UV2D).
- Puxing: PX Series (e.g., PX328, PX777).
- Quansheng: TG Series (e.g., TG-2AT), UV Series.
- ටයිට්: TH Series (e.g., TH-F8, TH-UVF8D), MD Series.
- Arcshell: AR Series.
- ටිඩ්රැඩියෝ: TD Series.
For a complete list of compatible models, please refer to the product's official documentation or contact customer support.
6. පිහිටුවීම
6.1 Charging the Noise Reduction Microphone
The noise reduction microphone requires charging to function. Use the provided Type-C cable to charge the unit. A full charge provides approximately 60 hours of operation under typical 5/5/90 usage (5% transmit, 5% receive, 90% standby).
- Locate the Type-C charging port on the side of the microphone unit (refer to Figure 4.3).
- Connect the Type-C cable to the port and the other end to a standard USB power source.
- The indicator light will illuminate during charging. It will change or turn off once fully charged.
සටහන: The microphone unit does not support USB-PD (Power Delivery) and requires a standard USB-A to USB-C charging method.
6.2 Connecting to Your Radio
- Ensure your radio is turned off before connecting the earpiece.
- Align the K1 2-pin connector with the corresponding ports on your two-way radio. The larger pin (3.5mm) goes into the larger jack, and the smaller pin (2.5mm) into the smaller jack.
- Gently push the connector firmly into the radio's ports until it is securely seated. Do not force the connector.
- ඔබේ රේඩියෝව ක්රියාත්මක කරන්න.

රූපය 6.1: Earpiece connected to a two-way radio.
7. මෙහෙයුම් උපදෙස්
7.1 ඉයර්පීස් එක පැළඳීම
The G-shaped earhook is designed for comfortable wear on either the left or right ear.
- Gently place the earhook over your ear.
- Adjust the earpiece so the speaker rests comfortably in your ear canal.
- Position the microphone unit for optimal voice pickup. The 360° swivel clip allows you to attach it to your collar or clothing.
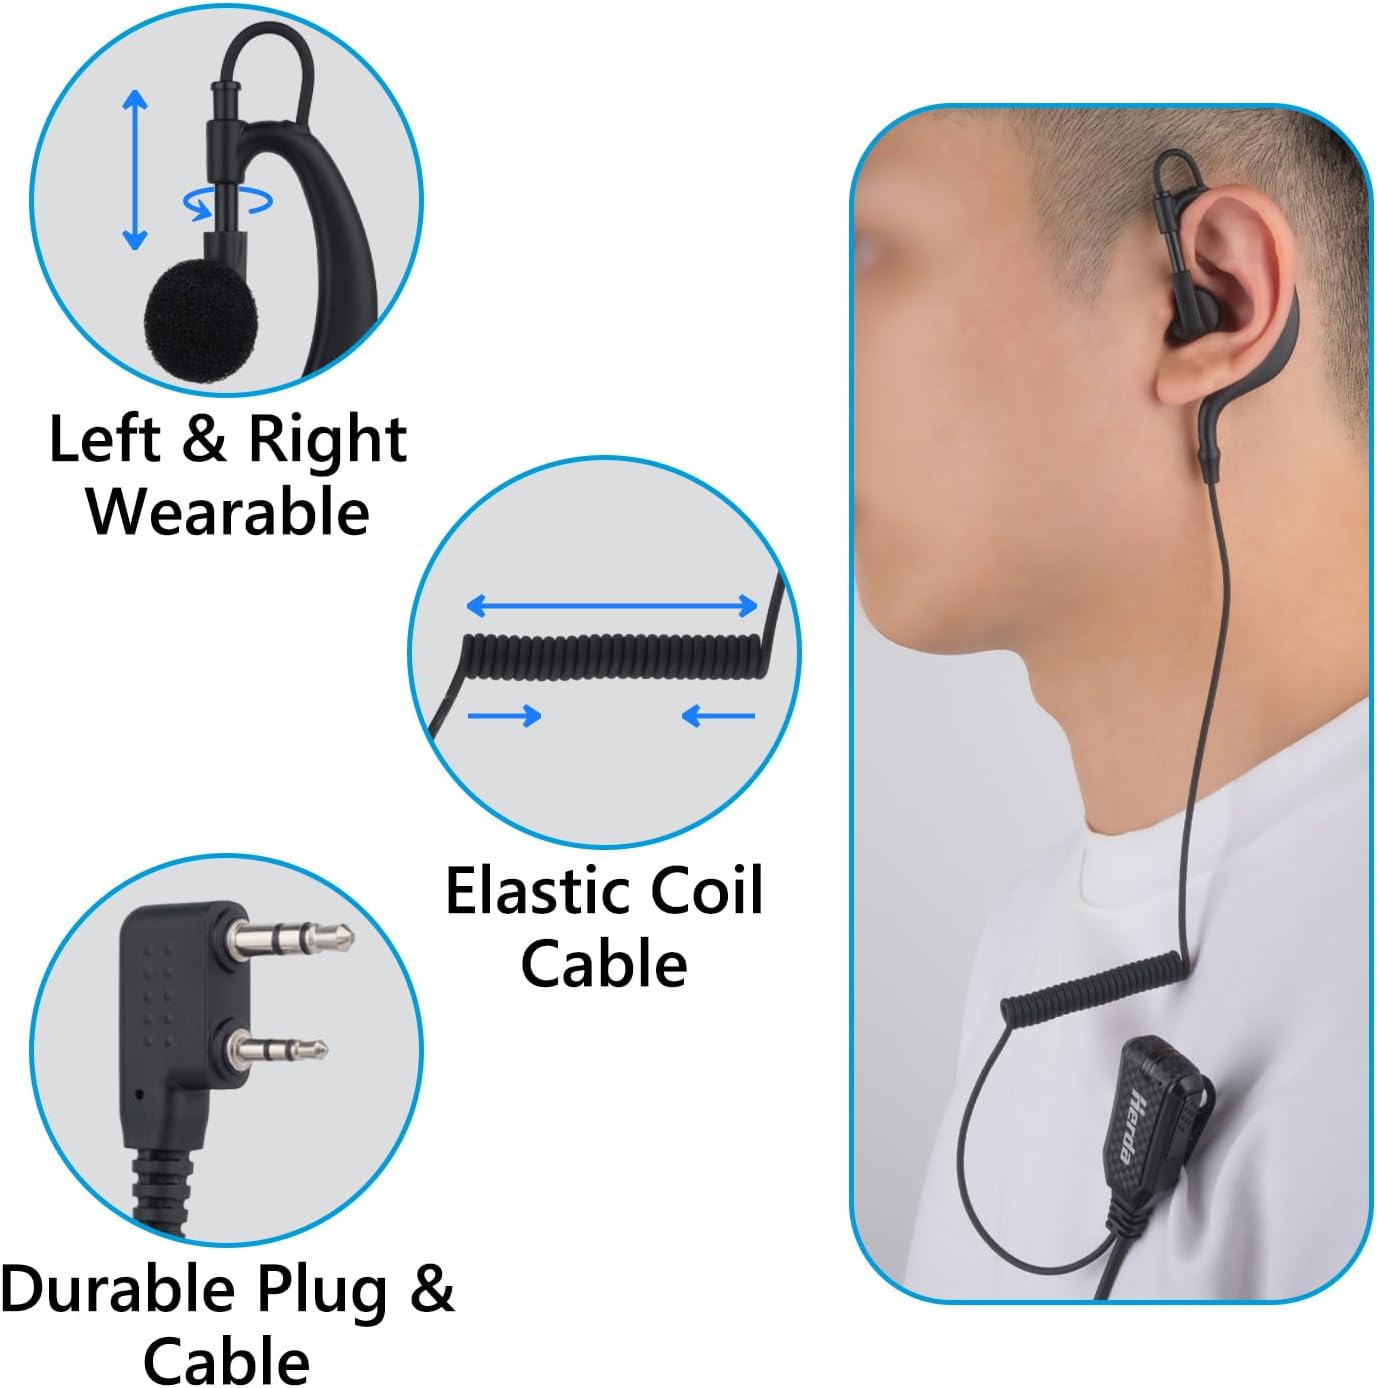
රූපය 7.1: Earpiece wearability and cable features.
7.2 සම්ප්රේෂණය සහ ලැබීම
- වෙත ලැබෙනවා audio, ensure the earpiece is properly connected and your radio is on. Audio will be directed through the earpiece.
- වෙත සම්ප්රේෂණය, press and hold the Push-To-Talk (PTT) button on the microphone unit. Speak clearly into the microphone.
- ලැබීමේ මාදිලියට ආපසු යාමට PTT බොත්තම මුදා හරින්න.
7.3 ශබ්දය අඩු කිරීමේ කාර්යය
The integrated noise reduction microphone actively filters out ambient background noise during transmission, ensuring your voice is transmitted clearly to the receiving party. This feature is particularly effective in noisy environments such as construction sites, factories, or crowded events.
8. නඩත්තු කිරීම
8.1 පිරිසිදු කිරීම
- Wipe the earpiece and microphone unit with a soft, dry cloth.
- දරුණු රසායනික ද්රව්ය, පිරිසිදු කිරීමේ ද්රාවණ හෝ ශක්තිමත් ඩිටර්ජන්ට් භාවිතා නොකරන්න.
- Avoid getting moisture into the charging port or microphone grille.
8.2 ගබඩා කිරීම
- Store the earpiece in a cool, dry place away from direct sunlight.
- Avoid tangling the cable.
9. දෝශ නිරාකරණය
- No audio from earpiece:
- Ensure the K1 connector is fully inserted into the radio.
- Check radio volume settings.
- Verify radio is powered on and functioning correctly.
- Poor transmission quality / Noise not reduced:
- Ensure the noise reduction microphone is charged.
- මයික්රෆෝනයට කෙලින්ම කතා කරන්න.
- Confirm the earpiece is compatible with your radio model.
- Earpiece uncomfortable:
- Adjust the position of the G-shaped earhook.
- Ensure the earpiece is not pulled by tension from the coiled cable.
- අයකිරීමේ ගැටලුව:
- Verify the Type-C cable is securely connected to both the microphone and the power source.
- Try a different USB power adapter or cable.
10. පිරිවිතර
| විශේෂාංගය | පිරිවිතර |
|---|---|
| මාදිලියේ නම | HENG-K |
| සම්බන්ධතා තාක්ෂණය | රැහැන්ගත |
| ආදාන උපාංග අතුරුමුහුණත | K1 2-pin connector |
| විශේෂ ලක්ෂණය | Noise Isolation, Rechargeable Battery |
| බැටරි ආයු කාලය | පැය 60 (ආසන්න වශයෙන්) |
| ආරෝපණ වරාය | වර්ගය-C |
| ඉයර්පීස් හැඩය | G Shape Earhook |
| සංඛ්යාත පරාසය | හර්ට්ස් 200 - හර්ට්ස් 3400 |
| අයිතමයේ බර | අවුන්ස 1.76 කි |
| නිෂ්පාදකයා | Herda Electronic Technology Co., Ltd. |
11. වගකීම් සහ සහාය
For warranty information or technical support, please refer to the product packaging or contact Herda customer service directly. Keep your purchase receipt as proof of purchase.