
1. හැඳින්වීම
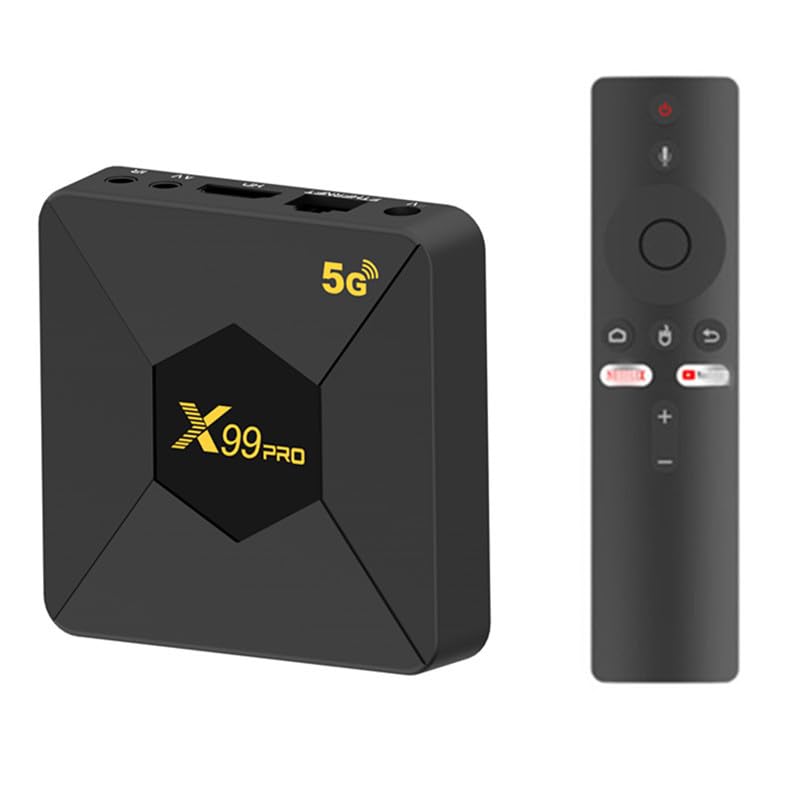
The CHROX X99 Pro Android 13.0 TV Box is a smart multimedia player designed to transform your television into a powerful entertainment hub. Featuring the latest Android 13.0 operating system and a robust H313 Quad-core processor, this device offers fast performance, 4K video playback, and extensive connectivity options for an enhanced viewඅත්දැකීමෙන්.
2. පැකේජ අන්තර්ගතය
පහත ලැයිස්තුගත කර ඇති සියලුම අයිතම ඔබේ පැකේජයට ඇතුළත් කර ඇති බව කරුණාකර සත්යාපනය කරන්න:
- 1 x CHROX X99 Pro Android 13.0 TV Box
- 1 x බල ඇඩැප්ටරය
- 1 x දුරස්ථ පාලකය
- 1 x HDMI කේබලය
- 1 x පරිශීලක අත්පොත (මෙම ලේඛනය)
3. නිෂ්පාදන අවසන්view
The CHROX X99 Pro TV Box is equipped with advanced hardware to deliver a smooth and responsive user experience. Below is an overview of the device and its ports.

රූපය 3.1: ඉහළ view of the CHROX X99 Pro Android TV Box, showing the 'X99 Pro' logo and '5G' indicator.
3.1 Front and Side Panels

රූපය 3.2: පැත්ත view of the CHROX X99 Pro Android TV Box, highlighting the USB ports and TF card slot.
The side panel features two USB ports (one USB 3.0 and one USB 2.0) for connecting external storage devices, keyboards, mice, or other peripherals. A TF card slot is also present for expanding storage.
3.2 පසුපස පුවරුව
රූපය 3.3: පසුපස view of the CHROX X99 Pro Android TV Box, showing the power input, Ethernet, HDMI, AV, and IR ports.
The rear panel provides essential connectivity:
- DC 5V බල ආදානය: සපයා ඇති බල ඇඩැප්ටරය මෙතැනට සම්බන්ධ කරන්න.
- ඊතර්නෙට් (RJ-45): රැහැන්ගත ජාල සම්බන්ධතාවය සඳහා.
- HDMI: Connect to your TV or display for video and audio output.
- වල: Analog video/audio output for older TVs.
- IR: External IR receiver port (if applicable).
4. සැකසුම් මාර්ගෝපදේශය
Follow these steps for initial setup of your CHROX X99 Pro TV Box:
- රූපවාහිනියට සම්බන්ධ වන්න: Use the provided HDMI cable to connect the HDMI port on the TV Box to an HDMI input port on your television. Note the HDMI input number on your TV (e.g., HDMI 1, HDMI 2).
- බලයට සම්බන්ධ කරන්න: Plug the power adapter into the DC 5V input port on the TV Box, then plug the adapter into a wall outlet. The device should power on automatically, or you may need to press the power button on the remote control.
- ජාලයට සම්බන්ධ වන්න (විකල්ප):
- රැහැන්ගත සම්බන්ධතාවය: Connect an Ethernet cable from your router to the Ethernet port on the TV Box.
- රැහැන් රහිත සම්බන්ධතාවය: Skip this step for now; you will configure Wi-Fi during the initial software setup.
- රූපවාහිනී ආදානය තෝරන්න: Turn on your TV and use its remote control to select the correct HDMI input source that corresponds to where you connected the TV Box.
- මූලික පිහිටුවීම්: The Android system will boot up. Follow the on-screen prompts to select your language, connect to Wi-Fi (if not using Ethernet), and complete any other initial configuration steps.
5. මෙහෙයුම් උපදෙස්
5.1 දුරස්ථ පාලනය
The included remote control allows you to navigate the Android interface. Familiarize yourself with its buttons:
- බල බොත්තම: Turns the device on/off or puts it into standby mode.
- සංචාලන බොත්තම් (ඉහළ/පහළ/වම/දකුණ): Move cursor or selection.
- හරි බොත්තම: Confirms selection or opens an item.
- පසුපස බොත්තම: පෙර තිරය වෙත නැවත පැමිණේ.
- මුල් පිටුව බොත්තම: ප්රධාන Android මුල් තිරය වෙත නැවත පැමිණේ.
- මෙනු බොත්තම: සන්දර්භ සංවේදී මෙනු වෙත ප්රවේශ වේ.
- වෙළුම් බොත්තම්: ශ්රව්ය පරිමාව සීරුමාරු කරයි.
5.2 Android අතුරුමුහුණත සැරිසැරීම
The CHROX X99 Pro runs on Android 13.0, providing a user-friendly interface. Use the remote control's navigation buttons to move between apps and settings. Press the OK button to launch an application or confirm a selection.
5.3 යෙදුම් ස්ථාපනය කිරීම සහ කළමනාකරණය කිරීම
You can install applications from the pre-installed app store or by sideloading APK files. To manage apps:
- වෙත යන්න සැකසීම් > යෙදුම් දක්වා view installed applications.
- Select an app to see options like විවෘත කරන්න, බලෙන් නවත්වන්න, අස්ථාපනය කරන්න, දත්ත හිස් කරන්න, හෝ හැඹිලිය හිස් කරන්න.
5.4 ජාල සැකසුම්
To configure network connectivity:
- වෙත යන්න සැකසීම් > ජාලය සහ අන්තර්ජාලය.
- For Wi-Fi, select Wifi, ඔබේ ජාලය තෝරා මුරපදය ඇතුළත් කරන්න.
- For Ethernet, ensure the cable is connected; the device should automatically obtain an IP address.
5.5 බ්ලූටූත් යුගල කිරීම
To connect Bluetooth devices (e.g., headphones, game controllers):
- වෙත යන්න සැකසීම් > සම්බන්ධිත උපාංග > නව උපාංගය යුගල කරන්න.
- ඔබේ බ්ලූටූත් උපාංගය යුගල කිරීමේ ක්රමයට දමන්න.
- Select your device from the list on the TV Box to pair.
6. පිරිවිතර
Detailed technical specifications for the CHROX X99 Pro Android 13.0 TV Box:
| විශේෂාංගය | පිරිවිතර |
|---|---|
| වෙළඳ නාමය | CHROX |
| මාදිලියේ නම | X99 Pro |
| මෙහෙයුම් පද්ධතිය | Android 13.0 |
| CPU | H313 Quad-core Cortex-A53 |
| GPU | මාලි-T720MP2 |
| RAM | 2GB DDR3 |
| ROM | 8GB EMMC |
| Wifi | 2.4G/5GHz Dual Band |
| ඊතර්නෙට් | 10/100M RJ-45 |
| බ්ලූටූත් | සහාය දුන්නා |
| USB සත්කාරක | 1x USB 3.0, 1x USB 2.0 |
| වීඩියෝ ප්රතිදානය | HDMI 2.0 (up to 8K, 6K@30fps MAX Resolution Output with HDR, CEC, HDCP 2.2) |
| කාඩ්පත් කියවනය | SD / SDHC / MMC කාඩ්පත් |
| වීඩියෝ විකේතනය | 8K H.265, 4K@60fps, 3D support |
| සහාය දක්වන වීඩියෝ ආකෘති | AVI, RM, RMVB, TS, VOB, MKV, MOV, ISO, WMV, ASF, FLV, DAT, MPG, MPEG |
| සහාය දක්වන ශ්රව්ය ආකෘති | MP3, WMA, AAC, WAV, OGG, AC3, DDP, TRUEHD, DTS, HD, FLAC, APE |
| සහාය දක්වන ඡායාරූප ආකෘති | HD JPEG, BMP, GIF, PNG, TIFF |
7. දෝශ නිරාකරණය
ඔබේ රූපවාහිනී පෙට්ටිය සමඟ ගැටළු ඇති වුවහොත්, පහත සඳහන් පොදු ගැටළු සහ විසඳුම් වෙත යොමු වන්න:
- බලය නැත:
- බල ඇඩැප්ටරය රූපවාහිනී පෙට්ටියට සහ ක්රියාකාරී බල අලෙවිසැලකට ආරක්ෂිතව සම්බන්ධ කර ඇති බවට වග බලා ගන්න.
- වෙනස් බල සැපයුමක් උත්සාහ කරන්න.
- රූපවාහිනියේ සංදර්ශකයක් නොමැත:
- Check that the HDMI cable is firmly connected to both the TV Box and the TV.
- ඔබගේ රූපවාහිනිය නිවැරදි HDMI ආදාන මූලාශ්රයට සකසා ඇති බව තහවුරු කරන්න.
- ඔබේ රූපවාහිනියේ වෙනස් HDMI කේබලයක් හෝ HDMI පෝට් එකක් උත්සාහ කරන්න.
- Wi-Fi සම්බන්ධතාවයක් නැත:
- වෙත යන්න සැකසීම් > ජාලය සහ අන්තර්ජාලය > Wi-Fi and ensure Wi-Fi is enabled.
- Check if your Wi-Fi password is entered correctly.
- ඔබගේ Wi-Fi රවුටරය සහ රූපවාහිනී පෙට්ටිය නැවත ආරම්භ කරන්න.
- රූපවාහිනී පෙට්ටිය ඔබගේ Wi-Fi රවුටරයේ පරාසය තුළ ඇති බවට වග බලා ගන්න.
- දුරස්ථ පාලකය ප්රතිචාර නොදක්වයි:
- දුරස්ථ පාලකයේ බැටරි ප්රතිස්ථාපනය කරන්න.
- Ensure there are no obstructions between the remote control and the TV Box's IR receiver.
- යෙදුම් බිඳ වැටීම හෝ කැටි කිරීම:
- වෙත යන්න සැකසීම් > යෙදුම්, select the problematic app, and try හැඹිලිය හිස් කරන්න or දත්ත හිස් කරන්න.
- If the issue persists, try අස්ථාපනය කරන්න and then reinstall the app.
- රූපවාහිනී පෙට්ටියේ ප්රමාණවත් නිදහස් ගබඩා ඉඩක් ඇති බවට වග බලා ගන්න.
8. නඩත්තු කිරීම
To ensure the longevity and optimal performance of your CHROX X99 Pro TV Box, follow these maintenance guidelines:
- පිරිසිදුව තබාගන්න: මෘදු, වියළි රෙද්දකින් උපාංගය නිතිපතා පිස දමන්න. දියර පිරිසිදු කරන්නන් හෝ උල්ෙල්ඛ ද්රව්ය භාවිතා කිරීමෙන් වළකින්න.
- වාතාශ්රය: අධික උනුසුම් වීම වැළැක්වීම සඳහා උපාංගය හොඳින් වාතාශ්රය ඇති ප්රදේශයක තබා ඇති බවට වග බලා ගන්න. කිසිදු වාතාශ්රය විවරයක් අවහිර නොකරන්න.
- උෂ්ණත්වය සහ ආර්ද්රතාවය: Operate the device within recommended temperature and humidity ranges. Avoid extreme heat, cold, or damp පරිසරයන්.
- නිසි ලෙස විදුලිය විසන්ධි කරන්න: Always power off the device correctly through the system menu or by using the remote control's power button to put it into standby. Avoid simply unplugging it from the power source.
- මෘදුකාංග යාවත්කාලීන: පද්ධති යාවත්කාලීන කිරීම් සඳහා වරින් වර පරීක්ෂා කරන්න සැකසීම් to ensure you have the latest features and security patches.
- භෞතික හානි වළක්වා ගන්න: Do not drop, strike, or attempt to disassemble the device. Unauthorized opening voids any warranty.
9. වගකීම් සහ සහාය
The CHROX X99 Pro Android 13.0 TV Box comes with a standard manufacturer's warranty. Please refer to the warranty card included in your package for specific terms and conditions, including the warranty period and coverage details.
For technical support, troubleshooting assistance beyond this manual, or warranty claims, please contact the seller or manufacturer directly through the contact information provided at the point of purchase or on the product packaging. When contacting support, please have your product model (X99 Pro) and purchase details readily available.


