1. හැඳින්වීම
This manual provides detailed instructions for the safe and effective operation of the Generic Digital Clamp Meter ACM81. This True RMS auto-ranging clamp meter is designed for measuring AC current, AC/DC voltage, resistance, continuity, diode, and temperature. It features a V-alert function for non-contact AC voltage detection and an automatic power-off function to conserve battery life.
2 ආරක්ෂිත තොරතුරු
අවවාදයයි: විදුලි කම්පනය හෝ පුද්ගලික තුවාල වළක්වා ගැනීම සඳහා, මෙම මීටරය භාවිතා කිරීමට පෙර සියලුම ආරක්ෂක තොරතුරු කියවා තේරුම් ගන්න.
- Always ensure the meter is in the correct function mode before making measurements.
- කිසිදු පරාසයක් සඳහා උපරිම ආදාන අගයන් ඉක්මවා නොයන්න.
- වෙළුම සමඟ වැඩ කිරීමේදී අතිශයින්ම පරෙස්සම් වන්නtages 30V AC RMS, 42V උපරිම, හෝ 60V DC ට වැඩි. මෙම වෙළුම්tagකම්පන උවදුරක් ඇති කරයි.
- Before measuring current with the clamp, ensure the circuit is de-energized if possible, and always wear appropriate personal protective equipment.
- The meter conforms to IEC-61010-1, IEC-61010-2-030, IEC-61010-2-032, IEC-61010-2-033 standards.
- අධික වෙළුමtage protection class: CAT III 300V, CAT II 600V, pollution degree II.
3. නිෂ්පාදන අවසන්view
Familiarize yourself with the components of your Digital Clamp Meter ACM81.

රූපය 3.1: Labeled diagram of the ACM81 Digital Clamp Meter, showing the V-Alert sensor area, jaws for current measurement, trigger, rotary switch, manual automatic switching keys, reading backlight, HOLD button, SEL button, display, and input terminals.
- හකු: ස්පර්ශ නොවන AC ධාරා මැනීම සඳහා භාවිතා වේ.
- ප්රේරකය: Opens and closes the jaws.
- රොටරි ස්විචය: Selects the measurement function (e.g., AC current, voltage, ප්රතිරෝධය).
- සංදර්ශකය: මිනුම් කියවීම් සහ දර්ශක පෙන්වයි.
- රැඳවුම් බොත්තම: සංදර්ශකයේ වත්මන් කියවීම කැටි කරයි.
- SEL බොත්තම: Selects sub-functions within a rotary switch position (e.g., AC/DC voltage, ඩයෝඩය/අඛණ්ඩතාවය).
- RAN Button: Toggles between auto-ranging and manual ranging (if applicable).
- V-Alert Button: Activates the non-contact AC voltagඊ හඳුනා ගැනීමේ කාර්යය.
- ආදාන පර්යන්ත: වෙළුම සඳහා පරීක්ෂණ ඊයම් සම්බන්ධ කිරීම සඳහාtage, resistance, continuity, diode, and temperature measurements.
4. පිහිටුවීම
4.1 බැටරි ස්ථාපනය
The meter requires two 1.5V AAA batteries (not included). Follow these steps to install or replace batteries:
- මීටරය ක්රියා විරහිත කර ඇති බවට වග බලා ගන්න.
- මීටරයේ පිටුපස බැටරි මැදිරිය සොයා ගන්න.
- Use a screwdriver to loosen the screw securing the battery cover.
- බැටරි ආවරණය ඉවත් කරන්න.
- Insert two 1.5V AAA batteries, observing the correct polarity (+ and -).
- බැටරි ආවරණය ප්රතිස්ථාපනය කර ඉස්කුරුප්පු ඇණ තද කරන්න.

රූපය 4.1: Illustration of the battery compartment and the process of replacing batteries using a screwdriver.
5. මෙහෙයුම් උපදෙස්
5.1 බලය සක්රිය / අක්රිය
Turn the rotary switch from the OFF position to any desired measurement function to power on the meter. To power off, turn the rotary switch back to the OFF position. The meter will automatically power off within 15 minutes if there is no operation.
5.2 AC Current Measurement (by Jaws)
AC ධාරාව මැනීමට:
- Turn the rotary switch to the 'A~' position.
- Press the trigger to open the jaws.
- Clamp the jaws around a single conductor (not a bundle of wires) through which the current is flowing. Ensure the jaws are fully closed.
- Read the AC current value on the display. The meter can measure AC current from a minimum of 1mA up to 200A.

රූපය 5.1: Demonstrates how to easily open the clamp meter jaws by pulling the trigger for current measurement.

රූපය 5.2: Clamp meter's jaws are shown clamped around a single conductor to measure industrial current.
5.3 වෙළුමtage මිනුම් (AC/DC)
AC හෝ DC පරිමාව මැනීමටtage:
- Insert the red test lead into the 'VΩ' input terminal and the black test lead into the 'COM' input terminal.
- Turn the rotary switch to the 'V~' (for AC voltage) or 'V=' (for DC voltage) position. If the symbol is 'V~', press 'SEL' to switch to 'V=' for DC voltage.
- ඔබ මැනීමට බලාපොරොත්තු වන පරිපථයට හෝ සංරචකයට සමාන්තරව පරීක්ෂණ ලීඩ් සම්බන්ධ කරන්න.
- වෙළුම කියවන්නtage value on the display. The meter measures voltage from 0.1mV to 600V.
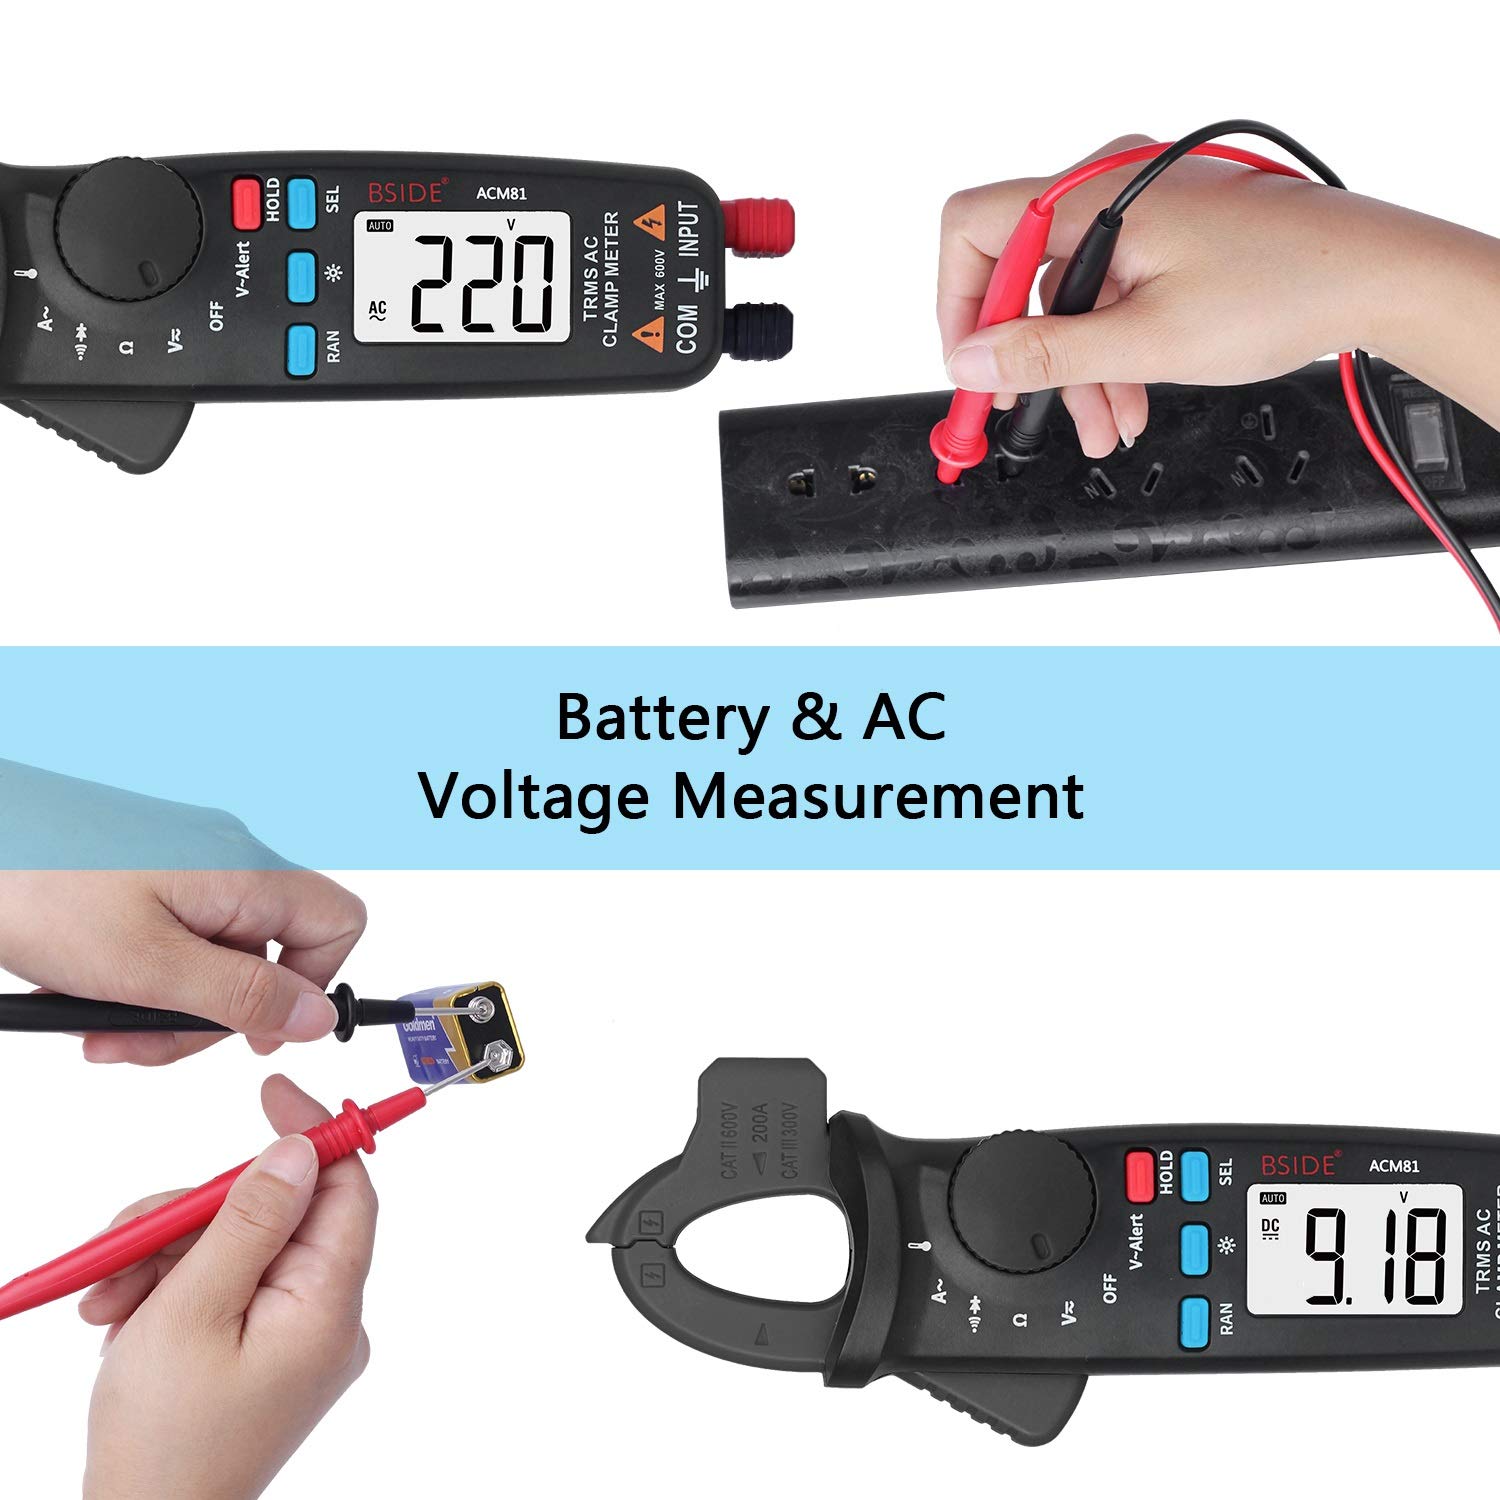
රූපය 5.3: Demonstrates the meter performing both AC voltage measurement from a power outlet and DC voltage measurement from a battery.
5.4 ප්රතිරෝධය මැනීම
ප්රතිරෝධය මැනීම සඳහා:
- Insert the red test lead into the 'VΩ' input terminal and the black test lead into the 'COM' input terminal.
- Turn the rotary switch to the 'Ω' position.
- Ensure the circuit or component is de-energized before connecting the test leads across it.
- දර්ශනයේ ප්රතිරෝධක අගය කියවන්න.
5.5 අඛණ්ඩ පරීක්ෂණය
අඛණ්ඩතා පරීක්ෂණයක් සිදු කිරීම සඳහා:
- Insert the red test lead into the 'VΩ' input terminal and the black test lead into the 'COM' input terminal.
- Turn the rotary switch to the 'Ω' position. Press 'SEL' until the continuity symbol (a speaker icon) appears on the display.
- පරිපථය හෝ සංරචකය හරහා පරීක්ෂණ ලීඩ් සම්බන්ධ කරන්න.
- If the resistance is less than approximately 30Ω, the continuity beeper will sound, indicating a continuous path.
5.6 දියෝඩ පරීක්ෂණය
ඩයෝඩයක් පරීක්ෂා කිරීමට:
- Insert the red test lead into the 'VΩ' input terminal and the black test lead into the 'COM' input terminal.
- Turn the rotary switch to the 'Ω' position. Press 'SEL' until the diode symbol appears on the display.
- Connect the red test lead to the anode and the black test lead to the cathode of the diode. The display will show the forward voltagඊ වැටීම.
- Reverse the test leads. The display should show 'OL' (Open Line) for a good diode.
5.7 උෂ්ණත්වය මැනීම
උෂ්ණත්වය මැනීම සඳහා:
- Insert the thermocouple into the input terminals, observing polarity.
- Turn the rotary switch to the 'TEMP' position (often shared with another function, use 'SEL' if needed).
- Place the thermocouple probe on or near the object whose temperature you wish to measure.
- Read the temperature value on the display. The meter measures temperature from -20°C to 500°C (-4°F to 932°F).
5.8 V-Alert Function (Non-Contact AC Voltagඊ හඳුනාගැනීම)
To use the V-alert function:
- Turn the rotary switch to the 'V-Alert' position.
- Bring the top part of the meter (V-Alert sensor area) close to an AC voltage source (e.g., an electrical outlet or insulated wire).
- AC පරිමාව නම්tage is detected, the meter will emit an audible beep and the V-Alert indicator light will flash.
5.9 දත්ත රඳවා තබා ගැනීම
To freeze the current reading on the display:
- While taking a measurement, press the 'HOLD' button. The reading on the display will be frozen.
- Press the 'HOLD' button again to release the data hold and resume live measurements.
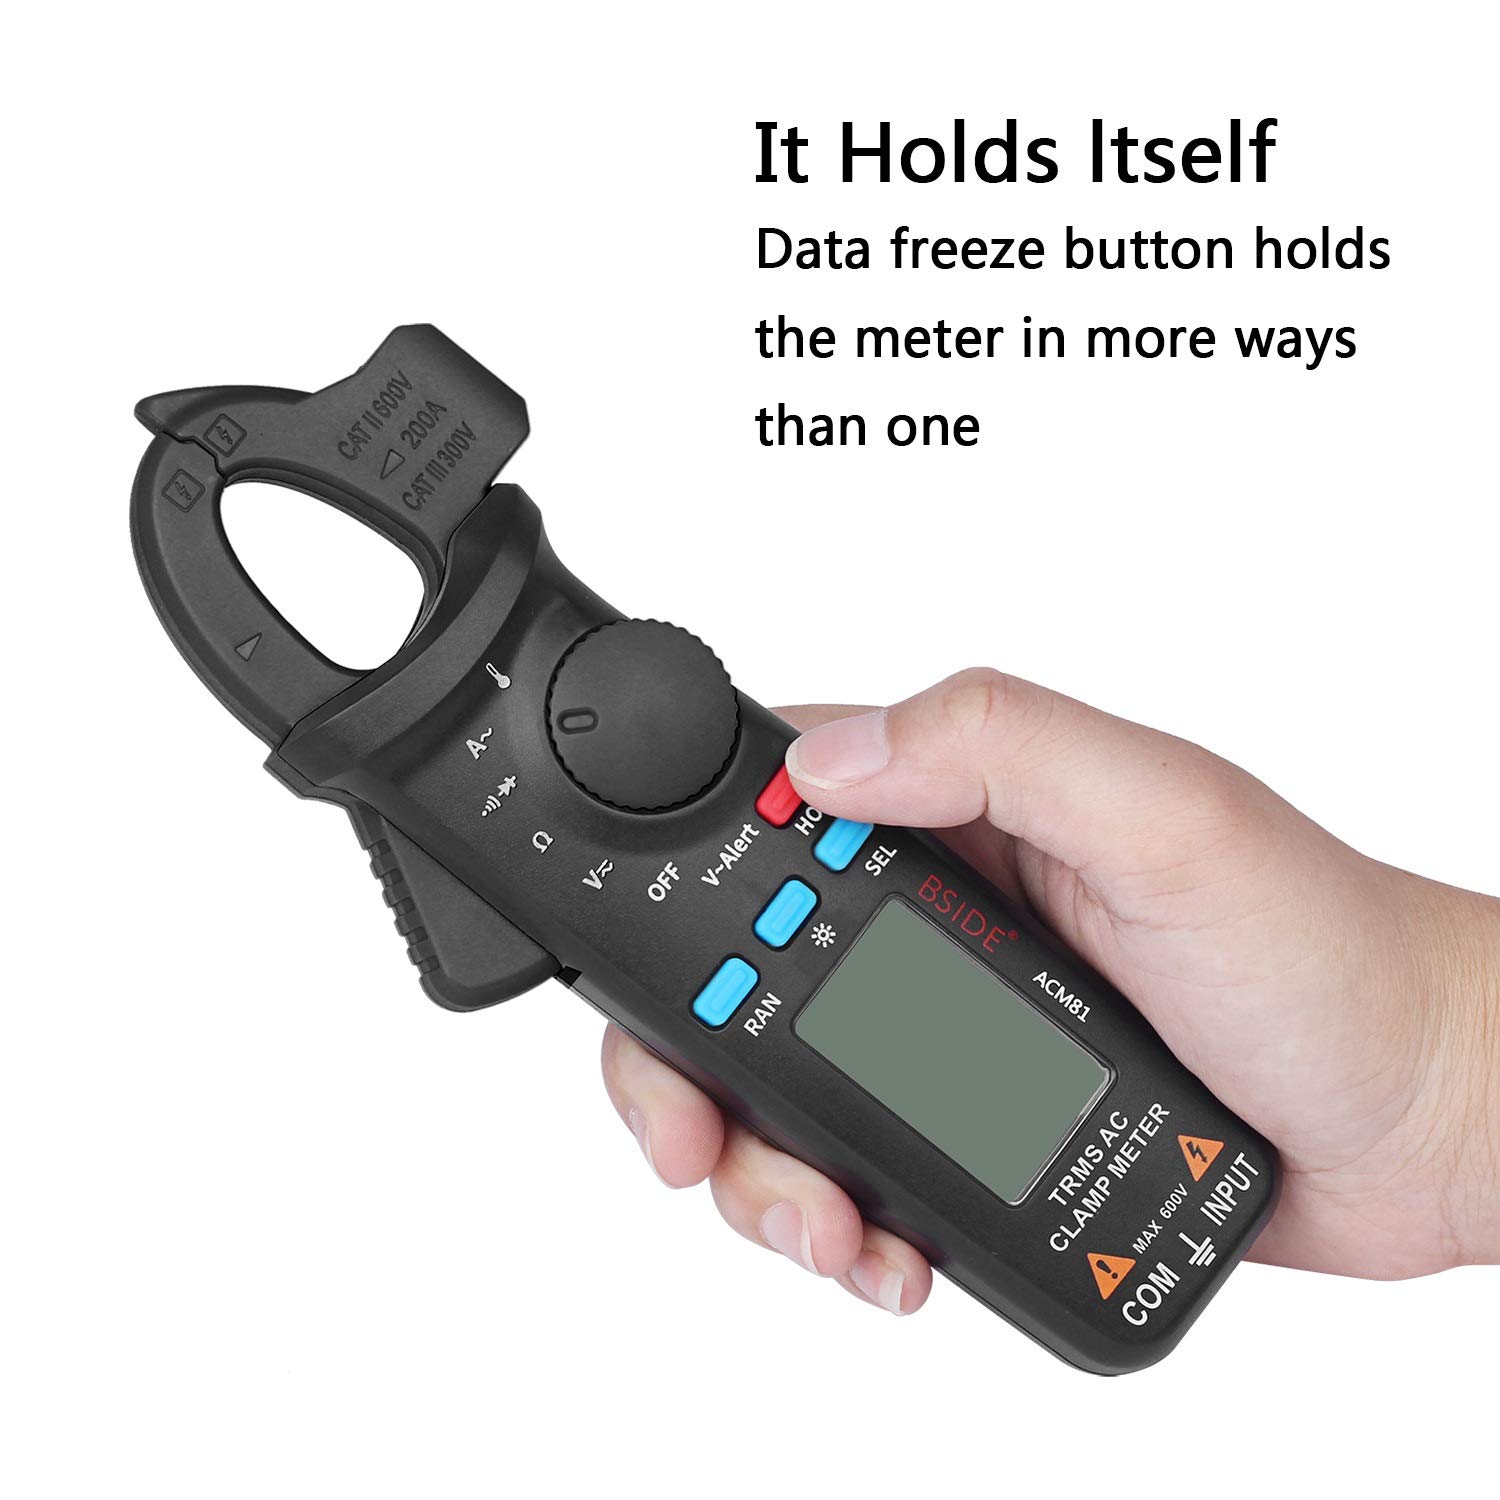
රූපය 5.4: The meter's data freeze function is activated by pressing the 'HOLD' button, allowing the current reading to be retained on the display.
6. නඩත්තු කිරීම
6.1 පිරිසිදු කිරීම
දැන්වීමකින් මීටරයේ කවරය පිස දමන්නamp රෙදි සහ මෘදු ඩිටර්ජන්ට්. උල්ෙල්ඛ හෝ ද්රාවක භාවිතා නොකරන්න. භාවිතයට පෙර මීටරය සම්පූර්ණයෙන්ම වියළී ඇති බවට වග බලා ගන්න.
6.2 බැටරි ප්රතිස්ථාපනය
When the low battery indicator appears on the display, replace the batteries as described in Section 4.1. Prompt battery replacement ensures accurate readings and proper meter function.
7. දෝශ නිරාකරණය
- සංදර්ශකය නැත: බැටරි ස්ථාපනය පරීක්ෂා කර බැටරි ක්ෂය වී නොමැති බවට වග බලා ගන්න. අවශ්ය නම් ප්රතිස්ථාපනය කරන්න.
- වැරදි කියවීම්: Verify the correct function is selected for the measurement. Ensure test leads are properly connected and making good contact. Check battery level.
- මීටරය ප්රතිචාර නොදක්වයි: Turn the meter off and then on again. If the issue persists, replace batteries.
8. පිරිවිතර
Detailed technical specifications for the Generic Digital Clamp Meter ACM81:
| පරාමිතිය | පරාසය | නිරවද්යතාව |
|---|---|---|
| ප්රදර්ශනය කරන්න | 2000 ගණන් | |
| AC ධාරාව | 2A/20A/200A | ± (2.5%+5) |
| ඩීසී වෙළුමtage | 200mV/2V/20V/200V/600V | ± (1.0%+3) |
| ඒසී වෙළුමtage | 200mV/2V/20V/200V/600V | ± (1.0%+3) |
| ප්රතිරෝධය | 200Ω/2kΩ/20kΩ/200kΩ/2MΩ | ± (1.0%+3) |
| 20MΩ | ± (1.2%+20) | |
| අඛණ්ඩතාව | Sounds if resistance < 30Ω | |
| ඩයෝඩය | Shows positive voltage value approximately | |
| උෂ්ණත්වය | -20 ℃ ~ 500 ℃ / -4 ℉ ~ 932 ℉ | ± (2.0%+2) |
| Jaw Capacity | 20 මි.මී | |
| බලය | 1.5V (AAA) x 2 | |
| ප්රමාණය | 179 x 67 x 36 මි.මී | |
| බර | ග්රෑම් 137 | |
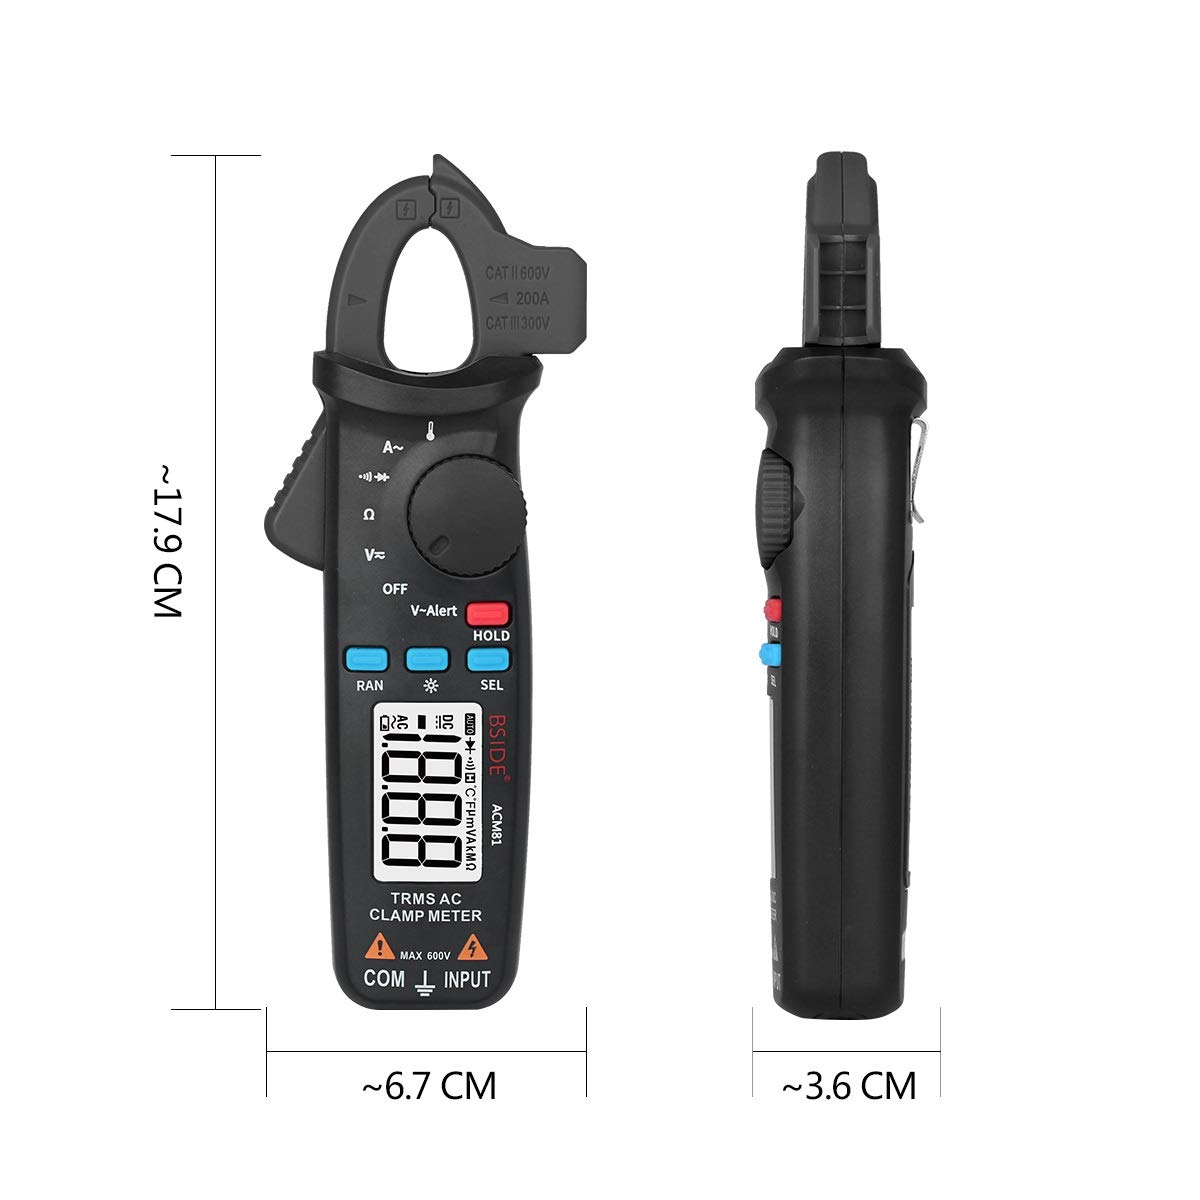
රූපය 8.1: Physical dimensions of the ACM81 Digital Clamp මීටරය.
9. පැකේජ අන්තර්ගතය
පහත අයිතම ඔබේ නිෂ්පාදන පැකේජයට ඇතුළත් කර ඇත:
- 1 x Digital TRMS Clamp Meter (ACM81)
- 1 x ටෙස්ට් නායකත්වය
- 1 x Thermocouple
- 1 x රැගෙන යන නඩුව
- 1 x ඉස්කුරුප්පු නියනක්
- 1 x පරිශීලක අත්පොත
10. වගකීම් සහ සහාය
වගකීම් තොරතුරු හෝ තාක්ෂණික සහාය සඳහා, කරුණාකර ඔබේ සිල්ලර වෙළෙන්දා හෝ නිෂ්පාදකයාගේ නිලධාරියා විසින් සපයන ලද සම්බන්ධතා තොරතුරු වෙත යොමු වන්න. webඅඩවිය. වගකීම් හිමිකම් සඳහා ඔබේ මිලදී ගැනීමේ රිසිට්පත තබා ගන්න.