1. හැඳින්වීම
This manual provides comprehensive instructions for the setup, operation, maintenance, and troubleshooting of your COBY CR-A78 AM/FM Digital Alarm Clock with Time Projector. Please read this manual thoroughly before using the device to ensure proper function and to maximize your user experience. Keep this manual for future reference.
2. නිෂ්පාදන අවසන්view
The COBY CR-A78 is a versatile digital alarm clock featuring an AM/FM radio tuner and a unique time projection function. It is designed to provide reliable timekeeping, alarm functions, and radio entertainment, with the added convenience of projecting the current time onto a wall or ceiling.
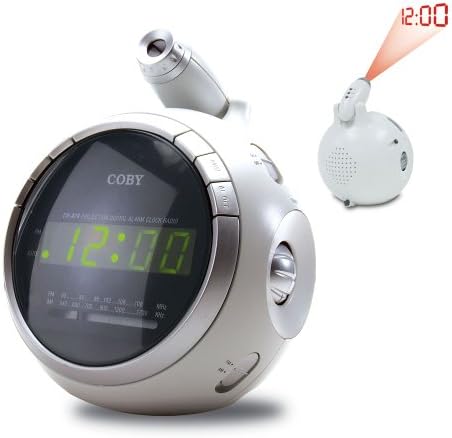
රූපය 2.1: ඉදිරිපස view of the COBY CR-A78 digital alarm clock, showing the green LED display and the adjustable time projector. An inset image illustrates the time '12:00' being projected onto a surface.
3. විශේෂාංග
- AM/FM Digital Tuner: For listening to your favorite radio stations.
- Large Green LED Display: Provides clear visibility of the time.
- Integrated Time Projector: Projects the current time onto a wall or ceiling for easy viewing.
- ද්විත්ව අනතුරු ඇඟවීමේ කාර්යය: Set two independent alarms for different wake-up times.
- මඳක් නිදි කිරීමේ කාර්යය: Allows for a temporary pause of the alarm.
- නින්ද ටයිමර්: Fall asleep to music with an automatic shut-off feature.
- බැටරි උපස්ථ: විදුලිය විසන්ධි කිරීමේදී කාලය සහ අනතුරු ඇඟවීමේ සැකසුම් පවත්වා ගනී.tages (requires 9V battery, not included).
4. පැකේජ අන්තර්ගතය
- COBY CR-A78 AM/FM Digital Alarm Clock
- AC බල ඇඩැප්ටරය
- පරිශීලක අත්පොත (මෙම ලේඛනය)
5. පිහිටුවීම
5.1. බල සම්බන්ධතාවය
- Insert the small end of the AC power adapter into the DC IN jack located on the back of the unit.
- Plug the other end of the AC power adapter into a standard wall outlet (AC 120V, 60Hz).
- The unit will power on, and the display will flash, indicating it is ready for time setting.
5.2. බැටරි බැකප් ස්ථාපනය
A 9-volt battery (not included) can be installed to provide backup power for the clock and alarm settings during a power interruption.
- ඒකකයේ පතුලේ බැටරි මැදිරි කවරය සොයා ගන්න.
- Remove the cover by sliding it off.
- Connect a 9-volt battery to the battery connector inside the compartment, observing polarity (+ and -).
- Place the battery into the compartment and replace the cover securely.
6. මෙහෙයුම් උපදෙස්
6.1. කාලය නියම කිරීම
- ඔබා අල්ලාගෙන සිටින්න ටයිම් සෙට් පැය ඉලක්කම් දැල්වීමට පටන් ගන්නා තෙක් බොත්තම ඔබාගෙන සිටින්න.
- ඔබන්න පැය පැය සකස් කිරීමට නැවත නැවතත් බොත්තම ඔබන්න. නිවැරදි AM/PM සැකසුම සඳහා PM දර්ශකය නිරීක්ෂණය කරන්න.
- ඔබන්න මිනිත්තුව මිනිත්තුව සකස් කිරීමට නැවත නැවතත් බොත්තම ඔබන්න.
- ඔබන්න ටයිම් සෙට් තහවුරු කිරීමට සහ කාල සැකසුම් මාදිලියෙන් පිටවීමට නැවත බොත්තම ඔබන්න.
6.2. අනතුරු ඇඟවීම සැකසීම
The CR-A78 features two independent alarms, Alarm 1 and Alarm 2.
- ඔබා අල්ලාගෙන සිටින්න එලාම 1 කට්ටලය (හෝ එලාම 2 කට්ටලය) button until the alarm hour digits flash.
- ඔබන්න පැය අපේක්ෂිත අනතුරු ඇඟවීමේ වේලාව සැකසීමට බොත්තම.
- ඔබන්න මිනිත්තුව අපේක්ෂිත අනතුරු ඇඟවීමේ මිනිත්තුව සැකසීමට බොත්තම.
- ඔබන්න එලාම 1 කට්ටලය (හෝ එලාම 2 කට්ටලය) button again to confirm the alarm time.
- අනතුරු ඇඟවීම සක්රිය කිරීමට, ස්ලයිඩ කරන්න එලාම 1 ක්රියාත්මක/අක්රිය (හෝ එලාම 2 ක්රියාත්මක/අක්රිය) switch to the 'ON' position. Select 'BUZZER' for a beeping alarm or 'RADIO' to wake to the radio.
6.3. ස්නූස් ශ්රිතය භාවිතා කිරීම
අනතුරු ඇඟවීමේ ශබ්දය ඇසෙන විට, එය ඔබන්න ස්නූස් කරන්න button. The alarm will temporarily stop and sound again after approximately 9 minutes. To turn off the alarm completely, press the අනතුරු ඇඟවීම සක්රිය / අක්රිය කරන්න 'OFF' වෙත මාරු වන්න.
6.4. ගුවන්විදුලි මෙහෙයුම (AM/FM)
- ඔබන්න රේඩියෝව සක්රිය / අක්රිය රේඩියෝව සක්රිය කිරීමට බොත්තම.
- ස්ලයිඩ් කරන්න AM/FM switch to select the desired band.
- කරකවන්න සුසර කිරීම ඔබට අවශ්ය ස්ථානය සොයා ගැනීමට බොත්තම.
- භාවිතා කරමින් පරිමාව සකසන්න පරිමාව බොත්තම්.
- රේඩියෝව ක්රියා විරහිත කිරීමට, ඔබන්න රේඩියෝව සක්රිය / අක්රිය නැවතත් බොත්තම.
6.5. Using the Time Projector
- Locate the projector lens on top of the unit.
- ඔබන්න ප්රොජෙක්ටරය ක්රියාත්මක/අක්රිය button to activate the time projection.
- ප්රක්ෂේපිත වේලාවේ නාභිගත කිරීම සකස් කිරීම සඳහා ප්රක්ෂේපක කාචය කරකවන්න.
- Adjust the angle of the projector arm to direct the time onto your desired surface (wall or ceiling).
- ඔබන්න ප්රොජෙක්ටරය ක්රියාත්මක/අක්රිය button again to turn off the projection.
7. නඩත්තු කිරීම
- පිරිසිදු කිරීම: ඒකකයේ බාහිර පිරිසිදු කිරීම සඳහා මෘදු වියළි රෙද්දක් භාවිතා කරන්න. උල්ෙල්ඛ පිරිසිදු කරන්නන් හෝ ද්රාවක භාවිතා නොකරන්න.
- කාච රැකවරණය: Gently wipe the projector lens with a soft, lint-free cloth if it becomes dusty.
- ස්ථානගත කිරීම: සෘජු හිරු එළිය, තාප ප්රභවයන් සහ අධික තෙතමනයෙන් ඈත්ව ස්ථාවර, පැතලි මතුපිටක් මත ඒකකය තබන්න.
- බැටරි ආදේශනය: Replace the 9-volt backup battery annually or if the unit experiences frequent power outages to ensure continuous backup functionality.
8. දෝශ නිරාකරණය
| ගැටලුව | විය හැකි හේතුව | විසඳුම |
|---|---|---|
| ඒකකය බලය සක්රිය නොවේ. | AC adapter not properly connected. | AC ඇඩැප්ටරය ඒකකයට සහ වැඩ කරන බිත්ති අලෙවිසැලකට ආරක්ෂිතව සම්බන්ධ කර ඇති බවට වග බලා ගන්න. |
| එලාම් එක නාද වෙන්නේ නැහැ. | අනතුරු ඇඟවීම සක්රිය කර හෝ වැරදි ලෙස සකසා නැත. | Verify the alarm time is set correctly and the ALARM ON/OFF switch is in the 'ON' position (BUZZER or RADIO). |
| ගුවන්විදුලි පිළිගැනීම දුර්වලයි. | Antenna not extended or unit too close to interference. | FM වයර් ඇන්ටනාව සම්පූර්ණයෙන්ම දිගු කරන්න. AM සඳහා, හොඳම පිළිගැනීම සඳහා ඒකකය කරකවන්න. අනෙකුත් ඉලෙක්ට්රොනික උපාංගවලින් ඈත් වන්න. |
| ප්රක්ෂේපිත කාලය නොපැහැදිලි ය. | Projector focus not adjusted. | Rotate the projector lens to adjust the focus until the time is clear. |
| බලය ලැබීමෙන් පසු කාලය/සැකසුම් නැති වියtage. | උපස්ථ බැටරිය අක්රිය වී හෝ ස්ථාපනය කර නැත. | Install a fresh 9-volt battery or replace the existing one. |
9. පිරිවිතර
| විශේෂාංගය | පිරිවිතර |
|---|---|
| වෙළඳ නාමය | කෝබි |
| ආකෘතිය | CR-A78 |
| සංදර්ශක වර්ගය | ඩිජිටල් LED (කොළ) |
| ගුවන්විදුලි සුසරකය | AM/FM Analog |
| බලශක්ති ප්රභවය | AC 120V, 60Hz |
| බැටරි බැකප් | 1 x 9V බැටරිය (ඇතුළත් කර නැත) |
| නිෂ්පාදන මානයන් (L x W x H) | 12.7 x 10.16 x 15.24 cm (5 x 4 x 6 අඟල්) |
| නිෂ්පාදන බර | ග්රෑම් 567 (රාත්තල් 1.25) |
| වර්ණය | රිදී |
10. වගකීම් සහ සහාය
For warranty information or technical support, please refer to the documentation provided at the time of purchase or contact Coby customer service. Keep your purchase receipt as proof of purchase for any warranty claims.


