1. හැඳින්වීම
The Velleman DVM810 is a compact and economical 3 1/2 digit digital multimeter designed for measuring DC and AC voltages, DC currents, resistance, and for performing diode and transistor (hFE) tests. It features overload protection and automatic polarity indication, making it suitable for hobbyists, field use, and workshops. This manual provides essential information for the safe and effective operation of your DVM810 multimeter.
2. නිෂ්පාදන ලක්ෂණ
- Automatic polarity indication
- වෙළුමtage measurements: AC 500V and DC 500V maximum
- Current measurements: DC 10A maximum (0.2A fused, 10A unfused)
- Resistance measurements: Up to 2MΩ
- Diode and transistor (hFE) test functions
- අධි බර ආරක්ෂාව
- Compact design with 3 1/2 digit LCD display
3. පැකේජ අන්තර්ගතය
සියලුම අයිතම පවතින බව සහතික කර ගැනීමට කරුණාකර පැකේජයේ අන්තර්ගතය පරීක්ෂා කරන්න:
- Velleman DVM810 ඩිජිටල් බහුමාපකය
- පරීක්ෂණ සටහන් (රතු එකක්, කළු එකක්)
- උපදෙස් අත්පොත
4. වැදගත් ආරක්ෂක තොරතුරු
Read all safety warnings and instructions carefully before using this product. Failure to follow these instructions may result in electric shock, fire, or serious injury.
- Always ensure the multimeter is set to the correct function and range before making any measurements.
- Never exceed the maximum input limits for any range. The maximum voltage for AC/DC is 500V.
- Do not attempt to measure current on circuits with voltag250V ඉක්මවයි.
- Inspect test leads for damaged insulation or exposed metal before each use. Replace damaged leads immediately.
- Do not use the multimeter if it appears damaged or if the case is open.
- Exercise extreme caution when working with live circuits. Use appropriate personal protective equipment.
- Always disconnect power to the circuit and discharge high-voltage capacitors before measuring resistance or performing diode/transistor tests.
- Replace the battery when the low battery indicator appears on the display to ensure accurate readings.
5. නිෂ්පාදන අවසන්view
Familiarize yourself with the components of your Velleman DVM810 multimeter:
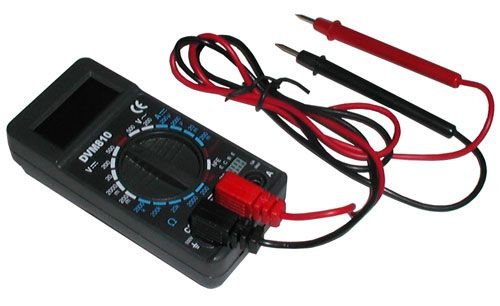
Figure 1: Velleman DVM810 Digital Multimeter. This image displays the front view of the compact multimeter, highlighting its liquid crystal display (LCD), the central rotary function switch, and the input jacks for test leads at the bottom.
- LCD සංදර්ශකය: Shows measurement readings, units, and polarity.
- රොටරි ස්විචය: අපේක්ෂිත මිනුම් ශ්රිතය සහ පරාසය තෝරා ගැනීමට භාවිතා කරයි.
- ආදාන ජැක්:
- COM ජැක්: Common (negative) input for all measurements. Connect the black test lead here.
- VΩmA Jack: වෙළුම සඳහා ධනාත්මක ආදානයtage, resistance, and current measurements up to 200mA. Connect the red test lead here.
- 10A Jack: Positive input for high current measurements (up to 10A). Connect the red test lead here for 10A measurements.
- පරීක්ෂණ තුඩු: Red and black leads used to connect the multimeter to the circuit under test.
6. පිහිටුවීම
6.1 බැටරි ස්ථාපනය
The DVM810 multimeter requires a 9V battery (not always included). To install or replace the battery:
- Ensure the multimeter is turned OFF (rotary switch set to OFF).
- ඒකකයේ පිටුපස බැටරි මැදිරි කවරය සොයා ගන්න.
- Remove the screw(s) securing the cover and carefully lift it off.
- නිවැරදි ධ්රැවීයතාව නිරීක්ෂණය කරමින්, නව 9V බැටරියක් බැටරි ක්ලිප් එකට සම්බන්ධ කරන්න.
- බැටරිය මැදිරියට දමා කවරය ප්රතිස්ථාපනය කර ඉස්කුරුප්පු ඇණ (ය) සමඟ එය සවි කරන්න.
6.2 පරීක්ෂණ මඟ පෙන්වීම් සම්බන්ධ කිරීම
Always connect the test leads correctly for accurate and safe measurements:
- කළු පරීක්ෂණ ඊයම් ඇතුල් කරන්න COM (පොදු) කොස්.
- බොහෝ මිනුම් සඳහා (වෙළුමtage, resistance, diode, hFE, and current up to 200mA), insert the red test lead into the VΩmA කොස්
- ඉහළ ධාරා මිනුම් සඳහා (10A දක්වා), රතු පරීක්ෂණ ඊයම් ඇතුල් කරන්න 10A කොස්
7. මෙහෙයුම් උපදෙස්
Before making any measurement, ensure the test leads are correctly connected and the rotary switch is set to the appropriate function and range.
7.1 මිනුම් DC වෙළුමtagඊ (V=)
- රතු ඊයම් ඇතුල් කරන්න VΩmA jack and the black lead into the COM කොස්
- භ්රමණ ස්විචය අපේක්ෂිත DC වෝල්ටීයතාවයට සකසන්න.tage (V=) range. Start with the highest range if the voltagඊ නොදනී.
- Connect the test leads across the component or circuit to be measured (in parallel).
- වෙළුම කියවන්නtage value on the LCD display. The display will show the correct polarity.
7.2 AC මිනුම් පරිමාවtagඉ (V~)
- රතු ඊයම් ඇතුල් කරන්න VΩmA jack and the black lead into the COM කොස්
- භ්රමණ ස්විචය අපේක්ෂිත AC වෝල්ටීයතාවයට සකසන්න.tage (V~) range. Start with the highest range if the voltagඊ නොදනී.
- Connect the test leads across the component or circuit to be measured (in parallel).
- වෙළුම කියවන්නtagLCD සංදර්ශකය මත e අගය.
7.3 Measuring DC Current (A=)
Caution: Never connect the multimeter in parallel with a voltage source when measuring current, as this can blow the fuse or damage the meter.
- Determine the expected current. For currents up to 200mA, insert the red lead into the VΩmA jack. For currents up to 10A, insert the red lead into the 10A jack. Always insert the black lead into the COM කොස්
- Set the rotary switch to the appropriate DC Current (A=) range. Start with the highest range if the current is unknown.
- Turn off power to the circuit. Open the circuit where the current is to be measured.
- බහුමාපකය පරිපථය සමඟ ශ්රේණිගතව සම්බන්ධ කරන්න.
- Restore power to the circuit and read the current value on the LCD display.
7.4 ප්රතිරෝධය මැනීම (Ω)
Caution: Ensure the circuit is completely de-energized and all capacitors are discharged before measuring resistance.
- රතු ඊයම් ඇතුල් කරන්න VΩmA jack and the black lead into the COM කොස්
- Set the rotary switch to the desired Resistance (Ω) range. Start with a higher range if the resistance is unknown.
- මැනිය යුතු සංරචකය හරහා පරීක්ෂණ ලීඩ් සම්බන්ධ කරන්න.
- LCD සංදර්ශකයේ ප්රතිරෝධක අගය කියවන්න.
7.5 දියෝඩ පරීක්ෂණය
Caution: Ensure the diode is disconnected from the circuit or the circuit is de-energized before testing.
- රතු ඊයම් ඇතුල් කරන්න VΩmA jack and the black lead into the COM කොස්
- Set the rotary switch to the Diode symbol (→|).
- Connect the red lead to the anode and the black lead to the cathode of the diode. The display will show the forward voltage පහත වැටීම (සාමාන්යයෙන් සිලිකන් ඩයෝඩ සඳහා 0.5V සිට 0.8V දක්වා).
- Reverse the leads. The display should show 'OL' (Overload) for a good diode. If it shows a reading in both directions or 'OL' in both directions, the diode may be faulty.
7.6 Transistor (hFE) Test
Caution: Ensure the transistor is disconnected from the circuit before testing.
- රතු ඊයම් ඇතුල් කරන්න VΩmA jack and the black lead into the COM කොස්
- භ්රමක ස්විචය hFE ස්ථානයට සකසන්න.
- Identify if the transistor is NPN or PNP. Insert the transistor's emitter, base, and collector leads into the corresponding holes in the hFE socket on the multimeter.
- LCD සංදර්ශකයේ hFE (DC ධාරා ලාභය) අගය කියවන්න.
8. පිරිවිතර
| පරාමිතිය | වටිනාකම |
|---|---|
| වෙළඳ නාමය | වෙලේමන් |
| ආදර්ශ අංකය | DVM810 |
| මිනුම් වර්ගය | බහුමාපකය |
| ඩීසී වෙළුමtagඊ පරාසය | 500V දක්වා |
| ඒසී වෙළුමtagඊ පරාසය | 500V දක්වා |
| ඩීසී වත්මන් පරාසය | Up to 10A (0.2A fused, 10A unfused) |
| ප්රතිරෝධක පරාසය | 2MΩ දක්වා |
| දියෝඩ පරීක්ෂණය | ඔව් |
| ට්රාන්සිස්ටර (hFE) පරීක්ෂණය | ඔව් |
| ප්රදර්ශනය කරන්න | 3 1/2 Digit LCD |
| බලශක්ති ප්රභවය | 9V බැටරි (ඇතුළත් නොවේ) |
| මානයන් | ආසන්න වශයෙන් 3.70" x 1.81" x 1.03" |
| අයිතමයේ බර | ආසන්න වශයෙන් අවුන්ස 3.2 (රාත්තල් 0.2) |
| UPC | 836479002272 |
9. නඩත්තු කිරීම
9.1 බැටරි ප්රතිස්ථාපනය
When the low battery indicator appears on the LCD, replace the 9V battery as described in Section 6.1. A weak battery can lead to inaccurate readings.
9.2 පිරිසිදු කිරීම
බහුමාපකය පිරිසිදු කිරීමට, දැන්වීමකින් කවරය පිස දමන්න.amp cloth and a mild detergent. Do not use abrasives or solvents. Ensure the unit is completely dry before use.
9.3 පරීක්ෂණ ඊයම් පරීක්ෂාව
Regularly inspect the test leads for any signs of damage, such as cracked insulation, exposed wires, or loose connections. Replace damaged leads immediately to prevent electric shock hazards.
10. දෝශ නිරාකරණය
- සංදර්ශකයක් හෝ දුර්වල සංදර්ශකයක් නොමැත: බැටරිය පරීක්ෂා කරන්න. අවශ්ය නම් ප්රතිස්ථාපනය කරන්න.
- වැරදි කියවීම්:
- Ensure the rotary switch is set to the correct function and range.
- බැටරි පරිමාව පරීක්ෂා කරන්නtage; replace if low.
- පරීක්ෂණ ඊයම් නිසි ලෙස සම්බන්ධ වී ඇති බවත් හානි නොවන බවත් සහතික කර ගන්න.
- For resistance measurements, ensure the circuit is de-energized.
- 'OL' (අධික බර) දර්ශනය වේ: මනින ලද අගය තෝරාගත් පරාසය ඉක්මවා යයි. ඉහළ පරාසයක් තෝරන්න හෝ පරිපථය මීටරයේ හැකියාවන් තුළ ඇති බව සහතික කර ගන්න.
- Fuse blown (during current measurement): If the meter stops measuring current, the internal fuse may have blown. Refer to a qualified technician for fuse replacement.
11. වගකීම් සහ සහාය
Warranty information for the Velleman DVM810 Digital Multimeter is typically provided with your purchase documentation or can be found on the official Velleman website. For technical support, service, or further inquiries, please refer to the contact information provided by your retailer or the manufacturer's official support channels.


