1. හැඳින්වීම
This manual provides comprehensive instructions for the setup, operation, and maintenance of your RadioShack CTR-121 Desktop Cassette Recorder. Please read this manual thoroughly before using the device to ensure proper function and longevity.
Key features of the CTR-121 include voice-activated (VOX) recording, auto-level recording, auto stop mechanism, and various input/output jacks for enhanced functionality.
2 ආරක්ෂිත තොරතුරු
ඒකකයට හානි වැළැක්වීමට සහ පරිශීලක ආරක්ෂාව සහතික කිරීමට පහත ආරක්ෂක පියවරයන් නිරීක්ෂණය කරන්න:
- ඒකකය වැසි හෝ තෙතමනය නිරාවරණය නොකරන්න.
- ඒකකය තාප ප්රභවයන් අසල හෝ සෘජු හිරු එළියේ තැබීමෙන් වළකින්න.
- නිශ්චිත බල ඇඩැප්ටරය පමණක් භාවිතා කරන්න.
- c එක අරින්න එපාasing; සියලුම සේවා සුදුසුකම් ලත් පුද්ගලයින් වෙත යොමු කරන්න.
- දරුවන්ට ළඟා විය නොහැකි ලෙස තබා ගන්න.
3. පැකේජ අන්තර්ගතය
සියලුම අයිතම පැකේජයේ ඇති බව තහවුරු කරගන්න:
- RadioShack CTR-121 Desktop Cassette Recorder
- AC විදුලි රැහැන
- පරිශීලක මාර්ගෝපදේශය (මෙම ලේඛනය)
- ආරක්ෂිත උපදෙස්
4. නිෂ්පාදන අවසන්view
Familiarize yourself with the various parts of your CTR-121 recorder.

රූපය 1: ඉදිරිපස view of the RadioShack CTR-121 Desktop Cassette Recorder, showing the speaker, cassette compartment, and control buttons.
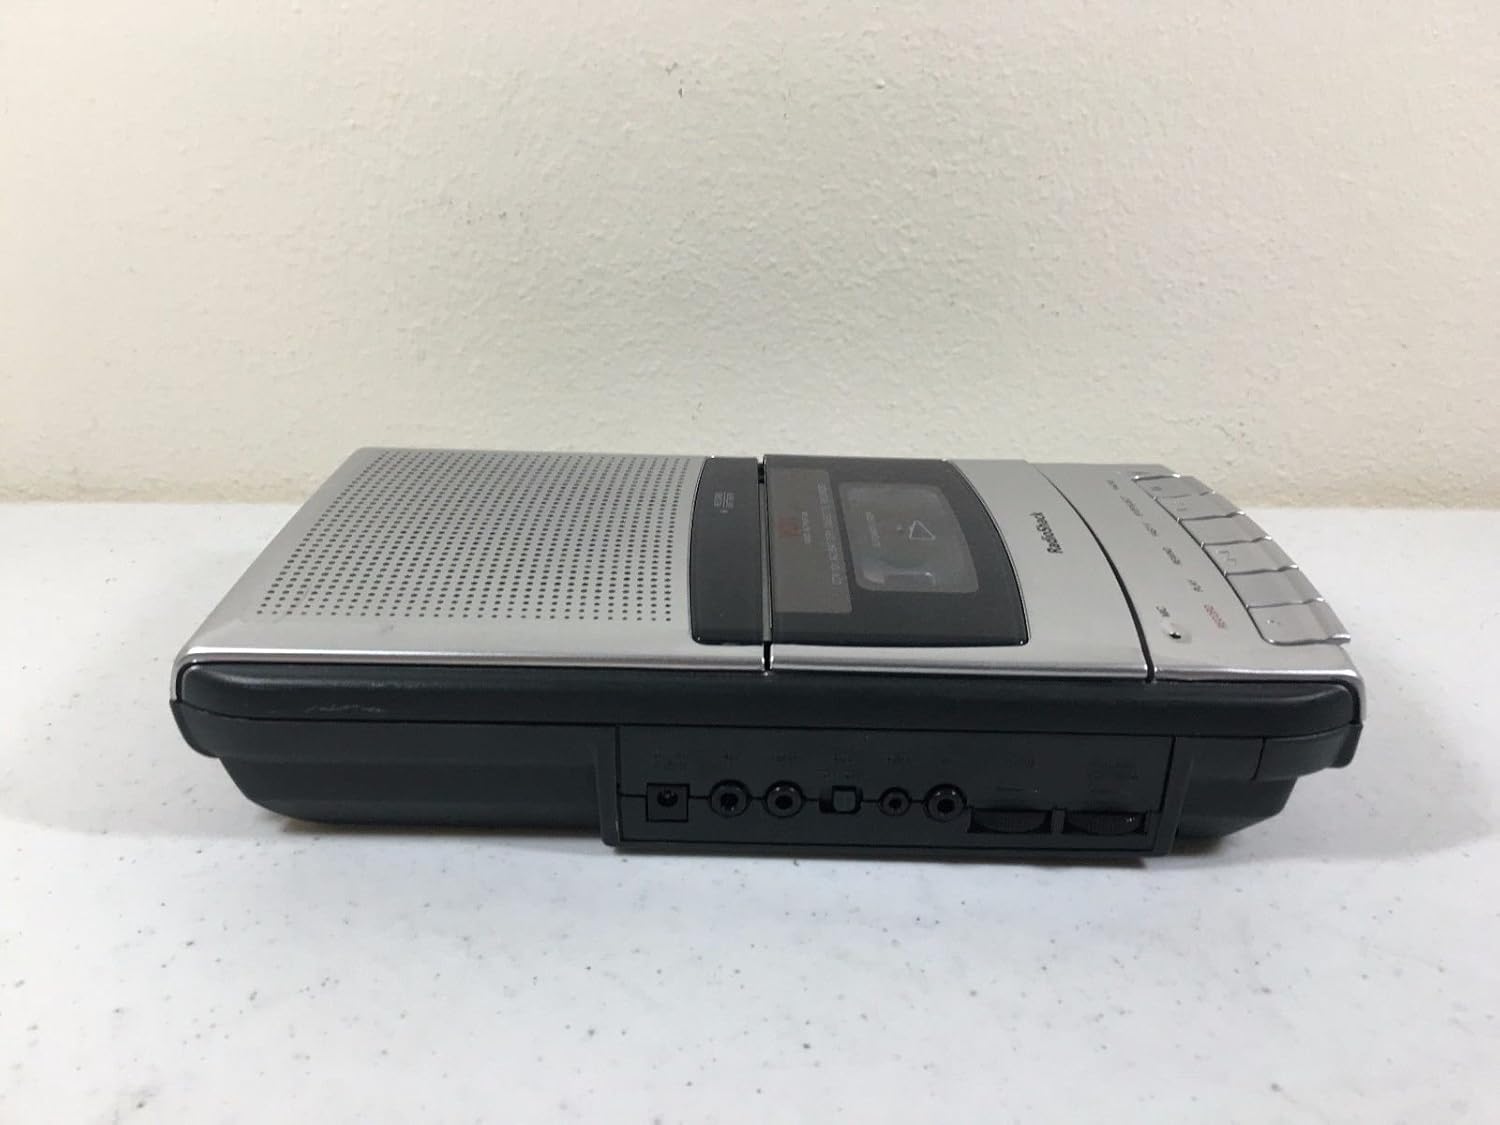
රූපය 2: වම් පැත්ත view of the recorder, illustrating the microphone, earphone, and remote control jacks.

රූපය 3: දකුණු පැත්ත view of the recorder, showing the DC power input jack.
The front panel includes controls for Record, Play, Rewind, Fast-F (Fast Forward), Stop/Eject, and Pause. A built-in microphone is located on the front, along with a speaker grille.
5. පිහිටුවීම
5.1 ඒකකය බල ගැන්වීම
The CTR-121 can be powered by either AC power or batteries.
AC බලය:
- Ensure the recorder is turned off.
- Connect the supplied AC power cord to the DC IN jack on the right side of the unit (refer to Figure 3).
- Plug the other end of the power cord into a standard AC wall outlet.
බැටරි බලය:
(Note: Battery compartment details are not provided in the product data, so this section will be generic.)
- Open the battery compartment cover, usually located on the bottom or rear of the unit.
- Insert the required number of C-size batteries (not included), observing the correct polarity (+/-) as indicated inside the compartment.
- බැටරි මැදිරි කවරය ආරක්ෂිතව වසා දමන්න.
5.2 සම්බන්ධක උපාංග
The CTR-121 features several jacks for external devices (refer to Figure 2):
- MIC ජැක්: Connect an external microphone for improved recording quality or hands-free operation.
- EARPHONE Jack: Connect headphones or an earphone for private listening.
- REMOTE Jack: Connect a compatible remote control for convenient operation (remote control sold separately).
6. මෙහෙයුම් උපදෙස්
6.1 කැසට් පටියක් පූරණය කිරීම
- ඔබන්න STOP/EJECT කරන්න කැසට් මැදිරියේ දොර විවෘත කිරීමට බොත්තම.
- Insert a standard audio cassette tape with the open edge facing upwards and the full reel on the left.
- කැසට් මැදිරියේ දොර ක්ලික් එකකින් වැසෙන තුරු මෘදු ලෙස වසා දමන්න.
6.2 පටිගත කිරීම
සාමාන්ය පටිගත කිරීම:
- Insert a blank or recordable cassette tape.
- ඔබන්න වාර්තා කරන්න බොත්තම. ද සෙල්ලම් කරන්න button will also engage automatically.
- The recording indicator light will illuminate.
- Speak into the built-in microphone or ensure an external microphone is connected and active.
- පටිගත කිරීම නැවැත්වීමට, ඔබන්න STOP/EJECT කරන්න බොත්තම.
Voice-Activated (VOX) Recording:
The VOX feature allows the recorder to start recording automatically when sound is detected and pause when silence occurs, conserving tape.
- Ensure the VOX switch (if present, location not specified in data) is set to the ON position.
- ඔබන්න වාර්තා කරන්න button. The recorder will enter standby mode.
- Recording will begin when sound is detected and pause during periods of silence.
- To stop VOX recording, press the STOP/EJECT කරන්න බොත්තම.
Auto Level Recording:
The CTR-121 features an automatic level control (ALC) system that adjusts the recording volume to an optimal level, preventing distortion from overly loud sounds and ensuring softer sounds are audible.
6.3 නැවත ධාවනය
- Insert a recorded cassette tape.
- ඔබන්න සෙල්ලම් කරන්න බොත්තම.
- Adjust the volume control (if present, location not specified in data) to your desired listening level.
- නැවත ධාවනය නැවැත්වීමට, ඔබන්න STOP/EJECT කරන්න බොත්තම.
6.4 වේගයෙන් ඉදිරියට සහ පසුපසට
- To fast forward the tape, press the FAST-F බොත්තම.
- To rewind the tape, press the ආපසු හරවන්න බොත්තම.
- ඔබන්න STOP/EJECT කරන්න වේගයෙන් ඉදිරියට යැවීම හෝ ආපසු යැවීම නැවැත්වීමට.
6.5 විරාම කාර්යය
පටිගත කිරීමේදී හෝ නැවත ධාවනය කිරීමේදී, විරාම කරන්න button to temporarily stop the tape movement. Press it again to resume.
6.6 නාද පාලනය
The CTR-121 includes a tone control feature (if present, location not specified in data) to adjust the audio output's treble and bass frequencies, allowing for a customized listening experience.
7. නඩත්තු කිරීම
7.1 පටි හිස් පිරිසිදු කිරීම
Regular cleaning of the tape heads, capstan, and pinch roller is essential for optimal sound quality and to prevent tape damage. Clean these components after every 10-12 hours of use or if sound quality deteriorates.
- කැසට් මැදිරිය විවෘත කරන්න.
- Using a cotton swab lightly moistened with isopropyl alcohol or a specialized head cleaning fluid, gently wipe the tape heads, capstan, and pinch roller.
- ටේප් එකක් ඇතුළු කිරීමට පෙර සංරචක සම්පූර්ණයෙන්ම වියළීමට ඉඩ දෙන්න.
7.2 සාමාන්ය රැකවරණය
- Keep the unit free from dust and dirt. Use a soft, dry cloth for cleaning the exterior.
- උල්ෙල්ඛ පිරිසිදු කරන්නන් හෝ ද්රාවණ භාවිතා නොකරන්න.
- දිගු කාලයක් භාවිතයේ නොමැති විට, කාන්දු වීම වැළැක්වීම සඳහා බැටරි ඉවත් කරන්න.
8. දෝශ නිරාකරණය
| ගැටලුව | විය හැකි හේතුව | විසඳුම |
|---|---|---|
| ඒකකය බලය සක්රිය නොවේ. | No AC power; dead batteries; incorrect battery polarity. | Check AC cord connection and outlet; replace batteries; ensure correct battery polarity. |
| නැවත ධාවනය අතරතුර ශබ්දයක් නැත. | Volume too low; headphones connected; dirty tape heads; faulty tape. | Increase volume; disconnect headphones; clean tape heads; try another tape. |
| දුර්වල පටිගත කිරීමේ ගුණාත්මකභාවය. | Dirty tape heads; microphone too far; faulty tape. | Clean tape heads; speak closer to microphone; try a new tape. |
| පටිය චලනය නොවේ. | Tape jammed; auto stop engaged; unit not powered. | Open compartment and re-seat tape; ensure power is on. |
9. පිරිවිතර
| ආදර්ශ අංකය | CTR-121 |
| වෙළඳ නාමය | රේඩියෝ ෂැක් |
| පැකේජ මානයන් | අඟල් 12.8 x 7 x 2.9 |
| අයිතමයේ බර | රාත්තල් 2.25 (දළ වශයෙන් කිලෝග්රෑම් 1.02) |
| නිෂ්පාදකයා | රේඩියෝ ෂැක් |
| ගැළපෙන උපාංග | Personal Computer (via USB, if applicable) |
| දෘඩාංග අතුරුමුහුණත | USB (for data transfer, if applicable) |
| මයික්රෆෝන ආකෘති සාධකය | බිල්ට්-ඉන් |
| ආකෘතිය | MP3 Audio (for digital output, if applicable) |
| හෙඩ්ෆෝන් ජැක් | මිලිමීටර් 3.5 කි |
| මතක ගබඩා ධාරිතාව | 2.2 GB (for digital storage, if applicable) |
| UPC | 040293153236 |
Note: Specifications are subject to change without notice. The "Compatible Devices", "Hardware Interface", "Format", and "Memory Storage Capacity" listed may refer to digital conversion capabilities or compatibility with modern systems, as the primary function is analog cassette recording.
10. වගකීම් සහ සහාය
For warranty information, please refer to the warranty card included with your product or contact RadioShack customer support. Keep your purchase receipt as proof of purchase.
For technical support or service inquiries, please visit the official RadioShack website or contact their customer service department using the information provided in your product packaging or on their webඅඩවිය.


