1. හැඳින්වීම
This manual provides detailed instructions for the proper setup, operation, maintenance, and troubleshooting of your JVC HR-VP58U 4 Head Hi-Fi Stereo VCR. Please read this manual thoroughly before using the unit to ensure optimal performance and safety. Keep this manual for future reference.
2. වැදගත් ආරක්ෂක තොරතුරු
අවවාදයයි: To reduce the risk of fire or electric shock, do not expose this appliance to rain or moisture. Do not remove the cover. Refer servicing to qualified personnel only.
- බල සැපයුම් පරිමාව සහතික කරන්නtage matches the rating on the unit.
- වාතාශ්රය විවෘත කිරීම අවහිර නොකරන්න.
- ඒකකය තාප ප්රභවයන් අසල හෝ සෘජු හිරු එළියේ තැබීමෙන් වළකින්න.
- ඒකකය බිංදු හෝ ඉසින දියර වලට නිරාවරණය නොකරන්න.
- අකුණු කුණාටු වලදී හෝ දිගු කාලයක් භාවිතා නොකළ විට ඒකකය විසන්ධි කරන්න.
3. පැකේජ අන්තර්ගතය
ඔබේ පැකේජයේ පහත අයිතම අඩංගු බව තහවුරු කරන්න:
- JVC HR-VP58U VCR Unit
- දුරස්ථ පාලකය
- විදුලි රැහැන ( අමුණා ඇත )
- Audio/Video Cables (RCA type, typically red, white, yellow)
- උපදෙස් අත්පොත (මෙම ලේඛනය)
4. නිෂ්පාදන අවසන්view
4.1 ඉදිරිපස පුවරුව

රූපය 1: ඉදිරිපස view of the JVC HR-VP58U VCR with its remote control. The VCR features a power button, tape slot, and front audio/video input jacks.

රූපය 2: සවිස්තරාත්මක view of the JVC HR-VP58U VCR's front panel, showing playback controls (Play, Rewind, Fast Forward, Stop/Eject, Pause) and the remote control.
The front panel provides access to essential controls and input jacks for convenient operation. Key features include:
- බල බොත්තම: VCR සක්රිය හෝ අක්රිය කරයි.
- Tape Slot: නැවත ධාවනය හෝ පටිගත කිරීම සඳහා VHS පටි ඇතුළු කරන්න.
- VIDEO (MONO) L-AUDIO-R Jacks: Front panel audio/video input for temporary connections (e.g., camcorder).
- පසුධාවන පාලන: Buttons for Play, Stop/Eject, Rewind, Fast Forward, and Pause.
- සංදර්ශකය: Shows current channel, time, and operational status.
4.2 පසුපස පුවරුව

රූපය 3: Rear panel of the JVC HR-VP58U VCR, displaying the power cord, serial number, and various audio/video input/output ports.
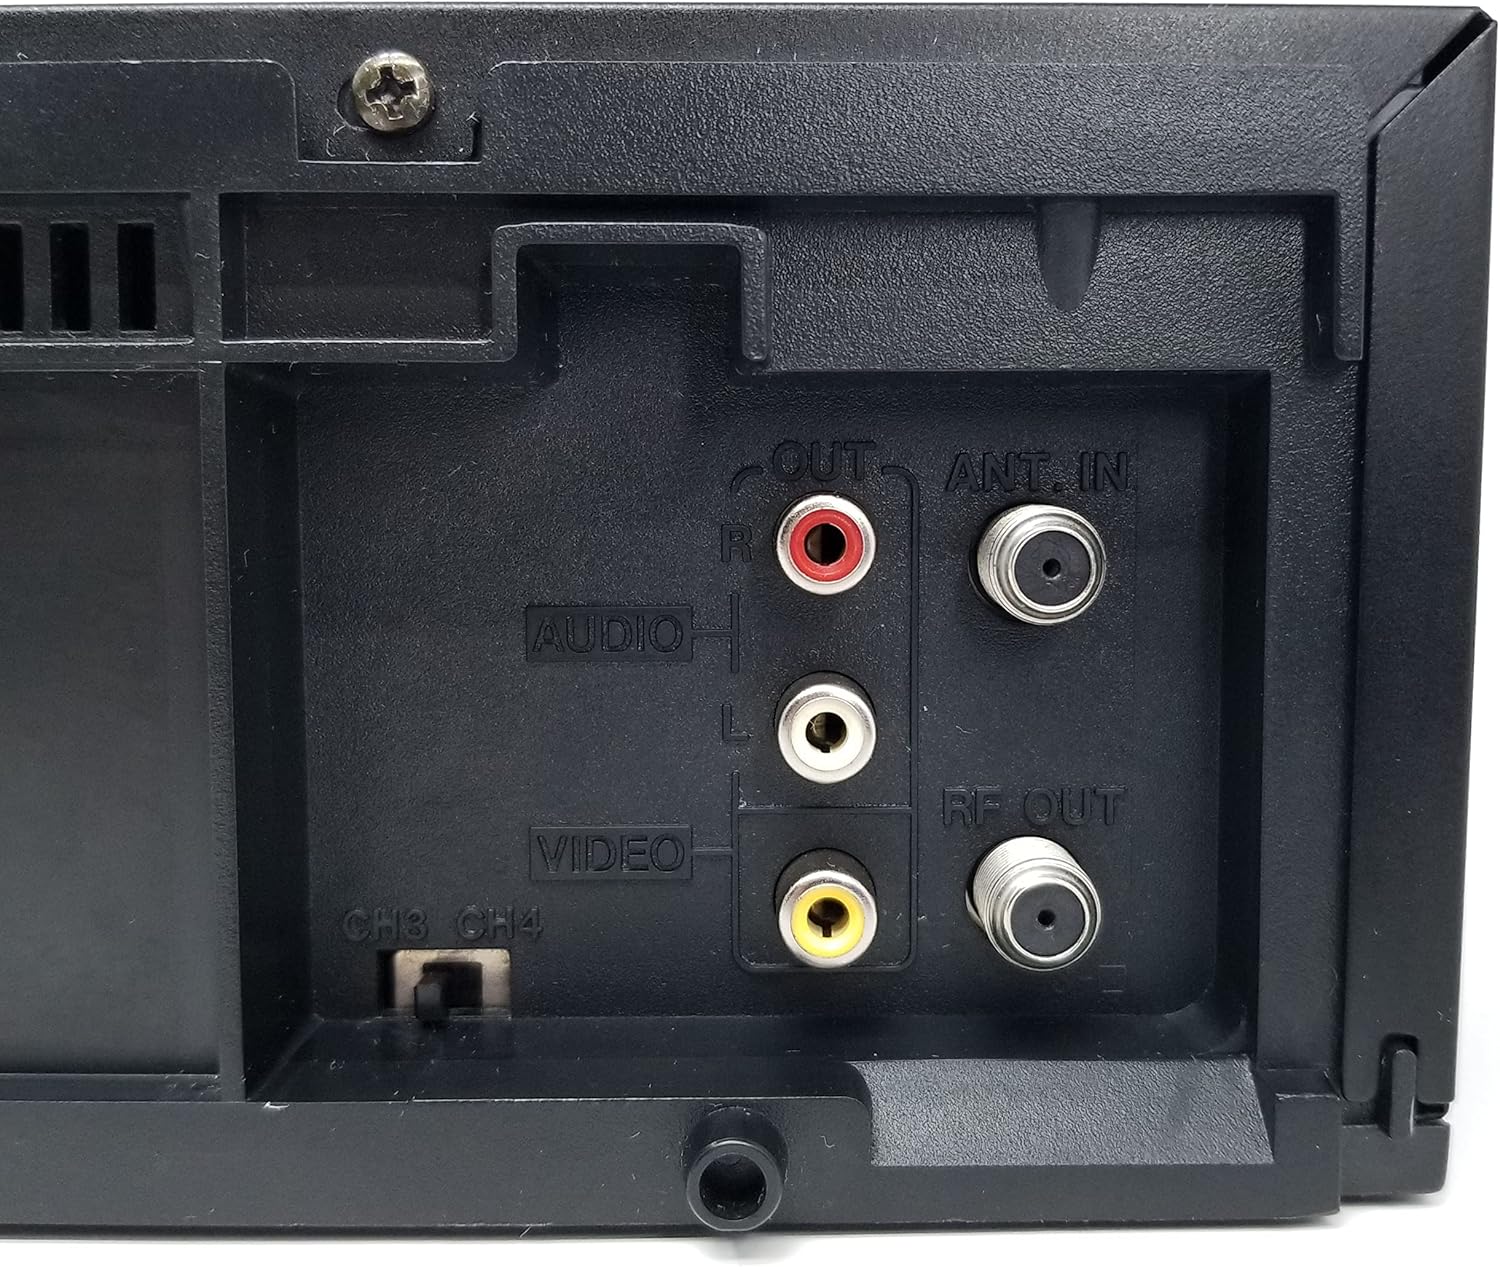
රූපය 4: Close-up of the rear audio (red/white RCA), video (yellow RCA), RF OUT, and ANT. IN connections on the JVC HR-VP58U VCR.
The rear panel houses all necessary connections for integrating the VCR into your home entertainment system.
- ANT. IN: Connects to your antenna or cable TV signal.
- RF පිටතට: Connects to your TV's antenna input (typically for older TVs).
- AUDIO OUT (L/R) & VIDEO OUT: RCA jacks (red, white, yellow) for connecting to your TV or audio receiver.
- AUDIO IN (L/R) & VIDEO IN: RCA jacks (red, white, yellow) for connecting external devices for recording.
- CH3/CH4 Switch: Selects the RF output channel for your TV.
5. පිහිටුවීම
5.1 රූපවාහිනියකට සම්බන්ධ වීම
There are two primary methods for connecting your VCR to a television:
- Using RCA Audio/Video Cables (Recommended for best quality):
- Connect the yellow VIDEO OUT jack on the VCR to the yellow VIDEO IN jack on your TV.
- Connect the white AUDIO OUT (L) jack on the VCR to the white AUDIO IN (L) jack on your TV.
- Connect the red AUDIO OUT (R) jack on the VCR to the red AUDIO IN (R) jack on your TV.
- Select the corresponding Video Input (e.g., Video 1, AV1) on your TV.
- Using an RF Coaxial Cable (for older TVs or limited inputs):
- Connect your antenna or cable TV signal to the ANT. IN jack on the VCR.
- Connect an RF coaxial cable from the RF OUT jack on the VCR to the ANT. IN jack on your TV.
- Set the CH3/CH4 switch on the VCR's rear panel to either 3 or 4.
- Tune your TV to the corresponding channel (3 or 4) to receive the VCR's signal.
5.2 බල සම්බන්ධතාවය
Plug the attached power cord into a standard AC wall outlet (120V, 60Hz).
6. මෙහෙයුම් උපදෙස්
6.1 මූලික නැවත ධාවනය
- Turn on your TV and select the correct input source (AV input or Channel 3/4).
- ඔබන්න බලය button on the VCR or remote control to turn on the unit.
- Insert a VHS tape into the tape slot. The VCR will automatically load the tape.
- ඔබන්න සෙල්ලම් කරන්න button on the VCR or remote control to begin playback.
- භාවිතා කරන්න REW (ආපසු හැරවීම) සහ FF ටේප් එක සැරිසැරීමට (වේගයෙන් ඉදිරියට) බොත්තම්.
- ඔබන්න විරාම කරන්න නැවත ධාවනය තාවකාලිකව නැවැත්වීමට බොත්තම. නැවත ආරම්භ කිරීමට නැවත ඔබන්න.
- ඔබන්න STOP/EJECT කරන්න button to stop playback and eject the tape.
6.2 පටිගත කිරීම
The JVC HR-VP58U allows for recording from various sources.
- Insert a recordable VHS tape with the erase protection tab intact.
- To record from TV: Select the desired TV channel on the VCR.
- To record from external device (e.g., camcorder): Connect the device to the front or rear AUDIO IN/VIDEO IN jacks. Select the appropriate input source on the VCR (e.g., Line 1, L1).
- ඔබන්න REC (Record) button. Recording will begin immediately.
- ඔබන්න නවත්වන්න පටිගත කිරීම අවසන් කිරීමට බොත්තම.
Refer to the remote control section for advanced recording features like timer recording.
6.3 දුරස්ථ පාලන කාර්යයන්
The included remote control provides full functionality for your VCR. Familiarize yourself with its buttons for convenient operation.
- බලය: Turns the VCR on/off.
- SHUTTLE PLUS: For variable speed playback and search.
- මෙනුව/හරි: මෙනු තේරීම් වෙත ප්රවේශ වී තහවුරු කරයි.
- CH +/-: Changes channels or navigates menus.
- TV/VCR: TV සහ VCR මාදිලි අතර මාරු වේ.
- REC/STOP/PLAY/PAUSE/FF/REW: Standard transport controls.
- ටයිමර්: Accesses timer recording settings.
- දර්ශනය: Shows on-screen display information.
7. නඩත්තු කිරීම
7.1 ඒකකය පිරිසිදු කිරීම
- Wipe the exterior of the VCR with a soft, dry cloth.
- නිමාව හෝ අභ්යන්තර සංරචක වලට හානි කළ හැකි බැවින්, දියර හෝ එයරෙසෝල් පිරිසිදු කරන්නන් භාවිතා නොකරන්න.
- මුරණ්ඩු අපිරිසිදුකම සඳහා, තරමක් dampරෙදි කැබැල්ල වතුරෙන් පිස දමා වහාම වියළා ගන්න.
7.2 Tape Head Cleaning
Over time, tape heads can accumulate dirt, leading to poor picture or sound quality. Use a dry-type VHS head cleaning cassette periodically (e.g., every 50-100 hours of use) according to the cleaning cassette's instructions. Avoid wet-type cleaners unless specifically recommended, as they can cause damage if used improperly.
8. දෝශ නිරාකරණය
| ගැටලුව | විය හැකි හේතුව | විසඳුම |
|---|---|---|
| බලය නැත | Power cord unplugged; outlet not active. | විදුලි රැහැන් සම්බන්ධතාවය පරීක්ෂා කරන්න; වෙනත් උපාංගයක් සමඟ අලෙවිසැල පරීක්ෂා කරන්න. |
| No picture/sound during playback | Incorrect TV input selected; A/V cables loose or incorrect; dirty tape heads. | Select correct TV input; check all cable connections; use a head cleaning cassette. |
| Tape will not play or eject | Tape jammed; VCR malfunction. | Do not force the tape. Power cycle the VCR. If issue persists, seek professional service. |
| දුර්වල පින්තූර ගුණාත්මකභාවය (හිම සහිත, විකෘති) | Dirty tape heads; worn-out tape; weak signal. | Clean tape heads; try a different tape; check antenna/cable connection. |
| දුරස්ථ පාලකය ක්රියා නොකරයි | Dead batteries; obstruction; remote sensor blocked. | Replace batteries; remove obstructions; ensure clear line of sight to VCR sensor. |
9. පිරිවිතර
- ආකෘතිය: HR-VP58U
- ප්රධානීන්: 4-හෙඩ් හයි-ෆයි ස්ටීරියෝ
- වීඩියෝ පද්ධතිය: NTSC
- බල සැපයුම: AC 120V, 60Hz
- මානයන් (W x H x D): Approximately 19.72 x 8.82 x 13.82 inches (based on package dimensions, actual unit may vary slightly)
- බර: ආසන්න වශයෙන් පවුම් 8.98 කි
- ශ්රව්ය: Hi-Fi ස්ටීරියෝ
- යෙදවුම්: Front A/V (RCA), Rear A/V (RCA), RF (Coaxial)
- නිමැවුම්: Rear A/V (RCA), RF (Coaxial)
10. වගකීම් සහ සහාය
For warranty information or technical support, please refer to the documentation provided at the time of purchase or contact your retailer. If you encounter any issues with the product, it is recommended to contact the seller directly for assistance before attempting repairs.
Note: This product is a JVC HR-VP58U VCR. For specific support related to this model, please have your model number and serial number ready when contacting support.