1. නිෂ්පාදන අවසන්view
The Vemo V30-72-0145 is a high-quality wheel speed sensor designed for automotive applications. This sensor plays a critical role in vehicle safety systems, including the Anti-lock Braking System (ABS), Traction Control System (TCS), and Electronic Stability Program (ESP). It accurately measures the rotational speed of the wheel and transmits this data to the vehicle's Electronic Control Unit (ECU), enabling precise control over braking and stability functions.
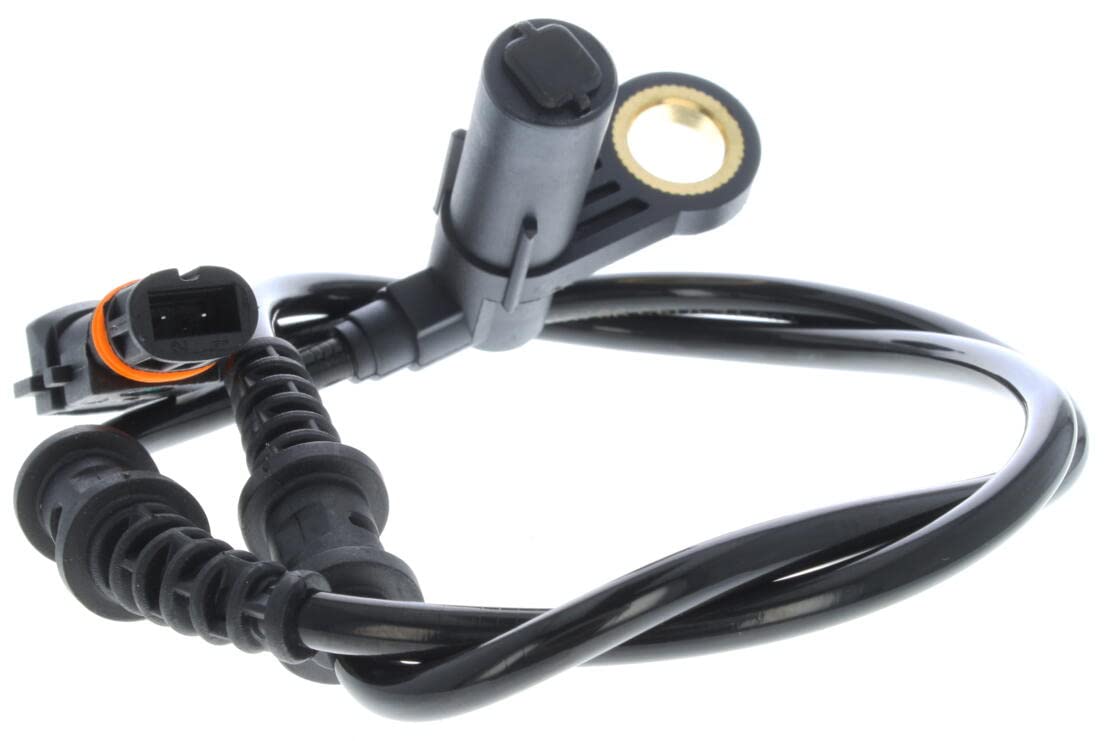
Figure 1: The Vemo V30-72-0145 wheel speed sensor, showing its main body, cable, and connector. The sensor features a flange mount design and is constructed from durable Acrylonitrile Butadiene Styrene.
2. පිරිවිතර
| ගුණාංගය | විස්තර |
|---|---|
| වෙළඳ නාමය | වේමෝ |
| ආදර්ශ අංකය | V30-72-0145 |
| ද්රව්ය | ඇක්රිලෝනිට්රයිල් බුටැඩීන් ස්ටයිරීන් |
| අයිතමයේ බර | අවුන්ස 1.6 කි |
| මානයන් (L x W x H) | අඟල් 4.9 x 1 x 9 |
| සවිකිරීමේ වර්ගය | ෆ්ලැන්ජ් මවුන්ට් |
| තනතුර | ඉදිරිපස |
| OEM කොටස් අංක | MERCEDES-BENZ: 220 540 01 17, 220 540 02 17 |
3. පිහිටුවීම සහ ස්ථාපනය
Installation of the Vemo V30-72-0145 wheel speed sensor should be performed by a qualified technician or an individual with experience in automotive repair. Incorrect installation can lead to system malfunctions and compromise vehicle safety.
3.1. පූර්ව ස්ථාපන චෙක්පත්
- විදුලි අනතුරු වළක්වා ගැනීම සඳහා වාහනයේ ජ්වලනය ක්රියා විරහිත කර බැටරිය විසන්ධි කර ඇති බවට වග බලා ගන්න.
- Identify the correct wheel location for sensor replacement (e.g., front left, front right).
- Inspect the new sensor for any visible damage or defects.
- Gather necessary tools, which typically include wrenches, sockets, a flathead screwdriver, and potentially a diagnostic scanner.
3.2. Removal of Old Sensor
- Safely lift the vehicle and secure it with jack stands. Remove the wheel.
- Locate the existing wheel speed sensor. It is usually mounted near the wheel hub or steering knuckle.
- Disconnect the electrical connector by carefully pressing the release tab and pulling it apart. Avoid pulling on the wires.
- Unbolt the sensor from its mounting point. Some sensors may be held by a single bolt, while others might be pressed into a bore.
- Carefully remove the old sensor. If it is seized, use penetrating oil and gentle persuasion. Avoid damaging the sensor ring or tone wheel.
3.3. Installation of New Sensor
- Clean the mounting surface and bore thoroughly to ensure proper seating of the new sensor. Remove any rust or debris.
- Insert the new Vemo V30-72-0145 sensor into its mounting location. Ensure it is fully seated and aligned correctly.
- Secure the sensor with the mounting bolt(s). Tighten to the manufacturer's specified torque, if available. Do not overtighten.
- Connect the electrical connector firmly until it clicks into place. Ensure a secure connection.
- Route the sensor cable along the original path, securing it with any clips or ties to prevent chafing or interference with moving parts.
- රෝදය නැවත සවි කර වාහනය පහත් කරන්න.
- බැටරිය නැවත සම්බන්ධ කරන්න.
3.4. ස්ථාපන-පසු සත්යාපනය
- Start the vehicle and check for any ABS, TCS, or ESP warning lights on the dashboard.
- If a diagnostic scanner is available, clear any stored fault codes related to the wheel speed sensor.
- Perform a short test drive to confirm proper operation of the ABS and other related systems. The warning lights should extinguish if the sensor is functioning correctly.
4. මෙහෙයුම් මූලධර්ම
The Vemo V30-72-0145 wheel speed sensor operates on the principle of electromagnetic induction or the Hall effect, depending on its specific design. Most modern wheel speed sensors are active sensors, meaning they require a power supply and generate a digital signal.
- Sensor Ring/Tone Wheel: The sensor works in conjunction with a toothed wheel (tone wheel) or a magnetic encoder ring, typically located on the wheel hub or axle shaft.
- සංඥා උත්පාදනය: As the wheel rotates, the teeth of the tone wheel or the magnetic poles of the encoder ring pass by the sensor. This movement induces a voltage pulse (in passive sensors) or causes a change in the magnetic field detected by the Hall effect element (in active sensors).
- සංඥා සම්ප්රේෂණය: These pulses or changes are converted into an electrical signal, which is then sent to the vehicle's ECU. The frequency of these pulses is directly proportional to the wheel's rotational speed.
- ECU Interpretation: The ECU uses this speed data from all wheels to determine if a wheel is locking up during braking (ABS), slipping during acceleration (TCS), or if the vehicle is losing directional stability (ESP). Based on this information, the ECU can modulate brake pressure or engine power to maintain control.
5. නඩත්තු කිරීම
Wheel speed sensors are generally low-maintenance components. However, periodic inspection can help ensure their longevity and proper function.
- දෘශ්ය පරීක්ෂාව: During routine vehicle maintenance (e.g., tire rotations, brake inspections), visually inspect the sensor and its wiring for any signs of physical damage, corrosion, or fraying.
- පිරිසිදුකම: Ensure the sensor head and the tone wheel/encoder ring are free from excessive dirt, rust, or debris, which can interfere with accurate readings. Use a soft brush or compressed air for cleaning if necessary.
- ආරක්ෂිත සවි කිරීම: Verify that the sensor is securely mounted and not loose.
- රැහැන් අඛණ්ඩතාව: Check that the wiring harness is properly routed and secured, preventing it from rubbing against moving parts or hot surfaces.
Do not attempt to disassemble the sensor, as it is a sealed unit and not user-serviceable.
6. දෝශ නිරාකරණය
If you experience issues with your vehicle's ABS, TCS, or ESP systems, or if a warning light illuminates, the wheel speed sensor may be a contributing factor. Here are common troubleshooting steps:
| රෝග ලක්ෂණය | විය හැකි හේතුව | විසඳුම |
|---|---|---|
| ABS/TCS/ESP warning light illuminated | Faulty sensor, damaged wiring, dirty tone wheel, or ECU issue. |
|
| Erratic speedometer readings | Incorrect signal from a wheel speed sensor (less common for this specific sensor, but possible if used for speedometer input). |
|
| ABS activates at low speeds or when stopping | Sensor signal discrepancy, often due to a dirty or damaged tone wheel, or a faulty sensor. |
|
සටහන: Many issues related to wheel speed sensors require specialized diagnostic tools and automotive knowledge. If you are unsure about any step, it is highly recommended to seek assistance from a certified automotive technician.
7. වගකීම් සහ සහාය
Vemo products are manufactured to high standards. For specific warranty information regarding the Vemo V30-72-0145 wheel speed sensor, please refer to the warranty documentation provided with your purchase or visit the official Vemo webවෙබ් අඩවිය. වගකීම් කොන්දේසි සාමාන්යයෙන් මිලදී ගත් දින සිට නිශ්චිත කාලයක් සඳහා නිෂ්පාදන දෝෂ ආවරණය කරයි.
For technical support, installation queries, or warranty claims, please contact your authorized Vemo distributor or the Vemo customer service department. Ensure you have your product model number (V30-72-0145) and proof of purchase available when contacting support.
Vemo Official Webඅඩවිය: www.vemo.com (මෙය ස්ථාන දරණුවකි URL, please verify the actual Vemo webසහාය සඳහා අඩවිය.)


