1. හැඳින්වීම
This manual provides essential information for the safe and efficient use of your Hitachi CP-EX251N XGA 3LCD Projector. Please read this manual thoroughly before operating the projector and keep it for future reference. The CP-EX251N is designed for clear, bright projections with 2700 lumens brightness and XGA (1024x768) native resolution, featuring 3LCD technology and a long-life lamp.
2 ආරක්ෂිත තොරතුරු
Observe the following safety precautions to prevent fire, electric shock, or injury.
- බලශක්ති ප්රභවය: Use only the power supply specified for this unit. Ensure the power cord is securely plugged into an outlet.
- වාතාශ්රය: වාතාශ්රය විවරයන් අවහිර නොකරන්න. අධික උනුසුම් වීම වැළැක්වීම සඳහා නිසි වායු ප්රවාහය සඳහා ප්රොජෙක්ටරය වටා ප්රමාණවත් ඉඩක් සහතික කරන්න.
- තාපය: ප්රක්ෂේපක එල්amp ක්රියාත්මක වන විට ඉතා උණුසුම් වේ. හැසිරවීමට හෝ නඩත්තු කිරීමට පෙර ප්රොජෙක්ටරය සිසිල් වීමට ඉඩ දෙන්න.
- Lamp: l ක්රියාත්මක වන විට ප්රොජෙක්ටර් කාචය දෙස කෙලින්ම නොබලන්න.amp දීප්තිමත් ආලෝකය ඔබේ ඇස්වලට හානි කළ හැකි බැවින්, ක්රියාත්මකයි.
- තෙතමනය: ගින්න හෝ විදුලි කම්පනය වැළැක්වීම සඳහා ප්රොජෙක්ටරය වර්ෂාවට හෝ තෙතමනයට නිරාවරණය නොකරන්න.
- සේවා: සියලුම සේවා සුදුසුකම් ලත් සේවා පුද්ගලයින් වෙත යොමු කරන්න. ප්රොජෙක්ටරය ඔබම විවෘත කිරීමට හෝ අලුත්වැඩියා කිරීමට උත්සාහ නොකරන්න.
3. පැකේජ අන්තර්ගතය
සියලුම අයිතම පැකේජයේ ඇති බව තහවුරු කරගන්න:
- Hitachi CP-EX251N Projector
- විදුලි රැහැන්
- බැටරි සමඟ දුරස්ථ පාලකය
- VGA කේබලය
- පරිශීලක අත්පොත (මෙම ලේඛනය)
4. නිෂ්පාදන අවසන්view

රූපය 4.1: කෝණික view of the Hitachi CP-EX251N Projector, showing the lens, control panel, and ventilation.
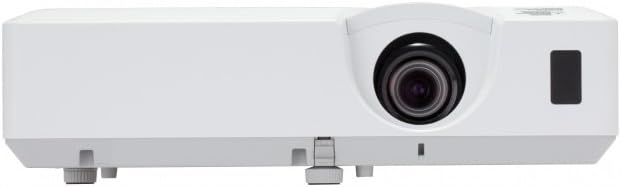
රූපය 4.2: ඉදිරිපස view of the Hitachi CP-EX251N Projector, highlighting the projection lens and front IR receiver.
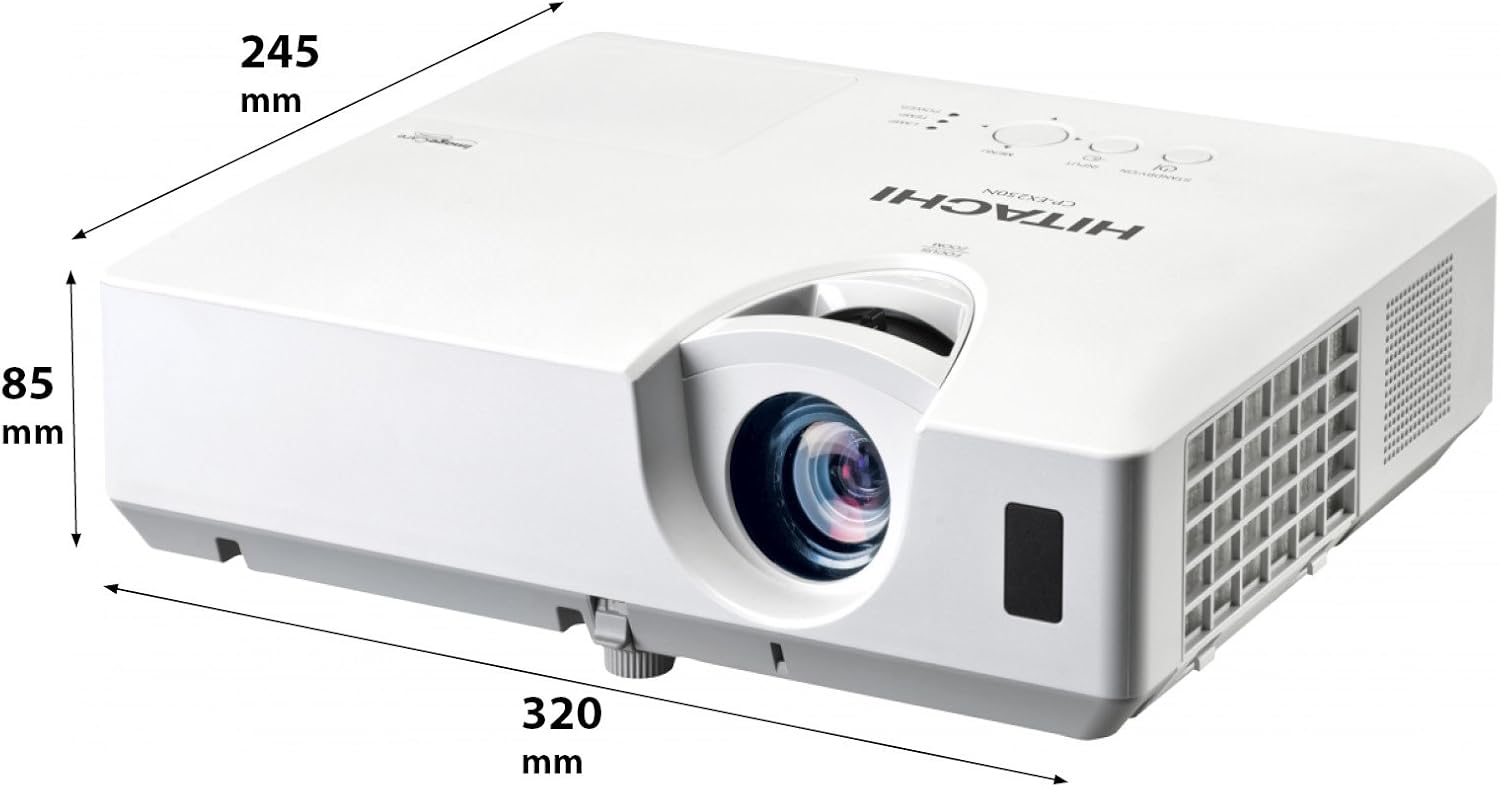
රූපය 4.3: කෝණික view of the projector illustrating its approximate dimensions (320mm length, 245mm width, 85mm height).
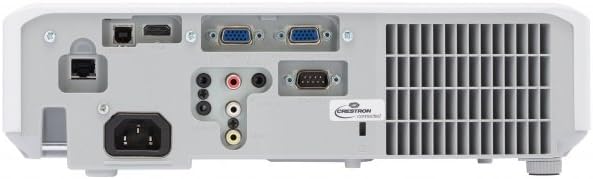
Figure 4.4: Rear panel of the projector, showing various input and output ports including HDMI, VGA, Composite, RS232C, and RJ45.
5. පිහිටුවීම
5.1 ස්ථානගත කිරීම
Position the projector on a stable, flat surface or mount it securely. Ensure the projector is at an appropriate distance from the screen to achieve the desired image size. Maintain clear space around the projector for ventilation.
5.2 සම්බන්ධක බලය
- ප්රොජෙක්ටරයේ AC ඇතුල්වීමට විදුලි රැහැන සම්බන්ධ කරන්න.
- විදුලි රැහැනේ අනෙක් කෙළවර බිම්ගත විදුලි අලෙවිසැලකට සම්බන්ධ කරන්න.
5.3 ආදාන මූලාශ්ර සම්බන්ධ කිරීම
The CP-EX251N offers multiple connectivity options:
- HDMI: Connect an HDMI cable from your source device (e.g., laptop, Blu-ray player) to the projector's HDMI port.
- VGA: Connect a VGA cable from your computer to one of the projector's VGA ports (VGA1 or VGA2).
- සංයුක්ත වීඩියෝව: Use an RCA composite video cable to connect devices like DVD players to the composite video input.
- ශ්රව්ය: Connect audio cables to the corresponding audio input jacks if using analog video sources.
- පාලනය: For remote control and monitoring, connect an RS232C serial cable or an RJ45 Ethernet cable to a control system.
5.4 මූලික බල සක්රිය කිරීම සහ රූප ගැලපීම
- Press the Power button on the projector or remote control. The power indicator will light up.
- සකස් කරන්න නාභිගත මුද්ද on the lens until the image is sharp.
- සකස් කරන්න විශාලන මුද්ද on the lens to achieve the desired image size.
- රූපය ත්රපීසොයිඩ් ලෙස දිස්වන්නේ නම්, භාවිතා කරන්න යතුරු ගල් නිවැරදි කිරීම function (usually found in the projector menu or via dedicated buttons on the remote) to square the image.
6. ක්රියාත්මක වීම
6.1 බලය සක්රිය / අක්රිය
- බල ගැන්වීමට: වරක් බල බොත්තම ඔබන්න.
- බලය අක්රිය කිරීමට: Press the Power button twice. The projector will enter a cooling cycle before shutting down completely. Do not unplug the projector during the cooling cycle.
6.2 ආදාන තේරීම
Press the 'Input' or 'Source' button on the remote control or projector control panel to cycle through available input sources (HDMI, VGA1, VGA2, Composite).
6.3 මෙනු සංචලනය
Use the 'Menu' button to access the on-screen display (OSD) menu. Navigate using the arrow buttons and confirm selections with the 'Enter' button. The menu allows adjustment of picture settings, audio, display options, and system settings.
6.4 පින්තූර ගැලපීම්
OSD මෙනුව තුළ, ඔබට සකස් කළ හැකිය:
- දීප්තිය: Adjust the overall lightness or darkness of the image.
- වෙනස: Adjust the difference between the light and dark areas of the image.
- වර්ණ මාදිලිය: Select from various preset modes (e.g., Standard, Dynamic, Cinema, sRGB) or customize settings.
- දර්ශන අනුපාතය: දර්ශන අනුපාතය වෙනස් කරන්න (උදා: 4:3, 16:9).
6.5 පරිසර ප්රකාරය
Activate Eco Mode to reduce lamp brightness, conserve energy, and extend lamp life up to 10,000 hours. This setting can be found in the projector's OSD menu.
7. නඩත්තු කිරීම
7.1 කාච පිරිසිදු කිරීම
දෘශ්ය මතුපිට සඳහා විශේෂයෙන් නිර්මාණය කර ඇති මෘදු, ලින්ට් රහිත රෙද්දකින් ප්රොජෙක්ටර් කාචය මෘදු ලෙස පිස දමන්න. උල්ෙල්ඛ පිරිසිදු කරන්නන් හෝ අධික බලයක් භාවිතා නොකරන්න.
7.2 වායු පෙරහන පිරිසිදු කිරීම
Regularly clean the air filter to maintain optimal performance and prevent overheating. Refer to the projector's OSD menu for filter usage time. Remove the filter cover and gently clean the filter with a soft brush or vacuum cleaner. Replace the filter if it is damaged or excessively dirty.
7.3 Lamp ආදේශ කිරීම
ප්රක්ෂේපක එල්amp has a long lifespan, but will eventually require replacement. When the lamp indicator lights up or the image becomes dim, replace the lamp. Always use a genuine Hitachi replacement lamp. Allow the projector to cool completely before attempting lamp replacement. Consult the full service manual for detailed lamp ආදේශන උපදෙස්.
7.4 ගබඩා කිරීම
When storing the projector for an extended period, ensure it is powered off and cooled down. Store it in a cool, dry place, away from direct sunlight and extreme temperatures.
8. දෝශ නිරාකරණය
| ගැටලුව | විය හැකි හේතුව | විසඳුම |
|---|---|---|
| බලය නැත | Power cord disconnected; Power outlet faulty; Projector in standby mode. | Check power cord connection; Try a different outlet; Press the Power button. |
| රූපයක් නොපෙන්වයි | Input source not selected; Cable not connected properly; Source device not outputting signal. | Select correct input source; Reconnect video cable; Check source device settings. |
| රූපය විකෘති හෝ නොපැහැදිලි | Focus/Zoom not adjusted; Keystone not corrected; Projector not perpendicular to screen. | Adjust Focus and Zoom rings; Use Keystone correction; Reposition projector. |
| ශබ්දයක් නැත | Audio cable not connected; Volume too low; Mute function active. | Connect audio cable (if applicable); Increase volume; Deactivate mute. |
| දුරස්ථ පාලකය ක්රියා නොකරයි | Batteries depleted; Obstruction between remote and projector; Remote sensor blocked. | Replace batteries; Remove obstructions; Ensure clear line of sight to IR sensor. |
9. පිරිවිතර
| විශේෂාංගය | පිරිවිතර |
|---|---|
| ආදර්ශ අංකය | CP-EX251N |
| සංදර්ශක තාක්ෂණය | 3LCD |
| දීප්තිය | 2700 Lumens |
| දේශීය විභේදනය | XGA (1024 x 768) |
| Lamp ජීවිතය | Up to 10,000 hours (in Eco Mode) |
| සම්බන්ධතාවය | HDMI x 1, VGA x 2, Component (Shared) x 2, Composite x 1, RS232C, RJ45 |
| ශ්රව්ය ප්රතිදානය | 16W කථානායක |
| අයිතමයේ බර | රාත්තල් 6.83 (දළ වශයෙන් කිලෝග්රෑම් 3.1) |
| නිෂ්පාදන මානයන් | 6 x 12 x 14 අඟල් (ආසන්න වශයෙන් 15.2 x 30.5 x 35.6 සෙ.මී.) |
| නිර්දේශිත භාවිතයන් | ව්යාපාර, අධ්යාපනය, ක්රීඩා, ගෘහ සිනමාව |
| විශේෂ ලක්ෂණය | අතේ ගෙන යා හැකි |
10. වගකීම් සහ සහාය
වගකීම් තොරතුරු සඳහා, කරුණාකර ඔබේ නිෂ්පාදනය සමඟ ඇතුළත් කර ඇති වගකීම් කාඩ්පත බලන්න හෝ නිල Hitachi වෙත පිවිසෙන්න. website. For technical support, service, or inquiries about replacement parts, please contact Hitachi customer service through their official channels.
මාර්ගගත සහාය: www.hitachi.com/support (උදාample link, please refer to actual product documentation for correct URL)


