1. හැඳින්වීම
This manual provides detailed instructions for the safe and effective operation of the Extech EX355 True RMS Multimeter. The EX355 is a professional digital multimeter designed for a wide range of electrical measurements, including AC/DC voltage, current, resistance, capacitance, frequency, duty cycle, and temperature. It features True RMS for accurate readings of non-sinusoidal waveforms, Non-Contact Voltage (NCV) detection for enhanced safety, Low Impedance (LoZ) mode to prevent ghost voltage readings, and a Low Pass Filter (LPF) for noise reduction in electrical environments.
Please read this manual thoroughly before using the device to ensure proper function and to prevent potential hazards.
2 ආරක්ෂිත තොරතුරු
Always adhere to the following safety precautions to avoid personal injury or damage to the multimeter:
- සියලුම උපදෙස් කියවන්න: භාවිතයට පෙර ක්රියාකාරිත්වය සහ ආරක්ෂක විශේෂාංග පිළිබඳව ඔබව හුරු කරවන්න.
- Observe all warnings: Pay close attention to all warnings and cautions marked on the meter and in this manual.
- Use proper range: Always select the correct function and range for your measurement.
- පරීක්ෂණ ඊයම් පරීක්ෂා කරන්න: එක් එක් භාවිතයට පෙර, හානි වූ පරිවරණ හෝ නිරාවරණය වූ ලෝහ සඳහා පරීක්ෂණ ඊයම් පරීක්ෂා කරන්න. හානි වී ඇත්නම් ප්රතිස්ථාපනය කරන්න.
- Do not exceed maximum input limits: කිසිවිටෙක voltage or current that exceeds the specified maximum limits for the meter.
- Avoid live circuits: Do not measure resistance, continuity, or diode on live circuits.
- අධි පරිමාව සමඟ ප්රවේශමෙන් භාවිතා කරන්නtages: Be extremely careful when working with voltag60V DC හෝ 30V AC RMS ට වැඩි, මන්ද මේවා කම්පන අනතුරක් ඇති කරයි.
- Do not operate if damaged: If the meter appears damaged or is not operating properly, discontinue use immediately.
- බැටරි ප්රතිස්ථාපනය: Replace batteries as soon as the low battery indicator appears to ensure accurate readings.
- CAT III 600V: This meter is designed for measurements in CAT III 600V environments.
3. නිෂ්පාදන අවසන්view
The Extech EX355 is a versatile True RMS Multimeter equipped with several advanced features for accurate and safe electrical testing.
ප්රධාන ලක්ෂණ:
- 12 Measurement Functions: Includes AC/DC voltage, current, resistance, capacitance, frequency, duty cycle, and temperature.
- True RMS Accuracy: Ensures precise readings for both standard and distorted electrical waveforms.
- සම්බන්ධතා නොවන වෙළුමtage (NCV) හඳුනාගැනීම: Allows for quick and safe detection of AC voltagඊ සෘජු සම්බන්ධතා නොමැතිව.
- Low Impedance (LoZ) Mode: Prevents false readings caused by ghost voltages in circuits.
- අඩු සමත් පෙරහන (LPF): Reduces high-frequency noise for stable and accurate measurements in noisy environments.
- සංදර්ශකය: 4000 count LCD display with backlight.
- Data Hold, Min/Max, Relative Mode: For capturing and analyzing measurements.
- ස්වයංක්රීය බලය අක්රිය: බැටරි ආයු කාලය ඉතිරි කරයි.
- අඛණ්ඩතාව සහ ඩයෝඩ පරීක්ෂණය: පරිපථ රෝග විනිශ්චය සඳහා අත්යවශ්ය වේ.

Figure 1: The Extech EX355 True RMS Multimeter. This image shows the front view of the multimeter, highlighting its display, rotary dial, function buttons, and input jacks.
4. පිහිටුවීම
4.1 බැටරි ස්ථාපනය
The Extech EX355 requires two (2) AA batteries for operation. These are typically included with the device.
- Ensure the multimeter is powered off.
- Locate the battery compartment cover on the rear of the unit.
- Unscrew the retaining screw(s) and carefully remove the cover.
- Insert two AA batteries, observing the correct polarity (+ and -) as indicated inside the compartment.
- බැටරි මැදිරි කවරය ප්රතිස්ථාපනය කර එය ඉස්කුරුප්පු ඇණ (ය) සමඟ සුරක්ෂිත කරන්න.
සටහන: Replace batteries immediately when the low battery indicator appears on the display to maintain measurement accuracy.
4.2 පරීක්ෂණ මඟ පෙන්වීම් සම්බන්ධ කිරීම
Always connect the test leads correctly for the desired measurement function.
- බොහෝ වෙළුම් සඳහාtage, resistance, continuity, diode, capacitance, and frequency measurements, insert the red test lead into the VΩHzCAP jack and the black test lead into the COM කොස්
- For current measurements up to 10A, insert the red test lead into the 10A jack and the black test lead into the COM කොස්
- For current measurements up to 400mA, insert the red test lead into the mAµA jack and the black test lead into the COM කොස්
- Ensure test leads are fully inserted into the jacks.
5. මෙහෙයුම් උපදෙස්
This section details how to perform various measurements using the Extech EX355 multimeter.
5.1 AC/DC වෙළුමtagඊ මැනීම
- භ්රමණ ඩයල් එක සකසන්න V~ (AC වෙළුමtage) හෝ V- (DC Voltage) තනතුර.
- රතු පරීක්ෂණ තුඩුව වෙත සම්බන්ධ කරන්න VΩHzCAP jack and the black test lead to the COM කොස්
- Touch the test probes to the circuit points where voltagඊ මැනිය යුතුය.
- වෙළුම කියවන්නtagතිරයේ ඊ අගය.
5.2 AC/DC Current Measurement
අවවාදයයි: කිසි විටෙකත් බහුමාපකය සමාන්තරව වෝල්ට් එකකට සම්බන්ධ නොකරන්න.tage source when measuring current. Always connect in series with the load.
- Set the rotary dial to the appropriate A~ (AC ධාරාව) හෝ A- (DC Current) range (e.g., 10A or mAµA).
- රතු පරීක්ෂණ තුඩුව වෙත සම්බන්ධ කරන්න 10A or mAµA jack and the black test lead to the COM කොස්
- Open the circuit where current is to be measured and connect the test probes in series.
- සංදර්ශකයේ වත්මන් අගය කියවන්න.
5.3 ප්රතිරෝධය මැනීම
අවවාදයයි: ප්රතිරෝධය මැනීමට පෙර පරිපථය ක්රියා විරහිත කර ඇති බවට වග බලා ගන්න.
- භ්රමණ ඩයල් එක සකසන්න Ω (Resistance) position.
- රතු පරීක්ෂණ තුඩුව වෙත සම්බන්ධ කරන්න VΩHzCAP jack and the black test lead to the COM කොස්
- Touch the test probes across the component or circuit segment to be measured.
- දර්ශනයේ ප්රතිරෝධක අගය කියවන්න.
5.4 ධාරිතාව මැනීම
අවවාදයයි: Discharge capacitors before measuring to prevent damage to the meter.
- භ්රමණ ඩයල් එක සකසන්න CAP (Capacitance) position.
- රතු පරීක්ෂණ තුඩුව වෙත සම්බන්ධ කරන්න VΩHzCAP jack and the black test lead to the COM කොස්
- ධාරිත්රක පර්යන්ත හරහා පරීක්ෂණ පරීක්ෂණ ස්පර්ශ කරන්න.
- සංදර්ශකයේ ධාරණ අගය කියවන්න.
5.5 Frequency and Duty Cycle Measurement
- භ්රමණ ඩයල් එක සකසන්න Hz /% (Frequency/Duty Cycle) position.
- රතු පරීක්ෂණ තුඩුව වෙත සම්බන්ධ කරන්න VΩHzCAP jack and the black test lead to the COM කොස්
- Touch the test probes to the signal source.
- ඔබන්න Hz /% button to toggle between frequency and duty cycle readings.
5.6 උෂ්ණත්වය මැනීම
The EX355 includes a general purpose bead wire temperature probe.
- භ්රමණ ඩයල් එක සකසන්න උෂ්ණත්වය (Temperature) position.
- Insert the temperature probe into the VΩHzCAP (positive) and COM (negative) jacks, observing polarity.
- Place the tip of the temperature probe on or in the object to be measured.
- Read the temperature value on the display. The unit can display in Celsius or Fahrenheit.

Figure 2: Using the Extech EX355 to measure temperature in an HVAC vent. The image shows a person holding the multimeter and inserting the temperature probe into an air conditioning vent.
5.7 සම්බන්ධතා නොවන වෙළුමtage (NCV) හඳුනාගැනීම
NCV mode allows for quick detection of AC voltage සෘජු සම්බන්ධතා නොමැතිව, ආරක්ෂාව වැඩි දියුණු කරයි.
- භ්රමණ ඩයල් එක සකසන්න NCV තනතුර.
- Move the top of the multimeter near a conductor or outlet.
- The NCV indicator light will illuminate and an audible beep will sound if AC voltage is detected. The intensity of the beep and light may increase with stronger fields.
5.8 Low Impedance (LoZ) Mode
LoZ mode helps eliminate false readings caused by ghost voltages.
- භ්රමණ ඩයල් එක සකසන්න LoZ V තනතුර.
- Connect the test leads as for standard voltagඊ මැනීම.
- The meter will present a low impedance load to the circuit, dissipating ghost voltages and providing a more accurate reading of actual voltage.
5.9 අඩු පාස් පෙරහන (LPF)
The LPF function is used to filter out high-frequency noise, providing stable readings in variable frequency drive (VFD) applications or other noisy electrical environments.
- Set the rotary dial to an AC Voltagඉ (V~) or AC Current (A~) පරාසය.
- ඔබන්න LPF button to activate the low pass filter. The LPF icon will appear on the display.
- Perform your measurement as usual. The meter will now display readings with high-frequency noise attenuated.
- ඔබන්න LPF button again to deactivate the filter.
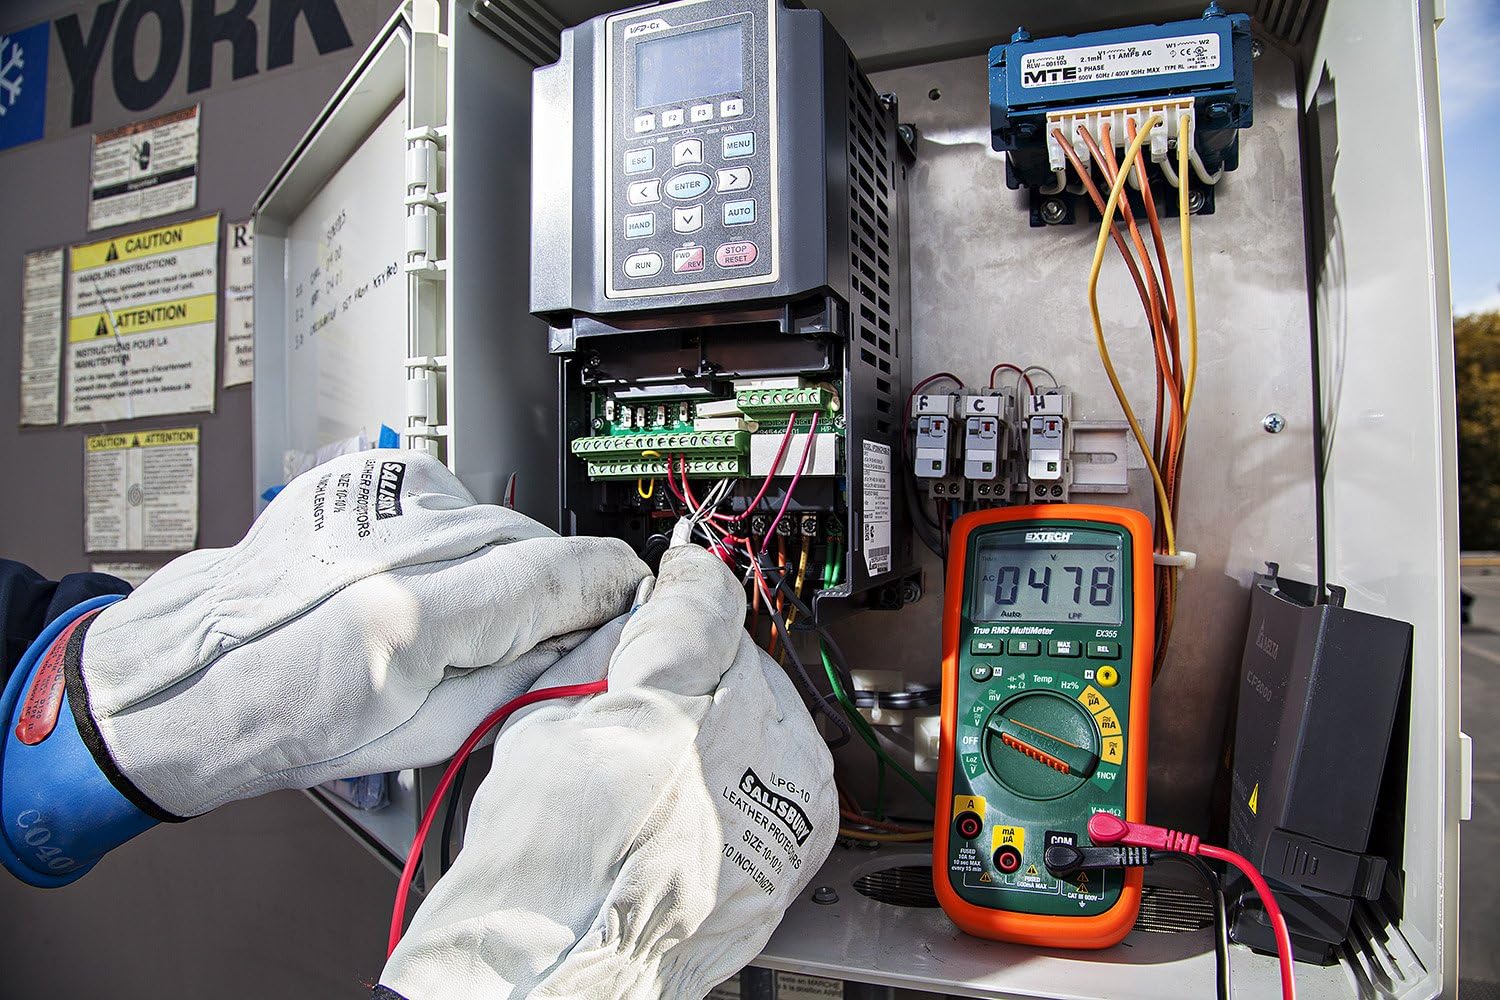
Figure 3: The Extech EX355 Multimeter in use, connected to an electrical control panel. This image demonstrates the multimeter's application in industrial or commercial electrical diagnostics.

Figure 4: The Extech EX355 Multimeter connected to a fuse box. This image illustrates the multimeter being used for testing within a residential or commercial electrical distribution system.
5.10 Data Hold, Min/Max, Relative Mode
- දත්ත රඳවා තබා ගැනීම: ඔබන්න අල්ලා ගන්න සංදර්ශකයේ වත්මන් කියවීම කැටි කිරීමට බොත්තම. මුදා හැරීමට නැවත ඔබන්න.
- අවම/උපරිම: ඔබන්න MIN / MAX button to enter Min/Max recording mode. The meter will display the maximum reading. Press again to cycle through minimum and average readings. Hold the button to exit.
- සාපේක්ෂ ප්රකාරය: ඔබන්න REL button to store the current reading as a reference value. Subsequent measurements will be displayed as a difference from this reference. Press again to exit.
5.11 Continuity and Diode Test
අවවාදයයි: Ensure the circuit is de-energized before performing continuity or diode tests.
- අඛණ්ඩ පැවැත්ම: භ්රමණ ඩයල් එක සකසන්න Ω (Ω) (Resistance) position and press the තෝරන්න button until the continuity symbol (♫ රේඩියෝ) appears. A continuous beep indicates a low resistance path (continuity).
- ඩයෝඩ පරීක්ෂණය: භ්රමණ ඩයල් එක සකසන්න Ω (Ω) (Resistance) position and press the තෝරන්න button until the diode symbol (→|) appears. Connect the red lead to the anode and black lead to the cathode for forward bias voltage drop. Reverse leads for reverse bias.
6. නඩත්තු කිරීම
6.1 බැටරි ප්රතිස්ථාපනය
Refer to section 4.1 for detailed instructions on replacing the two AA batteries. Always use fresh, high-quality AA batteries.
6.2 ෆියුස් ප්රතිස්ථාපනය
If the current measurement functions cease to work, the fuse may need replacement. This procedure should only be performed by qualified personnel.
- Ensure the multimeter is powered off and all test leads are disconnected.
- Remove the battery compartment cover and batteries.
- Unscrew the case screws and carefully separate the two halves of the meter casing.
- Locate the blown fuse(s). The EX355 typically uses two fuses: a 0.5A/600V fast-blow fuse for the mA/µA input and a 10A/600V fast-blow fuse for the 10A input.
- Replace the fuse(s) with fuses of the exact same type and rating. Never use a fuse with a different rating.
- Carefully reassemble the meter casing, ensuring all screws are tightened. Reinstall batteries and the battery cover.
6.3 පිරිසිදු කිරීම සහ ගබඩා කිරීම
- Clean the meter regularly with a damp රෙදි සහ මෘදු ඩිටර්ජන්ට්. උල්ෙල්ඛ හෝ ද්රාවක භාවිතා නොකරන්න.
- Ensure the meter is completely dry before use.
- When storing the meter for extended periods, remove the batteries to prevent leakage.
- මීටරය සෘජු හිරු එළියෙන් සහ අධික උෂ්ණත්වයන්ගෙන් ඈත්ව සිසිල් වියළි ස්ථානයක ගබඩා කරන්න.
7. දෝශ නිරාකරණය
| ගැටලුව | විය හැකි හේතුව | විසඳුම |
|---|---|---|
| සංදර්ශකයක් නැත හෝ දුර්වල සංදර්ශකයක් නොමැත | මිය ගිය හෝ අඩු බැටරි | බැටරි ප්රතිස්ථාපනය කරන්න (4.1 වගන්තිය බලන්න). |
| වැරදි කියවීම් | Incorrect function/range selected; Damaged test leads; External interference; Blown fuse (for current) | Verify function/range; Inspect/replace test leads; Move away from strong electromagnetic fields; Check/replace fuses (refer to Section 6.2). |
| අඛණ්ඩ බීප් හඬක් නැත | Open circuit; High resistance; Incorrect mode | Ensure circuit is closed; Check for high resistance; Verify continuity mode is selected. |
| ධාරා මිනුම ක්රියා නොකරයි | Blown fuse; Incorrect lead connection | Check and replace appropriate fuse (refer to Section 6.2); Ensure leads are in the correct current jacks. |
| NCV පරිමාව අනාවරණය නොකරයිtage | AC පරිමාවක් නැතtage present; Weak field; Incorrect mode | AC පරිමාව සත්යාපනය කරන්නtage with direct contact method; Ensure NCV mode is selected; Move closer to the conductor. |
8. පිරිවිතර
The following table outlines the key specifications for the Extech EX355 True RMS Multimeter:
| පරාමිතිය | වටිනාකම |
|---|---|
| ආදර්ශ අංකය | EX355 |
| මිනුම් කාර්යයන් | ඒසී/ඩීසී වෙළුමtage, AC/DC Current, Resistance, Capacitance, Frequency, Duty Cycle, Temperature, Diode, Continuity |
| ඇත්ත RMS | ඔව් |
| සම්බන්ධතා නොවන වෙළුමtagඊ (NCV) | ඔව් |
| Low Impedance (LoZ) | ඔව් |
| අඩු පාස් ෆිල්ටරය (එල්පීඑෆ්) | ඔව් |
| උපරිම මෙහෙයුම් පරිමාවtage | වෝල්ට් 600 |
| මිනුම් නිරවද්යතාව | +/-0.5% (typical, varies by function/range) |
| ප්රදර්ශනය කරන්න | 4000 ගණන් LCD |
| බලශක්ති ප්රභවය | 2 x AA බැටරි (ඇතුළත්) |
| මානයන් (L x W x H) | 8.1 x 4.8 x 17 cm (3.2 x 1.9 x 6.7 අඟල්) |
| අයිතමයේ බර | ග්රෑම් 372 (රාත්තල් 0.82) |
| ද්රව්ය | ABS |
| සහතික කිරීම | IEC 61010-1, CE, CAT III 600V |
| ඇතුළත් සංරචක | Test leads, two AA batteries, general purpose bead wire temperature probe |

Figure 5: Extech EX355 Multimeter with approximate dimensions shown in inches and centimeters. This image provides a visual reference for the physical size of the device.
9. වගකීම් තොරතුරු
Extech provides a warranty for its products. Specific warranty terms and conditions, including duration and coverage, may vary by region and product. For detailed warranty information, please refer to the warranty card included with your product or visit the official Extech webවෙබ් අඩවිය. ඕනෑම වගකීම් හිමිකම් පෑමක් සඳහා මිලදී ගැනීමේ සාක්ෂියක් ලෙස ඔබේ මිලදී ගැනීමේ රිසිට්පත තබා ගන්න.
10. පාරිභෝගික සහාය
For technical assistance, troubleshooting, or service inquiries regarding your Extech EX355 Multimeter, please contact Extech customer support. You can typically find contact information, including phone numbers and email addresses, on the official Extech webවෙබ් අඩවියේ හෝ ඔබේ නිෂ්පාදනය සමඟ සපයා ඇති ලියකියවිලිවල.
සබැඳි සම්පත්: Visit the official Extech website for FAQs, product downloads, and additional support resources.


