1. හැඳින්වීම
ස්තූතියි, උදව් කළාටasing the COBY DTV-700 Digital to Analog TV Converter. This device allows you to receive digital broadcast television signals and convert them for display on older analog televisions. It also functions as a multimedia player, supporting various audio, video, and image formats via its USB port, and offers recording capabilities. Please read this manual thoroughly before operating the device to ensure proper use and to maximize your viewඅත්දැකීමෙන්.
2. පැකේජ අන්තර්ගතය
කරුණාකර පහත අයිතම සඳහා කොටුව සලකුණු කරන්න:
- COBY DTV-700 Digital to Analog TV Converter
- දුරස්ථ පාලකය
- AC/DC බල ඇඩැප්ටරය
- AV කේබල් (RCA)
- පරිශීලක අත්පොත (මෙම ලේඛනය)
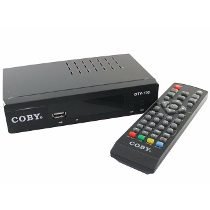
Image 2.1: The COBY DTV-700 Digital to Analog TV Converter. This image shows the compact design of the converter unit, typically black with various ports and indicators.
3 ආරක්ෂිත තොරතුරු
ආරක්ෂිත ක්රියාකාරිත්වය සහතික කිරීමට සහ හානි වැළැක්වීමට, කරුණාකර පහත සඳහන් පූර්වාරක්ෂාවන් නිරීක්ෂණය කරන්න:
- ඒකකය වර්ෂාව, තෙතමනය හෝ අධික උෂ්ණත්වයන්ට නිරාවරණය නොකරන්න.
- c එක අරින්න එපාasing; සියලුම සේවා සුදුසුකම් ලත් පුද්ගලයින් වෙත යොමු කරන්න.
- අධික උනුසුම් වීම වැළැක්වීම සඳහා ඒකකය වටා නිසි වාතාශ්රය සහතික කරන්න.
- සපයන ලද බල ඇඩැප්ටරය පමණක් භාවිතා කරන්න.
- ඒකකය සෘජු හිරු එළිය, තාප ප්රභවයන් සහ ශක්තිමත් චුම්භක ක්ෂේත්ර වලින් ඈත් කර තබන්න.
- Dispose of batteries and electronic waste responsibly according to local regulations.
4. නිෂ්පාදන අවසන්view
4.1 ඉදිරිපස පුවරුව
The front panel typically includes:
- බල දර්ශකය: ඒකකය ක්රියාත්මක වන විට දැල්වෙයි.
- නාලිකා ඉහළ/පහළ බොත්තම්: For changing channels.
- මෙනු බොත්තම: ප්රධාන මෙනුවට ප්රවේශ වේ.
- USB Port: For connecting USB storage devices for media playback and recording.
4.2 පසුපස පුවරුව
පසුපස පුවරුව අවශ්ය සියලුම සම්බන්ධතා වරායන් සපයයි:
- කුහුඹුවා: Connects to your antenna for receiving digital signals.
- HDMI පිටත: Connects to an HDMI-compatible TV for high-definition output.
- AV OUT (RCA): Connects to older analog TVs using composite video (yellow) and stereo audio (red/white) cables.
- COAXIAL අවුට්: Digital audio output (if available).
- ඩීසී: සපයා ඇති AC/DC බල ඇඩැප්ටරයට සම්බන්ධ වේ.
5. පිහිටුවීම
5.1 Connecting the Converter
- ඇන්ටෙනාව සම්බන්ධ කරන්න: ඔබේ ඩිජිටල් ඇන්ටනාව සම්බන්ධ කරන්න ANT IN port on the rear of the DTV-700.
- රූපවාහිනියට සම්බන්ධ වන්න:
- For Analog TVs: Use the supplied AV cable. Connect the yellow plug to the video input of your TV, and the red/white plugs to the corresponding audio inputs. Connect the other end to the AV පිටත ports on the DTV-700.
- For Digital/HDTVs: Use an HDMI cable (not included). Connect one end to the HDMI පිටතට port on the DTV-700 and the other end to an available HDMI input on your TV.
- සම්බන්ධක බලය: Plug the AC/DC power adapter into the DC IN port on the DTV-700, then plug the adapter into a wall outlet.
5.2 මූලික සැකසුම සහ නාලිකා ස්කෑන් කිරීම
- Turn on your TV and select the correct input source (e.g., AV1, HDMI1) that corresponds to your connection.
- Power on the DTV-700 using the remote control or the power button on the front panel.
- The first time you power on, an initial setup wizard may appear. Follow the on-screen prompts to select your language and country.
- Initiate an automatic channel scan. This will search for all available digital channels in your area. This process may take several minutes. Do not interrupt the scan.
- Once the scan is complete, the converter will tune to the first available channel.
6. මෙහෙයුම් උපදෙස්
6.1 දුරස්ථ පාලන කාර්යයන්
The remote control provides full functionality for your DTV-700. Ensure two AAA batteries are inserted correctly (batteries not included).
- බලය: ඒකකය සක්රිය හෝ අක්රිය කරයි.
- CH +/-: නාලිකා ඉහළට හෝ පහළට වෙනස් කරයි.
- VOL +/-: පරිමාව සකසයි.
- මෙනු: ප්රධාන මෙනුවට ප්රවේශ වේ.
- පිටවීම: වත්මන් මෙනුවෙන් හෝ කාර්යයෙන් පිටවෙයි.
- තොරතුරු: වත්මන් නාලිකා තොරතුරු පෙන්වයි.
- OK / Navigation Buttons: Confirms selections and navigates menus.
- REC: Starts recording the current program.
- PLAY/PAUSE, STOP, FF, REW: මාධ්ය නැවත ධාවනය පාලනයන්.
- USB: Switches to USB media playback mode.
6.2 Channel Navigation
භාවිතා කරන්න CH +/- buttons on the remote or front panel to browse channels. You can also directly enter a channel number using the numeric keypad on the remote.
6.3 ප්රධාන මෙනුව
ඔබන්න මෙනුව button to access settings for Program, Picture, Sound, Time, Option, and System. Use the navigation buttons to select options and OK තහවුරු කිරීමට.
7. මාධ්ය නැවත ධාවනය
The DTV-700 supports media playback from a USB storage device (e.g., USB flash drive, external hard drive). Insert your USB device into the USB port on the front panel.
7.1 සහය දක්වන ආකෘති
- සංගීතය: MP3, WMA
- ඡායාරූපය: JPG, BMP, PNG
- වීඩියෝ: MKV, AVI, DIVX, XVID, MOV, VOB, FLV, DAT, MPEG, MP4, TS
7.2 මාධ්ය වාදනය කිරීම
- USB පෝට් එකට USB ගබඩා උපාංගයක් ඇතුළු කරන්න.
- ඔබන්න USB button on the remote control or navigate to the 'Multimedia' section in the main menu.
- Select the desired media type (Music, Photo, Video) and browse your files.
- තෝරා ගැනීමට සංචාලන බොත්තම් භාවිතා කරන්න file සහ ඔබන්න OK සෙල්ලම් කිරීමට.
8. පටිගත කිරීමේ විශේෂාංග
The DTV-700 allows you to record live TV programs to a connected USB storage device.
8.1 ක්ෂණික පටිගත කිරීම
වැඩසටහනක් නරඹන අතරතුර, ඔබන්න REC button on the remote control to start recording. Press නවත්වන්න පටිගත කිරීම අවසන් කිරීමට.
8.2 Scheduled Recording (PVR)
Access the PVR (Personal Video Recorder) or Schedule menu via the main menu to set up timed recordings. You will need to specify the channel, start time, end time, and date for the recording.
9. දෝශ නිරාකරණය
| ගැටලුව | විය හැකි හේතුව / විසඳුම |
|---|---|
| පින්තූරයක් හෝ ශබ්දයක් නැත |
|
| Poor picture quality / No channels |
|
| දුරස්ථ පාලකය ක්රියා නොකරයි |
|
| USB media not playing |
|
10. පිරිවිතර
- ආකෘතිය: DTV-700
- වෙළඳ නාමය: කෝබි
- ආදානය: Digital TV Antenna (ATSC/DVB-T/T2 compatible, depending on region)
- ප්රතිදානය: HDMI, AV (RCA Composite Video/Audio)
- USB Port: Yes (for media playback and PVR)
- Supported Media Formats:
- Music: MP3, WMA
- ඡායාරූපය: JPG, BMP, PNG
- Video: MKV, AVI, DIVX, XVID, MOV, VOB, FLV, DAT, MPEG, MP4, TS
- බලය: AC/DC Adapter (Input: 100-240V ~ 50/60Hz, Output: typically 5V-12V DC)
- මානයන්: Approximately 20 x 15.6 x 6.2 cm (Package dimensions)
- බර: Approximately 490 g (Package weight)
- දුරස්ථ පාලක බැටරි: 2 x AAA (ඇතුළත් කර නැත)
11. නඩත්තු කිරීම
To ensure the longevity and optimal performance of your DTV-700 converter:
- පිරිසිදු කිරීම: ඒකකයේ බාහිර පිරිසිදු කිරීම සඳහා මෘදු වියළි රෙද්දක් භාවිතා කරන්න. දියර පිරිසිදු කරන්නන් හෝ උල්ෙල්ඛ රසායනික ද්රව්ය භාවිතා නොකරන්න.
- වාතාශ්රය: අධික උනුසුම් වීම වැළැක්වීම සඳහා වාතාශ්රය විවරයන් අවහිර නොවන බවට වග බලා ගන්න.
- ගබඩා: ඒකකය දිගු කාලයක් ගබඩා කරන්නේ නම්, එය විදුලියෙන් විසන්ධි කර සිසිල් වියළි ස්ථානයක ගබඩා කරන්න.
12. වගකීම් සහ සහාය
වගකීම් තොරතුරු සහ තාක්ෂණික සහාය සඳහා, කරුණාකර ඔබේ නිෂ්පාදනය සමඟ ඇතුළත් කර ඇති වගකීම් කාඩ්පත බලන්න හෝ නිල Coby වෙබ් අඩවියට පිවිසෙන්න. webවෙබ් අඩවිය. ඕනෑම වගකීම් හිමිකම් පෑමක් සඳහා මිලදී ගැනීමේ සාක්ෂියක් ලෙස ඔබේ මිලදී ගැනීමේ රිසිට්පත තබා ගන්න.
Coby is committed to providing quality products and customer satisfaction. If you encounter any issues not covered in this manual, please contact Coby customer service for assistance.


