හැඳින්වීම
Welcome to the user manual for your M-Wave Bicycle Lift. This manual provides essential information for the safe and efficient installation, operation, and maintenance of your bicycle lift. Please read this manual thoroughly before use and retain it for future reference.
The M-Wave Bicycle Lift is designed to provide a space-saving storage solution for bicycles and other heavy items, supporting weights up to 125 lbs (56.7 kg). It is particularly suitable for e-bikes and features a robust pulley system for easy lifting and lowering.
ආරක්ෂිත තොරතුරු
Always prioritize safety when installing and operating the M-Wave Bicycle Lift.
- Ensure the mounting surface (ceiling) is structurally sound and capable of supporting the lift's weight plus the maximum load (125 lbs / 56.7 kg). Consult a professional if unsure.
- Use appropriate mounting hardware for your ceiling type. The included hardware may not be suitable for all surfaces.
- Do not exceed the maximum weight capacity of 125 lbs (56.7 kg). Overloading can cause damage to the lift or injury.
- Keep hands and fingers clear of moving parts, especially during lifting and lowering operations.
- Regularly inspect the ropes, pulleys, and hooks for signs of wear, fraying, or damage. Replace worn components immediately.
- Ensure the locking mechanism engages properly when the load is at the desired height.
- Do not allow children to operate or play near the bicycle lift.
- Install the lift in an area where there is sufficient clearance to avoid accidental contact with the lifted item.
- The hooks are designed with plastic covers for scratch protection; ensure these are intact before use.
- The rope is 6.5mm thick and designed for ceilings up to 13 feet (4 meters) high. Do not extend the rope beyond its intended length.
පැකේජයේ අන්තර්ගතය
ස්ථාපනය ආරම්භ කිරීමට පෙර සියලුම සංරචක පවතින බව තහවුරු කර ගන්න.
- 2 x Pulley Assemblies (one with locking mechanism)
- 2 x Lifting Hooks with plastic covers
- 1 x Rope (6.5mm thick, suitable for up to 13 ft / 4m ceiling height)
- 1 x Wall Cleat (for securing excess rope)
- Mounting Hardware (screws, anchors - verify suitability for your ceiling type)
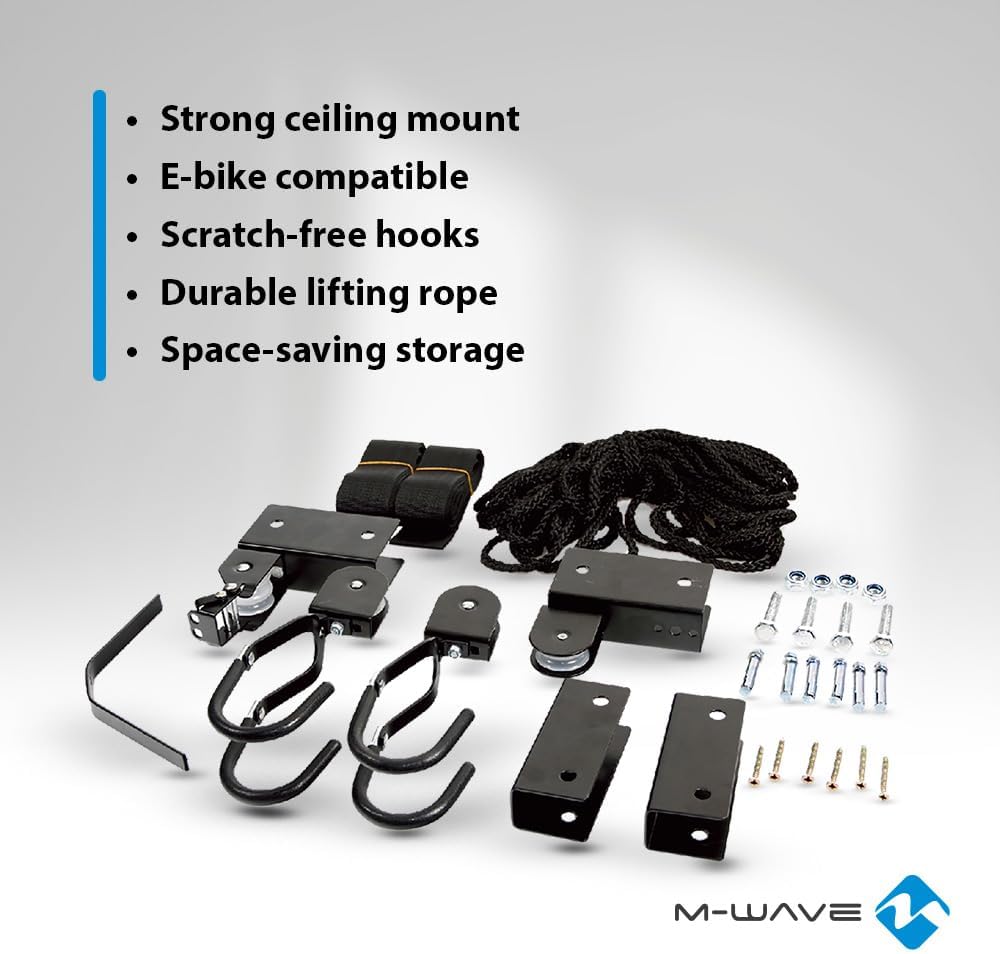
An image showing all the individual components included in the M-Wave Bicycle Lift package, including the pulley assemblies, hooks, rope, and mounting hardware.
සැකසුම සහ ස්ථාපනය
අවශ්ය මෙවලම්
- සරඹ
- Drill bits appropriate for mounting hardware and ceiling material
- මිනුම් පටිය
- පැන්සල
- Stud Finder (if mounting to ceiling joists)
- ඉණිමඟ
ස්ථාපන පියවර
- සවි කරන ස්ථානය තීරණය කරන්න: Choose a ceiling location that can safely support the weight of the lift and the item being stored. Ensure there is enough space to raise and lower the item without obstruction. The two pulley assemblies should be mounted parallel to each other, spaced appropriately for the item you intend to lift (e.g., bicycle handlebars and seat).
- Mark Pilot Holes: Hold one pulley assembly against the ceiling at your desired mounting point. Use a pencil to mark the locations for the mounting screws. Repeat for the second pulley assembly, ensuring it is parallel to the first and at the correct distance.
- සරඹ නියමු සිදුරු: Drill pilot holes at the marked locations. The size of the drill bit should match the recommended size for your mounting hardware and ceiling material.
- Attach Pulley Assemblies: Securely fasten both pulley assemblies to the ceiling using the provided mounting hardware or appropriate hardware for your ceiling type. Ensure they are firmly attached and do not wobble.
- Thread the Rope: Identify the pulley assembly with the locking mechanism. This will be the "control" side. Thread one end of the rope through the pulley system, following the diagram in the manual (or typical pulley system threading). The rope should pass through the pulleys on both ceiling-mounted units and then down to the hooks. Ensure the rope is correctly routed through the locking mechanism on the control side. Tie secure knots to attach the hooks to the ends of the rope that will hold the item.
- Install Wall Cleat: Mount the wall cleat at a convenient height on a nearby wall to secure the excess rope when the item is lifted.

An image showing the M-Wave Bicycle Lift installed on a ceiling, with a bicycle suspended beneath it, demonstrating the typical setup and use.

An image showing the M-Wave Bicycle Lift installed on a ceiling, with a large cargo box suspended beneath it, illustrating its versatility for various heavy items.

An image showing the M-Wave Bicycle Lift installed on a ceiling, with a ladder suspended beneath it, demonstrating its use for long, bulky items.
මෙහෙයුම් උපදෙස්
Lifting an Item
- Attach Item: Carefully attach the hooks to the item you wish to lift. For bicycles, typically attach one hook to the handlebars and the other to the seat. Ensure the item is balanced.
- Pull Rope: Stand near the control side of the lift. Pull the free end of the rope downwards to raise the item. The pulley system will reduce the effort required.
- Engage Lock: Once the item reaches the desired height, slowly release tension on the rope. The automatic locking mechanism will engage, holding the item securely in place.
- Secure Excess Rope: Wrap the excess rope around the wall cleat to keep it tidy and prevent accidental lowering.
Lowering an Item
- මුදා හැරීමේ අගුල: Gently pull the rope downwards to slightly lift the item, which will disengage the locking mechanism.
- Control Descent: Slowly and steadily release the rope, allowing the item to descend. Maintain control of the rope at all times.
- Detach Item: Once the item is safely on the ground, detach the hooks.

An image of the M-Wave Bicycle Lift showing a maximum height indication of 4 meters (approximately 13 feet), illustrating the maximum ceiling height it can accommodate.
නඩත්තු කිරීම
Regular maintenance ensures the longevity and safe operation of your M-Wave Bicycle Lift.
- කඹ පරීක්ෂාව: Periodically inspect the entire length of the rope for any signs of fraying, cuts, or excessive wear. If the rope shows significant wear, replace it immediately with a high-strength rope of similar diameter (6.5mm).
- පුලි පරීක්ෂාව: Check the pulleys for smooth operation. Ensure they rotate freely and are not obstructed by dirt or debris.
- කොකු පරීක්ෂාව: Verify that the plastic covers on the hooks are intact to prevent scratching your items. Replace hooks if they are bent or damaged.
- දෘඪාංග සවිකිරීම: Annually check all mounting screws and anchors to ensure they remain tight and secure. Retighten if necessary.
- ලිහිසි තෙල්: Apply a small amount of silicone spray or light lubricant to the pulley axles if they become stiff. Avoid over-lubrication.
- පිරිසිදු කිරීම: Wipe down the metal components with a damp cloth to remove dust and grime. Do not use abrasive cleaners.
දෝෂගවේෂණය
| ගැටලුව | විය හැකි හේතුව | විසඳුම |
|---|---|---|
| Lift is difficult to raise/lower | Overloaded; Pulleys are stiff/dirty; Rope is frayed or binding | Reduce load (do not exceed 125 lbs); Clean and lubricate pulleys; Inspect and replace rope if damaged. |
| Locking mechanism does not engage | Rope not threaded correctly; Mechanism is dirty/obstructed; Worn mechanism | Re-thread rope according to instructions; Clean mechanism; Contact manufacturer for replacement parts if worn. |
| Lift sways excessively | Item not balanced; Mounting points too close/far apart; Loose mounting hardware | Re-position item on hooks for better balance; Adjust spacing of pulley assemblies if possible; Tighten all mounting hardware. |
| Hooks scratching item | Plastic covers are missing or damaged | Replace or repair plastic covers on hooks. |
පිරිවිතර
| විශේෂාංගය | විස්තර |
|---|---|
| ආකෘතිය | 430098 |
| වෙළඳ නාමය | M-Wave |
| ද්රව්ය | ඇලුමිනියම් |
| වර්ණය | කළු |
| උපරිම. බර ධාරිතාව | රාත්තල් 125 (කිලෝග්රෑම් 56.7) |
| Max. Ceiling Height | අඩි 13 (මීටර් 4) |
| Rope Thickness | 6.5 මි.මී |
| සවිකිරීමේ වර්ගය | සිවිලින් මවුන්ට් |
| නිෂ්පාදන මානයන් (ඇසුරුම් කර ඇත) | අඟල් 11 x 4.5 x 6 |
| අයිතමයේ බර | කිලෝ ග්රෑම් 2.5 යි |
| UPC | 887539023034 |
වගකීම් සහ සහාය
For warranty information or technical support, please contact M-Wave customer service or refer to the official M-Wave webවෙබ් අඩවිය. මිලදී ගැනීම පිළිබඳ සාක්ෂියක් ලෙස ඔබේ මිලදී ගැනීමේ රිසිට්පත තබා ගන්න.
Note: Specific warranty terms may vary by region and retailer. Please consult your point of purchase or the manufacturer's official documentation for detailed warranty information.