හැඳින්වීම
This manual provides comprehensive instructions for the installation, operation, and maintenance of your Lockly Secure Plus Bluetooth Smart Door Lock. Please read this manual thoroughly before use to ensure proper function, optimal security, and longevity of your device. Keep this manual for future reference.
නිෂ්පාදනය අවසන්view
ප්රධාන ලක්ෂණ
- Multiple Ways to Unlock: Access your home using the patented PIN Genie digital keypad, a 3D biometric fingerprint sensor, the Lockly mobile application, voice control (with optional Wi-Fi hub), Scan to Open QR code (with optional Wi-Fi hub), or traditional physical keys.
- Secure PIN Genie Keypad: Features a patented peek-proof numeric keypad where numbers dynamically shuffle after each use, making it impossible for onlookers to guess your code.
- Advanced 3D Biometric Fingerprint Sensor: Provides quick access in approximately 0.3 seconds and can store up to 99 unique fingerprints. The AI learning algorithm improves recognition over time.
- ජංගම යෙදුම් පාලනය: Remotely lock and unlock your door, monitor real-time status, and view access history from anywhere using the Lockly App (requires optional Wi-Fi hub for remote functionality).
- හඬ පාලන ඒකාබද්ධ කිරීම: Seamlessly connect with Amazon Alexa or Google Assistant-enabled devices for convenient voice commands (requires optional Wi-Fi hub).
- Real-Time Monitoring & Alerts: Receive instant notifications on your smartphone regarding lock status, unauthorized access attempts, and low battery warnings.
- Offline Access Code (OAC): Generate single-use or limited-use access codes that can be used without an internet connection or the Lockly app, ideal for guests or service providers.
- Programmable Auto-Lock: Customize the auto-lock delay from 5 to 300 seconds, ensuring your door is always secured after entry or exit.
සංරචක
The Lockly Secure Plus package typically includes the following:
- Exterior Assembly (Keypad with Handle)
- අභ්යන්තර එකලස් කිරීම
- ලෑච් බෝල්ට්
- වැඩ වර්ජන තහඩුව
- දෘඪාංග සවිකිරීම
- 4 x AA බැටරි
- 2 x Physical Backup Keys
- ස්ථාපන අත්පොත සහ පරිශීලක මාර්ගෝපදේශය
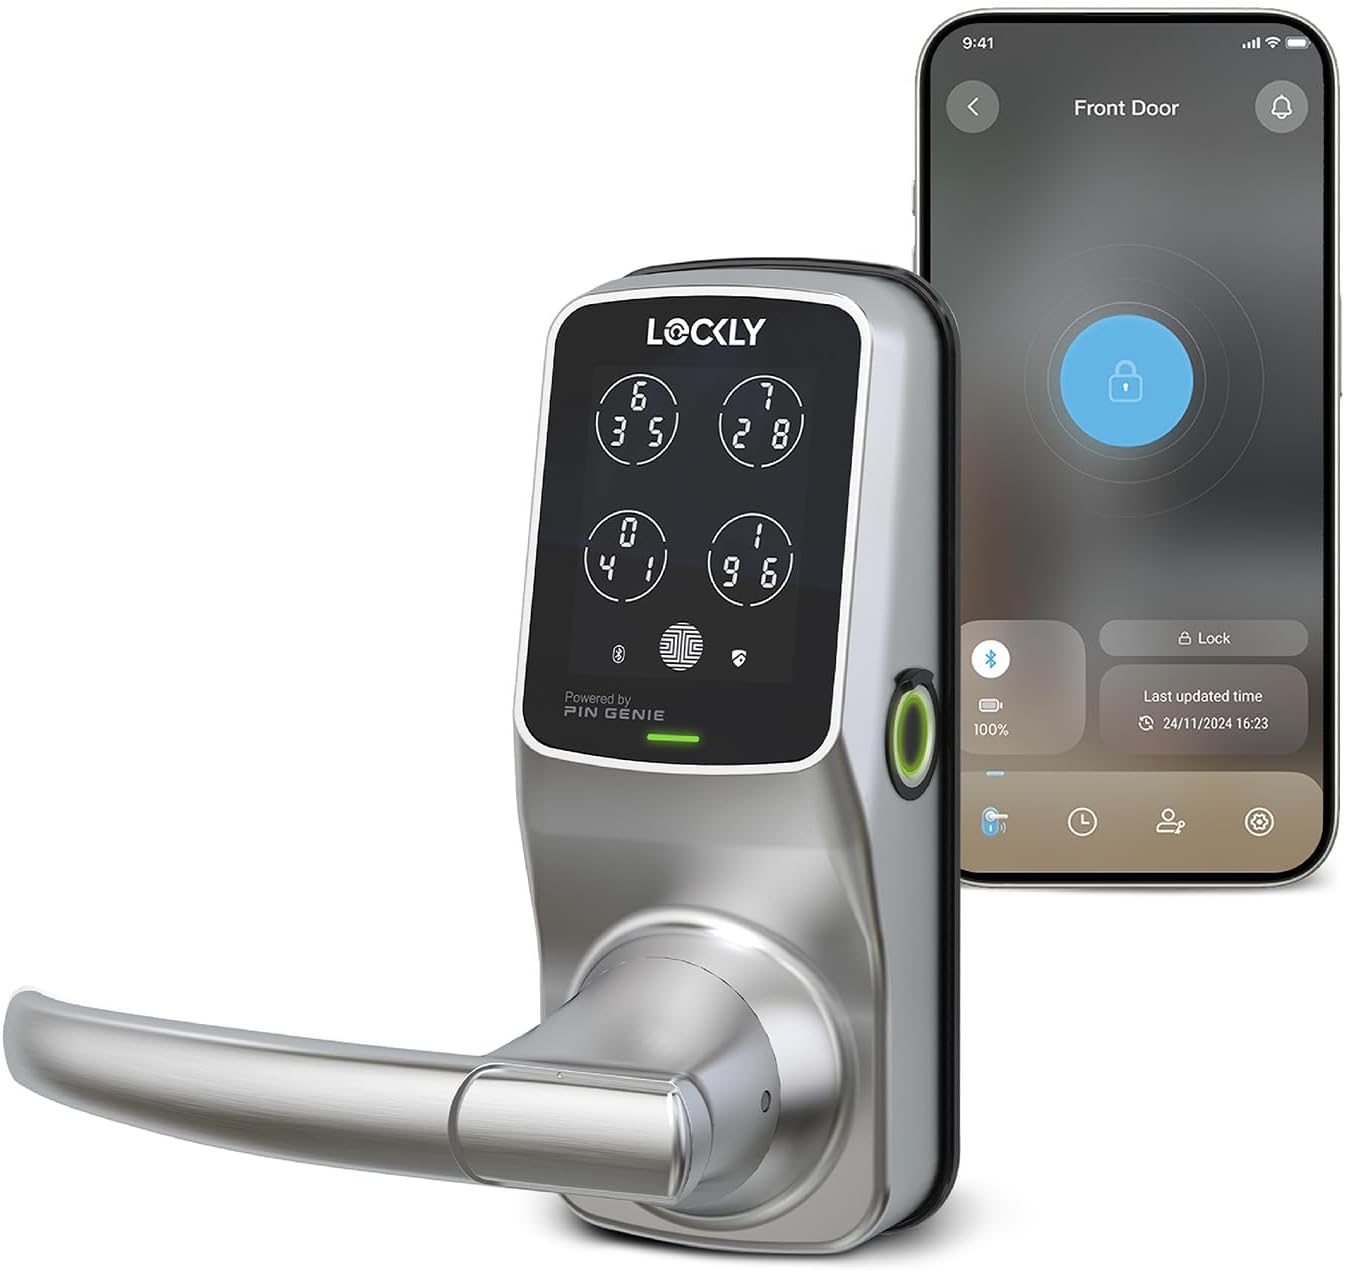
Image: Lockly Secure Plus Smart Door Lock in Satin Nickel finish, shown alongside a smartphone displaying the Lockly app interface for lock control.
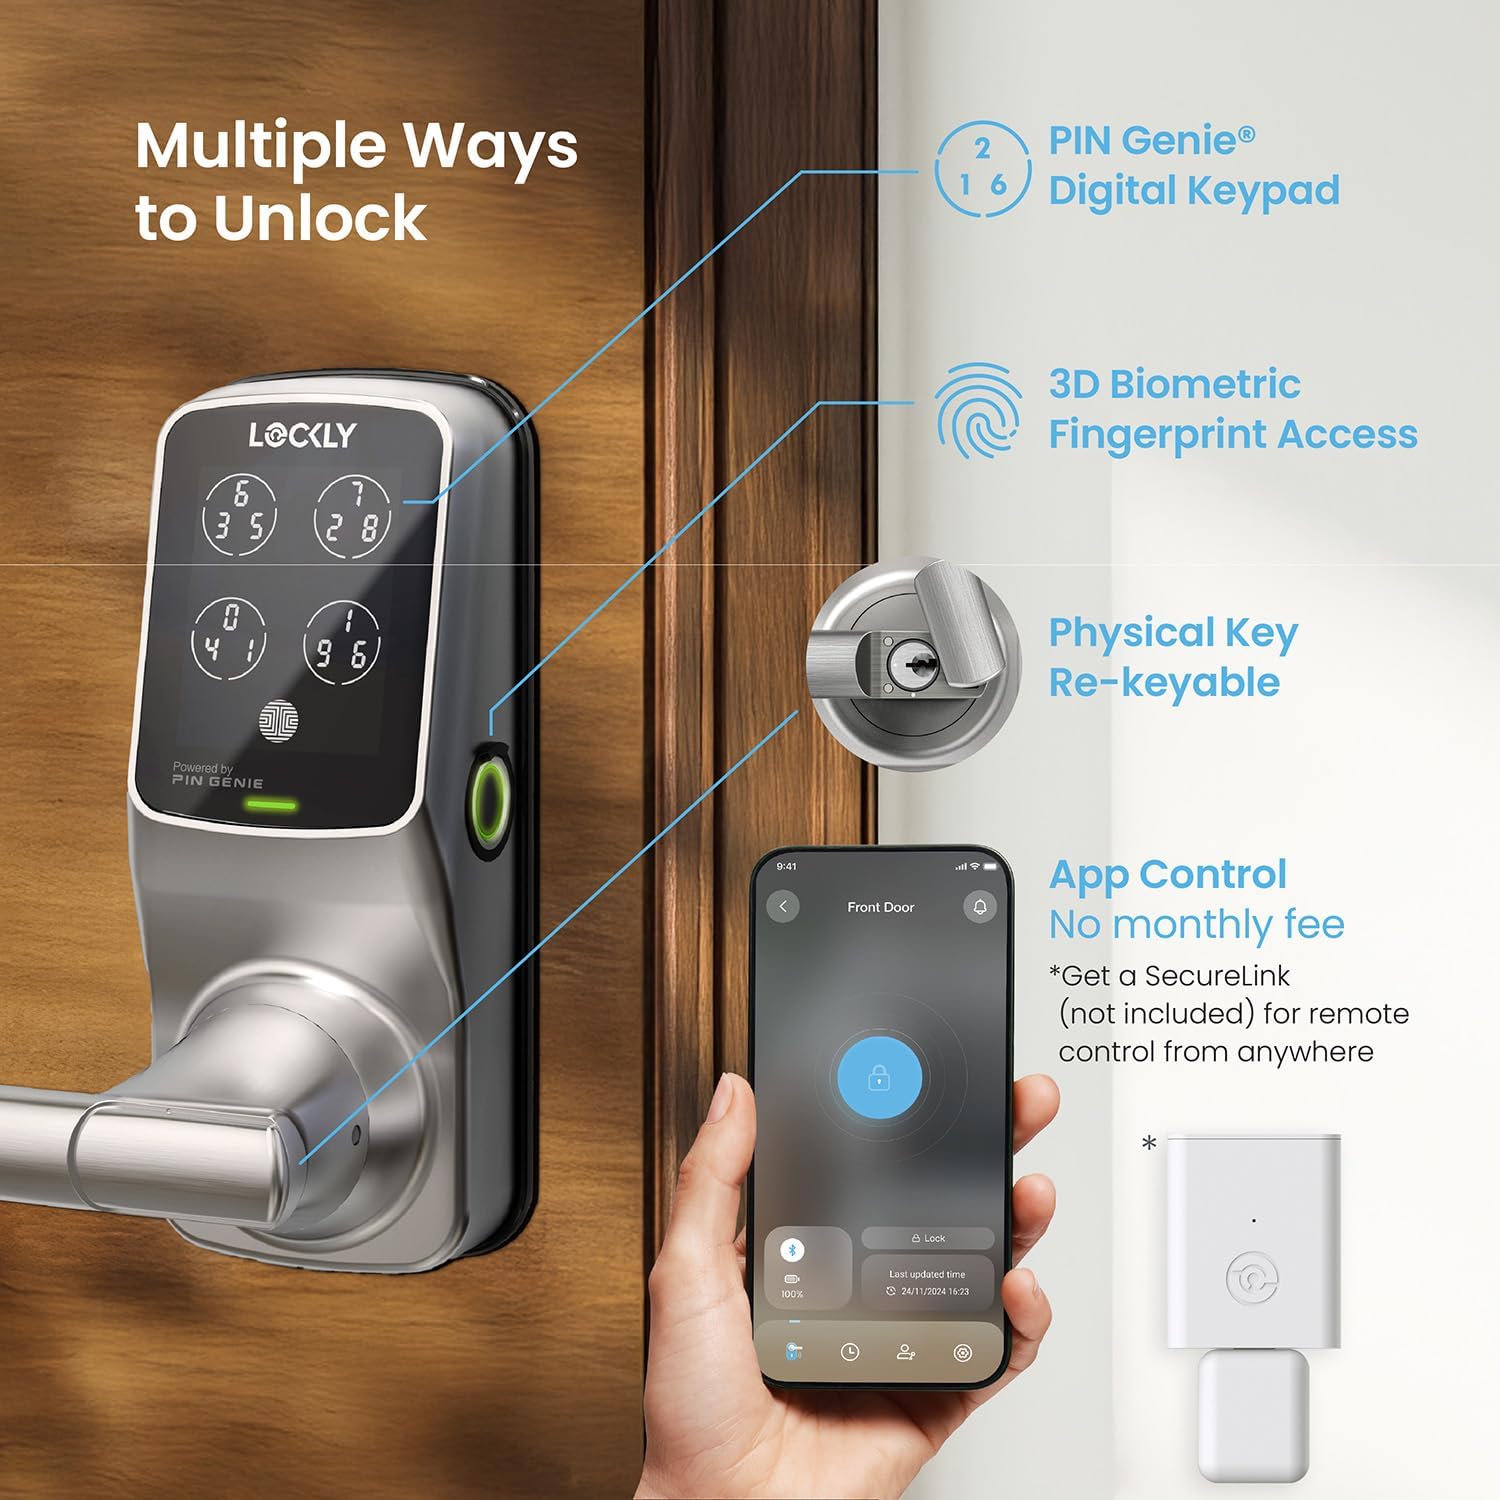
Image: Diagram illustrating the various unlocking methods: PIN Genie Digital Keypad, 3D Biometric Fingerprint Access, Physical Key, and App Control (with optional Secure Link Wi-Fi Hub).
සැලසුම
දොර අනුකූලතාව
ස්ථාපනය ආරම්භ කිරීමට පෙර, ඔබේ දොර පහත පිරිවිතරයන්ට අනුකූලදැයි පරීක්ෂා කරන්න:
- දොර ඝණකම: 1 3/8" to 2" (35mm - 50mm)
- පසුපෙළ: 2 3/8" or 2 3/4" (60mm or 70mm)
- සිදුරු විෂ්කම්භය: 2 1/8" (මි.මී. 54)

Image: Diagram detailing door thickness (1 3/8" - 2"), backset (2 3/8" or 2 3/4"), and bore hole diameter (2 1/8") for compatibility.
ස්ථාපනය
For detailed step-by-step installation instructions, please refer to the dedicated Installation Manual (PDF) included with your product. An official installation video may also be available on the Lockly support webඅඩවිය.
App Setup and Connection
To unlock the full potential of your Lockly Secure Plus, download and set up the Lockly App:
- යෙදුම බාගන්න: ඒ සඳහා සොයන්න "LOCKLY" in your smartphone's app store (iOS or Android) and download the official application.
- ගිණුම තනන්න: යෙදුම විවෘත කර නව පරිශීලක ගිණුමක් සෑදීමට හෝ ඔබට දැනටමත් එකක් තිබේ නම් ලොග් වීමට විමසීම් අනුගමනය කරන්න.
- අගුල එක් කරන්න: Select the option to add a new lock and choose your specific model (Lockly Secure Plus Latch Edition).
- බ්ලූටූත් හරහා සම්බන්ධ කරන්න: Ensure Bluetooth is enabled on your smartphone and that you are within close proximity to the lock. The app will guide you through the connection process. You may need to scan a QR code or enter an initial code found on your Lockly Activation Card.
- පරිපාලක සැකසුම: Note that only one administrator is allowed per lock. If you wish to control the lock from multiple devices, log in with the same administrator account.

Image: A hand holding a smartphone displaying the Lockly app, showing options for managing trusted users, guests, one-time access codes, and offline access.
මෙහෙයුම් උපදෙස්
අගුළු හැරීමේ ක්රම
PIN Genie ඩිජිටල් යතුරු පෑඩය
The PIN Genie keypad provides enhanced security by shuffling the numbers on the display:
- Activate Keypad: Lightly touch the keypad to activate the display.
- කේතය ඇතුළත් කරන්න: Input your 6-8 digit access code. The numbers on the four virtual buttons will change positions after each digit is pressed.
- තහවුරු කරන්න: Press the Lockly button (located at the bottom right of the keypad) to confirm your entry and unlock the door.
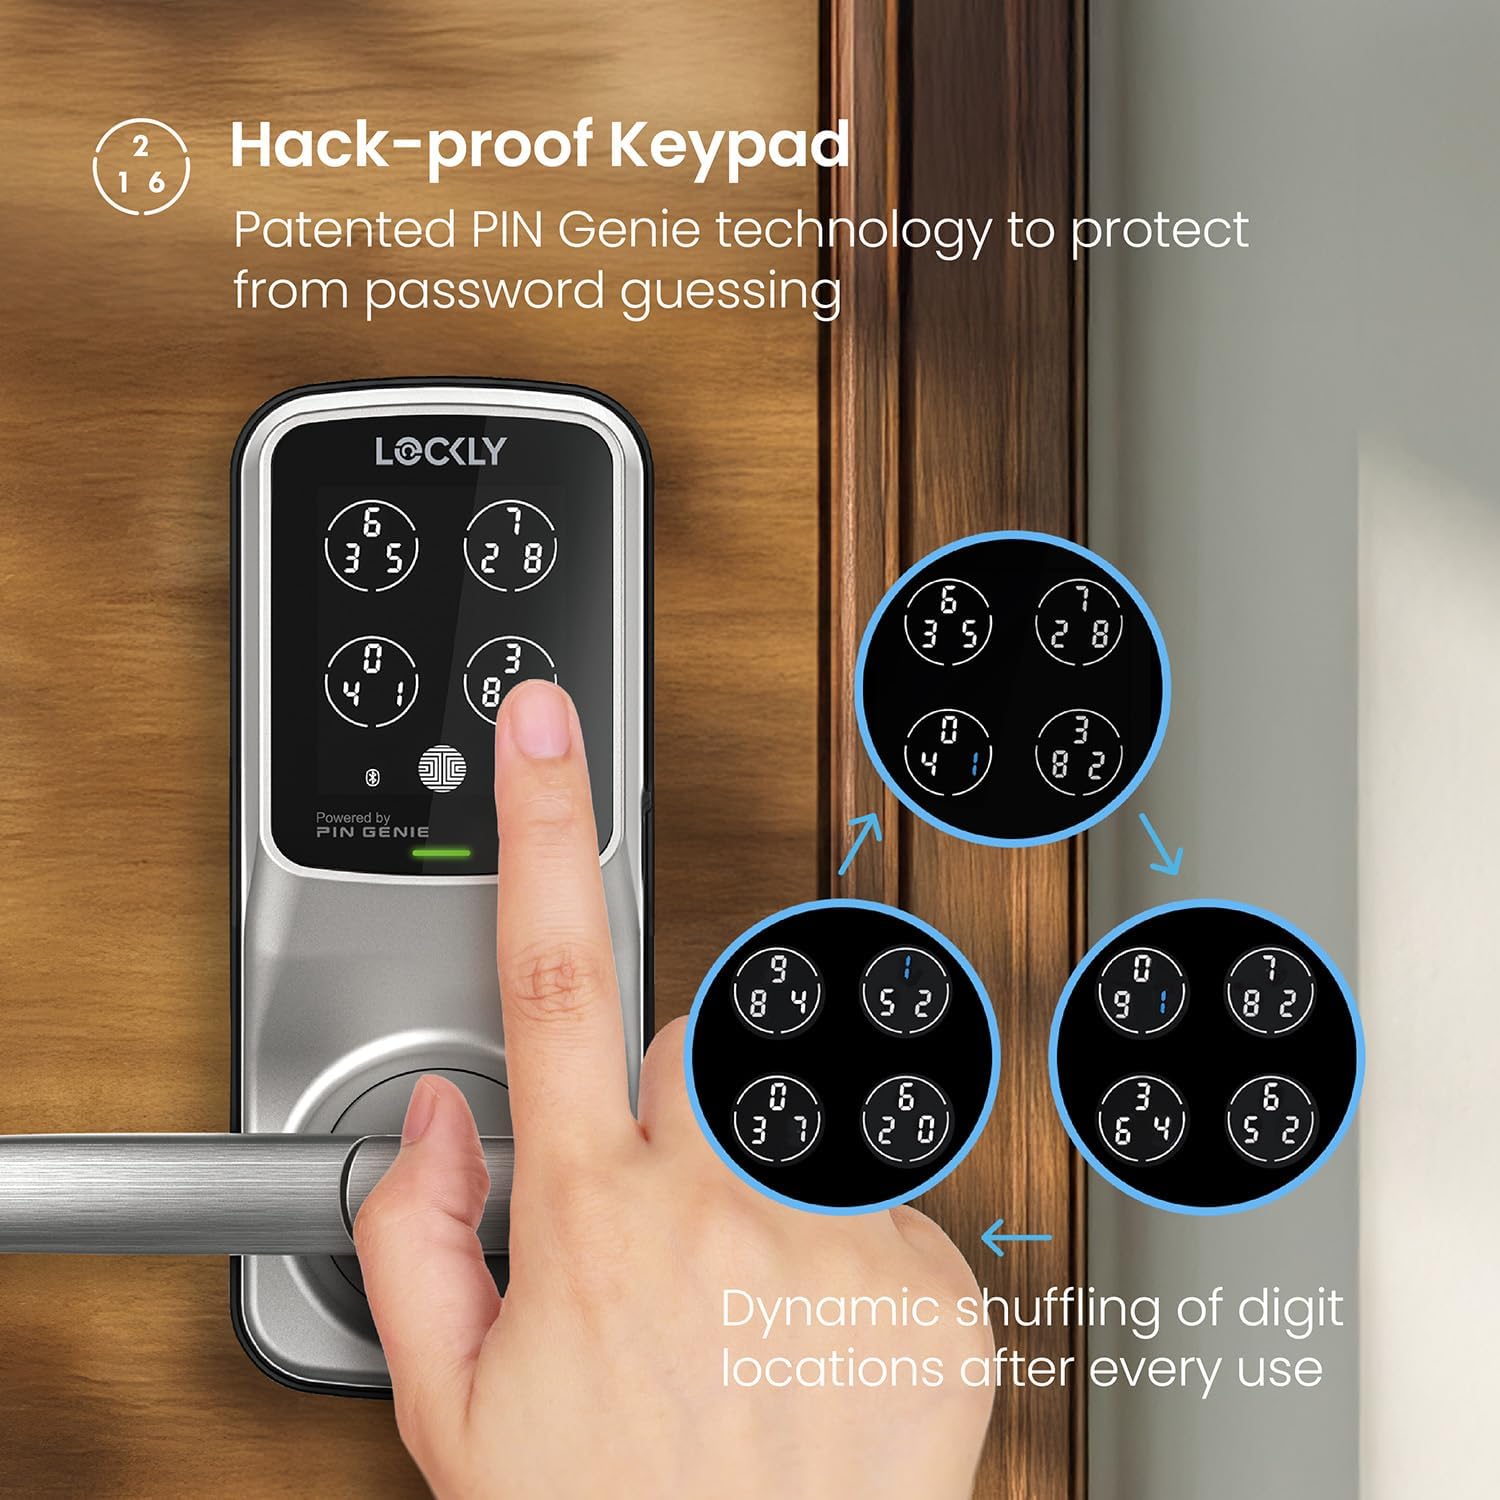
Image: A hand interacting with the Lockly PIN Genie keypad, demonstrating the dynamic shuffling of digits across the four virtual buttons for enhanced security.
3D Biometric Fingerprint Sensor
For quick and convenient access:
- Place Finger: Position your registered finger flat on the fingerprint sensor located on the side of the lock.
- අගුළු ඇරීම: The lock will recognize your fingerprint and unlock in approximately 0.3 seconds.
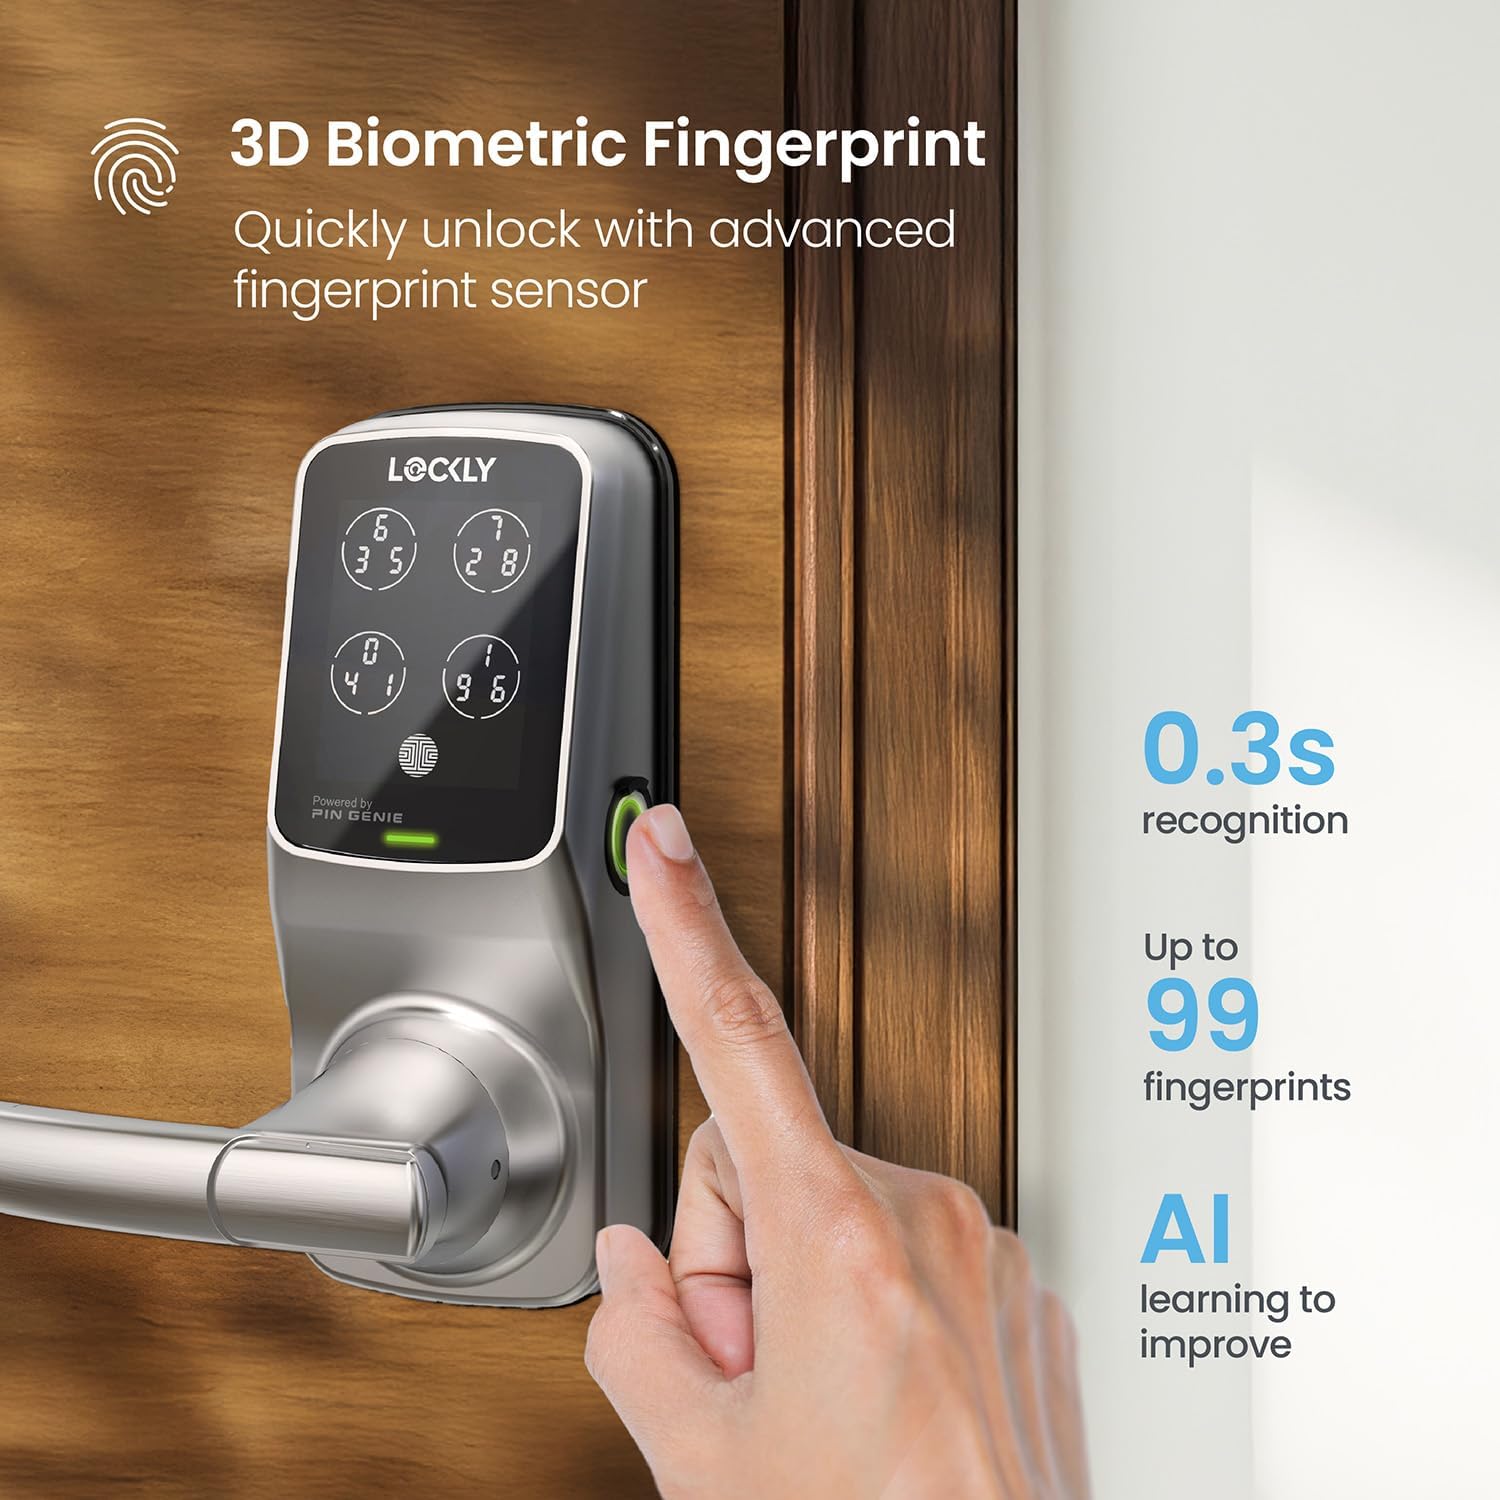
Image: A hand placing a finger on the side-mounted 3D biometric fingerprint sensor of the Lockly smart lock for quick unlocking.
ජංගම යෙදුම් පාලනය
Control your lock directly from your smartphone:
- යෙදුම විවෘත කරන්න: Launch the Lockly App on your smartphone.
- Select Lock: Choose the specific lock you wish to control from your list of devices.
- අගුල/අගුලු හැරීම: Tap the prominent lock/unlock icon on the main screen to change the door's status.

Image: A smartphone displaying the Lockly app's access history log, showing timestamps and methods of lock/unlock events.
Voice Control (with optional Wi-Fi Hub)
If you have the optional Lockly Secure Link Wi-Fi Hub, you can use voice commands:
- කුසලතාව/ක්රියාව සබල කරන්න: Ensure the Lockly skill (for Amazon Alexa) or action (for Google Assistant) is enabled in your respective smart home app.
- නිකුත් කිරීමේ විධානය: Use voice commands such as "Alexa, unlock the front door" or "Hey Google, is the front door locked?"

Image: A woman using voice commands with a smart speaker to control her Lockly smart lock, illustrating compatibility with Alexa and Google Assistant.
ස්වයංක්රීය අගුළු විශේෂාංගය
The auto-lock feature provides peace of mind by automatically securing your door after a specified time:
- ප්රවේශ සැකසීම්: Navigate to the auto-lock settings within the Lockly App.
- ප්රමාදය සකසන්න: Choose your preferred auto-lock delay, ranging from 5 to 300 seconds.

Image: A smartphone screen displaying the Lockly app's auto-lock settings, showing options to customize the automatic locking delay.
නඩත්තු කිරීම
බැටරි ප්රතිස්ථාපනය
Your Lockly Secure Plus is powered by 4 AA batteries. The lock will provide low battery alerts via the app and on the lock's display when replacement is needed.
- මැදිරිය සොයා ගන්න: The battery compartment is located on the interior side of the lock.
- බැටරි ප්රතිස්ථාපනය කරන්න: Remove the cover and replace all four AA batteries, ensuring correct polarity.
හදිසි බලය
In the event of complete battery depletion, you can temporarily power the lock using a 9V battery:
- Locate Contacts: Find the two contact points on the bottom edge of the exterior keypad.
- බලය යොදන්න: Press a 9V battery firmly against these contacts while simultaneously entering your access code or using your registered fingerprint.

Image: Diagram showing the location of the 4x AA battery compartment and the 9V battery emergency power contacts on the Lockly smart lock.
පිරිසිදු කිරීම
To maintain the appearance and functionality of your lock, clean the keypad and fingerprint sensor with a soft, dry, lint-free cloth. Avoid using abrasive cleaners, solvents, or harsh chemicals, as these can damage the finish or electronic components.
දෝෂගවේෂණය
පොදු ගැටළු සහ විසඳුම්
| කලාපය | විය හැකි හේතුව | විසඳුම |
|---|---|---|
| Lock not responding to keypad or fingerprint. | Low batteries, incorrect code/fingerprint, sensor obstruction. | Replace all four AA batteries. Ensure correct PIN entry. Clean fingerprint sensor and re-register fingerprint if necessary. |
| Mobile app not connecting to lock. | Bluetooth disabled, out of range, app glitch, Wi-Fi Hub issue. | Verify Bluetooth is enabled on your phone and you are within range. Restart the Lockly app or your phone. Check Wi-Fi Hub connection if using remote access. |
| Auto-lock feature is not engaging. | Auto-lock setting is disabled or set to a long delay. | Open the Lockly App, navigate to settings, and confirm that auto-lock is enabled with your desired delay time. |
| Physical backup key is not working. | Incorrect key, debris in keyway, lock mechanism issue. | Ensure you are using one of the two provided backup keys. Check the keyway for any obstructions. If the issue persists, contact Lockly support. |
| Keypad numbers are not visible or dim. | Low batteries, keypad malfunction. | බැටරි මාරු කරන්න. ගැටලුව දිගටම පවතී නම්, පාරිභෝගික සහාය අමතන්න. |
පිරිවිතර
- වෙළඳ නාමය: ලොක්ලි
- මාදිලියේ නම: Lockly Secure Plus
- ආදර්ශ අංකය: PGD628F
- UPC: 850003895062
- අගුළු වර්ගය: Smart Lock
- ද්රව්ය: සින්ක් මිශ්ර ලෝහය
- වර්ණය: සැටින් නිකල්
- මානයන් (L x W x H): අඟල් 7.8 x 2.9 x 7.2
- අයිතමයේ බර: රාත්තල් 6.48 කි
- බලශක්ති ප්රභවය: 4 AA බැටරි (ඇතුළත්)
- බැටරි ආයු කාලය: මාස 12 දක්වා (සාමාන්ය භාවිතය)
- සම්බන්ධතාවය: Bluetooth, Wi-Fi (with optional Secure Link Wi-Fi Hub)
- මෙහෙයුම් උෂ්ණත්වය: -4°F සිට 140°F (-20°C සිට 60°C)
- කාලගුණ ප්රතිරෝධය: IPX4 certified (Waterproof)
- විශේෂ ලක්ෂණ: Biometric Fingerprint, Touchscreen Keypad, Patented PIN Genie Technology, Smartphone Control, eKeys & eBadges, Offline Access Codes™
වගකීම් සහ සහාය
Lockly products are designed for durability and reliability. Your Lockly Secure Plus comes with a manufacturer's warranty. For detailed information regarding warranty terms, coverage, and duration, please refer to the warranty card included in your product packaging or visit the official Lockly webඅඩවිය.
For technical assistance, troubleshooting, or any product-related inquiries, Lockly offers dedicated customer support:
- මාර්ගගත සහාය: Visit the Lockly Support Center at www.lockly.com/support for FAQs, guides, and contact options.
- දුරකථන සහාය: Refer to your product packaging or the Lockly website for the most current customer service contact numbers and operating hours.


