1. හැඳින්වීම
Thank you for choosing the FLYLINKTECH Portable Car Battery Jump Starter. This device is designed to provide a reliable and safe solution for jump-starting 12V vehicles with up to 5.0L gas or 4.0L diesel engines. It also functions as a portable power bank and features an integrated LED flashlight. Please read this manual thoroughly before use to ensure proper operation and safety.

Image: The FLYLINKTECH Portable Car Battery Jump Starter, showing the main unit, smart clamps, and charging cables.
2 ආරක්ෂිත තොරතුරු
අවවාදයයි: මෙම නිෂ්පාදනය භාවිතා කිරීමට පෙර සියලුම ආරක්ෂක අනතුරු ඇඟවීම් සහ උපදෙස් කියවන්න. අනතුරු ඇඟවීම් සහ උපදෙස් අනුගමනය කිරීමට අපොහොසත් වීමෙන් විදුලි කම්පනය, ගින්න සහ/හෝ බරපතල තුවාල සිදුවිය හැක.
- Do not attempt to jump-start vehicles with engines larger than specified (5.0L gas or 4.0L diesel).
- බැටරිය ක්රියා විරහිත නම් ජම්ප් ස්ටාටරය භාවිතා නොකරන්න.amps හෝ කේබල් හානි වී ඇත.
- Ensure proper polarity connection: Red clamp to positive (+), Black clamp to negative (-). Reverse polarity can cause damage.
- දරුවන්ට ළඟා විය නොහැකි ලෙස තබා ගන්න.
- නිෂ්පාදිතය වැසි හෝ හිම වලට නිරාවරණය නොකරන්න.
- ඒකකය විසුරුවා හරින්න එපා. සියලුම සේවා සුදුසුකම් ලත් පුද්ගලයින් වෙත යොමු කරන්න.
- Avoid short-circuiting the clamps.
- The device features intelligent chip protection against overcurrent, short-circuit, overload, overvoltage, overcharge, over-discharge, and reverse polarity. However, always exercise caution.
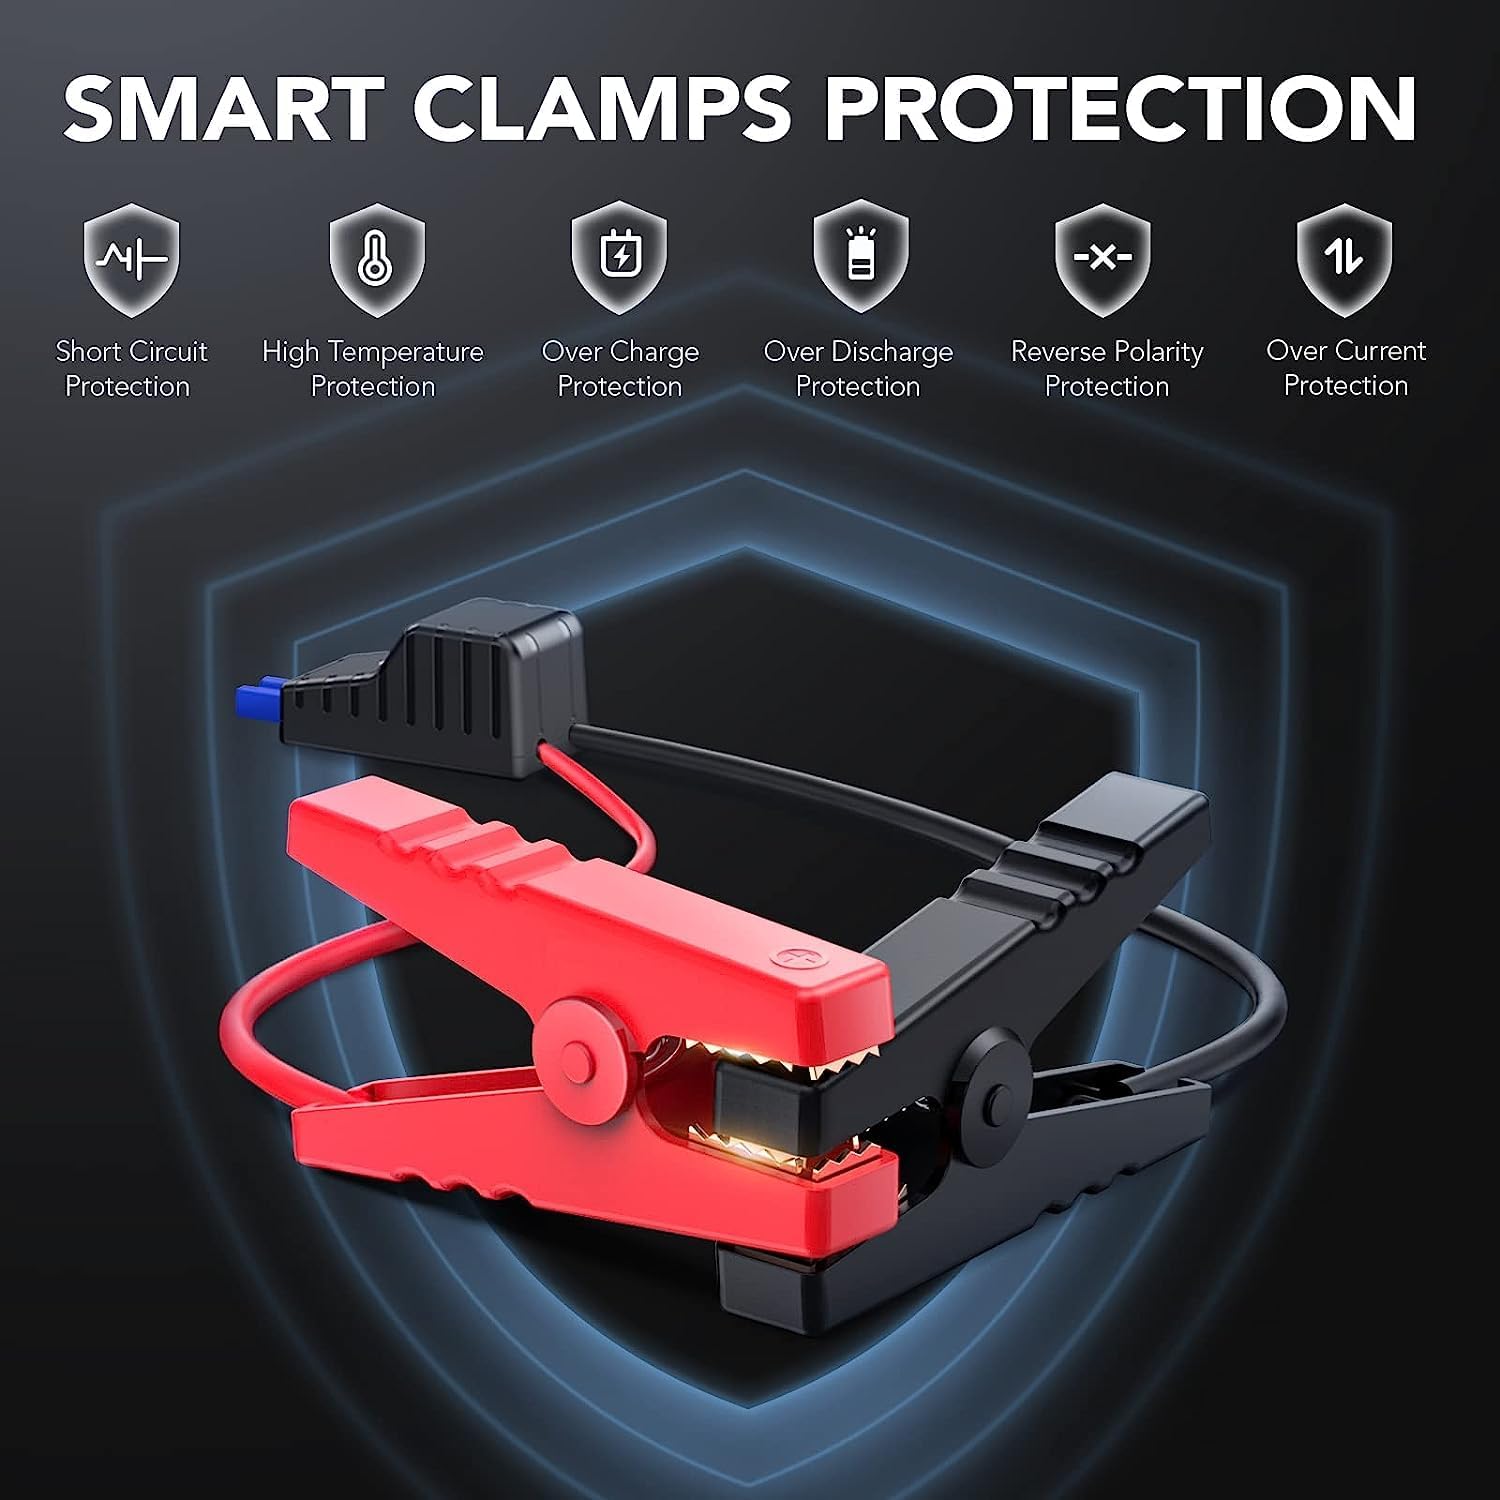
Image: Illustration of the smart clamps and their integrated safety protection features.
3. පැකේජ අන්තර්ගතය
ඔබගේ පැකේජයේ සියලුම අයිතම ඇති බව තහවුරු කරගන්න:
- FLYLINKTECH Jump Starter Unit
- Smart Jumper Cables (with Red and Black clamps)
- Micro USB Charging Cable
- පරිශීලක අත්පොත
- EC5 Cigarette Lighter Adapter (Optional, may vary by package)

රූපය: නිෂ්පාදන පැකේජයට ඇතුළත් කර ඇති සියලුම සංරචක.
4. නිෂ්පාදන අවසන්view
Familiarize yourself with the components of your jump starter:

Image: Detailed diagram labeling the various ports, buttons, and indicators on the jump starter unit and its clamps.
- බල බොත්තම: Turns the unit on/off and cycles through flashlight modes.
- LED දර්ශක පහන්: Show the battery charge level.
- ෆ්ලෑෂ් ලයිට්: බහු මාදිලි සහිත ඒකාබද්ධ LED ආලෝකය.
- මයික්රෝ USB ආදානය: For charging the jump starter unit.
- USB ප්රතිදානය: For charging external devices (e.g., smartphones, tablets).
- Auto Jump Port: Connects to the smart jumper cables.
- ස්මාර්ට් ජම්පර් කේබල්: රතු (+) සහ කළු (-) clamps with built-in safety features.
5. පැනීමේ ආරම්භකය ආරෝපණය කිරීම
පළමු භාවිතයට පෙර, ජම්ප් ස්ටාටරය සම්පූර්ණයෙන්ම ආරෝපණය කරන්න. භාවිතයේ නොමැති වුවද, බැටරි සෞඛ්යය පවත්වා ගැනීම සඳහා සෑම මාස 3-6 කට වරක් ඒකකය නැවත ආරෝපණය කිරීම නිර්දේශ කෙරේ.
- Connect the Micro USB charging cable to the Micro USB Input port on the jump starter.
- Connect the other end of the USB cable to a 5V/2A USB wall adapter (not included) or a car charger.
- The LED indicator lights will illuminate and flash to show the charging progress. All lights will be solid when fully charged.
6. මෙහෙයුම් උපදෙස්
6.1. වාහනයක් පැනීම ආරම්භ කිරීම
Ensure the jump starter is at least 75% charged (3 LED lights illuminated) before attempting to jump-start a vehicle.

Image: The jump starter connected to a vehicle battery, ready for use.

Image: Visual guide for vehicle compatibility based on engine displacement.
- ස්මාර්ට් Cl සම්බන්ධ කරන්නamps: Insert the blue plug of the smart jumper cables into the Auto Jump Port on the jump starter. Ensure a firm connection.
- කාර් බැටරියට අමුණන්න: රතු (+) cl සම්බන්ධ කරන්නamp to the positive terminal of the car battery and the black (-) clamp සෘණ අග්රයට. ස්මාර්ට් clamps will indicate a successful connection (e.g., a green light). If an error is detected (e.g., reverse polarity), an alarm may sound or a red light may appear.
- වාහනය ආරම්භ කරන්න: වරක් clamps are correctly attached and the indicator is green, start your vehicle.
- Cl ඉවත් කරන්නamps: After the vehicle starts, immediately remove the smart clamps from the car battery, then disconnect the smart clampජම්ප් ස්ටාර්ටර් ඒකකයෙන්.

Image: Step-by-step visual instructions for jump starting a vehicle.
6.2. අතේ ගෙන යා හැකි බලශක්ති බැංකුවක් ලෙස භාවිතා කිරීම
The jump starter can charge various USB-powered devices.
- Connect your device's USB charging cable to the USB Output port on the jump starter.
- පැනීමේ ආරම්භකය ඔබගේ උපාංගය ස්වයංක්රීයව ආරෝපණය කිරීම ආරම්භ කරයි.
- ඔබගේ උපාංගයේ ආරෝපණ තත්ත්වය නිරීක්ෂණය කරන්න.

Image: The jump starter functioning as a power bank, charging a smartphone and a tablet.
6.3. LED Flashlight Modes
The integrated LED flashlight has three modes:
- සාමාන්ය ආලෝකය: සක්රිය කිරීමට බල බොත්තම වරක් ඔබන්න.
- SOS මාදිලිය: Press the power button a second time to activate the SOS signal.
- ස්ට්රෝබ් ආලෝකය: Press the power button a third time for a flashing strobe light.
- ෆ්ලෑෂ් ලයිට් එක නිවා දැමීමට බල බොත්තම සිව්වන වරටත් ඔබන්න.

Image: The jump starter's LED flashlight in use, highlighting its three modes.
7. නඩත්තු කිරීම හා ගබඩා කිරීම
- පිරිසිදු කිරීම: Wipe the unit with a dry, soft cloth. Do not use harsh chemicals or abrasive materials.
- අයකිරීම: Recharge the unit every 3-6 months to prevent deep discharge and prolong battery life.
- ගබඩා: Store the jump starter in a cool, dry place, away from direct sunlight and extreme temperatures.
- උෂ්ණත්ව පරාසය: The device is designed to operate and be stored within a temperature range of -20°C to 60°C (-4°F to 140°F).
- ජලය සහ දූවිලි ප්රතිරෝධය: The unit has an IP67 rating, making it resistant to water and dust. However, avoid prolonged submersion.
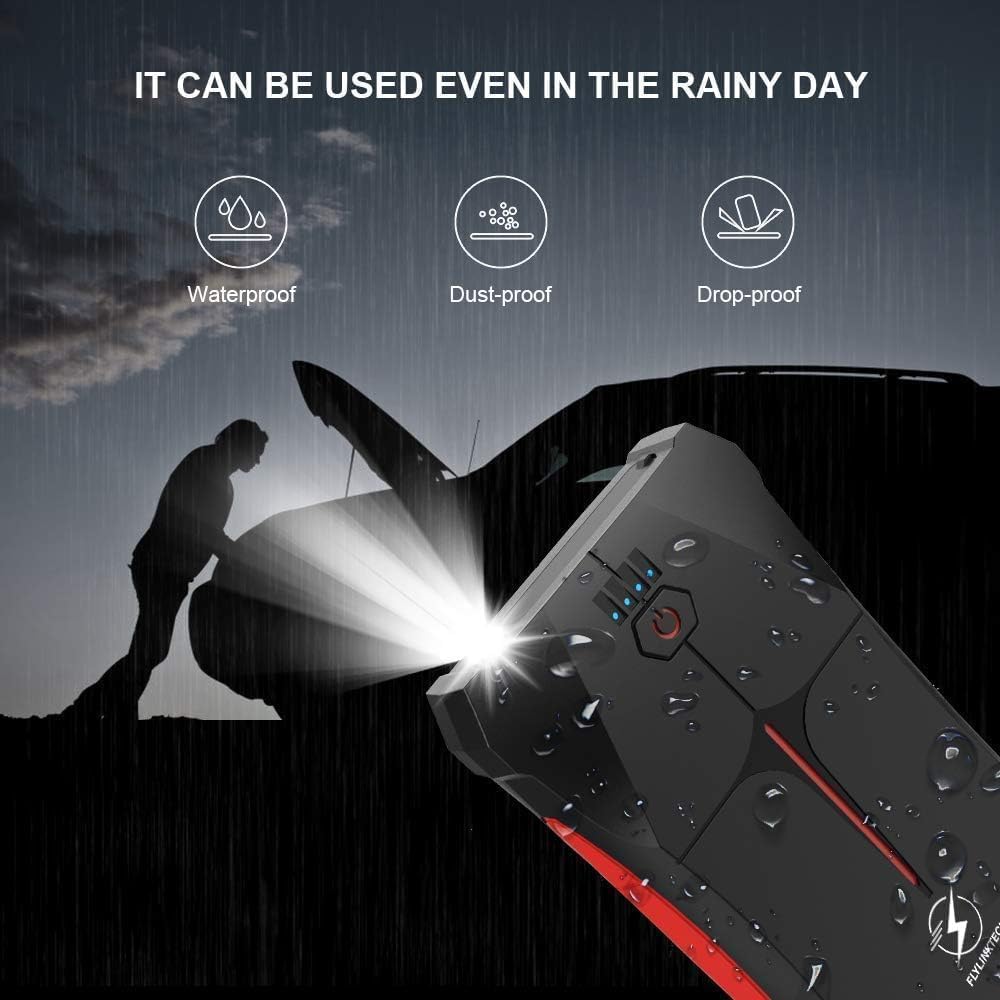
Image: The jump starter demonstrating its weather-resistant properties (waterproof, dust-proof, drop-proof).

Image: The jump starter's operational temperature range from -20°C to 60°C.
8. දෝශ නිරාකරණය
| ගැටලුව | විය හැකි හේතුව | විසඳුම |
|---|---|---|
| පැනීමේ ආරම්භකය ක්රියාත්මක නොවේ. | බැටරිය සම්පූර්ණයෙන්ම විසර්ජනය වී ඇත. | ජම්ප් ස්ටාටරය සම්පූර්ණයෙන්ම ආරෝපණය කරන්න. |
| වාහනය පණ ගන්වන්නේ නැත. | වැරදි clamp සම්බන්ධතාවය. | Ensure red clamp is on positive (+), black on negative (-). Check smart clamp දර්ශකය. |
| ජම්ප් ස්ටාටර් බැටරිය අඩුයි. | පැනීමේ ආරම්භකය නැවත ආරෝපණය කරන්න. | |
| වාහනයේ බැටරියට දැඩි ලෙස හානි සිදුවී ඇත. | වෘත්තීය කාර්මිකයෙකුගෙන් විමසන්න. | |
| ස්මාර්ට් clamps show error/alarm. | Reverse polarity or short circuit. | Disconnect immediately and re-attach clamps නිවැරදිව. |
| USB උපාංගය ආරෝපණය නොවේ. | ජම්ප් ස්ටාටර් බැටරිය අඩුයි. | පැනීමේ ආරම්භකය නැවත ආරෝපණය කරන්න. |
| USB cable or device fault. | වෙනත් USB කේබලයක් හෝ උපාංගයක් උත්සාහ කරන්න. |
9. පිරිවිතර
| විශේෂාංගය | විස්තර |
|---|---|
| ආකෘතිය | CF200 |
| උච්ච ධාරාව | 800A |
| බැටරි ධාරිතාව | 13200mAh (Lithium-polymer/Lithium-ion) |
| ආරම්භය වෙළුමtage | 12V |
| ගෑස් එන්ජින් ශ්රේණිගත කිරීම | 5.0L දක්වා |
| ඩීසල් එන්ජින් ශ්රේණිගත කිරීම | 4.0L දක්වා |
| USB ප්රතිදානය | 5V/2.1A |
| මයික්රෝ USB ආදානය | 5V/2A |
| මෙහෙයුම් උෂ්ණත්වය | -20°C සිට 60°C (-4°F සිට 140°F) |
| මානයන් (L x W x H) | 15.8 x 8.5 x 2 cm (6.2 x 3.3 x 0.8 අඟල්) |
| බර | ග්රෑම් 370 (රාත්තල් 0.82) |
| ජල/දූවිලි ප්රතිරෝධය | IP67 |
| සහතික | CE |
10. වගකීම් සහ සහාය
FLYLINKTECH provides a 3-year warranty for this product from the date of purchase. This warranty covers manufacturing defects and workmanship under normal use. It does not cover damage caused by misuse, accidents, unauthorized modifications, or natural disasters.
For warranty claims, technical support, or any questions regarding your product, please contact FLYLINKTECH customer service. Please have your purchase receipt and product model number (CF200) ready when contacting support.
සබඳතා තොරතුරු:
- විද්යුත් තැපෑල: support@flylinktech.hk
- Webඅඩවිය: www.flylinktech.com (Please check for the most current contact details)
Note: No official product videos were found in the provided data for embedding in this manual.


