හැඳින්වීම

Figure 1: Amazon Basics Programmable Bread Maker. This image shows the black bread maker from an angled front view, highlighting its compact design, control panel with LCD display, and program settings listed on the top surface.
ස්තූතියි, උදව් කළාටasing the Amazon Basics Programmable Bread Maker. This appliance is designed to simplify the process of making fresh bread, doughs, and jams at home. Please read this instruction manual thoroughly before first use to ensure safe operation and optimal performance. Keep this manual for future reference.
වැදගත් ආරක්ෂක උපදෙස්
- උපාංගය භාවිතා කිරීමට පෙර සියලුම උපදෙස් කියවන්න.
- උණුසුම් මතුපිට ස්පර්ශ නොකරන්න. හසුරු හෝ බොත්තම් භාවිතා කරන්න.
- විදුලි කම්පනයෙන් ආරක්ෂා වීමට, ලණුව, පේනු හෝ උපකරණ ජලයේ හෝ වෙනත් දියරයක ගිල්වන්න එපා.
- ඕනෑම උපකරණයක් ළමුන් විසින් හෝ ඒ අසල භාවිතා කරන විට සමීප අධීක්ෂණයක් අවශ්ය වේ.
- භාවිතයේ නොමැති විට සහ පිරිසිදු කිරීමට පෙර අලෙවිසැලෙන් විසන්ධි කරන්න. කොටස් දැමීමට හෝ ඉවත් කිරීමට පෙර සිසිල් වීමට ඉඩ දෙන්න.
- හානියට පත් ලණුවකින් හෝ ප්ලග් එකකින් හෝ උපකරණය ක්රියා විරහිත වූ පසු හෝ කිසිඳු ආකාරයකින් හානි වූ පසු කිසිඳු උපකරණයක් ක්රියාත්මක නොකරන්න.
- උපකරණ නිෂ්පාදකයා විසින් නිර්දේශ නොකළ උපාංග ඇමුණුම් භාවිතා කිරීම තුවාල වීමට හේතු විය හැක.
- එළිමහනේ භාවිතා නොකරන්න.
- ලණුව මේසයේ හෝ කවුන්ටරයේ අද්දර එල්ලීමට හෝ උණුසුම් මතුපිට ස්පර්ශ කිරීමට ඉඩ නොදෙන්න.
- උණුසුම් වායුවක් හෝ විදුලි දාහකයක් මත හෝ ඒ අසල හෝ රත් වූ උඳුනක තබන්න එපා.
- උණුසුම් තෙල් හෝ වෙනත් උණුසුම් ද්රව සහිත උපකරණයක් ගෙන යාමේදී අතිශයින්ම පරෙස්සම් විය යුතුය.
- විසන්ධි කිරීමට, ඕනෑම පාලනයක් "අක්රිය" ලෙස හරවන්න, ඉන්පසු බිත්ති අලෙවිසැලෙන් ප්ලග් ඉවත් කරන්න.
- අපේක්ෂිත භාවිතය සඳහා හැර වෙනත් උපකරණ භාවිතා නොකරන්න.
නිෂ්පාදන සංරචක
Familiarize yourself with the parts of your bread maker before operation.

රූපය 2: ඇතුළත් උපාංග. This image displays the bread pan with handle, a clear plastic measuring cup, a black kneading blade, a white double-sided measuring spoon (teaspoon/tablespoon), and a metal hook for removing the kneading blade.
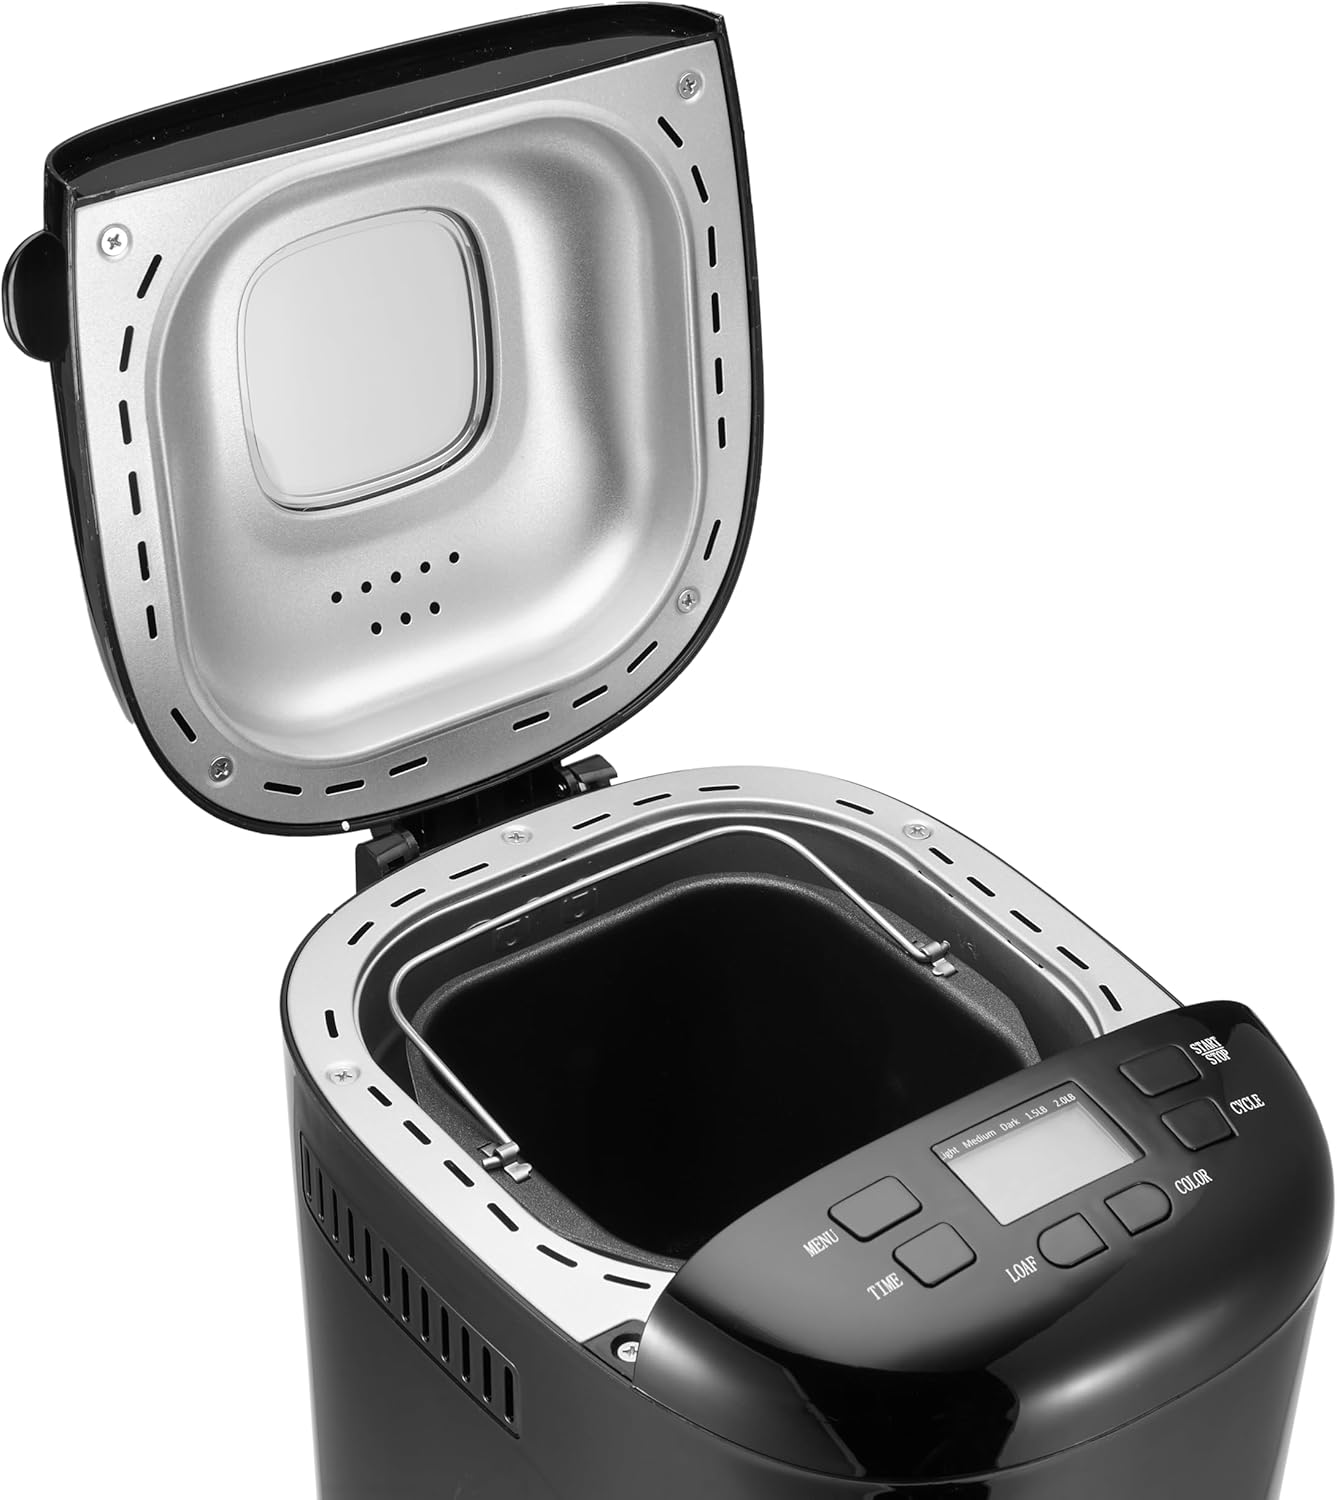
Figure 3: Bread Maker Interior. This image shows the bread maker with its lid open, revealing the heating element and the space where the bread pan is inserted. The control panel with its LCD display and buttons is visible at the front.
- ප්රධාන ඒකකය: පාන් සාදන්නාගේ ප්රාථමික නිවාසය.
- පාලන පුවරුව: Features an LCD display and buttons for program selection, time, loaf size, and crust color.
- පියන: ෙබ්කිං කුටිය ආවරණය කරයි, බොහෝ විට a viewජනේලය.
- පාන් පෑන්: Non-stick baking pan where ingredients are placed and bread is baked.
- අනන තලය: Attaches to the shaft inside the bread pan for mixing and kneading dough.
- මිනුම් කෝප්පය: For liquid and dry ingredients.
- මිනුම් හැන්දක්: For smaller measurements (teaspoon/tablespoon).
- කොක්ක: Used to remove the kneading blade from the baked loaf.
ස්ථාපනය සහ පළමු භාවිතය
- ඇසිරීම: පාන් සාදන්නා සහ සියලුම උපාංග ඇසුරුම් වලින් ප්රවේශමෙන් ඉවත් කරන්න. අනාගත ගබඩා කිරීම හෝ ප්රවාහනය සඳහා ඇසුරුම් තබා ගන්න.
- පිරිසිදු කිරීම: Before first use, wash the bread pan and kneading blade with warm, soapy water. Rinse thoroughly and dry completely. Wipe the exterior of the bread maker with a damp රෙදි. ප්රධාන ඒකකය ජලයේ ගිල්වන්න එපා.
- මූලික පිළිස්සීම: It is recommended to run the bread maker empty for approximately 10 minutes on a "Bake" cycle (if available, or a short custom bake cycle) to burn off any manufacturing oils. Some smoke or odor may be present; this is normal. Ensure adequate ventilation. After this, allow the unit to cool completely and clean the interior again.
- ස්ථානගත කිරීම: පාන් සාදන්නා සෘජු හිරු එළියෙන් සහ තාප ප්රභවයන්ගෙන් ඈත්ව, ස්ථාවර, පැතලි, තාප ප්රතිරෝධී මතුපිටක් මත තබන්න. උපකරණය වටා ප්රමාණවත් වාතාශ්රයක් ඇති බවට වග බලා ගන්න.
- බල සම්බන්ධතාවය: විදුලි රැහැන භූගත විදුලි අලෙවිසැලකට සම්බන්ධ කරන්න. ඒකකය භාවිතයට සූදානම් බව දක්වමින් සංදර්ශකය ආලෝකමත් වනු ඇත.
මෙහෙයුම් උපදෙස්
This section guides you through the process of making bread with your appliance.
පාලක පැනලය අවසන්view
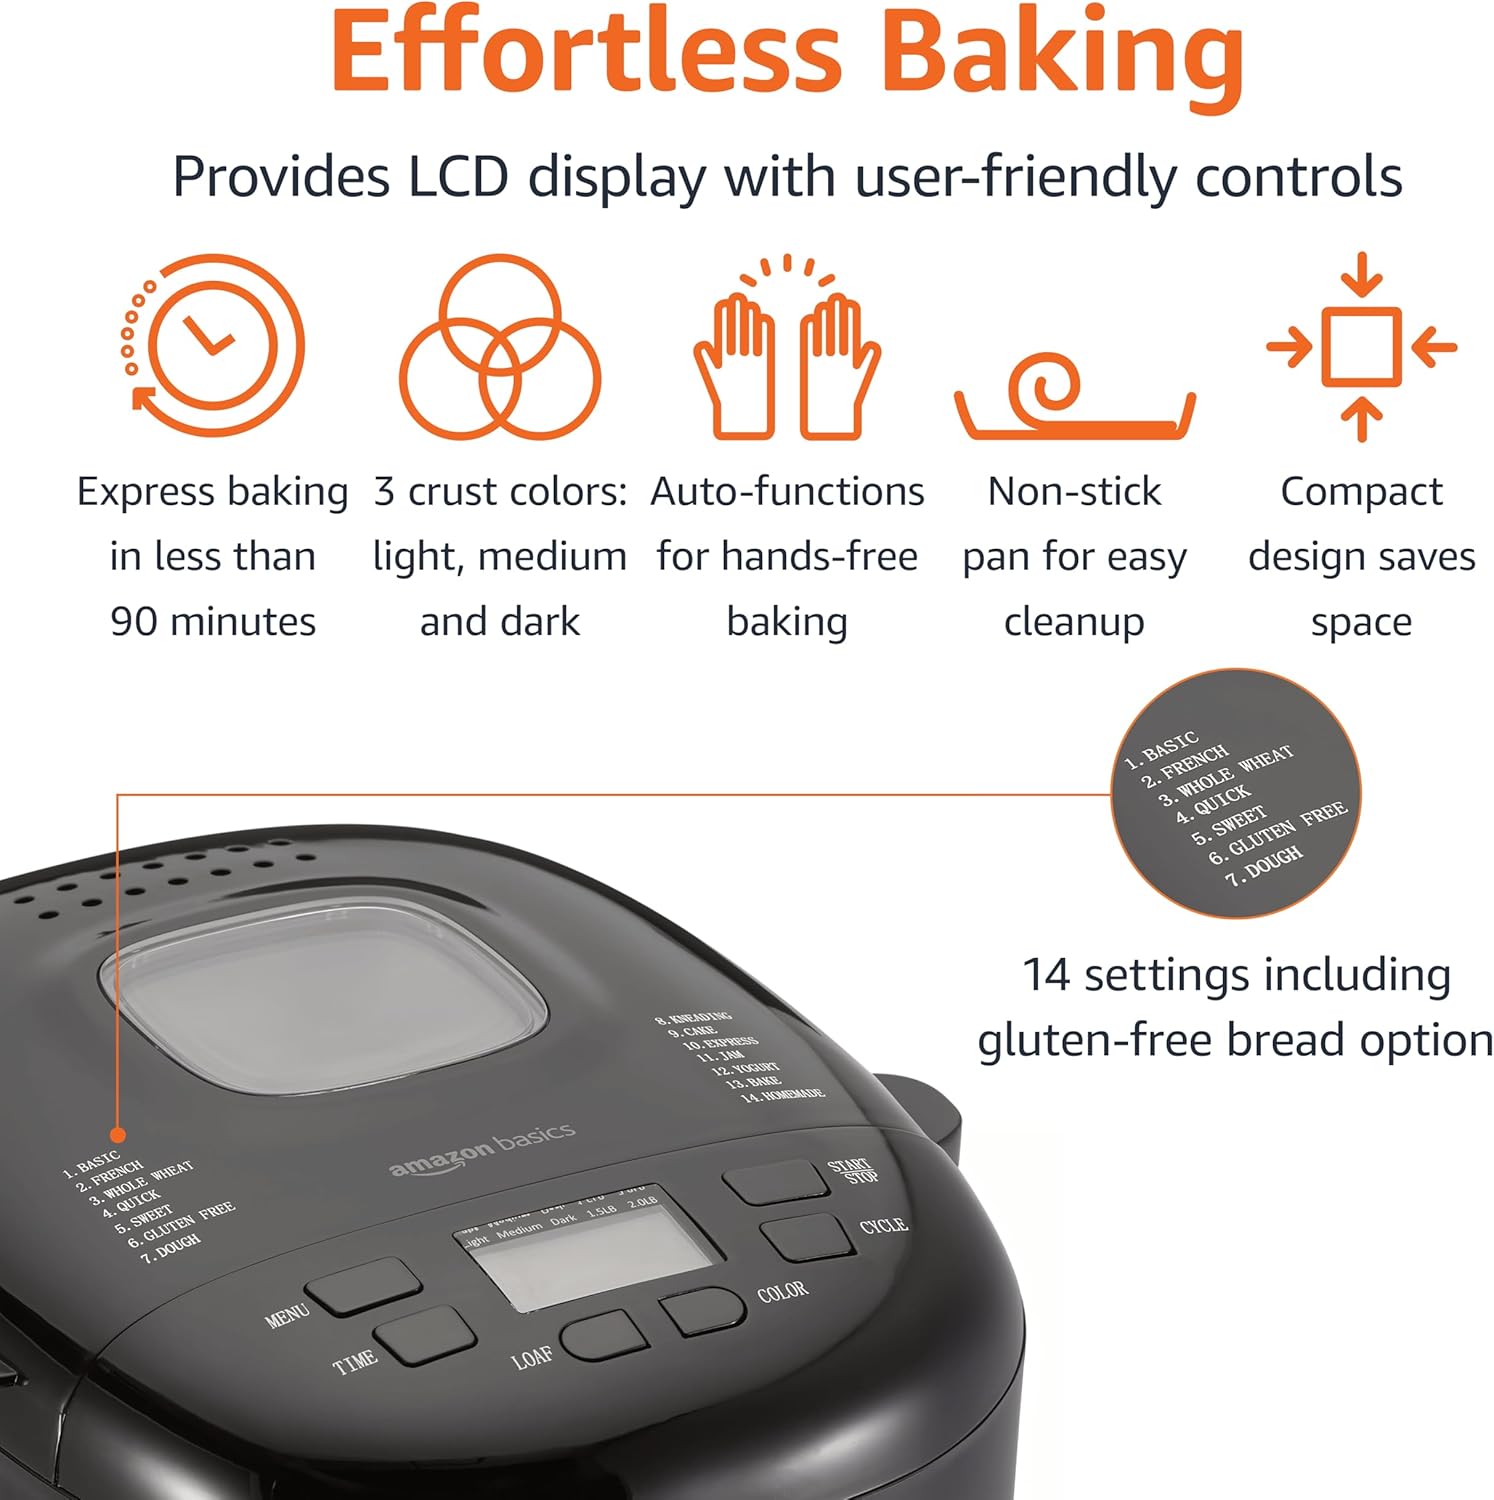
රූපය 4: පාලක පැනලය. This image highlights the bread maker's control panel, featuring an LCD screen that displays program information. Buttons for 'MENU', 'TIME', 'LOAF', 'COLOR', and 'CYCLE' are clearly visible, along with a list of 14 program settings.
- මෙනු බොත්තම: Selects one of the 14 available programs (e.g., Basic, French, Whole Wheat, Sweet, Gluten Free, Dough, Jam).
- TIME Buttons (+/-): ප්රමාද වූ පිළිස්සීම සඳහා ප්රමාද ටයිමරය සකසයි.
- LOAF බොත්තම: Selects the loaf size (e.g., 1.5 lb or 2 lb).
- වර්ණ බොත්තම: Selects the crust darkness (Light, Medium, Dark).
- CYCLE (Start/Stop) Button: Starts or stops the selected program.
- LCD සංදර්ශකය: Shows the selected program, time remaining, loaf size, and crust color.
පාන් සෑදීමේ මූලික පියවර
- ඇනීමේ තලය ඇතුළු කරන්න: පාන් පෑන් එක ඇතුලේ තියෙන පතුවළ මත අනන තලය තබන්න.
- අමුද්රව්ය එකතු කරන්න: ඔබේ වට්ටෝරුවෙහි දක්වා ඇති අනුපිළිවෙලට පාන් පෑන් එකට අමුද්රව්ය එකතු කරන්න (සාමාන්යයෙන් පළමුව දියර, පසුව වියළි අමුද්රව්ය, අවසානයේ යීස්ට් දමා දියර/ලුණු වලින් වෙන් කරන්න). නිවැරදි මිනුම් සහතික කරන්න.
- පාන් පෑන් තබන්න: Insert the bread pan into the bread maker, ensuring it is securely locked in place. Close the lid.
- වැඩසටහන තෝරන්න: ඔබන්න මෙනුව button to choose the desired program (e.g., "Basic" for white bread).
- රොටියේ ප්රමාණය තෝරන්න: ඔබන්න ලොෆ් button to select the appropriate loaf size (1.5 lb or 2 lb).
- කබොල වර්ණය තෝරන්න: ඔබන්න වර්ණ button to choose your preferred crust darkness (Light, Medium, or Dark).
- වැඩසටහන ආරම්භ කරන්න: ඔබන්න සයිකල් button to start the program. The machine will begin mixing.
- අධීක්ෂණය: During the kneading cycles, you may check the dough consistency by opening the lid briefly. If the dough is too dry, add a small amount of liquid; if too wet, add a small amount of flour.
- සම්පූර්ණ කිරීම: Once the program is complete, the bread maker will usually beep and switch to a "Keep Warm" cycle. Press the සයිකල් යන්ත්රය නතර කිරීමට බොත්තම.
- පාන් ඉවත් කරන්න: Using oven mitts, carefully remove the hot bread pan from the machine. Invert the pan onto a wire rack to release the bread. If the kneading blade remains in the loaf, use the provided hook to carefully remove it.
- සිසිලනය: පෙති කැපීමට පෙර පාන් අවම වශයෙන් විනාඩි 20-30ක් කම්බි රාක්කයක් මත සිසිල් වීමට ඉඩ දෙන්න. මෙය අභ්යන්තර ව්යුහය සැකසීමට ඉඩ සලසයි.
ටයිමර් ක්රියාකාරිත්වය ප්රමාද කරන්න
The delay timer allows you to program the bread maker to finish baking at a later time, up to 13 hours. This is useful for having fresh bread ready in the morning.
- After selecting your program, loaf size, and crust color, press the TIME buttons to set the desired delay time. The displayed time includes the baking cycle duration.
- ඔබන්න සයිකල් button. The timer will count down, and the machine will start automatically when the delay time expires.
- අවවාදයයි: Do not use the delay timer with recipes containing highly perishable ingredients like milk, eggs, or fresh fruit, as they may spoil before baking begins.
වට්ටෝරු මාර්ගෝපදේශය
The Amazon Basics Bread Maker offers 14 settings for various types of baked goods. For best results, always use recipes specifically designed for bread makers and ensure accurate measurement of ingredients.
- Bread Programs: Basic, French, Whole Wheat, Sweet, Gluten-Free, ExpressBake.
- පිටි ගුලිය වැඩසටහන්: For pizza dough, pasta dough, or rolls.
- Specialty Programs: Jam, Cake, Yogurt.
Refer to the recipe book that came with your bread maker or reliable bread machine recipe sources for ingredient quantities and specific instructions for each program.
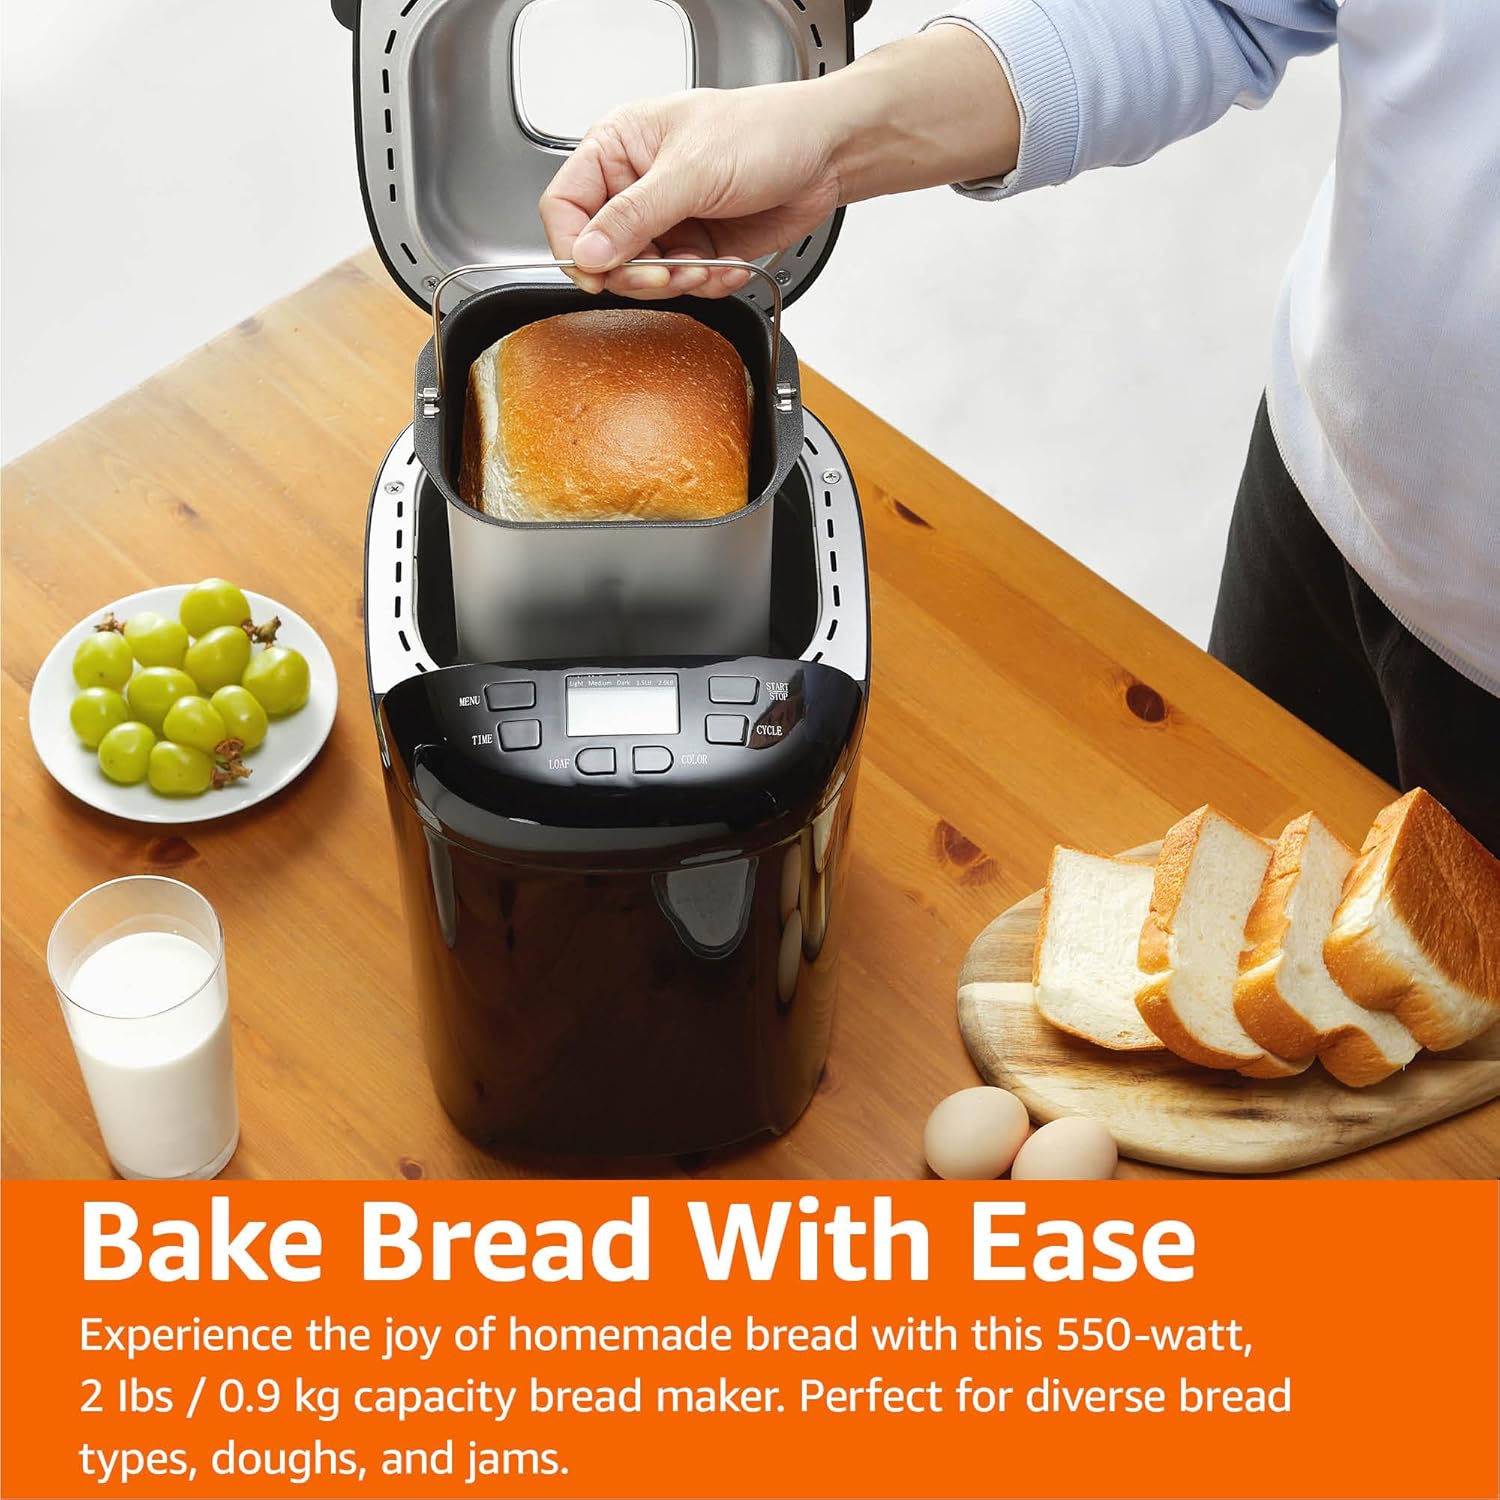
Figure 5: Freshly Baked Bread. This image shows a person carefully lifting the bread pan, containing a golden-brown loaf, out of the bread maker. Surrounding the machine are fresh grapes, a glass of milk, and slices of bread, illustrating the end result of the baking process.
රැකවරණය සහ නඩත්තුව
නිසි පිරිසිදු කිරීම සහ නඩත්තු කිරීම ඔබේ පාන් සාදන්නාගේ ආයු කාලය දීර්ඝ කරයි.
- විසන්ධි කරන්න: සෑම විටම විදුලිබල අලෙවිසැලෙන් උපකරණය විසන්ධි කර පිරිසිදු කිරීමට පෙර එය සම්පූර්ණයෙන්ම සිසිල් වීමට ඉඩ දෙන්න.
- පාන් පෑන් සහ අනන තලය: Wash the bread pan and kneading blade with warm, soapy water. Do not use abrasive cleaners or metal scouring pads, as this can damage the non-stick coating. Rinse thoroughly and dry completely.
- බාහිර: පාන් සාදන්නාගේ පිටත පැත්ත මෘදු, d රෙදි කඩකින් පිස දමන්න.amp රෙදි. දරුණු රසායනික ද්රව්ය හෝ උල්ෙල්ඛ පිරිසිදු කරන්නන් භාවිතා නොකරන්න.
- අභ්යන්තර: බේකින් කුටියේ අභ්යන්තරය දැන්වීමකින් පිරිසිදු කරන්නamp රෙදි කැබැල්ලක් හෝ අපද්රව්ය ඉවත් කරන්න.
- ගබඩා: Store the bread maker in a clean, dry place. Ensure the bread pan and kneading blade are clean and dry before storing.
දෝශ නිරාකරණ මාර්ගෝපදේශය
If you encounter issues with your bread maker, refer to the following common problems and solutions.
| ගැටලුව | විය හැකි හේතුව | විසඳුම |
|---|---|---|
| පාන් නැඟෙන්නේ නැත. | Expired or inactive yeast, incorrect water temperature, too much salt, not enough sugar. | යීස්ට් කල් ඉකුත්වන දිනය පරීක්ෂා කරන්න. ඇල්මැරුණු ජලය (105-115°F / 40-46°C) භාවිතා කරන්න. නිවැරදි අමුද්රව්ය මිනුම් සහතික කර ගන්න. |
| පාන් ඉතා ඝන හෝ බරයි. | Too much flour, not enough liquid, incorrect yeast amount, high humidity. | Measure ingredients accurately, especially flour (use a scale if possible). Adjust liquid slightly in humid conditions. |
| පිළිස්සීමේදී පාන් කඩා වැටේ. | Too much liquid, too much yeast, high altitude, opening lid too often. | Reduce liquid slightly. Ensure correct yeast amount. Avoid opening the lid during baking. |
| පාන් වල සිරවී ඇති අනන තලය. | සුලභ සිදුවීමක්. | Use the provided hook to carefully remove the blade after the bread has cooled slightly. |
| යන්ත්රය ආරම්භ නොවේ. | සම්බන්ධ කර නැත, බලය හෝtage, lid not closed properly, program not selected. | Check power connection. Ensure lid is fully closed. Select a program and press START. |
නිෂ්පාදන පිරිවිතර
Technical details for the Amazon Basics Programmable Bread Maker.
- ආදර්ශ අංකය: BM1349-UL-B
- වෙළඳ නාමය: Amazon Basics
- වර්ණය: කළු
- බලය: වොට් 550
- රොටි ධාරිතාව: පවුම් 2 දක්වා
- වැඩසටහන් ගණන: 14
- නිෂ්පාදන මානයන්: 11.6"D x 8.8"W x 11.4"H
- අයිතමයේ බර: රාත්තල් 8 කි
- නිෂ්පාදකයා: ඇමේසන්
- සත්කාර උපදෙස්: වියළි රෙද්දකින් පිස දමන්න (පිටත භාවිතය සඳහා)
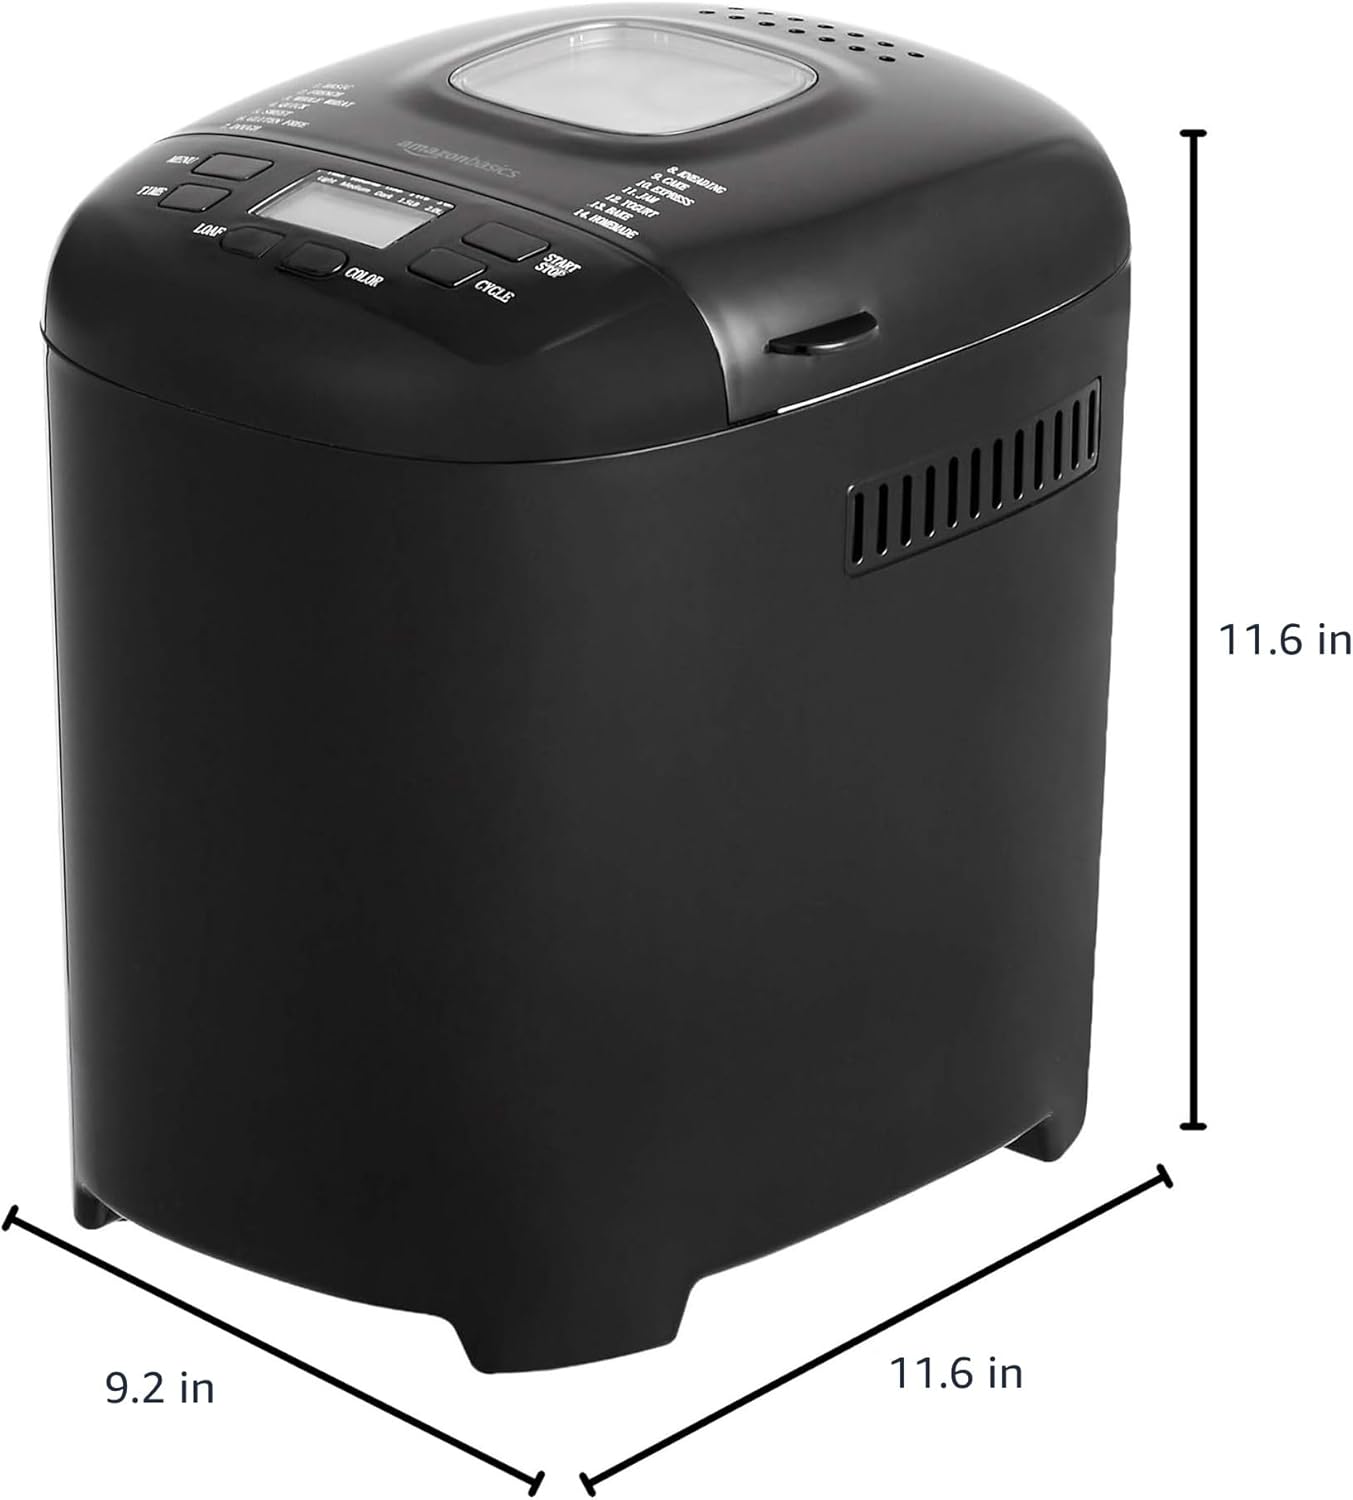
රූපය 6: නිෂ්පාදන මානයන්. This image provides a visual representation of the bread maker's dimensions, indicating a depth of 11.6 inches, a width of 9.2 inches, and a height of 11.6 inches.
වගකීම් තොරතුරු
For detailed warranty information, please refer to the warranty card included with your product packaging or visit the official Amazon Basics webවෙබ් අඩවිය. වගකීම් සහතිකය සාමාන්යයෙන් සාමාන්ය භාවිතය යටතේ ද්රව්ය හා වැඩ කිරීමේ දෝෂ ආවරණය කරයි.
පාරිභෝගික සහාය
If you have any questions, require assistance, or need to report an issue with your Amazon Basics Bread Maker, please contact Amazon Basics Customer Service. You can typically find contact information on the Amazon website under the "Help" or "Customer Service" sections, or through your order details.
සබැඳි සහාය සඳහා, පිවිසෙන්න: Amazon පාරිභෝගික සේවය


