1. හැඳින්වීම
ස්තූතියි, උදව් කළාටasing the LOVCUBE 15 Inch Digital Photo Frame L15N. This manual provides essential information for setting up, operating, and maintaining your digital photo frame. Please read these instructions carefully before use to ensure optimal performance and longevity of your device.
The LOVCUBE L15N features a 15-inch HD IPS display, motion sensor, and supports various media formats for photos, videos, and music. It is designed for ease of use, allowing you to display your cherished memories with minimal setup.
2. නිෂ්පාදන අවසන්view
2.1 පැකේජයේ අන්තර්ගතය
- LOVCUBE 15 Inch Digital Photo Frame
- Remote Control (requires 1 CR2 battery, typically included)
- බල ඇඩැප්ටරය
- ඩෙස්ක්ටොප් ස්ථාවරය
- Wall-mounting Brackets and Screws
- පරිශීලක අත්පොත
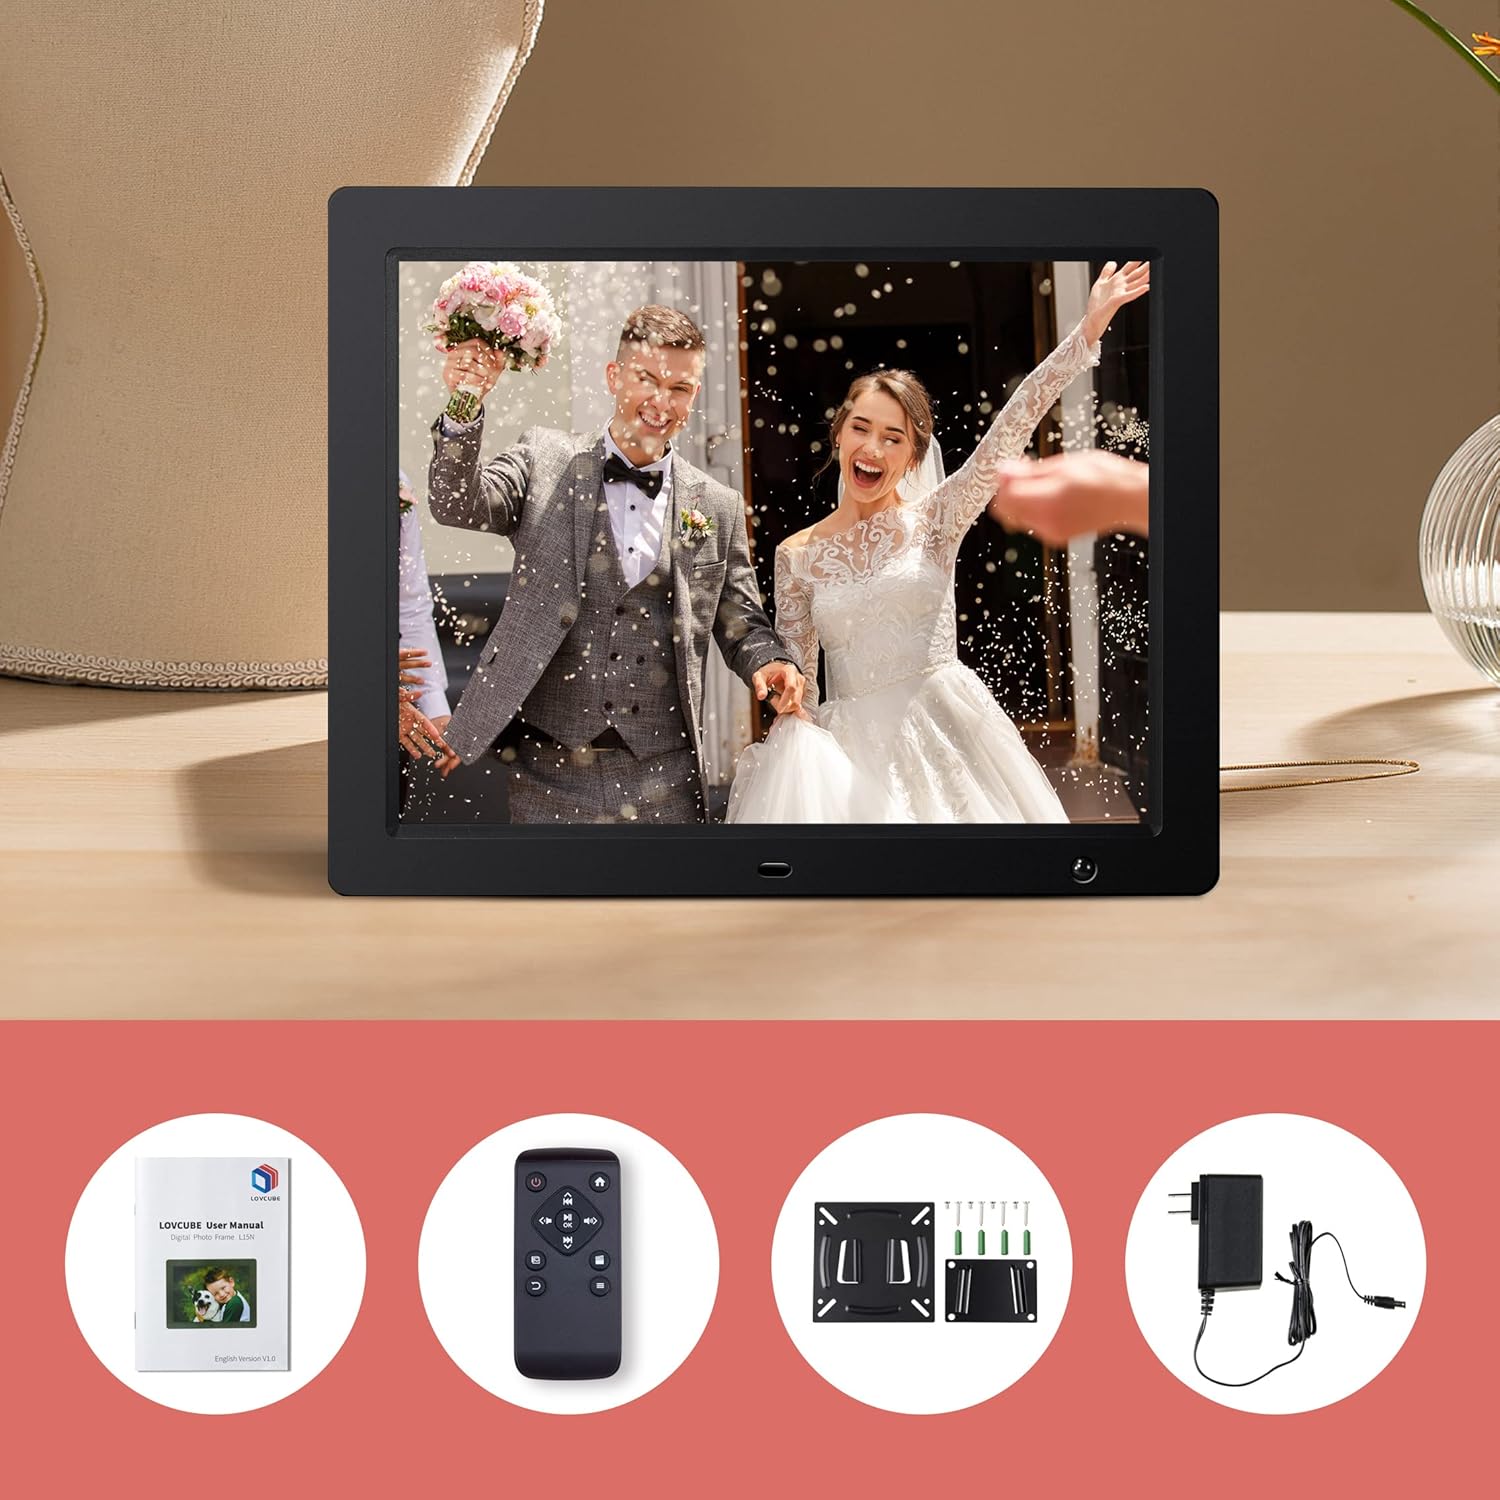
Image: Package contents of the LOVCUBE digital photo frame.
2.2 ප්රධාන ලක්ෂණ
- අඟල් 15 HD IPS සංදර්ශකය: 1024x768 resolution with a 4:3 aspect ratio and 178° wide viewing angle for clear and vibrant images.
- චලන සංවේදකය: Built-in high-sensitivity motion sensor to conserve energy by turning the screen on/off automatically.
- මාධ්ය නැවත ධාවනය: Supports photos, 1080p Full HD videos, and background music playback.
- Breakpoint Play: Resumes playback of photos, music, or videos from the last viewed point.
- Slideshow Options: Customizable slideshow effects, transition times, and playback order (random or sequential).
- බහු කාර්යයන්: Includes clock, alarm, calendar, and auto power on/off scheduling.
- සම්බන්ධතාවය: Features USB and SD card slots for easy media input (supports up to 32GB).
- බහුකාර්ය ස්ථානගත කිරීම: Comes with a desktop stand and wall-mounting brackets.
2.3 වරායන් සහ පාලන
Familiarize yourself with the ports and controls located on the back and sides of the frame.
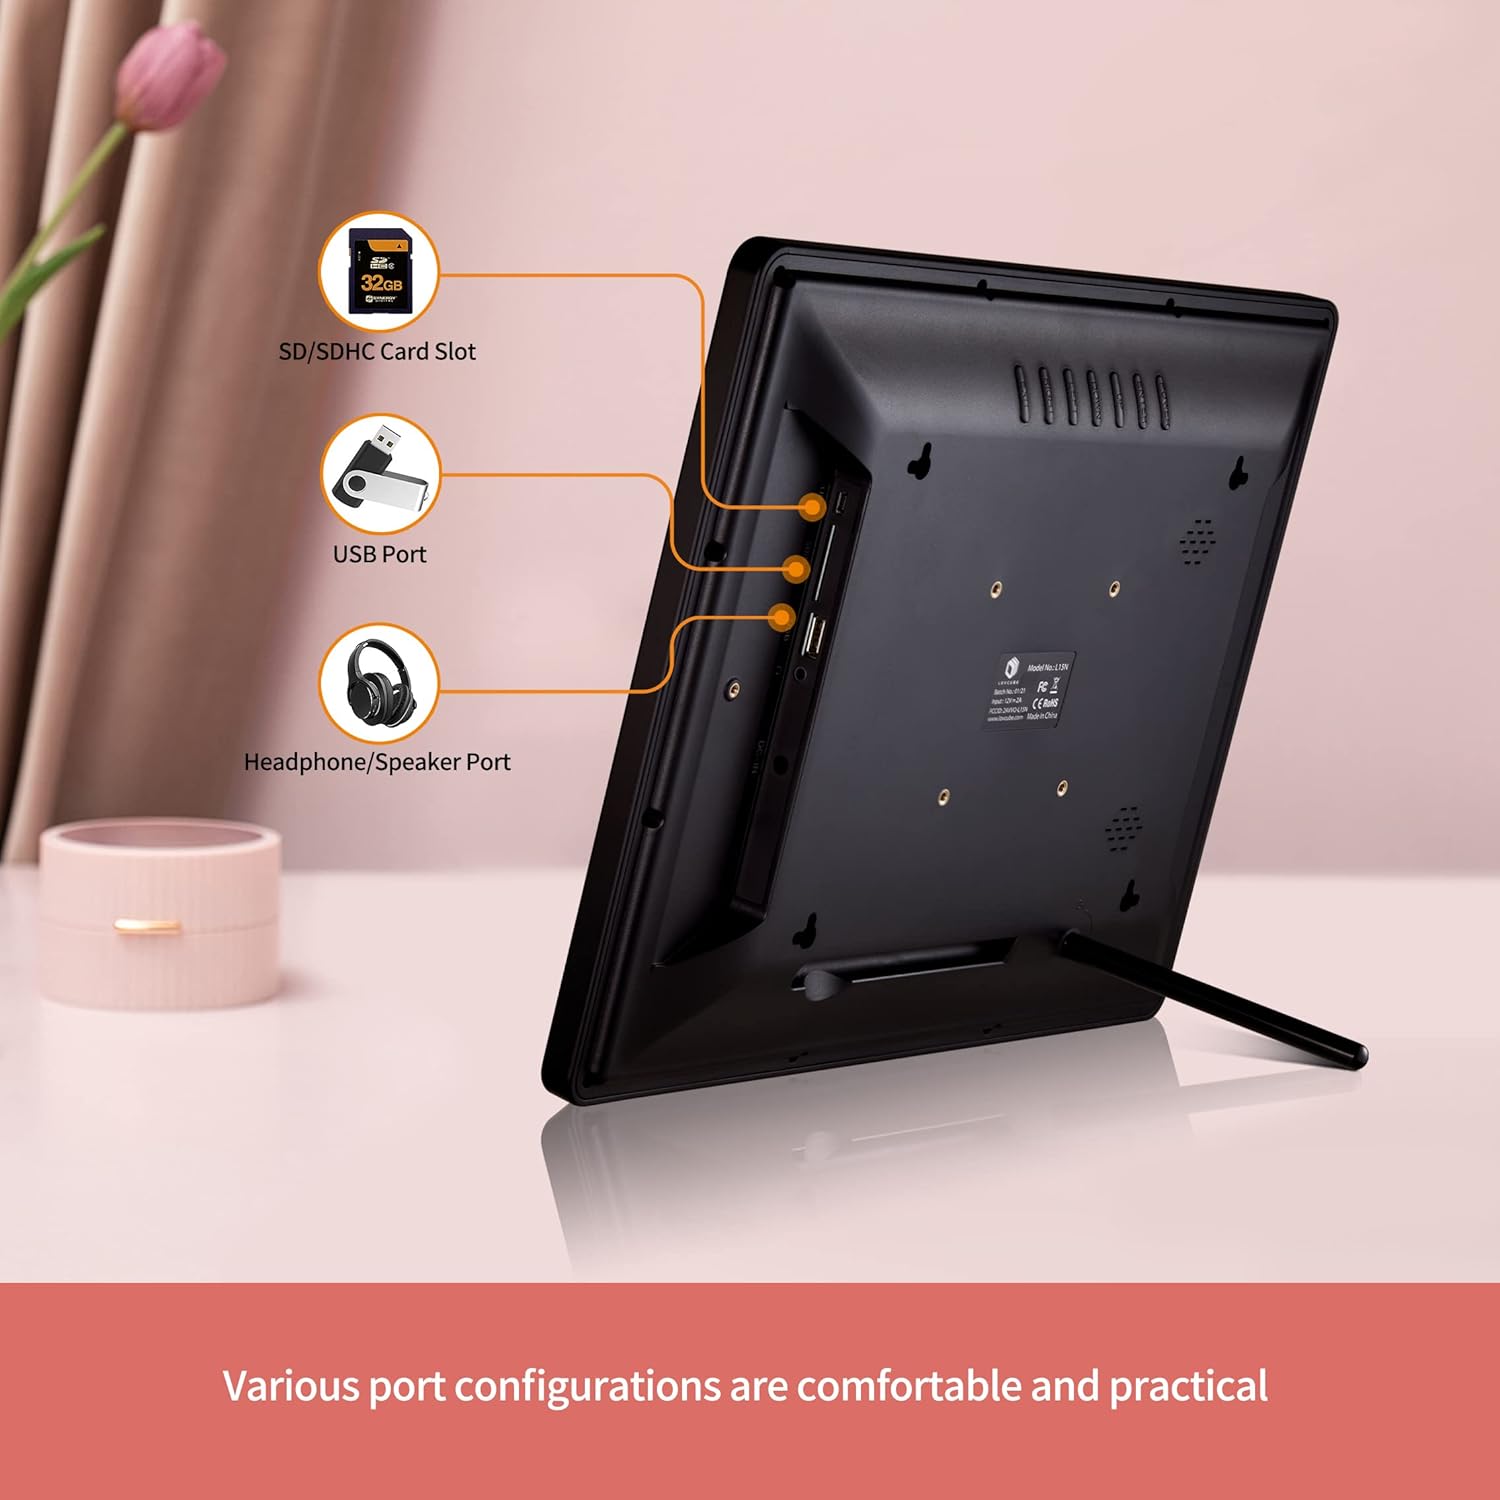
රූපය: පසුපස view of the digital photo frame with labeled ports.
- SD/SDHC කාඩ්පත් තව්: Insert your SD or SDHC memory card here.
- USB Port: මාධ්ය නැවත ධාවනය සඳහා USB ෆ්ලෑෂ් ධාවකයක් සම්බන්ධ කරන්න.
- Headphone/Speaker Port: බාහිර හෙඩ්ෆෝන් හෝ ස්පීකර් සම්බන්ධ කරන්න.
- ඩීසී: බල ඇඩැප්ටරය මෙහි සම්බන්ධ කරන්න.
- බල බොත්තම: රාමුව සක්රිය හෝ අක්රිය කරයි.
- සංචාලන බොත්තම්: For menu navigation (Up, Down, Left, Right, Enter).
- මෙනු බොත්තම: ප්රධාන මෙනුවට ප්රවේශ වේ.
- පිටවීමේ බොත්තම: පෙර තිරයට නැවත පැමිණේ හෝ මෙනුවෙන් පිටවෙයි.
3. පිහිටුවීම
3.1 ඇසිරීම සහ ස්ථානගත කිරීම
- ඇසුරුම්කරණයෙන් සියලුම සංරචක ප්රවේශමෙන් ඉවත් කරන්න.
- Choose a suitable location for your digital photo frame.
- For Desktop Use: Attach the included desktop stand to the back of the frame.
- බිත්ති සවි කිරීම සඳහා: Use the provided wall-mounting brackets and screws to securely mount the frame on a wall. Ensure the wall can support the weight of the frame.

Image: Wall hanging method diagram.
3.2 බල සම්බන්ධතාවය
- Connect the power adapter to the DC IN port on the frame.
- බල ඇඩැප්ටරය සම්මත විදුලි අලෙවිසැලකට සම්බන්ධ කරන්න.
3.3 Inserting Media
The frame supports SD/SDHC cards and USB flash drives up to 32GB. No software installation is required.
- Insert your SD card into the SD/SDHC card slot or your USB flash drive into the USB port. Ensure it is inserted correctly.
- The frame will automatically detect the media and begin playing content.

Image: Plug and play functionality with a USB stick.
3.4 දුරස්ථ පාලක සැකසුම
The remote control requires one CR2 battery. Ensure the battery is correctly installed according to the polarity markings.
4. මෙහෙයුම් උපදෙස්
4.1 මූලික සංචාලනය
Use the remote control or the buttons on the back of the frame to navigate the menus.
- බල බොත්තම: Press to turn the frame on or off.
- මෙනු බොත්තම: Press to access the main menu options (Photo, Music, Video, Calendar, Settings).
- ඊතල බොත්තම්: Use to move between menu items or adjust settings.
- ඇතුල් කරන්න බොත්තම: තේරීමක් තහවුරු කරන්න.
- පිටවීමේ බොත්තම: Go back to the previous screen or exit the current function.

Image: Using the remote control to operate the digital photo frame.
4.2 Photo Slideshow
- ප්රධාන මෙනුවෙන්, තෝරන්න ඡායාරූපය.
- The frame will start a slideshow of all photos on the inserted media.
- In the settings menu, you can customize:
- Slideshow Effects: Choose from various transition styles.
- සංක්රාන්ති කාලය: එක් එක් ඡායාරූපය දර්ශනය වන කාල සීමාව සකසන්න.
- ක්රීඩා ප්රකාරය: Select random or sequential playback.
- පසුබිම් සංගීතය: Enable music to play during the slideshow.

Image: Slideshow mode with background music.
4.3 Video and Music Playback
- ප්රධාන මෙනුවෙන්, තෝරන්න වීඩියෝ or සංගීතය.
- ඔබගේ හරහා සංචාලනය කරන්න files and select the desired video or music track to play.
- The frame supports 1080p FHD video playback.
4.4 චලන සංවේදකය
The built-in motion sensor helps save energy by automatically turning the screen on when motion is detected and off when no motion is present for a set period.
- වෙත පිවිසෙන්න සැකසීම් මෙනුව.
- සොයා ගන්න චලන සංවේදකය විකල්පය.
- Enable or disable the motion sensor and adjust its sensitivity or delay time as needed.

Image: Motion sensor functionality.
4.5 Clock, Calendar, and Alarm
The frame can display the current time and date, and function as an alarm clock.
- ප්රධාන මෙනුවෙන්, තෝරන්න දින දර්ශනය දක්වා view දිනය සහ වේලාව.
- දී සැකසීම් menu, you can set the time, date, and configure alarms.

Image: Digital photo frame displaying clock and calendar.
4.6 Auto Power On/Off
Schedule specific times for the frame to automatically power on and off.
- වෙත යන්න සැකසීම් මෙනුව.
- සොයා ගන්න ස්වයංක්රීය බලය සක්රිය / අක්රිය විකල්පය.
- Set your desired power on and power off times.
4.7 භාෂා සැකසුම්
The frame supports multiple languages.
- වෙත පිවිසෙන්න සැකසීම් මෙනුව.
- තෝරන්න භාෂාව option and choose your preferred language.
5. නඩත්තු කිරීම
5.1 රාමුව පිරිසිදු කිරීම
- Always unplug the frame before cleaning.
- Use a soft, dry cloth to wipe the screen and frame.
- තිරය මත ඇති මුරණ්ඩු සලකුණු සඳහා, සැහැල්ලුවෙන් dampරෙදි කැබැල්ල වතුරෙන් හෝ තිර පිරිසිදු කිරීමේ ද්රාවණයකින් ආලේප කරන්න. සැර රසායනික ද්රව්ය වලින් වළකින්න.
5.2 Safe Media Removal
To prevent data corruption, always ensure the frame is not actively reading or writing to the SD card or USB drive before removing it. It is recommended to power off the frame before removing media.
6. දෝශ නිරාකරණය
- බලය නැත: බල ඇඩැප්ටරය රාමුවට සහ ක්රියාකාරී විදුලි අලෙවිසැලකට ආරක්ෂිතව සම්බන්ධ කර ඇති බවට වග බලා ගන්න.
- සංදර්ශකය/හිස් තිරයක් නැත: Check if the frame is powered on. Verify that an SD card or USB drive with compatible media is inserted correctly. The motion sensor might have turned the screen off; try moving in front of the frame or pressing a button on the remote.
- දුරස්ථ පාලකය ප්රතිචාර නොදක්වයි: Check the CR2 battery in the remote control and replace if necessary. Ensure there is a clear line of sight between the remote and the frame's IR receiver.
- Media Not Recognized: Ensure the SD card or USB drive is formatted correctly (FAT32 is generally recommended) and its capacity does not exceed 32GB. Reinsert the media.
- වීඩියෝ පසුධාවන ගැටළු: වීඩියෝව සහතික කරන්න files are in a supported format and resolution (up to 1080p FHD). Some high-bitrate 1080p videos may not play smoothly.
- Images Appear Distorted: Ensure your images have a resolution compatible with the frame's 1024x768 display and 4:3 aspect ratio for best results.
7. පිරිවිතර
| විශේෂාංගය | විස්තර |
|---|---|
| ආදර්ශ අංකය | WH00004D |
| තිර ප්රමාණය | අඟල් 15 |
| සංදර්ශක වර්ගය | HD IPS |
| විභේදනය | 1024 x 768 පික්සල |
| දර්ශන අනුපාතය | 4:3 |
| Viewing කෝණය | 178° |
| සහාය දක්වන මාධ්ය | SD/SDHC Card (up to 32GB), USB Flash Drive (up to 32GB) |
| වීඩියෝ නැවත ධාවනය | Up to 1080p FHD |
| සම්බන්ධතාවය | USB |
| විශේෂ ලක්ෂණ | Motion Sensor, Breakpoint Play, Clock, Calendar, Alarm, Auto Power On/Off |
| දුරස්ථ පාලක බැටරි | 1 x CR2 (ඇතුළත්) |
| ආසන්න වශයෙන් අයිතම බර | රාත්තල් 5.92 කි |
8. වගකීම් සහ සහාය
8.1 වගකීම් තොරතුරු
LOVCUBE provides a මාස 12ක වගකීමක් for each unit from the date of purchase. This warranty covers manufacturing defects and ensures your product functions as intended under normal use.
8.2 පාරිභෝගික සහාය
For any questions, technical assistance, or warranty claims, please contact LOVCUBE customer service. We offer 24-hour after-sales service ඔබට උදව් කිරීමට.
Please refer to the contact information provided with your purchase or visit the official LOVCUBE webසහාය විස්තර සඳහා අඩවිය.