1. හැඳින්වීම
This manual provides essential information for the proper installation, configuration, and operation of your GIGABYTE B550 AORUS ELITE AX motherboard. This motherboard is designed to support 3rd Gen AMD Ryzen Processors and offers advanced features for high-performance computing.

රූපය 1.1: ඉවරයිview of the GIGABYTE B550 AORUS ELITE AX Motherboard. This image displays the full motherboard with its various components, including the CPU socket, RAM slots, PCIe slots, and heatsinks.
Key features include a True 12+2 Phases Digital VRM Solution, advanced thermal design with enlarged surface heatsinks, an Ultra Durable PCIe 4.0 x16 Slot, dual ultra-fast NVMe PCIe 4.0/3.0 x4 M.2 slots with dual thermal guards, and integrated Intel WiFi 6 802.11ax with Bluetooth 5.
2. පිහිටුවීම සහ ස්ථාපනය
Before beginning installation, ensure your system is powered off and unplugged from the wall outlet. Always handle the motherboard by its edges to avoid static discharge.
2.1. සංරචක හඳුනා ගැනීම
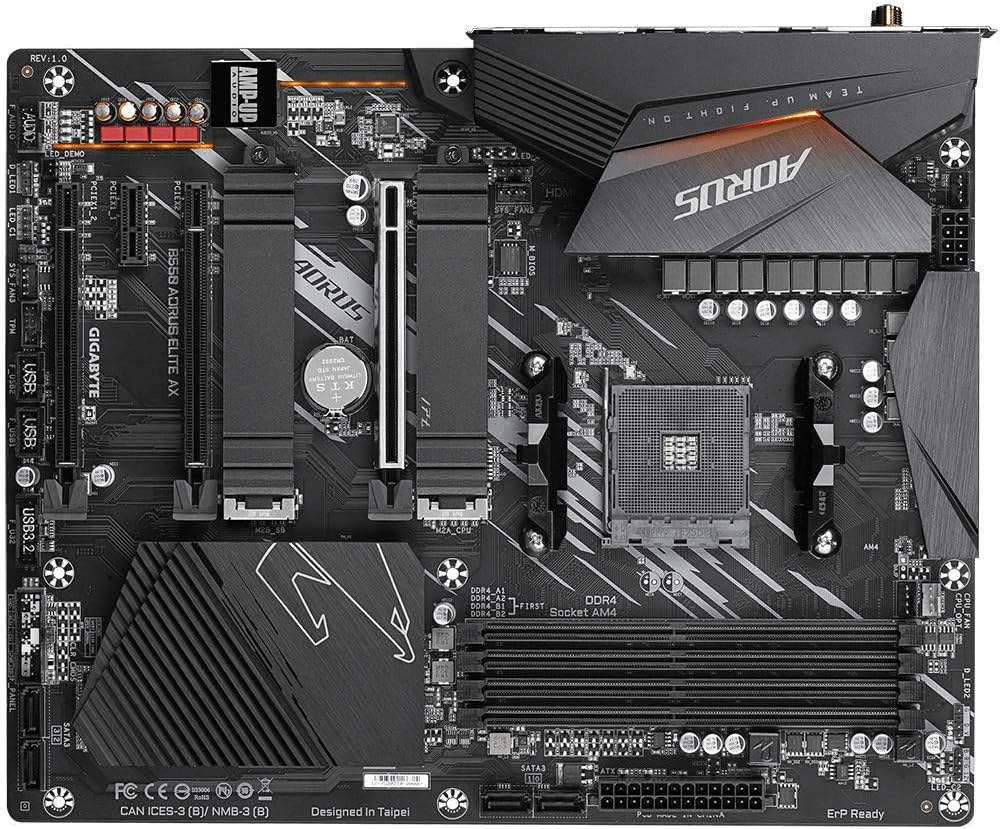
රූපය 2.1: ඉහළ-පහළ view of the GIGABYTE B550 AORUS ELITE AX Motherboard. This image highlights the layout of the CPU socket, four DDR4 DIMM slots, multiple PCIe slots, and two M.2 slots with their thermal guards.
2.2. CPU ස්ථාපනය
- Locate the AM4 CPU socket. Lift the load lever to open the socket.
- CPU එකේ ත්රිකෝණාකාර සලකුණ සොකට් එකේ සලකුණ සමඟ ප්රවේශමෙන් පෙළගස්වන්න. බලෙන් තද නොකර CPU එක සොකට් එකට මෘදු ලෙස තබන්න.
- Lower the load lever back into place to secure the CPU.
2.3. RAM ස්ථාපනය
This motherboard supports Dual Channel ECC/Non-ECC Unbuffered DDR4 memory across 4 DIMM slots.
- DIMM ස්ලොට් එකේ කෙළවර දෙකෙහිම ක්ලිප් විවෘත කරන්න.
- DDR4 මතක මොඩියුලයේ නොච් එක DIMM ස්ලොට් එකේ යතුර සමඟ පෙළගස්වන්න.
- ක්ලිප් නිසි තැනට වැටෙන තුරු මතක මොඩියුලයේ කෙළවර දෙකෙහිම තදින් ඔබන්න.
2.4. M.2 SSD ස්ථාපනය
The motherboard features dual ultra-fast NVMe PCIe 4.0/3.0 x4 M.2 slots with dual thermal guards.
- Unscrew and remove the M.2 thermal guard from the desired slot.
- M.2 SSD එක කෝණයකින් ස්ලොට් එකට ඇතුළු කරන්න.
- SSD මෘදු ලෙස පහළට තල්ලු කර සපයා ඇති ඉස්කුරුප්පු ඇණ සමඟ එය සවි කරන්න.
- Reattach the M.2 thermal guard to ensure optimal cooling.
2.5. PCIe කාඩ්පත් ස්ථාපනය
Install graphics cards or other expansion cards into the PCIe slots. The top slot is an Ultra Durable PCIe 4.0 x16 slot.
- Align the PCIe card with the chosen slot.
- Press down firmly until the card is fully seated and the retention clip engages.
2.6. බල සම්බන්ධතා
24-pin ATX ප්රධාන බල සම්බන්ධකය සහ 8-pin CPU බල සම්බන්ධකය ඔබේ බල සැපයුමෙන් මවු පුවරුවට සම්බන්ධ කරන්න.
2.7 ඉදිරිපස පැනල් සම්බන්ධක
Connect the power button, reset button, HDD LED, and USB/audio headers from your PC case to the corresponding pins on the motherboard. Refer to the motherboard diagram for exact pin locations.
2.8. පසුපස I/O පැනලය

Image 2.2: Rear I/O Panel of the GIGABYTE B550 AORUS ELITE AX Motherboard. This image shows the various ports available, including USB 3.2 Gen 1, USB 3.2 Gen 2, DisplayPort, HDMI, 2.5GbE LAN, Wi-Fi antenna connectors, and audio jacks. The pre-installed I/O shield is visible.
The motherboard features a pre-installed I/O shield for easy and quick installation. Connect your peripherals such as monitor, keyboard, mouse, and network cable to the appropriate ports on the rear I/O panel.
3. මෙහෙයුම් උපදෙස්
3.1. පළමු ආරම්භය
After assembling all components and connecting power, press the power button on your PC case. The system should power on and display the GIGABYTE splash screen.
3.2. BIOS/UEFI වෙත ප්රවේශ වීම
BIOS/UEFI සැකසුම් උපයෝගීතාවයට ඇතුළු වීමට, ඔබන්න DEL key repeatedly during the initial boot process when the GIGABYTE logo appears. The BIOS allows you to configure system settings, boot order, and enable features like XMP for memory profiles.
3.3. ධාවක ස්ථාපනය
After installing your operating system, install the necessary drivers for the motherboard's components. These include chipset drivers, LAN drivers, Wi-Fi/Bluetooth drivers, and audio drivers. Drivers can typically be found on the GIGABYTE official webඔබේ නිශ්චිත මවු පුවරු ආකෘතිය සඳහා අඩවිය.
4. නඩත්තු කිරීම
4.1. පද්ධති පිරිසිදු කිරීම
Regularly clean your computer's interior to prevent dust buildup, which can lead to overheating and reduced performance. Use compressed air to remove dust from fans, heatsinks, and other components. Ensure the system is powered off and unplugged before cleaning.
4.2. BIOS යාවත්කාලීන කිරීම්
GIGABYTE provides BIOS updates to improve system stability, add support for new hardware, and fix bugs. The B550 AORUS ELITE AX supports Q-Flash Plus, allowing you to update the BIOS without installing the CPU, memory, or graphics card. Refer to the GIGABYTE website for detailed instructions on using Q-Flash Plus and for the latest BIOS versions.
5. දෝශ නිරාකරණය
මෙම කොටසින් ඔබට මුහුණ දීමට සිදුවිය හැකි පොදු ගැටළු සාකච්ඡා කෙරේ.
5.1. බලය නැත / බූට් නැත
- සියලුම බල කේබල් (24-pin ATX, 8-pin CPU) මවු පුවරුවට සහ බල සැපයුමට ආරක්ෂිතව සම්බන්ධ වී ඇති බව තහවුරු කර ගන්න.
- බල සැපයුම් ස්විචය 'ON' ස්ථානයේ ඇති බවට වග බලා ගන්න.
- Check that the front panel power button connector is correctly attached to the motherboard.
- හැකි නම් වෙනත් බල සැපයුමකින් පරීක්ෂා කරන්න.
5.2. සංදර්ශක ප්රතිදානයක් නොමැත
- Ensure your monitor is connected to the graphics card (if installed) or the motherboard's HDMI/DisplayPort (if using an APU with integrated graphics).
- ග්රැෆික් කාඩ්පත සහ මතක මොඩියුල නැවත ස්ථාපනය කරන්න.
- එක් RAM ස්ටික් එකක් පමණක් ස්ථාපනය කර ආරම්භ කිරීමට උත්සාහ කරන්න.
5.3. Bluetooth / Wi-Fi Connectivity Issues
- Ensure the external Wi-Fi antenna is securely connected to the rear I/O panel.
- Update your Wi-Fi and Bluetooth drivers to the latest version from the GIGABYTE webඅඩවිය.
- If Bluetooth devices disconnect after sleep mode, try disabling USB selective suspend settings in Windows Power Options or updating the BIOS to the latest version, as this has resolved similar issues in some cases.
5.4. BIOS Reset
If you encounter issues after changing BIOS settings, you may need to reset the BIOS to default settings. This motherboard does not feature a dedicated BIOS reset button. To clear CMOS (BIOS settings), power off your system, unplug it, and remove the small circular battery (CMOS battery) from the motherboard for a few minutes. Reinsert the battery and power on the system.
6. පිරිවිතර
Below are the key technical specifications for the GIGABYTE B550 AORUS ELITE AX Motherboard:
| විශේෂාංගය | පිරිවිතර |
|---|---|
| වෙළඳ නාමය | ගිගාබයිට් |
| මාදිලියේ නම | B550 AORUS ELite AX |
| CPU සොකට් | සොකට් AM4 |
| අනුකූල සකසනයන් | AMD 3වන පරම්පරාවේ Ryzen |
| චිප්සෙට් වර්ගය | AMD B550 |
| RAM මතක තාක්ෂණය | DDR4 |
| මතක වේගය | 2133 MHz (Base), up to 4733MHz (OC) |
| මතක ගබඩා ධාරිතාව | 128 GB (උපරිම) |
| රැහැන් රහිත වර්ගය | 802.11ax (Intel WiFi 6) |
| LAN | 2.5 ගිගාබිට් ඊතර්නෙට් |
| PCIe ස්ලට්ස් | 1x PCIe 4.0 x16, 2x PCIe 3.0 x16 (x4 mode), 1x PCIe 3.0 x1 |
| M.2 Slots | 2x NVMe PCIe 4.0/3.0 x4 with Thermal Guards |
| USB 2.0 Ports | 2 (පසුපස) |
| USB 3.2 Gen 1 වරාය | 4 (පසුපස) |
| USB 3.2 Gen 2 වරාය | 2 (Rear, Type-A) |
| වීඩියෝ ප්රතිදානය | HDMI, ඩිස්ප්ලේපෝට් |
| ශ්රව්ය උපකරණ | රියල්ටෙක් ALC1200 කෝඩෙක්, AMP-UP ශ්රව්ය |
| ආකෘති සාධකය | ATX |
| අයිතමයේ බර | රාත්තල් 4.07 කි |
| නිෂ්පාදන මානයන් | අඟල් 13.18 x 10.62 x 3.14 |
7. වගකීම් තොරතුරු
GIGABYTE products are covered by a limited warranty. The specific terms and duration of the warranty may vary by region and product type. Please retain your proof of purchase for warranty claims. For detailed warranty information, including coverage, limitations, and the claims process, please visit the official GIGABYTE webඅඩවියට පිවිසෙන්න හෝ ඔබේ ප්රාදේශීය සිල්ලර වෙළෙන්දා අමතන්න.
8 තාක්ෂණික සහාය
If you encounter issues that cannot be resolved using this manual or require further assistance, please contact GIGABYTE technical support. You can find support resources, FAQs, driver downloads, and contact information on the official GIGABYTE webඅඩවිය:
When contacting support, please have your motherboard model (B550 AORUS ELITE AX) and a detailed description of your issue ready.


