1. හැඳින්වීම
ස්තූතියි, උදව් කළාටasing the Optoma X309ST projector. This manual provides essential information for safely installing, operating, and maintaining your device. Please read this manual thoroughly before using the projector to ensure optimal performance and longevity.
පෙට්ටියේ ඇති දේ
- Optoma X309ST Projector
- විදුලි රැහැන්
- දුරස්ථ පාලකය (බැටරි සහිත)
- VGA කේබලය
- පරිශීලක අත්පොත (මෙම ලේඛනය)
- වගකීම් කාඩ්පත
2 ආරක්ෂිත තොරතුරු
WARNING: To prevent fire or electric shock, do not expose this appliance to rain or moisture.
- වාතාශ්රය විවරයන් අවහිර නොකරන්න. නිසි වායු ප්රවාහය සඳහා ප්රොජෙක්ටරය වටා ප්රමාණවත් ඉඩක් ඇති බවට වග බලා ගන්න.
- l ක්රියාත්මක වන විට ප්රොජෙක්ටර් කාචය දෙස කෙලින්ම නොබලන්න.amp ක්රියාත්මකයි. දීප්තිමත් ආලෝකය ඔබේ ඇස්වලට හානි කළ හැකිය.
- ප්රොජෙක්ටරය සමඟ සපයා ඇති විදුලි රැහැන පමණක් භාවිතා කරන්න.
- මෙම නිෂ්පාදනය ඔබම සේවය කිරීමට උත්සාහ නොකරන්න. සියලුම සේවා සුදුසුකම් ලත් සේවකයින් වෙත යොමු කරන්න.
- ප්රොජෙක්ටරය ජලයෙන් හෝ තෙතමනයෙන් ඈත් කර තබන්න.
- ප්රොජෙක්ටරය අස්ථායී පෘෂ්ඨ මත තැබීමෙන් වළකින්න.
3. නිෂ්පාදන අවසන්view
ප්රක්ෂේපක සංරචක

රූපය 3.1: ඉහළ view of the Optoma X309ST projector. This image displays the control panel with buttons for power, menu navigation, and source selection, along with the focus and zoom adjustment rings located near the lens.

රූපය 3.2: ඉදිරිපස view of the Optoma X309ST projector. The main projection lens is visible, flanked by ventilation grilles on either side, designed for efficient heat dissipation.
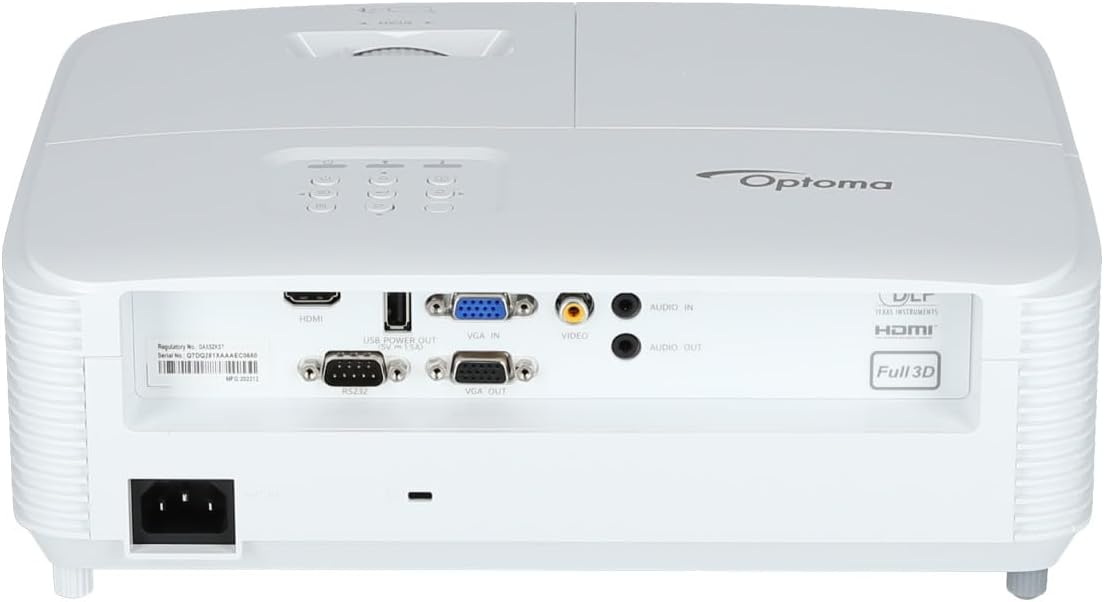
රූපය 3.3: පසුපස view of the Optoma X309ST projector. This image highlights the various connectivity ports including HDMI, VGA In, VGA Out, USB Power Out, Audio In, Audio Out, Video (RCA Composite), and the RS-232 control port, along with the power input.
පාලන පුවරුව
The control panel on the top of the projector allows for basic operation without the remote control. It includes buttons for:
- බලය: ප්රොජෙක්ටරය සක්රිය හෝ අක්රිය කරයි.
- මෙනුව: තිරයේ සංදර්ශක (OSD) මෙනුවට ප්රවේශ වේ.
- සංචාලන ඊතල: මෙනු විකල්ප හරහා සැරිසැරීමට සහ සැකසුම් සකස් කිරීමට භාවිතා කරයි.
- මූලාශ්රය: ආදාන මූලාශ්රය (HDMI, VGA, ආදිය) තෝරයි.
- නැවත සමමුහුර්ත කරන්න: Optimizes the image for analog sources.
4. පිහිටුවීම
4.1 ප්රොජෙක්ටර් ස්ථානගත කිරීම
The Optoma X309ST is a short-throw projector, designed to project large images from a short distance. Place the projector on a stable, flat surface or mount it securely. Ensure the projection surface (screen or wall) is flat and clear of obstructions.
- ප්රශස්ත රූප ගුණාත්මකභාවය සඳහා, ප්රොජෙක්ටරය තිරයට ලම්බකව ස්ථානගත කරන්න.
- Maintain adequate ventilation space around the projector (at least 30 cm / 12 inches).
4.2 සම්බන්ධක බලය
- ප්රොජෙක්ටරයේ පිටුපස ඇති AC ඇතුල්වීමට විදුලි රැහැන සම්බන්ධ කරන්න.
- විදුලි රැහැනේ අනෙක් කෙළවර බිම්ගත විදුලි අලෙවිසැලකට සම්බන්ධ කරන්න.
- The power LED on the projector will illuminate, indicating standby mode.
4.3 ආදාන මූලාශ්ර සම්බන්ධ කිරීම
The projector supports various input sources. Choose the appropriate cable for your device.
- HDMI: For digital video and audio. Connect an HDMI cable from your source device (e.g., laptop, Blu-ray player) to the HDMI port on the projector.
- VGA: For analog video. Connect a VGA cable from your computer to the VGA IN port on the projector. For audio, connect a 3.5mm audio cable from your computer's audio output to the AUDIO IN port.
- RCA Composite Video: For standard definition analog video. Connect an RCA composite video cable (yellow connector) to the VIDEO port. For audio, connect RCA audio cables (red/white) to the AUDIO IN ports.
- USB බලය විසන්ධි: This port provides 5V power for external devices like streaming sticks, but does not transmit data.
5. ප්රොජෙක්ටරය ක්රියාත්මක කිරීම
5.1 බල ගැන්වීම සක්රිය / අක්රිය කිරීම
- බල ගැන්වීමට: Press the Power button on the control panel or remote control. The power LED will change from red (standby) to blue (on).
- බලය අක්රිය කිරීමට: Press the Power button twice. The first press will display a confirmation message; press again to confirm shutdown. The power LED will return to red.
සටහන: Allow the projector to cool down for a few minutes after powering off before unplugging it or moving it.
5.2 ආදාන මූලාශ්රයක් තෝරා ගැනීම
ඔබන්න මූලාශ්රය button on the control panel or remote control repeatedly to cycle through available input sources (HDMI, VGA, Video). Alternatively, use the dedicated input buttons on the remote control.
5.3 රූපය සකස් කිරීම
- අවධානය යොමු කරන්න: රූපය තියුණු හා පැහැදිලිව පෙනෙන තුරු කාචය මත නාභිගත වළල්ල කරකවන්න.
- විශාලනය: Rotate the zoom ring on the lens to adjust the image size without moving the projector.
- යතුරු ගල් නිවැරදි කිරීම: If the image appears trapezoidal, use the Keystone Correction function in the OSD menu to square the image. Access via the මෙනුව බොත්තම.
5.4 තිරය මත සංදර්ශක (OSD) මෙනුව
ඔබන්න මෙනුව button to access the OSD. Use the navigation arrows to browse categories and options. Press ඇතුල් කරන්න or the right arrow to select an option, and the left arrow or මෙනුව again to go back or exit.
පොදු OSD සැකසුම් වලට ඇතුළත් වන්නේ:
- රූප සැකසීම්: Brightness, Contrast, Color, Aspect Ratio, Picture Mode.
- සංදර්ශක සැකසුම්: Keystone, Overscan, Wall Color.
- Setup Settings: Language, Auto Power Off, High Altitude Mode.
- Lamp සැකසීම්: Lamp Hours, Lamp Mode (Bright, Eco).
6. නඩත්තු කිරීම
නිතිපතා නඩත්තු කිරීම ප්රශස්ත ක්රියාකාරිත්වය සහතික කරන අතර ඔබේ ප්රොජෙක්ටරයේ ආයු කාලය දීර්ඝ කරයි.
6.1 ප්රොජෙක්ටරය පිරිසිදු කිරීම
- බාහිර: මෘදු, ලින්ට් රහිත රෙදි භාවිතා කරන්න dampened with a mild, non-abrasive cleaner. Do not spray cleaner directly onto the projector.
- කාච: Use a lens cleaning cloth or lens paper with a specialized lens cleaning solution. Avoid touching the lens surface with your fingers.
- වාතාශ්රය ග්රිල්: Use a soft brush or a vacuum cleaner with a brush attachment to remove dust from the ventilation grilles. Ensure the projector is powered off and unplugged before cleaning.
6.2 Lamp ආදේශ කිරීම
WARNING: Projector lamps operate at high temperatures and pressures. Allow the projector to cool completely before attempting lamp replacement. Refer to the full service manual for detailed lamp replacement instructions or contact qualified service personnel.
එල්amp life can vary depending on usage and lamp mode. A warning message will appear on screen when the lamp is nearing the end of its life. Only use genuine Optoma replacement lamps.
6.3 වායු පෙරහන පිරිසිදු කිරීම/ප්රතිස්ථාපනය කිරීම
The Optoma X309ST projector is designed with a sealed optical engine, which typically means it does not have user-serviceable air filters that require regular cleaning or replacement. However, ensure the ventilation grilles remain clear of dust and debris as described in section 6.1.
7. දෝශ නිරාකරණය
ඔබේ ප්රොජෙක්ටරය සමඟ ගැටළු ඇති වුවහොත්, පහත පොදු ගැටළු සහ විසඳුම් වෙත යොමු වන්න:
| ගැටලුව | විය හැකි හේතුව | විසඳුම |
|---|---|---|
| තිරයේ රූපයක් නැත. |
|
|
| රූපය බොඳයි. |
|
|
| රූපය ත්රපීසොයිඩ් ය. |
|
|
| Projector overheats or shuts down. |
|
|
If the problem persists after trying these solutions, please contact Optoma customer support.
8. පිරිවිතර
| විශේෂාංගය | විස්තර |
|---|---|
| ආදර්ශ අංකය | E9PD7DQ01EZ1 |
| දීප්තිය | 3700 ANSI ලුමෙන්ස් |
| දේශීය විභේදනය | XGA (1024 x 768) |
| විසි කිරීමේ අනුපාතය | 0.617:1 Short Throw |
| සම්බන්ධතා තාක්ෂණය | HDMI, USB, VGA |
| යෙදවුම් | HDMI, VGA, RCA Composite Video, Analog Audio (3.5mm) |
| ප්රතිදාන | VGA Out (Loop-Through), Analog Audio (3.5mm) |
| විශේෂ ලක්ෂණ | USB Power Output, Built-In 10-Watt Speaker, RS-232 Controllable, IR Remote Control Included, Full 3D content support |
| අයිතමයේ බර | රාත්තල් 6.61 (දළ වශයෙන් කිලෝග්රෑම් 3) |
| නිෂ්පාදන මානයන් (L x W x H) | 15.42 x 10.35 x 13.52 අඟල් (ආසන්න වශයෙන් 39.17 x 26.29 x 34.34 සෙ.මී.) |
| නිර්දේශිත භාවිතයන් | Business presentations, Education, Multimedia, Full 3D content |
9. වගකීම් සහ සහාය
9.1 වගකීම් තොරතුරු
Your Optoma X309ST projector comes with a standard manufacturer's warranty. Please refer to the warranty card included in your product packaging for specific terms, conditions, and duration. Keep your proof of purchase for warranty claims.
The product includes 1 year technical support as part of the purchase.
9.2 පාරිභෝගික සහාය
For technical assistance, troubleshooting beyond this manual, or warranty inquiries, please contact Optoma customer support. Visit the official Optoma website for the most up-to-date contact information, FAQs, and driver downloads.
ඔබට වැඩිදුර තොරතුරු සහ සහාය සම්පත් මෙතැනින් සොයාගත හැකිය Optoma Store on Amazon or the official Optoma webඅඩවිය.


