1. වැදගත් ආරක්ෂක උපදෙස්
Always observe basic safety precautions to reduce the risk of fire, electric shock, and personal injury when operating power tools. Read all instructions carefully before use.
- වැඩ ප්රදේශයේ ආරක්ෂාව: ඔබේ වැඩ කරන ප්රදේශය පිරිසිදුව හා හොඳින් ආලෝකමත්ව තබා ගන්න. අවුල් සහගත හෝ අඳුරු ප්රදේශ අනතුරු වලට ආරාධනා කරයි. දැවෙන ද්රව, වායූන් හෝ දූවිලි වැනි පුපුරන සුලු වායුගෝලයේ බල මෙවලම් ක්රියාත්මක නොකරන්න.
- විදුලි ආරක්ෂාව: බල මෙවලම් පේනු අලෙවිසැලට ගැළපිය යුතුය. කිසි විටෙකත් ප්ලග් එක කිසිම ආකාරයකින් වෙනස් නොකරන්න. පයිප්ප, රේඩියේටර්, රේන්ජ් සහ ශීතකරණ වැනි පස් සහිත හෝ බිම් සහිත මතුපිට සමඟ ශරීර සම්බන්ධතා වළක්වා ගන්න.
- පුද්ගලික ආරක්ෂාව: Always wear eye protection. Use hearing protection when operating for extended periods. Dress properly; do not wear loose clothing or jewelry. Keep hair, clothing, and gloves away from moving parts.
- මෙවලම් භාවිතය සහ රැකවරණය: බල මෙවලමට බල නොකරන්න. ඔබගේ යෙදුම සඳහා නිවැරදි බල මෙවලම භාවිතා කරන්න. කිසියම් ගැලපීමක් කිරීමට, උපාංග වෙනස් කිරීමට හෝ බල මෙවලම් ගබඩා කිරීමට පෙර බල ප්රභවයෙන් ප්ලග් එක විසන්ධි කරන්න.
- නඩත්තු: බල මෙවලම් නඩත්තු කරන්න. චලනය වන කොටස් අස්ථානගත කිරීම හෝ බන්ධනය කිරීම, කොටස් කැඩී යාම සහ බල මෙවලමේ ක්රියාකාරිත්වයට බලපාන වෙනත් ඕනෑම තත්වයක් සඳහා පරීක්ෂා කරන්න. හානි වී ඇත්නම්, භාවිතයට පෙර බල මෙවලම අළුත්වැඩියා කරන්න.
2. නිෂ්පාදන අවසන්view සහ සංරචක
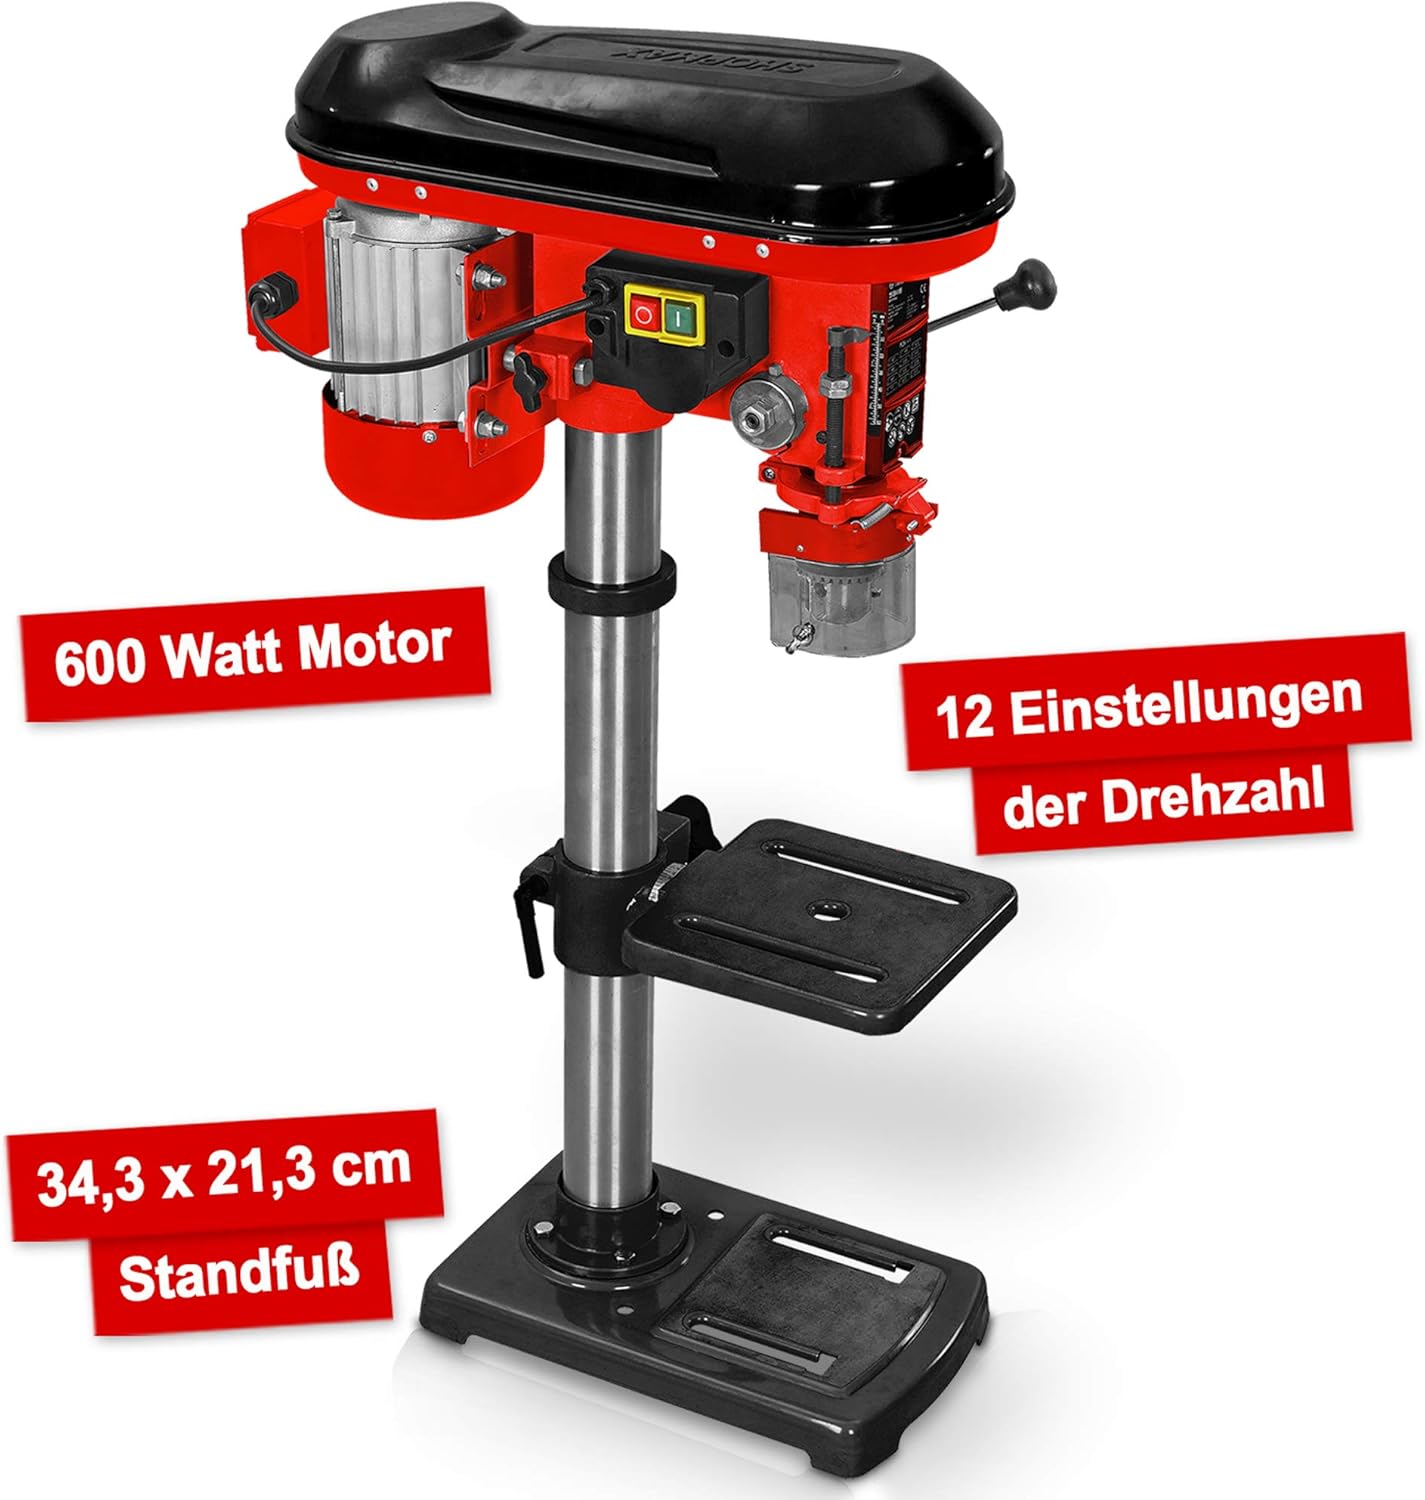
The Hecht Professional Pillar Drill is designed for precise drilling operations. Familiarize yourself with its main components for safe and effective use.

- මෝටර් නිවාස: Contains the 600W motor and belt drive system.
- ප්රධාන රැස්වීම: Includes the chuck, spindle, and depth stop.
- තීරුව: The main support structure for the head assembly and drilling table.
- Drilling Table: Adjustable in height and angle for versatile drilling.
- මූලික තහඩුව: Provides stability and features mounting slots for securing to a workbench.
- චක්: Holds the drill bits securely (3-16 mm capacity).
- Speed Adjustment Lever: Used to change the drilling speed.
- පෝෂක හැන්ඩ්ල්: Used to lower the chuck and drill bit into the workpiece.
- සක්රිය / අක්රිය ස්විචය: Power control for the drill.
- Chip Protection Guard: Transparent guard for safety during operation.
3. සැකසීම සහ එකලස් කිරීම
Follow these steps to assemble and set up your pillar drill before initial use.
- ඇසිරීම: ඇසුරුම්කරණයෙන් සියලුම සංරචක ප්රවේශමෙන් ඉවත් කරන්න. කිසියම් හානියක් හෝ නැතිවූ කොටස් තිබේදැයි පරීක්ෂා කරන්න.
- Base Plate Installation: Place the base plate on a stable, level workbench. Secure it using appropriate bolts through the elongated slots on the base.
- Column Assembly: Mount the column securely onto the base plate according to the provided hardware.
- Drilling Table Attachment: Slide the drilling table assembly onto the column. Adjust its height and secure it with the locking handle.
- Head Assembly Mounting: Carefully place the head assembly onto the top of the column and secure it.
- චක් ස්ථාපනය: Insert the chuck onto the spindle taper. Use a rubber mallet to gently tap it into place, ensuring a firm fit.
- Chip Guard: Attach the transparent chip protection guard around the chuck area.

4. මෙහෙයුම් උපදෙස්
Understand how to properly operate your pillar drill for optimal performance and safety.
4.1 Selecting Drill Bits
Choose the appropriate drill bit for the material and desired hole size. The chuck accommodates bits from 3 mm to 16 mm. Ensure the drill bit is sharp and free from damage.
4.2 සරඹ බිටු ස්ථාපනය කිරීම
- Ensure the drill is unplugged.
- Open the chuck jaws using the chuck key.
- Insert the drill bit into the chuck, ensuring it is centered and seated firmly.
- Tighten the chuck jaws securely with the chuck key. Remove the chuck key immediately after tightening.
4.3 වේගය සකස් කිරීම
The drill features 12 speed settings, adjustable via a belt drive system. Select the speed appropriate for your material and drill bit size. Lower speeds are generally for larger bits and harder materials, while higher speeds are for smaller bits and softer materials.


4.4 Adjusting Drilling Table
The drilling table can be adjusted in height and tilted up to +/- 45 degrees. Loosen the locking handle, position the table as required, and then securely tighten the handle.

4.5 විදුම් ගැඹුර සැකසීම
Use the depth stop mechanism to set the desired drilling depth. This ensures consistent hole depths for repetitive tasks.
4.6 විදුම් ක්රියා පටිපාටිය
- Secure the workpiece firmly to the drilling table using clamps or a vise. Never hold the workpiece by hand.
- Adjust the table height and angle, and set the drilling depth.
- සුදුසු වේගය තෝරන්න.
- Turn on the drill using the On/Off switch.
- Slowly lower the drill bit into the workpiece using the feed handles, applying steady, even pressure.
- අපේක්ෂිත ගැඹුරට ළඟා වූ පසු, වැඩ කොටසෙන් සරඹ බිට් එක ඉවත් කරන්න.
- Turn off the drill.
5. නඩත්තු කිරීම
Regular maintenance ensures the longevity and safe operation of your pillar drill.
- පිරිසිදු කිරීම: After each use, clean the drill of dust and chips. Use a brush or compressed air. Do not use solvents that may damage plastic parts.
- ලිහිසි තෙල්: Periodically lubricate moving parts such as the column, spindle, and depth stop mechanism with light machine oil.
- පටි ආතතිය: Check the tension of the drive belt regularly. Adjust if necessary to prevent slippage and ensure proper power transmission. Refer to the belt diagram inside the motor housing cover.
- චක් නඩත්තුව: Keep the chuck jaws clean and free of debris. If the chuck becomes stiff, clean and lightly lubricate it.
- විදුලි රැහැන්: Inspect the power cord for any damage. Replace if frayed or cut.
6. දෝශ නිරාකරණය
This section addresses common issues you might encounter with your pillar drill.
| ගැටලුව | විය හැකි හේතුව | විසඳුම |
|---|---|---|
| සරඹය ආරම්භ නොවේ | බල සැපයුමක් නැත; දෝෂ සහිත ස්විචය; මෝටරයේ ගැටළුවක් | Check power connection and circuit breaker; Inspect switch for damage; Consult qualified service personnel. |
| අධික කම්පනය | Loose mounting; Unbalanced drill bit; Worn bearings | Tighten mounting bolts; Replace or re-center drill bit; Consult service personnel for bearing replacement. |
| සරඹ බිට් එක චක් එකේ ලිස්සා යයි | Chuck not tightened sufficiently; Oily chuck jaws; Damaged chuck jaws | Tighten chuck firmly with key; Clean chuck jaws; Replace chuck if damaged. |
| මෝටර් අධි තාපනය | Overloading; Insufficient ventilation; Prolonged use | Reduce load; Ensure clear ventilation; Allow motor to cool down. |
| සාවද්ය කැණීම් | Loose workpiece; Worn drill bit; Misaligned table | Secure workpiece firmly; Replace drill bit; Check and adjust table alignment. |
7. පිරිවිතර
Technical data for the Hecht Professional Pillar Drill.
| විශේෂාංගය | පිරිවිතර |
|---|---|
| නිෂ්පාදකයා | Hecht |
| අයිතම ආදර්ශ අංකය | Standbohrmaschine Hecht |
| බලශක්ති ප්රභවය | රැහැන්ගත විදුලි |
| වෙළුමtage | වෝල්ට් 230 |
| උපරිම බලය | වොට් 600 |
| උපරිම භ්රමණ වේගය | 2700 RPM |
| වේග ගණන | 12 |
| උපරිම චක් ප්රමාණය | 16 මි.මී |
| ද්රව්ය | ලෝහ |
| වර්ණය | Red Pillar Drill |
| පැකේජ මානයන් | 71 x 45 x 27 සෙ.මී |
| බර | 23 kilograms (approx.) |
| භාවිත පරිසරය | ගෘහස්ථ |
| යොමු අංකය | 8595614925655 |
8. වගකීම් සහ සහාය
For warranty information, please refer to the documentation provided with your purchase or contact the retailer. For technical support or spare parts inquiries, please contact Hecht customer service or your authorized dealer.
Please have your model number (Standbohrmaschine Hecht) and reference number (8595614925655) available when contacting support.


