1. හැඳින්වීම
Thank you for choosing the Allsmartlife 2x2 LED Flat Panel Ceiling Light. This manual provides essential information for the safe and efficient installation, operation, and maintenance of your new lighting fixture. Please read these instructions thoroughly before installation and retain them for future reference.

Image 1.1: Allsmartlife 2x2 LED Flat Panel Ceiling Light (4-Pack)
2 ආරක්ෂිත තොරතුරු
අවවාදයයි: විදුලි කම්පනය ඇතිවීමේ අවදානම. ස්ථාපනය කිරීමට හෝ සේවා කිරීමට පෙර විදුලිය විසන්ධි කරන්න.
- සියලුම විදුලි සම්බන්ධතා දේශීය කේත සහ ආඥාපනත මෙන්ම ජාතික විදුලි කේතය (NEC) වලට අනුකූල වන බවට සහතික වන්න.
- ස්ථාපන ක්රියාවලිය පිළිබඳව ඔබට විශ්වාසයක් නොමැති නම් සුදුසුකම් ලත් විදුලි කාර්මිකයෙකුගෙන් විමසන්න.
- තාප ප්රභවයන් අසල හෝ අධික තෙතමනය ඇති ප්රදේශවල ස්ථාපනය නොකරන්න.
- මෙම නිෂ්පාදනය ගෘහස්ථ භාවිතය සඳහා පමණක් නිර්මාණය කර ඇත.
- සවිකිරීම වෙනස් කිරීමට උත්සාහ නොකරන්න. ඕනෑම වෙනස් කිරීමක් වගකීම් අවලංගු කළ හැකි අතර ආරක්ෂිත උපද්රව ඇති කළ හැකිය.
- Handle the light panel with care to avoid damage.
3. නිෂ්පාදන ලක්ෂණ
- Brightness Upgrade: Enhanced to 60W/7200 lumens, offering 30% more brightness than traditional 40W panel lights.
- 0-10V Dimmable: Compatible with 0-10V dimmer switches for stable and smooth dimming from 0% to 100%.
- 5CCT Selectable: Offers five color temperature options: 3000K (Warm White), 3500K (Neutral White), 4500K (Bright White), 5000K (Daylight White), and 6000K (Cool White).
- අක්ෂි ආරක්ෂාව: CRI > 85+ for even light distribution, soft lighting, no flicker, and no buzzing sound, reducing eye fatigue.
- අතිශය සිහින් නිර්මාණය: Back-lit panel with a 1.2-inch thickness and sealed housing for efficient dust and heat dissipation.
- Multiple Installation Options: Supports surface mounted, drop mounted, and recessed mounted installations.
- සහතික: UL and ETL certified for quality assurance.
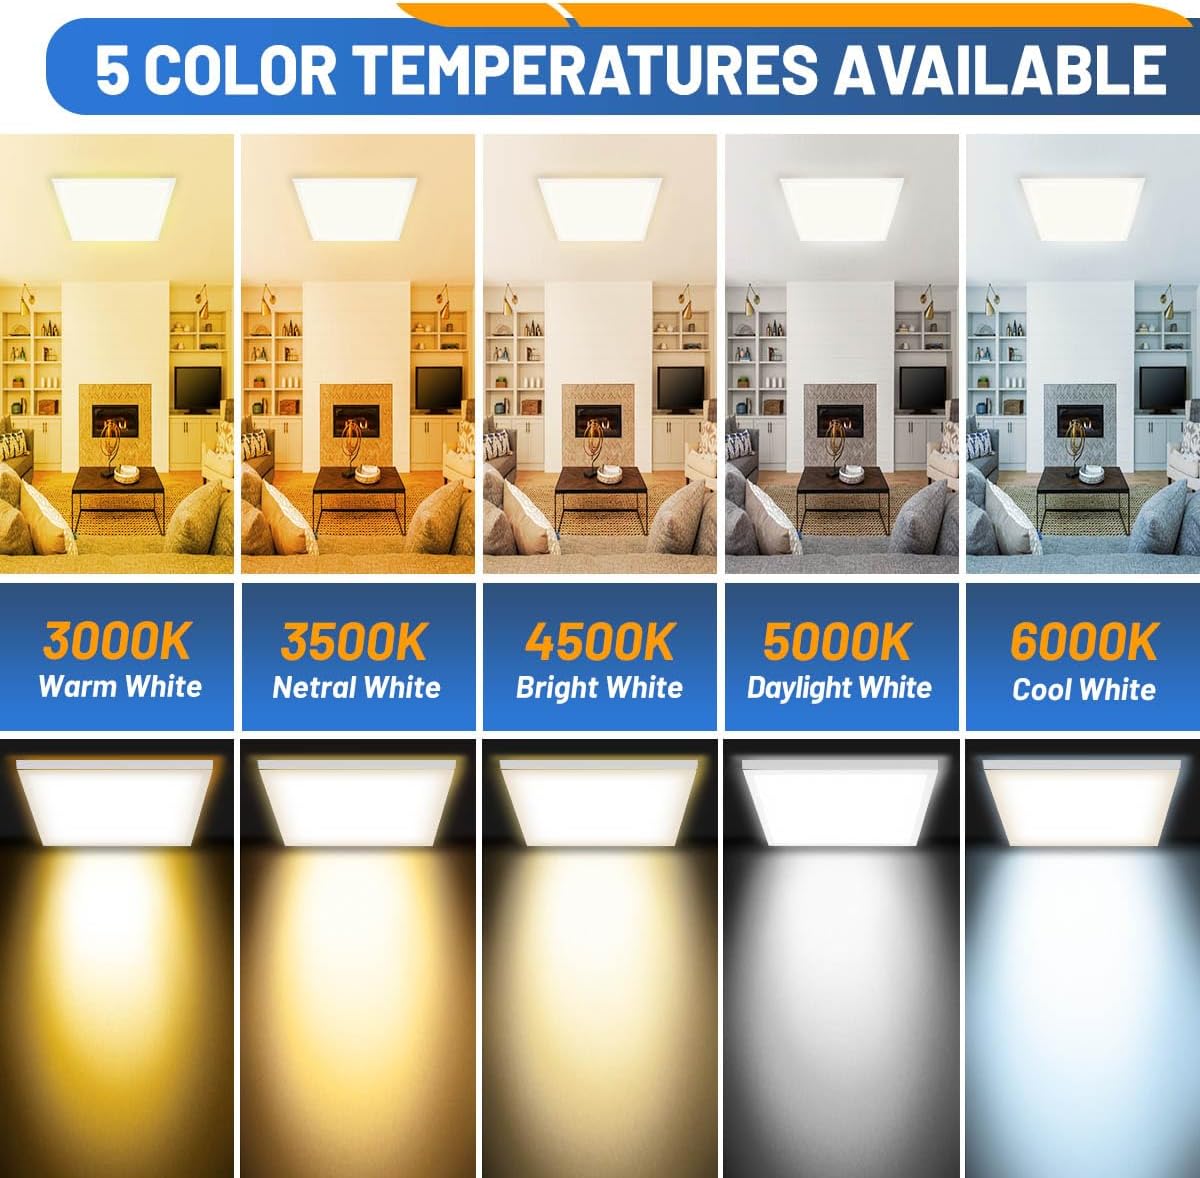
Image 3.1: Illustration of the 5 selectable color temperatures (3000K, 3500K, 4500K, 5000K, 6000K).

Image 3.2: Visual representation of 0-10V dimming capability from 0% to 100% brightness.

Image 3.3: Comparison highlighting the 60W/7200LM brightness upgrade and energy efficiency compared to traditional lighting.
4. පැකේජ අන්තර්ගතය
The Allsmartlife 2x2 LED Flat Panel Light kit includes:
- LED Flat Panel Light(s) (Quantity depends on pack size, e.g., 4 for a 4-pack)
- Installation accessories (brackets for T-Grid mount)
- උපදෙස් අත්පොත
Note: Suspension accessories for drop mount and surface frame for surface mount are sold separately.
5. පිරිවිතර
| විශේෂාංගය | විස්තර |
|---|---|
| වෙළඳ නාමය | Allsmartlife |
| ආදර්ශ අංකය | ASL Back-Lit LED Flat Panel Light |
| මානයන් | 24"අඟල් x 23.99"අඟල් x 1.2"උ |
| වර්ණය | සුදු |
| ද්රව්ය | ඇලුමිනියම්, ප්ලාස්ටික් |
| වට්tage | 60W (Adjustable: 60W/50W/40W/30W/25W) |
| දීප්තිය | ලුමෙන් 7200 (උපරිම) |
| කාර්යක්ෂමතාව | වොට් එකකට ලුමෙන් 125 ක් |
| වර්ණ උෂ්ණත්වය (CCT) | 3000K, 3500K, 4500K, 5000K, 6000K (තෝරාගත හැකි) |
| අඳුරු කළ හැකි | ඔව්, 0-10V අඳුරු කිරීම |
| වෙළුමtage | 100-277V ඒසී |
| ආලෝක ප්රභවයේ වර්ගය | LED |
| ස්ථාපන වර්ගය | Flush Mount, Surface Mount, Drop Mount |
| සහතික | UL, ETL Certified |
| ගෘහස්ථ / එළිමහන් භාවිතය | ගෘහස්ථ |

Image 5.1: Detailed dimensions and adjustable features of the 2x2FT LED Flat Panel Light.
6. පිහිටුවීම සහ ස්ථාපනය
Before beginning installation, ensure the power supply is turned off at the circuit breaker to prevent electric shock.
6.1. Flush Mount (Recessed Grid-Ceiling)
- Turn off the power and carefully remove the existing ceiling tile or prepare the opening in the grid ceiling.
- Connect the electrical wires (Live, Neutral, Ground) from the ceiling to the light fixture's wiring. Ensure secure connections.
- Place the LED panel light into the ceiling grid opening.
- ආලෝකය පරීක්ෂා කිරීමට බලය සක්රිය කරන්න.

Image 6.1: Step-by-step guide for flush mount installation in a recessed grid ceiling.
6.2. Drop Mount (Suspended)
Requires suspension accessories (sold separately).
- Install the suspension wires' basis points securely on the ceiling.
- Connect the electrical wires (Live, Neutral, Ground) from the ceiling to the light fixture's wiring.
- Attach the hooks of the suspension wires through the fixed rings on the back of the LED panel.
- Adjust the suspension wires to the desired height.
- ආලෝකය පරීක්ෂා කිරීමට බලය සක්රිය කරන්න.

Image 6.2: Step-by-step guide for drop mount installation using suspension wires.
6.3. මතුපිට සවි කිරීම
Requires a surface mount frame (sold separately).
- Assemble the surface mount frame and securely mount it onto the ceiling using screws.
- Connect the electrical wires (Live, Neutral, Ground) from the ceiling to the light fixture's wiring.
- Place the LED panel light body horizontally into the mounting plate of the surface frame.
- Secure the light panel within the frame.
- ආලෝකය පරීක්ෂා කිරීමට බලය සක්රිය කරන්න.

Image 6.3: Step-by-step guide for surface mount installation using a surface frame.
7. මෙහෙයුම් උපදෙස්
7.1. වර්ණ උෂ්ණත්වය (CCT) සකස් කිරීම
The LED panel features a 5CCT selectable switch, typically located on the back or side of the fixture. Before final installation or with power off, select your desired color temperature:
- 3000K: උණුසුම් සුදු
- 3500K: උදාසීන සුදු
- 4500K: දීප්තිමත් සුදු
- 5000K: දිවා ආලෝකය සුදු
- 6000K: සිසිල් සුදු
Once selected, the light will operate at this CCT when powered on.
7.2. අඳුරු කිරීමේ කාර්යය
This LED panel light is compatible with 0-10V dimmer switches. Connect the light fixture to a compatible 0-10V dimmer switch (sold separately) according to the dimmer's instructions and local electrical codes. The dimmer allows for smooth brightness adjustment from 0% to 100%.
Note: Ensure the dimmer switch is specifically designed for 0-10V LED dimming to avoid damage or improper operation.
8. නඩත්තු කිරීම
The Allsmartlife LED Flat Panel Light requires minimal maintenance.
- පිරිසිදු කිරීම: පිරිසිදු කිරීමට පෙර විදුලිය විසන්ධි කර ඇති බවට වග බලා ගන්න. මෘදු, වියලි හෝ තරමක් d පිරිසිදු කරන්නෙකු භාවිතා කරන්න.amp cloth to wipe the surface of the panel. Do not use abrasive cleaners, solvents, or cleaners containing ammonia, as these may damage the finish or electrical components.
- පරීක්ෂාව: Periodically inspect the fixture for any signs of damage or loose connections. If any issues are found, disconnect power and consult a qualified electrician or contact customer support.
- පරිශීලක-සේවා කළ හැකි කොටස් නොමැත: There are no user-serviceable parts inside the LED panel. Do not attempt to open or repair the fixture.
9. දෝශ නිරාකරණය
| ගැටලුව | විය හැකි හේතුව | විසඳුම |
|---|---|---|
| ආලෝකය ක්රියාත්මක නොවේ. | බල සැපයුමක් නැත. ලිහිල් රැහැන් සම්බන්ධතාවය. දෝෂ සහිත ස්විචය. | පරිපථ කඩනය සහ බිත්ති ස්විචය පරීක්ෂා කරන්න. සියලුම රැහැන් සම්බන්ධතා ආරක්ෂිත දැයි තහවුරු කර ගන්න (පළමුව විදුලිය විසන්ධි කර ඇති බවට වග බලා ගන්න). Test the switch with another device or replace it. |
| ආලෝකය දැල්වෙයි හෝ ඝෝෂා කරයි. | නොගැලපෙන ඩිමර් ස්විචය. ලිහිල් රැහැන්. වෙළුමtagඊ උච්චාවචනයන්. | Ensure a 0-10V compatible dimmer is used. රැහැන් සම්බන්ධතා පරීක්ෂා කරන්න. බල සැපයුම් ස්ථායිතාව පරීක්ෂා කිරීම සඳහා විදුලි කාර්මිකයෙකුගෙන් විමසන්න. |
| Light is not dimming properly. | නොගැලපෙන ඩිමර් ස්විචය. Incorrect dimmer wiring. | Verify the dimmer is a 0-10V type. Recheck dimmer wiring according to its instructions. |
| වැරදි වර්ණ උෂ්ණත්වය. | CCT ස්විචය වැරදි ලෙස සකසා ඇත. | Turn off power, access the CCT switch on the fixture, and select the desired color temperature. |
If troubleshooting steps do not resolve the issue, please contact Allsmartlife customer support.
10. වගකීම් සහ සහාය
10.1. වගකීම් තොරතුරු
The Allsmartlife 2x2 LED Flat Panel Light comes with a වසර 5ක වගකීමක් මිලදී ගත් දින සිට. මෙම වගකීම් සහතිකය සාමාන්ය භාවිතය යටතේ ද්රව්ය හා වැඩ කිරීමේ දෝෂ ආවරණය කරයි.
වගකීම් සහතිකය ආවරණය නොවේ:
- Damage caused by improper installation, misuse, abuse, or neglect.
- අනවසර අලුත්වැඩියාවන් හෝ වෙනස් කිරීම් නිසා සිදුවන හානිය.
- ස්වාභාවික විපත් හෝ දෙවියන්ගේ ක්රියා නිසා සිදුවන හානි.
වගකීම් හිමිකම් සඳහා කරුණාකර ඔබගේ මිලදී ගැනීමේ සාක්ෂි තබා ගන්න.
10.2. පාරිභෝගික සහාය
For technical assistance, warranty claims, or any questions regarding your Allsmartlife product, please contact our customer support team. We are committed to resolving any issues proactively within 12 hours.
Contact information can typically be found on the product packaging or the official Allsmartlife website. You may also refer to your purchase platform for seller contact details.
11. නිර්දේශිත යෙදුම්
This versatile LED panel light is ideal for a variety of commercial and residential settings, including:
- Offices and Conference Halls
- Studies and Reading Areas
- සුපිරි වෙළඳසැල් සහ සිල්ලර වෙළඳසැල්
- Hotels and Hospitality Spaces
- Production Work Areas
- Garages and Basements

රූපය 11.1: උදාamples of common installation environments such as meeting rooms, offices, and kitchens.


