DrayTek Vigor 2865ax ඊතර්නෙට් රවුටර් පරිශීලක අත්පොත
මාදිලිය: V2865AX-K
හැඳින්වීම
Welcome to the user manual for your DrayTek Vigor 2865ax Ethernet Router. This document provides detailed instructions for setting up, operating, maintaining, and troubleshooting your device to ensure optimal performance and connectivity. The Vigor 2865ax is a high-performance router designed for Small to Medium Businesses (SMBs) and advanced home users, offering robust features like VDSL2/ADSL2+ and Ethernet WAN load balancing, Wi-Fi 6 (AX3000), VPN capabilities, and extensive LAN port options.
ආරක්ෂිත තොරතුරු
Please read these safety instructions carefully before using the device.
- Place the router on a stable, flat surface away from direct sunlight, heat sources, and moisture.
- අධික උනුසුම් වීම වැළැක්වීම සඳහා උපාංගය වටා ප්රමාණවත් වාතාශ්රයක් සහතික කරන්න.
- Use only the power adapter supplied with the router.
- Do not open the router casing; සියලුම සේවා සුදුසුකම් ලත් පුද්ගලයින් වෙත යොමු කරන්න.
- උපකරණය ළමයින් සහ සුරතල් සතුන්ගෙන් ඈත් කරන්න.
- Disconnect power during electrical storms or when unused for long periods.
පැකේජයේ අන්තර්ගතය
පහත ලැයිස්තුගත කර ඇති සියලුම අයිතම ඔබේ පැකේජයට ඇතුළත් කර ඇති බව තහවුරු කරගන්න:
- Vigor 2865 Series Router
- DC 12V Power Supply with UK Plug
- ඉක්මන් ආරම්භක මාර්ගෝපදේශය
- Screws & wall plugs for wall mounting
- 2m Cat-5e RJ-45 Network Cable
- 2x Detachable Wireless LAN Antennas
නිෂ්පාදනය අවසන්view
Familiarize yourself with the physical components and ports of your DrayTek Vigor 2865ax router.
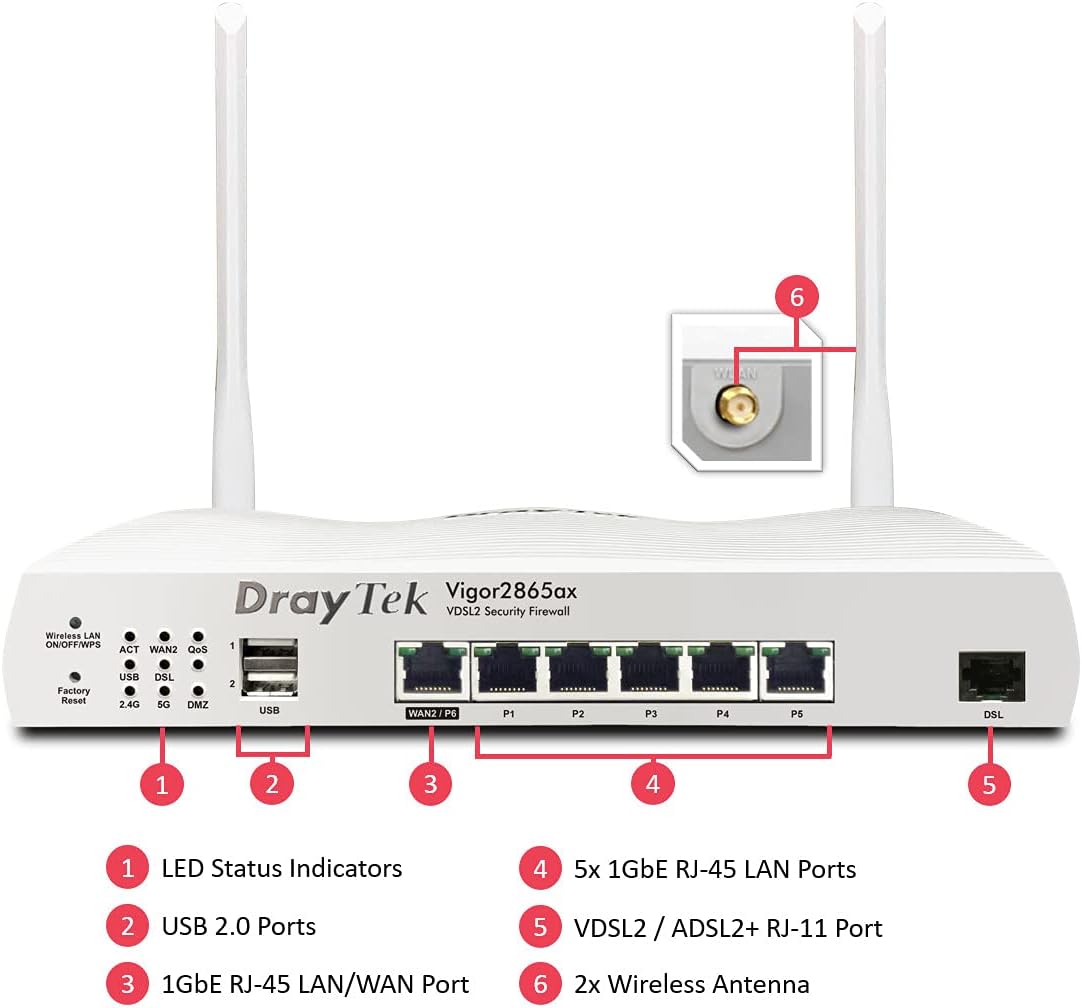
This image displays the front panel of the DrayTek Vigor 2865ax router, highlighting key components. Label 1 points to the LED Status Indicators, Label 2 to the USB 2.0 Ports, Label 3 to the 1GbE RJ-45 LAN/WAN Port (WAN2/P6), Label 4 to the 5x 1GbE RJ-45 LAN Ports (P1-P5), Label 5 to the VDSL2 / ADSL2+ RJ-11 Port (DSL), and Label 6 to the 2x Wireless Antenna connectors.
ඉදිරිපස පුවරුව
- LED තත්ත්ව දර්ශක: Provide visual feedback on the router's operational status, including power, internet connectivity, Wi-Fi activity, and LAN port status.
- USB 2.0 Ports: For connecting external devices such as 3G/4G USB modems for backup WAN or USB storage for network-attached storage (NAS) functionality.
- WAN2/P6 (1GbE RJ-45 LAN/WAN Port): Configurable as either a Gigabit Ethernet WAN port for connecting to a fiber modem or another internet source, or as an additional LAN port.
- P1-P5 (5x 1GbE RJ-45 LAN Ports): Gigabit Ethernet ports for connecting wired devices such as computers, servers, and network switches.
- DSL (VDSL2 / ADSL2+ RJ-11 Port): For connecting directly to your VDSL or ADSL broadband line.
පසුපස පුවරුව
- බල ආදානය: Connects to the supplied DC 12V power adapter.
- බල බොත්තම: රවුටරය සක්රිය හෝ අක්රිය කිරීමට.
- ඇන්ටෙනා සම්බන්ධක: For attaching the two detachable wireless LAN antennas.
සැලසුම
පියවර 1: දෘඪාංග සම්බන්ධ කරන්න
- ඇන්ටනා සම්බන්ධ කරන්න: Screw the two detachable wireless LAN antennas onto the connectors at the rear of the router.
- අන්තර්ජාලයට සම්බන්ධ වන්න (WAN):
- For VDSL/ADSL: Connect an RJ-11 cable from your telephone line's DSL filter/socket to the DSL port on the router.
- For Ethernet WAN (e.g., Fibre/Cable Modem): Connect an Ethernet cable from your fiber/cable modem to the WAN2/P6 port on the router.
- දේශීය ජාලයට (LAN) සම්බන්ධ වන්න: Connect an Ethernet cable from one of the LAN ports (P1-P5) on the router to your computer or network switch.
- සම්බන්ධක බලය: Connect the supplied DC 12V power adapter to the router's power input and then plug it into a power outlet. Press the power button to turn on the router.
පියවර 2: මුලික වින්යාසය
- ප්රවේශය Web අතුරු මුහුණත: a විවෘත කරන්න web browser on a connected computer and enter the default IP address: 192.168.1.1.
- ඇතුල් වන්න: පෙරනිමි පරිශීලක නාමය ඇතුළත් කරන්න (පරිපාලක) සහ මුරපදය (පරිපාලක). It is highly recommended to change the default password immediately after logging in for the first time.
- Run Quick Start Wizard: Follow the on-screen instructions of the Quick Start Wizard to configure your internet connection (WAN settings), Wi-Fi network name (SSID), and password.
- ස්ථිරාංග යාවත්කාලීන කිරීම: After initial setup, navigate to පද්ධති නඩත්තුව > ස්ථිරාංග උත්ශ්රේණි කිරීම to check for and install the latest firmware. This ensures optimal performance and security.
මෙහෙයුම් උපදෙස්
Multi-WAN Load Balancing and Failover
The Vigor 2865ax supports multiple WAN connections, allowing for load balancing to increase bandwidth or failover for connection redundancy.

This diagram shows the DrayTek Vigor 2865ax router connected to various internet sources: WiFi WAN, 1Gb Ethernet & FTTP, ADSL2+ & VDSL2 FTTC, and G.Fast FTTC. This illustrates the router's capability to utilize multiple WAN connections simultaneously for load balancing or failover.
Configure WAN settings under WAN > සාමාන්ය සැකසුම. You can enable load balancing policies or set up failover rules to ensure continuous internet access.
Wi-Fi 6 (AX3000) Configuration
The router provides high-speed Wi-Fi 6 connectivity across dual bands (2.4GHz and 5GHz).

This image depicts the Wi-Fi coverage provided by the DrayTek Vigor 2865ax router, showing distinct coverage areas for the 2.4GHz (AX600) and 5GHz (AX2400) bands, with various devices connected within these zones.
Access Wi-Fi settings via රැහැන් රහිත LAN menu. Here you can:
- Change SSID (Wi-Fi network name) and password.
- Configure security settings (WPA2/WPA3).
- Set up multiple SSIDs for different networks (e.g., guest network).
- Adjust channel and bandwidth settings for optimal performance.
VPN (අතථ්ය පුද්ගලික ජාලය)
The Vigor 2865ax supports up to 32 VPN tunnels, including SSL VPN and OpenVPN, for secure remote access and site-to-site connectivity.
වෙත සංචාලනය කරන්න VPN සහ දුරස්ථ ප්රවේශය to configure VPN profiles. Detailed guides for various VPN types are available on the DrayTek support webඅඩවිය.
LAN Management and VLANs
The router features 5+1 Gigabit LAN ports and supports VLANs for network segmentation.
Manage LAN settings under LAN > General Setup. ඔයාට පුළුවන්:
- Configure IP addresses and DHCP server settings.
- Create VLANs (Virtual LANs) to isolate network segments for enhanced security and management (e.g., separating guest Wi-Fi from internal network).
- Set up port mirroring or link aggregation if supported.
නඩත්තු කිරීම
ස්ථිරාංග යාවත්කාලීන කිරීම්
Regularly check for and install firmware updates to ensure your router has the latest features, security patches, and performance improvements.
- නිල DrayTek වෙත පිවිසෙන්න website and navigate to the support section for the Vigor 2865ax.
- නවතම ස්ථිරාංග බාගන්න file.
- රවුටරයට ප්රවේශ වන්න web interface and go to පද්ධති නඩත්තුව > ස්ථිරාංග උත්ශ්රේණි කිරීම.
- Follow the on-screen instructions to upload and install the firmware. Do not power off the router during this process.
උපස්ථ වින්යාසය
It is advisable to back up your router's configuration settings before performing major changes or firmware updates.
වෙත යන්න පද්ධති නඩත්තුව > වින්යාස උපස්ථය to save your settings to a file.
කර්මාන්තශාලා යළි පිහිටුවීම
If you encounter persistent issues or wish to revert all settings to default, you can perform a factory reset.
අවවාදයයි: A factory reset will erase all your custom configurations.
කර්මාන්තශාලා යළි පිහිටුවීම සිදු කිරීමට:
- With the router powered on, use a paperclip or a thin object to press and hold the කර්මාන්තශාලා යළි පිහිටුවීම button (located on the front panel, often recessed) for about 5-10 seconds until the LEDs flash.
- Release the button and wait for the router to restart with default settings.
දෝෂගවේෂණය
අන්තර්ජාල සම්බන්ධතාවයක් නොමැත
- කේබල් පරීක්ෂා කරන්න: Ensure all Ethernet and DSL cables are securely connected to the correct ports.
- WAN LED පරීක්ෂා කරන්න: Verify that the WAN LED (DSL or WAN2) is lit and stable, indicating a connection to your ISP.
- ISP සැකසුම්: Confirm that your WAN settings (e.g., PPPoE username/password, static IP, DHCP) are correctly configured in the router's web interface, matching your ISP's requirements.
- මොඩමයේ තත්ත්වය: If using an external modem, check its status lights to ensure it's online.
- නැවත ආරම්භ කරන්න: Power cycle both your modem (if applicable) and the DrayTek router.
Wi-Fi Not Working or Slow
- Check Wireless LAN LED: Ensure the Wireless LAN LED is active.
- SSID විකාශනය: Verify that your Wi-Fi network (SSID) is being broadcast.
- මුරපදය: ඔබගේ Wi-Fi මුරපදය දෙවරක් පරීක්ෂා කරන්න.
- නාලිකා මැදිහත්වීම: Try changing the Wi-Fi channel in the router's settings to avoid interference from neighboring networks.
- සංඥා ශක්තිය: Ensure the router is placed centrally and away from obstructions.
ප්රවේශ විය නොහැක Web අතුරු මුහුණත
- IP ලිපිනය: Confirm your computer's IP address is in the same subnet as the router (e.g., 192.168.1.x).
- කේබල් සම්බන්ධතාවය: Ensure your computer is directly connected to a LAN port on the router.
- බ්රව්සර් හැඹිලිය: ඔබගේ බ්රවුසරයේ හැඹිලිය හිස් කරන්න හෝ වෙනත් බ්රවුසරයක් උත්සාහ කරන්න.
- ෆයර්වෝල්/ප්රති-වයිරස: ඔබගේ පරිගණකයේ ප්රවේශය අවහිර කළ හැකි ඕනෑම මෘදුකාංග ෆයර්වෝල් හෝ ප්රති-වයිරස වැඩසටහන් තාවකාලිකව අක්රිය කරන්න.
- කර්මාන්තශාලා යළි පිහිටුවීම: As a last resort, perform a factory reset (see Maintenance section).
පිරිවිතර
| විශේෂාංගය | විස්තර |
|---|---|
| නිෂ්පාදන මානයන් | 34.5 x 28.6 x 7.5 cm; කිලෝ ග්රෑම් 1.6 කි |
| අයිතම ආදර්ශ අංකය | V2865AX-K හඳුන්වා දීම |
| වෙළඳ නාමය | DrayTek |
| මාදිලියේ නම | Vigor 2865ax |
| විශේෂ ලක්ෂණය | දුරස්ථ ප්රවේශය |
| සංඛ්යාත කලාප පන්තිය | ද්විත්ව සංගීත කණ්ඩායම |
| රැහැන් රහිත සන්නිවේදන ප්රමිතිය | 802.11a (Wi-Fi 6 AX3000) |
| ගැළපෙන උපාංග | ලැප්ටොප්, පුද්ගලික පරිගණකය, ටැබ්ලට්, ස්මාර්ට්ෆෝන් |
| සංඛ්යාතය | 2.4 GHz, 5 GHz |
| නිර්දේශිත භාවිතයන් | ක්රීඩා, නිවස, ව්යාපාර |
| සම්බන්ධතා තාක්ෂණය | Wi-Fi, Ethernet, VDSL2/ADSL2+ |
වගකීම් සහ සහාය
DrayTek products typically come with a standard manufacturer's warranty. Please refer to the warranty card included in your product packaging or visit the official DrayTek webඔබේ කලාපයට විශේෂිත වූ සවිස්තරාත්මක වගකීම් නියමයන් සහ කොන්දේසි සඳහා අඩවිය.
For technical support, firmware downloads, and additional documentation, please visit the official DrayTek support webඅඩවිය: www.draytek.co.uk/support. You may also contact DrayTek customer service directly for assistance.
When contacting support, please have your router's model number (Vigor 2865ax) and serial number ready.