1. හැඳින්වීම
ස්තූතියි, උදව් කළාටasing the TURBOX Giantpeak Mechanical Feel RGB Gaming Keyboard. This manual provides essential information for setting up, operating, and maintaining your new keyboard. Please read this manual carefully before use to ensure optimal performance and longevity of your device.
2 ආරක්ෂිත තොරතුරු
- Keep the keyboard away from excessive heat, direct sunlight, and moisture.
- Although the keyboard is spill-resistant, avoid intentionally exposing it to large amounts of liquid. In case of spills, disconnect the keyboard immediately and allow it to dry completely before reconnecting.
- Do not attempt to disassemble or modify the keyboard. This will void the warranty and may cause damage.
- නිශ්චිතව දක්වා ඇති පරිදි අනුකූල උපාංග සහ බල ප්රභවයන් සමඟ පමණක් භාවිතා කරන්න.
- දරුවන්ට ළඟා විය නොහැකි ලෙස තබා ගන්න.
3. පැකේජ අන්තර්ගතය
කරුණාකර පහත අයිතම සඳහා පැකේජය පරීක්ෂා කරන්න:
- TURBOX Giantpeak Mechanical Feel RGB Gaming Keyboard
- පරිශීලක අත්පොත (මෙම ලේඛනය)
4. නිෂ්පාදන අවසන්view
The TURBOX Giantpeak keyboard is designed for gaming, featuring a mechanical feel, customizable RGB lighting, and macro capabilities. It also includes a convenient mobile device holder.
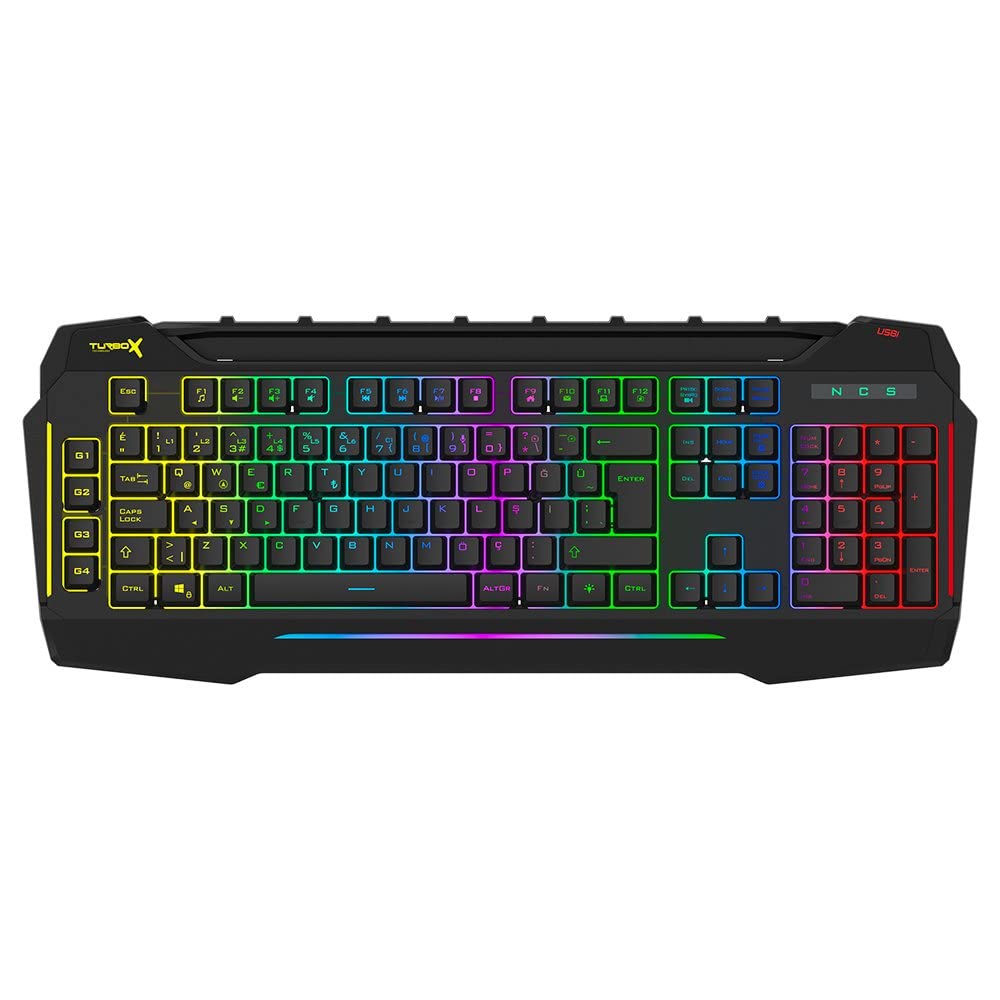
Figure 4.1: TURBOX Giantpeak keyboard with integrated mobile device stand.
This full-size keyboard offers a standard Q layout, providing a comfortable and responsive typing experience for both gaming and general use.

රූපය 4.2: ඉහළ view of the TURBOX Giantpeak keyboard.
The keyboard features vibrant RGB backlighting that can be customized to various effects, including sound-sensitive modes. Its spill-resistant design provides added durability.

රූපය 4.3: කෝණික view showing RGB lighting.
Dedicated macro keys (G1-G4) are located on the left side, allowing for quick execution of complex commands or sequences.

Figure 4.4: Close-up of programmable G-keys.
The keyboard also includes a full numeric keypad for data entry and additional functions.

Figure 4.5: Numeric keypad detail.
Connectivity is provided via a durable USB cable, ensuring a stable and responsive connection to your computer.

රූපය 4.6: පැත්ත view USB කේබලය සමඟ.
5. පිහිටුවීම
Follow these steps to set up your TURBOX Giantpeak keyboard:
- යතුරු පුවරුව ඉවත් කරන්න: Carefully remove the keyboard and any packaging materials from the box.
- පරිගණකයට සම්බන්ධ කරන්න: Plug the USB connector of the keyboard into an available USB port on your desktop or laptop computer.
- ධාවක ස්ථාපනය: Your operating system (Windows, macOS, etc.) should automatically detect and install the necessary drivers. This process may take a few moments.
- ක්රියාකාරීත්වය තහවුරු කරන්න: Once drivers are installed, test the keyboard by typing in a text editor or browser to ensure all keys are functioning correctly. The RGB lighting should also illuminate.
6. මෙහෙයුම් උපදෙස්
6.1 මූලික යතුරුපුවරු කාර්යයන්
The TURBOX Giantpeak keyboard operates like a standard Q-layout keyboard. All standard keys (alphanumeric, function keys, numeric keypad, navigation keys) function as expected.
6.2 RGB ආලෝකකරණ පාලනය
The keyboard features customizable RGB backlighting with 7 different color options and sound-sensitive modes. Specific key combinations are used to cycle through lighting effects and adjust brightness:
- ආලෝක මාදිලිය වෙනස් කරන්න: භාවිතා කරන්න Fn + අනුචලන අගුල keys to cycle through various lighting effects.
- දීප්තිය සකසන්න: භාවිතා කරන්න Fn + පිටුව ඉහළට (වැඩි කිරීම) හෝ Fn + පිටුව පහළට (decrease) keys to adjust the brightness level of the backlighting.
- Sound-Sensitive Mode: The keyboard supports sound-sensitive lighting. Refer to specific software or key combinations (if available) for activation. (Note: Specific key combinations for sound-sensitive mode may vary or require software.)
6.3 Macro Programming (G1-G4 Keys)
The TURBOX Giantpeak keyboard includes 4 programmable macro keys (G1, G2, G3, G4) for executing custom commands or sequences. Follow these general steps for macro recording:
- Enter Macro Recording Mode: ඔබන්න MR key (Macro Record, usually near the G-keys). The keyboard's indicator light may flash to indicate recording mode.
- මැක්රෝ යතුර තෝරන්න: Press one of the G-keys (G1, G2, G3, or G4) where you want to save the macro.
- Record Sequence: Type the sequence of keys you wish to record. This can include multiple keystrokes, delays, and modifier keys.
- Exit Macro Recording Mode: ඔබන්න MR key again to save the macro and exit recording mode. The indicator light should stop flashing.
- Execute Macro: To use the recorded macro, simply press the assigned G-key.
Note: For advanced macro settings or specific software-based macro management, please check the manufacturer's website for any available utility software.
6.4 Mobile Device Holder
The integrated slot at the top of the keyboard is designed to hold smartphones or small tablets, providing a convenient viewing angle while gaming or working.
7. නඩත්තු කිරීම
To ensure the longevity and performance of your keyboard, follow these maintenance guidelines:
- පිරිසිදු කිරීම: යතුරු පුවරුවේ මතුපිට පිස දැමීමට මෘදු වියළි රෙද්දක් භාවිතා කරන්න. මුරණ්ඩු අපිරිසිදුකම සඳහා, තරමක් dampරෙදි කැබැල්ල වතුරෙන් හෝ මෘදු පිරිසිදු කිරීමේ ද්රාවණයකින් පිස දමන්න. සැර රසායනික ද්රව්ය හෝ උල්ෙල්ඛ ද්රව්ය වලින් වළකින්න.
- දූවිලි ඉවත් කිරීම: යතුරු කැප් අතර ඇති දූවිලි හා සුන්බුන් ඉවත් කිරීමට සම්පීඩිත වාතය භාවිතා කරන්න.
- කාන්දු කළමනාකරණය: In case of liquid spills, immediately disconnect the keyboard from your computer. Turn it upside down to drain any liquid and allow it to air dry completely for at least 24-48 hours before reconnecting.
- ගබඩා: When not in use for extended periods, store the keyboard in a clean, dry environment.
8. දෝශ නිරාකරණය
If you encounter issues with your TURBOX Giantpeak keyboard, refer to the following common problems and solutions:
| ගැටලුව | හැකි විසඳුම |
|---|---|
| යතුරු පුවරුව ප්රතිචාර නොදක්වයි. |
|
| RGB lighting is not working or is stuck. |
|
| Macro keys (G1-G4) are not working. |
|
| යතුරු ඇලෙන සුළු හෝ ප්රතිචාර නොදක්වයි. |
|
9. පිරිවිතර
| විශේෂාංගය | විස්තර |
|---|---|
| මාදිලියේ නම | Giantpeak |
| කොටස අංකය | ID9923266 |
| වෙළඳ නාමය | ටර්බොක්ස් |
| සම්බන්ධතා තාක්ෂණය | USB Wired |
| ගැළපෙන උපාංග | ලැප්ටොප්, පීසී |
| යතුරු වර්ගය | Mechanical Feel (Membrane) |
| විශේෂ ලක්ෂණ | RGB Lighting, Macro Keys (4), Sound-Sensitive Lighting, Spill-Resistant, Mobile Device Holder |
| යතුරු ගණන | 87 (Note: Visuals suggest a full-size layout, this number may refer to a specific key group or variant.) |
| දෘඩාංග අතුරුමුහුණත | USB |
| පැකේජ මානයන් | 51.2 x 22.2 x 5.2 සෙ.මී |
| අයිතමයේ බර | 1 කිලෝ ග්රෑම් |
10. වගකීම් සහ සහාය
For warranty information and technical support, please refer to the warranty card included with your product or visit the official TURBOX webවෙබ් අඩවිය. ඕනෑම වගකීම් හිමිකම් සඳහා ඔබේ මිලදී ගැනීමේ සාක්ෂි තබා ගන්න.
If you require further assistance, please contact TURBOX customer support through their official channels.


