1. හැඳින්වීම
The Cherry MW 8C Ergo is an ergonomic, right-handed wireless mouse designed for comfort and precision. It offers flexible connectivity options via Bluetooth or a 2.4 GHz wireless USB dongle, ensuring a stable and secure connection with AES-128 encryption. This rechargeable mouse features a high-precision sensor for accurate tracking and is built for durability and extended use. This manual provides detailed instructions for setting up, operating, maintaining, and troubleshooting your MW 8C Ergo mouse.
2. පැකේජ අන්තර්ගතය
කරුණාකර පහත අයිතම සඳහා පැකේජය පරීක්ෂා කරන්න:
- චෙරි MW 8C Ergo රැහැන් රහිත මවුස්
- USB-A සිට USB-C ආරෝපණ කේබලය
- 2.4 GHz Wireless USB Receiver (dongle)
- Storage Pouch (fabric carry pouch)
- උපදෙස් අත්පොත (මෙම ලේඛනය)
3. නිෂ්පාදන ලක්ෂණ
- Ergonomic Design: Shaped for comfortable right-handed use, reducing strain during long periods.
- Dual Wireless Connectivity: Seamlessly switch between Bluetooth and 2.4 GHz wireless modes.
- නැවත ආරෝපණය කළ හැකි බැටරි: Integrated battery provides long-lasting power and can be charged via USB-C.
- අධි-නිරවද්ය දෘශ්ය සංවේදකය: Ensures accurate and smooth cursor control.
- AES-128 Encryption: Secure wireless transmission for data protection.
- සකස් කළ හැකි DPI: Customize cursor speed to suit your preferences.
- කල් පවතින ඉදිකිරීම්: High-quality materials for reliability and longevity.
4. පිහිටුවීම
4.1. මූසිකය ආරෝපණය කිරීම
Before first use, it is recommended to fully charge the mouse. Connect the supplied USB-A to USB-C charging cable to the USB-C port on the front of the mouse and to a USB-A port on your computer or a USB power adapter.
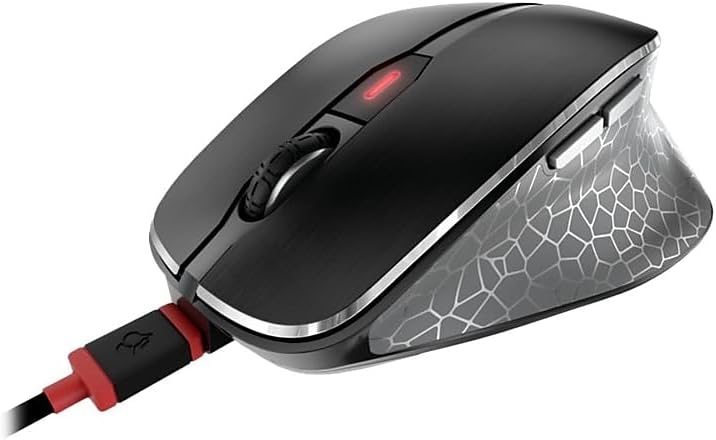
Image: The Cherry MW 8C Ergo mouse connected to its USB-C charging cable, showing the charging port and the mouse's top view.
The LED indicator on the mouse will show charging status. Once fully charged, the LED will change or turn off depending on the model's specific indicator behavior.
4.2. Connecting via 2.4 GHz Wireless (USB Receiver)
- Locate the 2.4 GHz USB receiver (dongle), usually stored magnetically in a compartment on the bottom of the mouse.
- USB ග්රාහකය ඔබේ පරිගණකයේ ඇති USB-A port එකකට සම්බන්ධ කරන්න.
- On the bottom of the mouse, slide the 3-position switch to the "2.4 GHz" position (often indicated by a small wireless icon).
- ඔබේ පරිගණකය අවශ්ය ධාවක ස්වයංක්රීයව හඳුනාගෙන ස්ථාපනය කළ යුතුය. මූසිකය භාවිතයට සූදානම් වනු ඇත.
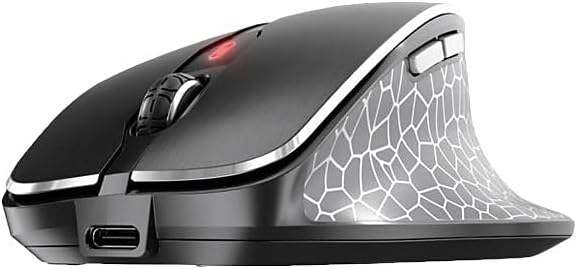
රූපය: ඉදිරිපස පැත්තක් view of the Cherry MW 8C Ergo mouse, highlighting the USB-C charging port and the scroll wheel.
4.3. බ්ලූටූත් හරහා සම්බන්ධ වීම
- On the bottom of the mouse, slide the 3-position switch to the "Bluetooth" position (often indicated by a Bluetooth icon).
- Press and hold the Bluetooth detection button on the bottom of the mouse for a few seconds until the LED indicator starts blinking, indicating pairing mode.
- ඔබේ පරිගණකයේ, බ්ලූටූත් සැකසුම් විවෘත කරන්න:
- වින්ඩෝස්: Go to Settings > Devices > Bluetooth & other devices. Click "Add Bluetooth or other device" and select "Bluetooth".
- මැකෝස්: Go to System Preferences > Bluetooth.
- Select "Cherry MW 8C Ergo" from the list of available devices.
- යුගල කිරීමේ ක්රියාවලිය සම්පූර්ණ කිරීමට තිරයේ ඇති ඕනෑම විමසීමක් අනුගමනය කරන්න. සාර්ථකව යුගල කළ පසු මූසිකයේ LED දර්ශකය දැල්වීම නවත්වනු ඇත.
5. මූසිකය ක්රියාත්මක කිරීම
5.1. බොත්තම් කාර්යයන්
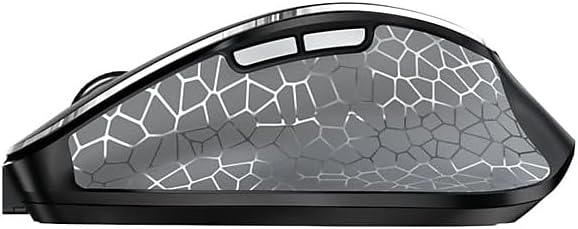
රූපය: පැත්තක් view of the Cherry MW 8C Ergo mouse, highlighting the two programmable side buttons.
- වම් ක්ලික් බොත්තම: මූලික ක්ලික් කිරීමේ කාර්යය.
- දකුණු ක්ලික් බොත්තම: Secondary click function, typically opens context menus.
- අනුචලන රෝදය: ලේඛන ඉහළට/පහළට අනුචලනය කරන්න සහ web පිටු. මැද-ක්ලික් ශ්රිතයක් සඳහා ද එබිය හැකිය.
- DPI බොත්තම: Located behind the scroll wheel, this button allows you to cycle through different DPI (Dots Per Inch) sensitivity settings.
- පැති බොත්තම්: Two buttons located on the thumb side of the mouse. By default, these often function as "Forward" and "Back" in web බ්රව්සර් සහ file explorers. Their functions may be customizable via software (if available).
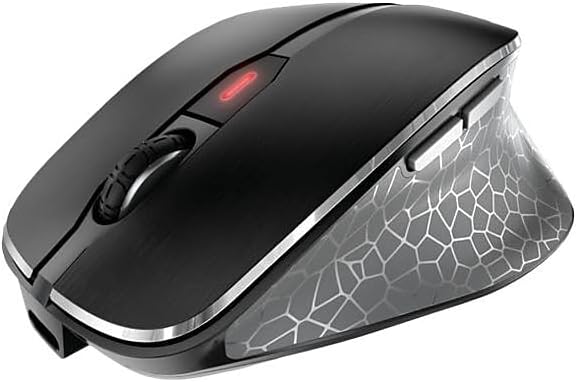
රූපය: ඉහළ-පහළ view of the Cherry MW 8C Ergo mouse, clearly showing the scroll wheel and the DPI adjustment button.
5.2. Adjusting DPI Sensitivity
Press the DPI button (located behind the scroll wheel) to cycle through the available sensitivity settings. Each press will change the cursor speed, allowing you to find the optimal setting for your tasks. The mouse typically has multiple preset DPI levels.
5.3. සම්බන්ධතා මාතයන් මාරු කිරීම
To switch between 2.4 GHz wireless and Bluetooth modes, use the 3-position switch on the bottom of the mouse. Ensure the correct mode is selected for your desired connection type.
6. නඩත්තු කිරීම
6.1. මූසිකය පිරිසිදු කිරීම
- Disconnect the mouse from any charging cables and turn it off using the switch on the bottom.
- මෘදු, ලින්ට් රහිත රෙදි තරමක් භාවිතා කරන්න dampමූසිකයේ මතුපිට පිසදැමීම සඳහා ජලය හෝ මෘදු පිරිසිදු කිරීමේ ද්රාවණයකින් ආලේප කරන්න.
- රළු රසායනික ද්රව්ය, උල්ෙල්ඛ පිරිසිදු කරන්නන් හෝ මූසිකය මත කෙලින්ම දියර ඉසීමෙන් වළකින්න.
- දෘශ්ය සංවේදකය සඳහා, දූවිලි හෝ සුන්බුන් මෘදු ලෙස පිරිසිදු කිරීමට වියළි කපු පුළුන් කැබැල්ලක් භාවිතා කරන්න.
6.2. බැටරි රැකවරණය
- බැටරි ආයු කාලය දීර්ඝ කිරීම සඳහා, මූසිකය නිතර සම්පූර්ණයෙන්ම විසර්ජනය කිරීමෙන් වළකින්න.
- Charge the mouse regularly, especially when the low battery indicator appears.
- If storing the mouse for an extended period, charge it to about 50% and turn it off. Recharge every few months to prevent deep discharge.
7. දෝශ නිරාකරණය
7.1. මූසිකය ප්රතිචාර නොදක්වයි
- බලය පරීක්ෂා කරන්න: මූසිකය ක්රියාත්මක කර ඇති බවත් ප්රමාණවත් බැටරි ආරෝපණයක් ඇති බවත් සහතික කර ගන්න.
- සම්බන්ධතා මාදිලිය පරීක්ෂා කරන්න: Verify the switch on the bottom of the mouse is set to the correct mode (2.4 GHz or Bluetooth) for your connection type.
- 2.4 GHz සම්බන්ධතාවය:
- USB ග්රාහකය ක්රියාකාරී USB පෝට් එකකට ආරක්ෂිතව සම්බන්ධ කර ඇති බවට වග බලා ගන්න.
- ග්රාහකය වෙනත් USB පෝට් එකකට සම්බන්ධ කිරීමට උත්සාහ කරන්න.
- Ensure the receiver is within range of the mouse (typically up to 10 meters).
- බ්ලූටූත් සම්බන්ධතාවය:
- ඔබේ පරිගණකයේ බ්ලූටූත් සක්රීය කර ඇති බව සහතික කර ගන්න.
- Try re-pairing the mouse with your computer (refer to Section 4.3).
- Ensure the mouse is within range of your computer's Bluetooth receiver.
- යළි අරඹන්න: Turn the mouse off and then on again. Restart your computer if necessary.
7.2. Cursor Movement is Erratic or Inaccurate
- පිරිසිදු සංවේදකය: Clean the optical sensor on the bottom of the mouse (refer to Section 6.1).
- මතුපිට: පිරිසිදු, පරාවර්තක නොවන සහ ඒකාකාර මතුපිටක් මත මූසිකය භාවිතා කරන්න. වීදුරු හෝ අධික පරාවර්තක මතුපිට වළක්වා ගන්න.
- ඩීපීඅයි සැකසීම: Adjust the DPI sensitivity using the DPI button to see if a different setting improves performance.
7.3. Mouse Not Charging
- කේබල් සම්බන්ධතාවය: USB-C කේබලය මූසිකය සහ බල ප්රභවය යන දෙකටම ආරක්ෂිතව සම්බන්ධ කර ඇති බවට වග බලා ගන්න.
- බලශක්ති ප්රභවය: Try a different USB port on your computer or a different USB power adapter.
- කේබල් අඛණ්ඩතාව: Inspect the charging cable for any damage. Try using a different USB-C charging cable if available.
8. පිරිවිතර
| විශේෂාංගය | විස්තර |
|---|---|
| මාදිලියේ නම | MW 8C Ergo |
| අයිතම ආදර්ශ අංකය | JW-8600US |
| වෙළඳ නාමය | චෙරි |
| සම්බන්ධතා තාක්ෂණය | Bluetooth, 2.4 GHz Wireless |
| චලනය හඳුනාගැනීම | ඔප්ටිකල් |
| බලශක්ති ප්රභවය | බැටරි බලයෙන් (නැවත ආරෝපණය කළ හැකි) |
| මෙහෙයුම් පද්ධති අනුකූලතාව | Windows 7, Windows 8, Windows 10, Windows 11 |
| අයිතමයේ බර | අවුන්ස 8 (ආසන්න වශයෙන් ග්රෑම් 227) |
| නිෂ්පාදන මානයන් (LxWxH) | 4.72 x 3.11 x 1.75 අඟල් (ආසන්න වශයෙන් 120 x 79 x 44 මි.මී.) |
| වර්ණය | කළු |
| සංකේතනය | AES-128 (for 2.4 GHz wireless) |
9. වගකීම් සහ සහාය
9.1. වගකීම් තොරතුරු
Cherry products are manufactured to high-quality standards. This product is covered by a limited warranty against defects in materials and workmanship. Please refer to the official Cherry website or your purchase documentation for specific warranty terms and conditions applicable to your region. Keep your proof of purchase for warranty claims.
9.2 තාක්ෂණික සහාය
If you encounter any issues not covered in the troubleshooting section or require further assistance, please contact Cherry customer support. You can find contact information, FAQs, and additional resources on the official Cherry webඅඩවිය:
Official Cherry Webඅඩවිය: www.cherry.de/en/
Please have your product model number (JW-8600US) and proof of purchase ready when contacting support.


