හැඳින්වීම
The MOUNTUP Vertical Dual Monitor Stand is designed to optimize your workspace by stacking two screens vertically. This free-standing desk mount provides a stable and ergonomic solution for monitors ranging from 13 to 32 inches, with a weight capacity of up to 33 lbs per monitor. It supports VESA mounting patterns of 100 x 100mm and 75 x 75mm, offering versatile compatibility and enhanced viewing comfort through extensive articulation and height adjustment capabilities.
ආරක්ෂිත තොරතුරු
Please read and understand all instructions before installation and use. Failure to do so may result in personal injury or property damage. Keep this manual for future reference.
- බර ධාරිතාව: Do not exceed the maximum weight capacity of 33 lbs (15 kg) per monitor. Ensure your monitors' weight, including accessories, is within this limit.
- VESA අනුකූලතාව: Verify that your monitors have VESA mounting patterns of 75x75mm or 100x100mm.
- ස්ථාවර මතුපිට: Install the monitor stand on a stable, level, and sufficiently strong desk or surface that can support the combined weight of the stand and monitors.
- එකලස් කිරීම: Assemble the product according to the instructions provided. Do not use power tools for assembly unless specifically instructed, as overtightening may damage components.
- කේබල් කළමනාකරණය: Route cables safely to prevent tripping hazards and ensure free movement of the monitor arms.
- දරුවන්: Keep small parts and packaging materials away from children, as they may pose a choking hazard.
පැකේජයේ අන්තර්ගතය
Before beginning installation, ensure all parts are present and undamaged. If any parts are missing or damaged, please contact MOUNTUP customer service for assistance.
- Vertical Pole with VESA Mounts
- Free-Standing Tempered Glass Base
- සවි කිරීමේ දෘඩාංග (ඉස්කුරුප්පු, රෙදි සෝදන යන්ත්ර, ස්පේසර්)
- Assembly Tools (Allen wrenches, etc.)
- කේබල් කළමනාකරණ ක්ලිප්
සැකසුම සහ ස්ථාපනය
Follow these steps for a secure and efficient installation. It is recommended to have assistance when lifting and mounting monitors.
Step 1: Assemble the Base and Pole

Figure 1: Product Dimensions and Compatibility. This diagram illustrates the overall height of the stand (33.9 inches), compatibility with monitors from 13 to 32 inches, a maximum weight capacity of 33 lbs per monitor, and VESA patterns of 75x75mm and 100x100mm.
Attach the vertical pole to the tempered glass base using the provided screws. Ensure all connections are tight and secure for stability.

Figure 2: Free-Standing Tempered Glass Base. The image highlights the smooth, rounded edges of the base for safety and confirms that no drilling is required for installation, preserving your desktop surface.
පියවර 2: මොනිටර වලට VESA තහඩු සවි කරන්න.
Secure the VESA mounting plates to the back of your monitors using the appropriate screws and spacers from the hardware kit. Ensure the screws are tightened firmly but do not overtighten.
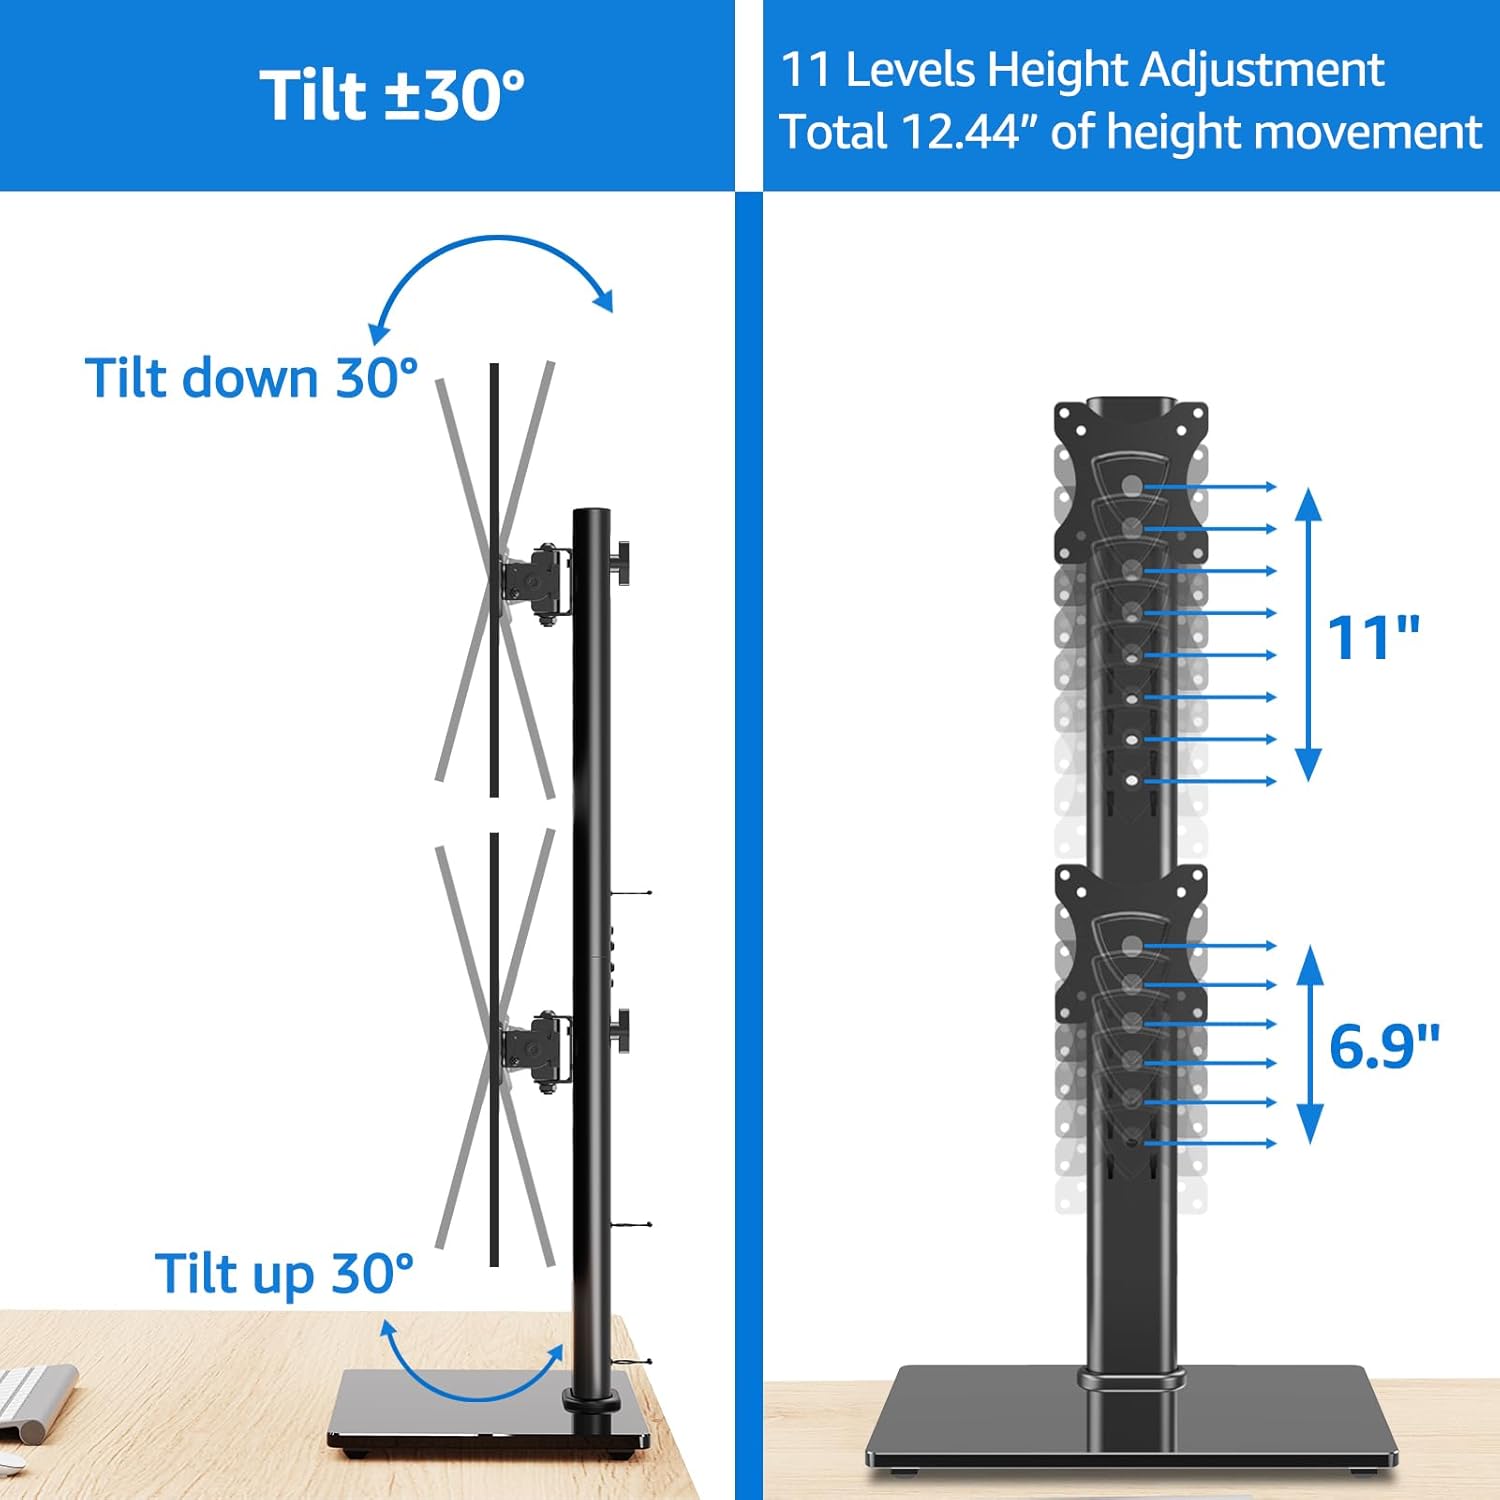
Figure 3: VESA Plate Attachment and Monitor Mounting. This composite image demonstrates the process of attaching the VESA plate to the back of a monitor and then sliding the monitor onto the vertical pole of the stand.
Step 3: Mount Monitors onto the Stand
Carefully slide the monitors, with VESA plates attached, onto the vertical pole. Use the quick-release VESA mount feature for effortless attachment. Adjust the height of each monitor along the pole to your desired viewing level. Secure the monitors in place using the safety lock mechanism.
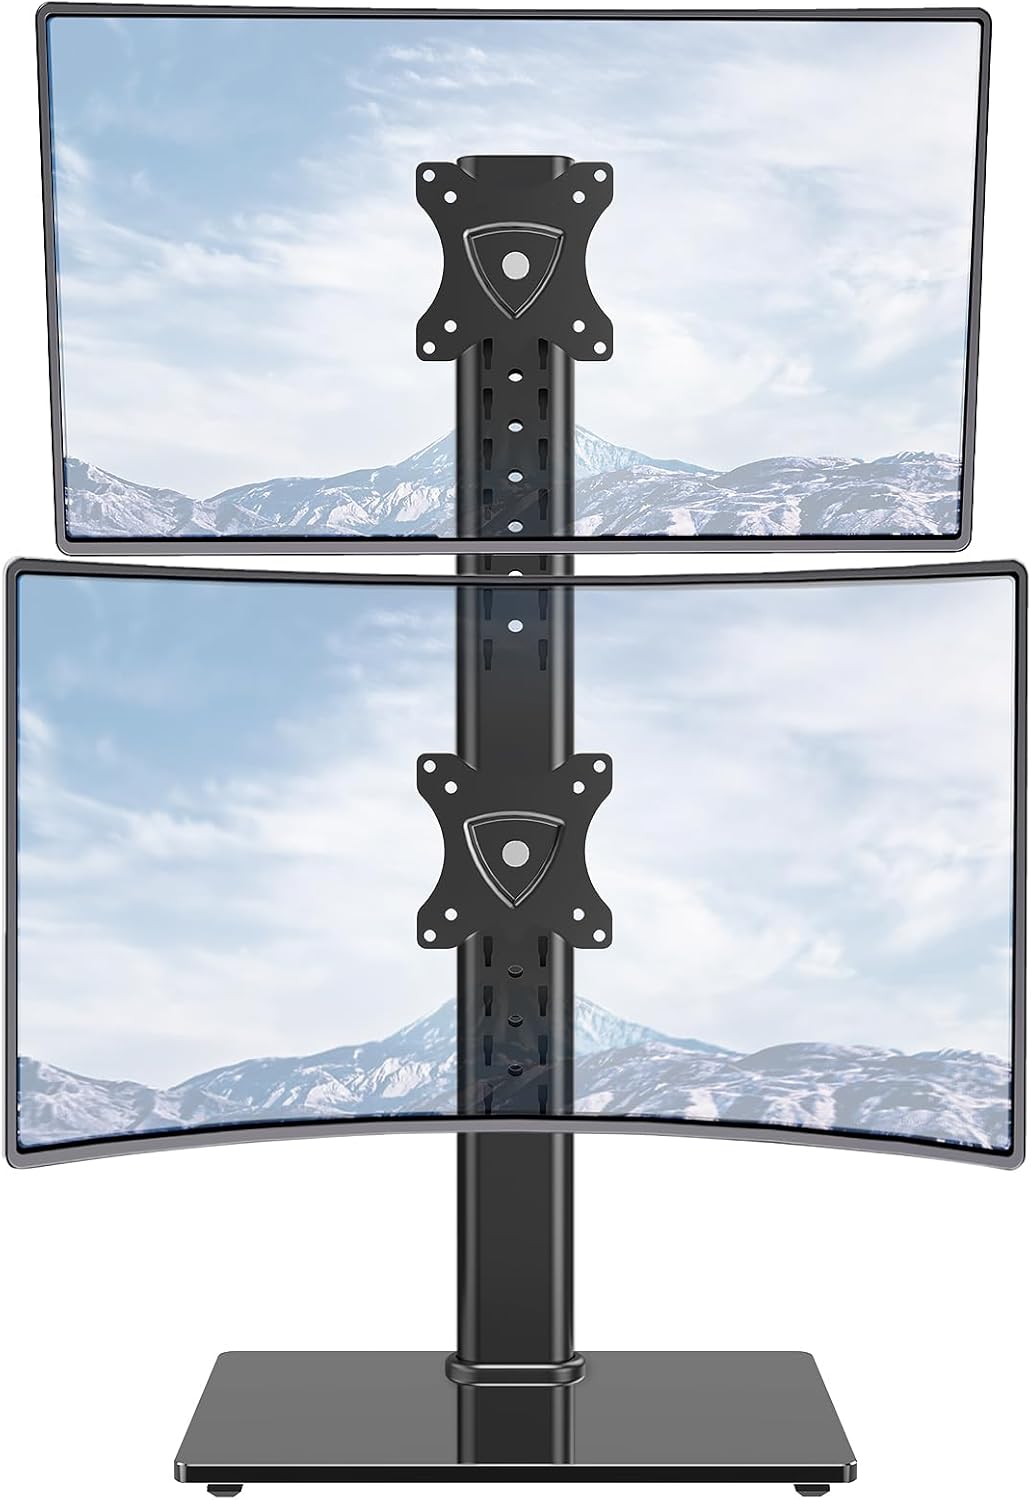
Figure 4: Fully Assembled Dual Monitor Stand. This image shows the MOUNTUP Vertical Dual Monitor Stand with two monitors successfully mounted in a stacked configuration, ready for use.

Figure 5: Cable Management and Stability Features. පසුපස view of the stand demonstrates the integrated cable management clips that help keep cables organized and out of sight. It also highlights the safety lock for secure monitor positioning and rubber anti-slip feet on the base for added stability.
මෙහෙයුම් සහ ගැලපීම්
The MOUNTUP Vertical Dual Monitor Stand offers extensive adjustability to achieve optimal ergonomic viewing.
උස ගැලපීම
Monitors can be adjusted vertically along the pole. The stand offers 11 different height positions, providing a total of 12.44 inches of height movement. To adjust, loosen the safety lock, slide the monitor to the desired height, and re-tighten the lock.

Figure 6: Tilt and Height Adjustment. This illustration shows the monitor's ability to tilt 30 degrees up or down and demonstrates the multiple height adjustment levels available along the vertical pole.
ඇල ගැලපීම
Each monitor can be tilted 30 degrees up or down to reduce glare and optimize viewing angles. Loosen the tilt mechanism, adjust the monitor, and then re-tighten to secure.
පිහිනුම් ගැලපුම
Monitors can be swiveled 25 degrees right or left. This allows for easy screen sharing or adjusting the angle for different tasks. The actual swivel angle may be determined by the screen size if the stand is placed against a wall.
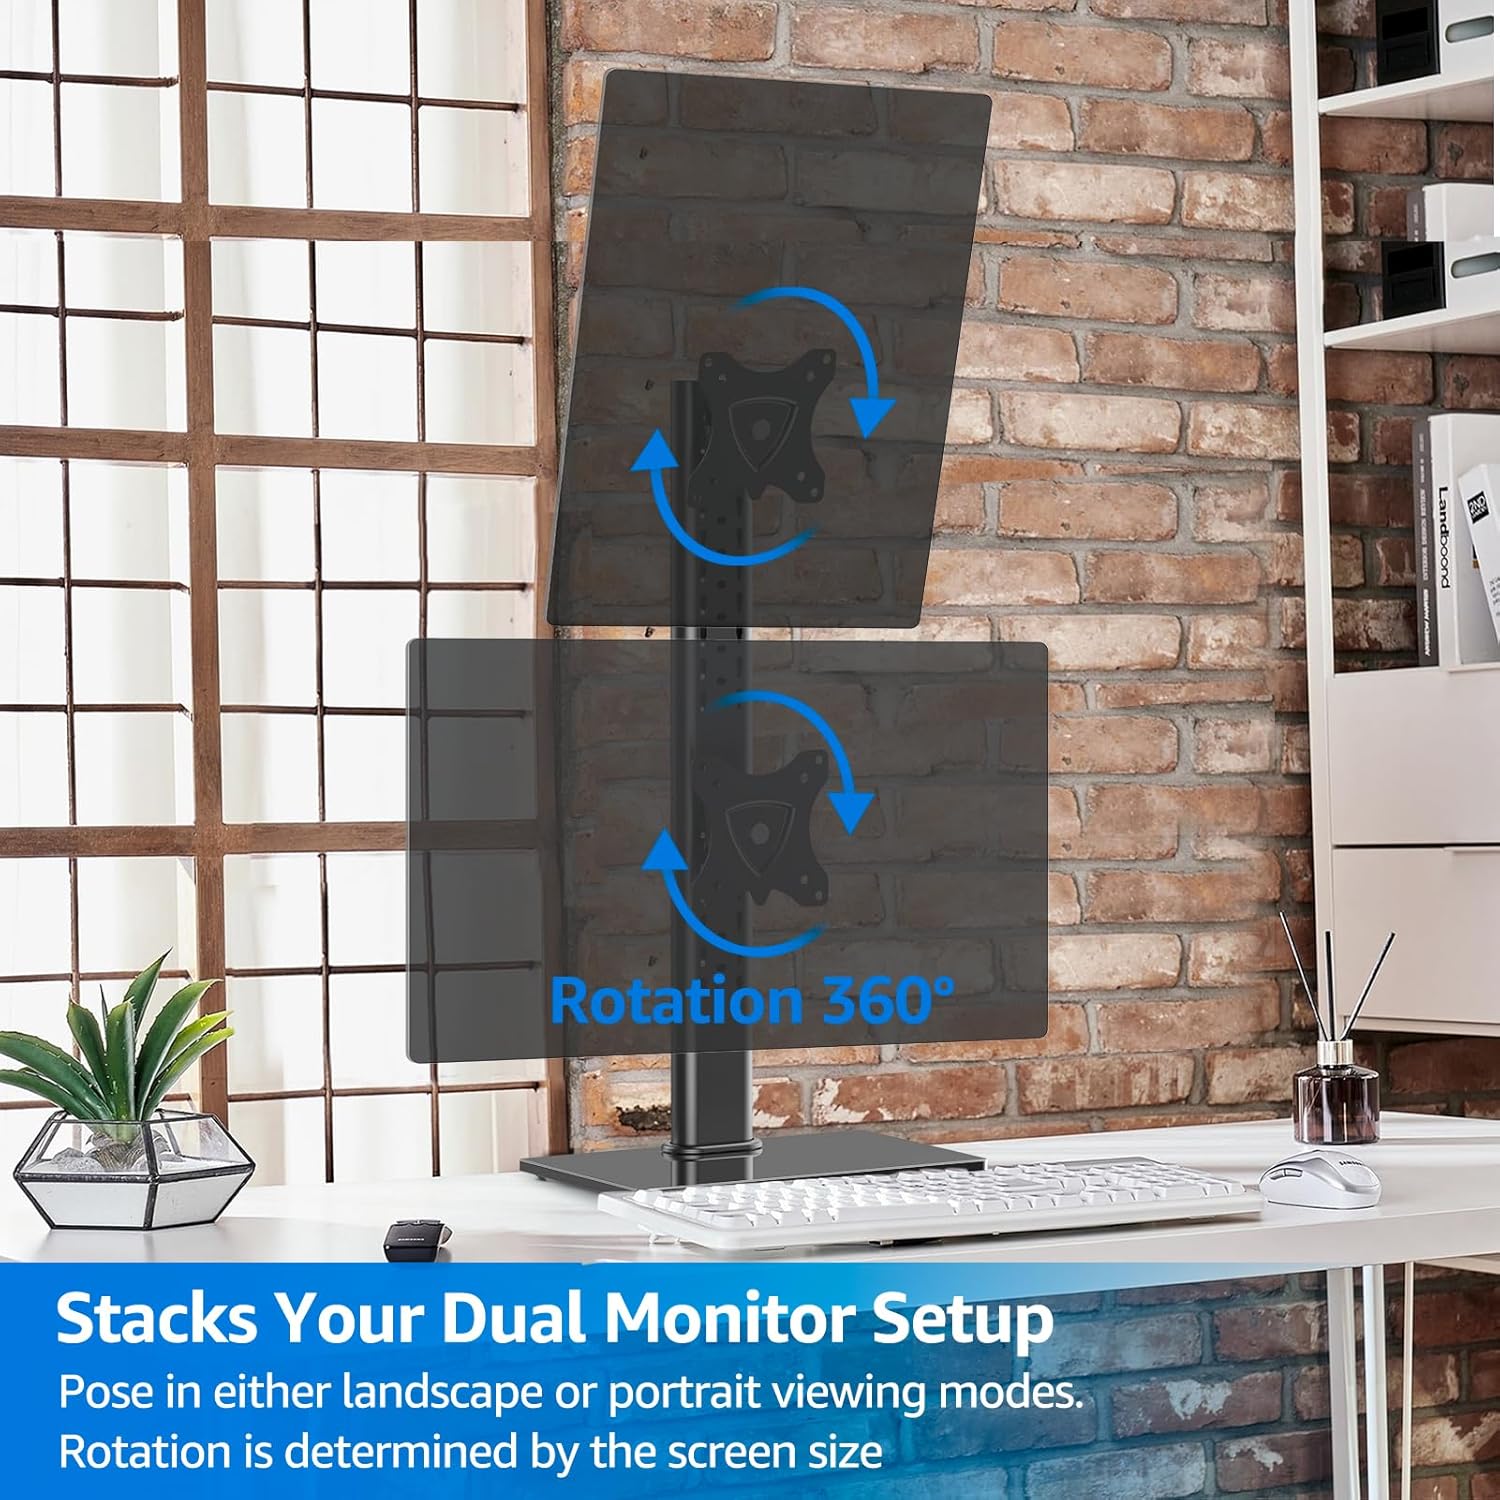
Figure 7: Swivel Functionality. This image demonstrates the monitor's ability to swivel up to 25 degrees in either direction, allowing for flexible viewing angles and collaboration.
භ්රමණය
The monitors can be rotated 360 degrees, allowing for quick switching between landscape and portrait viewing modes. This is particularly useful for coding, document review, or graphic design. The extent of rotation is influenced by the monitor's size.

Figure 8: 360-Degree Rotation. This image illustrates how monitors can be rotated a full 360 degrees, enabling users to switch between landscape and portrait orientations as needed for various tasks.
නඩත්තු කිරීම
To ensure the longevity and proper functioning of your MOUNTUP Vertical Dual Monitor Stand, follow these simple maintenance guidelines:
- පිරිසිදු කිරීම: Wipe the stand and base with a soft, damp රෙදි. නිමාවට හානි කළ හැකි උල්ෙල්ඛ පිරිසිදු කරන්නන් හෝ ද්රාවක භාවිතා කිරීමෙන් වළකින්න.
- සම්බන්ධතා පරීක්ෂා කරන්න: සියලුම ඉස්කුරුප්පු සහ සම්බන්ධතා තදින් සහ ආරක්ෂිතව පවතින බව සහතික කර ගැනීම සඳහා වරින් වර පරීක්ෂා කරන්න. අවශ්ය නම් නැවත තද කරන්න.
- ලිහිසි තෙල්: No lubrication is typically required for the moving parts. If any movement becomes stiff, ensure no debris is obstructing the mechanism.
දෝෂගවේෂණය
If you encounter any issues with your monitor stand, please refer to the following common problems and solutions:
| ගැටලුව | විය හැකි හේතුව | විසඳුම |
|---|---|---|
| ස්ථාවරය සෙලවෙන හෝ අස්ථායී ය. | ලිහිල් සම්බන්ධතා; අසමාන මතුපිට; අධික ලෙස පටවා ඇත. | Ensure all screws are tightened. Place on a flat, stable surface. Verify monitor weight is within limits. |
| Monitors are difficult to adjust (tilt/swivel/rotate). | Adjustment mechanism too tight; debris. | Check if adjustment screws are overtightened. Clear any obstructions. |
| Monitors sag or do not hold position. | Adjustment mechanism too loose; overloaded. | Tighten the relevant adjustment screws. Ensure monitor weight is within limits. |
| එකලස් කිරීමේදී කොටස් අතුරුදහන් වීම. | ඇසුරුම්කරණ දෝෂයකි. | ආදේශක කොටස් සඳහා වහාම MOUNTUP පාරිභෝගික සහාය අමතන්න. |
If the issue persists, please contact MOUNTUP customer support for further assistance.
පිරිවිතර
- වෙළඳ නාමය: මොන්ටප්
- ආදර්ශ අංකය: MU1006
- ද්රව්ය: ලෝහ, තෙම්පරාදු වීදුරු
- වර්ණය: කළු
- අයිතමයේ බර: රාත්තල් 10.72 කි
- නිෂ්පාදන මානයන්: 15.35 x 10.2 x 2.1 inches (Base)
- අනුකූල මොනිටර ප්රමාණය: අඟල් 13 සිට 32 දක්වා
- බර ධාරිතාව: Up to 33 lbs (15 kg) per monitor
- VESA අනුකූලතාව: 75x75mm, 100x100mm
- චලන වර්ගය: Height Adjusting, Rotate, Swivel, Tilt
- උපරිම ඇල කෝණය: අංශක 30
- කැරකෙන කෝණය: 25 Degrees (left/right)
- භ්රමණය: අංශක 360
- සවිකිරීමේ වර්ගය: Tabletop Mount (Free-Standing)
වගකීම් සහ සහාය
The MOUNTUP Vertical Dual Monitor Stand comes with a වසර 3ක නිෂ්පාදක සහාය. For any questions, concerns, or technical assistance, please contact MOUNTUP customer service.
You can also refer to the official PDF manuals for more detailed instructions:
Visit the official MOUNTUP Store for more products and information: මවුන්ටප් වෙළඳසැල


