හැඳින්වීම
This manual provides instructions for the proper use and maintenance of your Alecto AK-20 Alarm Clock with Thermometer. Please read these instructions carefully before operating the device and retain them for future reference. The AK-20 is designed to display time, date, day, and indoor temperature, featuring multiple alarms, a snooze function, and radio-controlled time synchronization.
ආරක්ෂිත තොරතුරු
- උපාංගය අධික උෂ්ණත්වයන්ට, සෘජු හිරු එළියට හෝ අධික ආර්ද්රතාවයට නිරාවරණය නොකරන්න.
- උපාංගය අතහැර දැමීමෙන් හෝ එය දැඩි බලපෑම්වලට ලක් කිරීමෙන් වළකින්න.
- ඒකකය ඔබම විසුරුවා හැරීමට හෝ අලුත්වැඩියා කිරීමට උත්සාහ නොකරන්න. සියලුම සේවා සුදුසුකම් ලත් පුද්ගලයින් වෙත යොමු කරන්න.
- භාවිතා කරන ලද බැටරි දේශීය රෙගුලාසිවලට අනුව වගකීමෙන් යුතුව බැහැර කරන්න.
පැකේජයේ අන්තර්ගතය
ඇසුරුම් ඉවත් කිරීමේදී සියලුම අයිතම හොඳ තත්ත්වයේ පවතින බවට වග බලා ගන්න:
- Alecto AK-20 Alarm Clock
- User Manual (NL/EN/DE/FR)
නිෂ්පාදනය අවසන්view
The Alecto AK-20 features a clear digital display and intuitive controls for easy operation.

රූපය 1: ඉදිරිපස view of the Alecto AK-20 Alarm Clock, showing the large digital display with time, date, day, and temperature, along with control buttons at the bottom.

රූපය 2: කෝණික view of the Alecto AK-20, highlighting the main display and the alarm ON/OFF switches on the right side.
පාලන සහ සංදර්ශක අංග:
- විශාල ඩිජිටල් සංදර්ශකය: Shows time (AM/PM indicator), date, day of the week, and indoor temperature.
- වේලාව සකසන්න බොත්තම: කාල සැකසුම් මාදිලියට ඇතුළු වීමට භාවිතා කරයි.
- - / + Buttons: Used to adjust values (decrease/increase).
- එලාම් කට්ටල බොත්තම: අනතුරු ඇඟවීමේ සැකසුම් මාදිලියට ඇතුළු වීමට භාවිතා කරයි.
- ALARM 1-4 ON/OFF Switches: Located on the side for individual alarm activation.
- SNOOZE / LIGHT බොත්තම: Located on top, activates backlight and snooze function.
- AUTO LIGHT Switch: Located on the back, controls automatic backlight.
- බොත්තම නැවත සකස්: Located on the back, for factory reset.

රූපය 3: දකුණු පැත්ත view of the alarm clock, showing the physical ON/OFF switches for Alarm 3 and Alarm 4.

රූපය 4: ආපසු view of the alarm clock, showing the battery compartment, RESET button, and AUTO LIGHT switch.
සැලසුම
1. බැටරි ස්ථාපනය
- Locate the battery compartment on the back of the alarm clock (refer to Figure 4).
- බැටරි මැදිරි කවරය විවෘත කරන්න.
- නිවැරදි ධ්රැවීයතාව (+ සහ -) සහතික කරමින් AA බැටරි දෙකක් ඇතුළු කරන්න.
- බැටරි මැදිරි කවරය ආරක්ෂිතව වසා දමන්න.
The display will light up, and the clock will begin searching for the DCF radio signal for automatic time synchronization.
2. Initial Time and Date Synchronization (DCF)
The AK-20 is a radio-controlled clock. Upon battery installation, it will automatically attempt to synchronize with the DCF signal. This process may take several minutes. A signal icon on the display indicates successful reception.
- Place the clock near a window for better signal reception.
- බාධා ඇති කළ හැකි ඉලෙක්ට්රොනික උපාංග අසල තැබීමෙන් වළකින්න.
3. Manual Time and Date Setting (Optional)
If DCF synchronization is not desired or unsuccessful, you can set the time and date manually:
- ඔබා අල්ලාගෙන සිටින්න ටයිම් සෙට් පැය ඉලක්කම් දැල්වීමට පටන් ගන්නා තෙක් බොත්තම.
- භාවිතා කරන්න - or + පැය සකස් කිරීමට බොත්තම්.
- ඔබන්න ටයිම් සෙට් පැය තහවුරු කර මිනිත්තු වෙත යාමට නැවතත්.
- මිනිත්තු, වර්ෂය, මාසය සහ දිනය සඳහා ක්රියාවලිය නැවත කරන්න.
- ඔබන්න ටයිම් සෙට් one last time to exit the setting mode.
4. භාෂා තේරීම
The device supports multiple languages for day display. To change the language:
- සාමාන්ය කාල සංදර්ශක ප්රකාරයේදී, ඔබන්න - බොත්තම නැවත නැවතත්.
- The day of the week will cycle through available languages (Dutch, French, German, English, Spanish, Italian, Danish, Russian).
- Stop when your desired language is displayed.
මෙහෙයුම් උපදෙස්
1. අනතුරු ඇඟවීම් සැකසීම
The AK-20 allows setting up to four independent alarms.
- ඔබා අල්ලාගෙන සිටින්න අනතුරු ඇඟවීමේ කට්ටලය button until the alarm time (e.g., ALARM-1) starts flashing.
- භාවිතා කරන්න - or + buttons to adjust the desired alarm hour.
- ඔබන්න අනතුරු ඇඟවීමේ කට්ටලය පැය තහවුරු කර මිනිත්තු වෙත යාමට නැවතත්.
- භාවිතා කරන්න - or + buttons to adjust the desired alarm minutes.
- ඔබන්න අනතුරු ඇඟවීමේ කට්ටලය to confirm and move to the next alarm (ALARM-2, ALARM-3, ALARM-4).
- Repeat steps 2-4 for each alarm you wish to set.
- After setting all desired alarms, press අනතුරු ඇඟවීමේ කට්ටලය අනතුරු ඇඟවීමේ සැකසුම් මාදිලියෙන් පිටවීමට.
2. Activating/Deactivating Alarms
Each alarm has a dedicated ON/OFF switch on the side of the unit (refer to Figure 3).
- Slide the corresponding switch to ON to activate an alarm. An alarm icon will appear on the display.
- වෙත ස්විචය තල්ලු කරන්න අක්රියයි to deactivate an alarm. The alarm icon will disappear.
3. ස්නූස් ක්රියාකාරිත්වය
අනතුරු ඇඟවීමක් ඇසෙන විට, ඔබන්න ස්නූස් / ආලෝකය button on top of the clock. The alarm will temporarily stop and sound again after a few minutes (typically 5-10 minutes, depending on the model's default setting).
4. පසුතල ආලෝක ක්රියාකාරිත්වය
The display features a backlight for visibility in low-light conditions.
- අතින් පසුබිම් ආලෝකය: කෙටියෙන් ඔබන්න ස්නූස් / ආලෝකය button to activate the backlight for a few seconds.
- ස්වයංක්රීය පසුබිම් ආලෝකය: On the back of the unit, slide the ස්වයංක්රීය ආලෝකය වෙත මාරු කරන්න ON. The backlight will automatically illuminate in dark environments. Slide to අක්රියයි මෙම විශේෂාංගය අක්රිය කිරීමට.
5. උෂ්ණත්ව සංදර්ශකය
The integrated thermometer displays the indoor temperature.
- To switch between Celsius (°C) and Fahrenheit (°F), press the + button while in normal time display mode.
නඩත්තු කිරීම
- මෘදු වියළි රෙද්දකින් උපාංගය පිරිසිදු කරන්න. උල්ෙල්ඛ පිරිසිදු කරන්නන් හෝ ද්රාවක භාවිතා නොකරන්න.
- උපාංගය දිගු කාලයක් භාවිතා නොකරන්නේ නම්, කාන්දු වීම වැළැක්වීම සඳහා බැටරි ඉවත් කරන්න.
දෝෂගවේෂණය
| ගැටලුව | විය හැකි හේතුව | විසඳුම |
|---|---|---|
| සංදර්ශකය හිස් හෝ අඳුරු ය. | බැටරි අඩුයි හෝ වැරදි ලෙස ඇතුළත් කර ඇත. | නිවැරදි ධ්රැවීයතාව සහතික කරමින් බැටරි නව AA බැටරි සමඟ ප්රතිස්ථාපනය කරන්න. |
| කාලය වැරදියි. | DCF signal not received or manual time not set. | Ensure the clock is in an area with good signal reception. Manually set the time if necessary. |
| එලාම් එක නාද වෙන්නේ නැහැ. | අනතුරු ඇඟවීම සක්රිය කර හෝ වැරදි ලෙස සකසා නැත. | Check the alarm ON/OFF switch on the side. Verify alarm time settings. |
| පසුතල ආලෝකය ක්රියා නොකරයි. | AUTO LIGHT switch is OFF or batteries are low. | Check the AUTO LIGHT switch on the back. Replace batteries if needed. |
මෙම විසඳුම් උත්සාහ කිරීමෙන් පසුවත් ගැටලුව පවතින්නේ නම්, කරුණාකර පාරිභෝගික සහාය අමතන්න.
පිරිවිතර
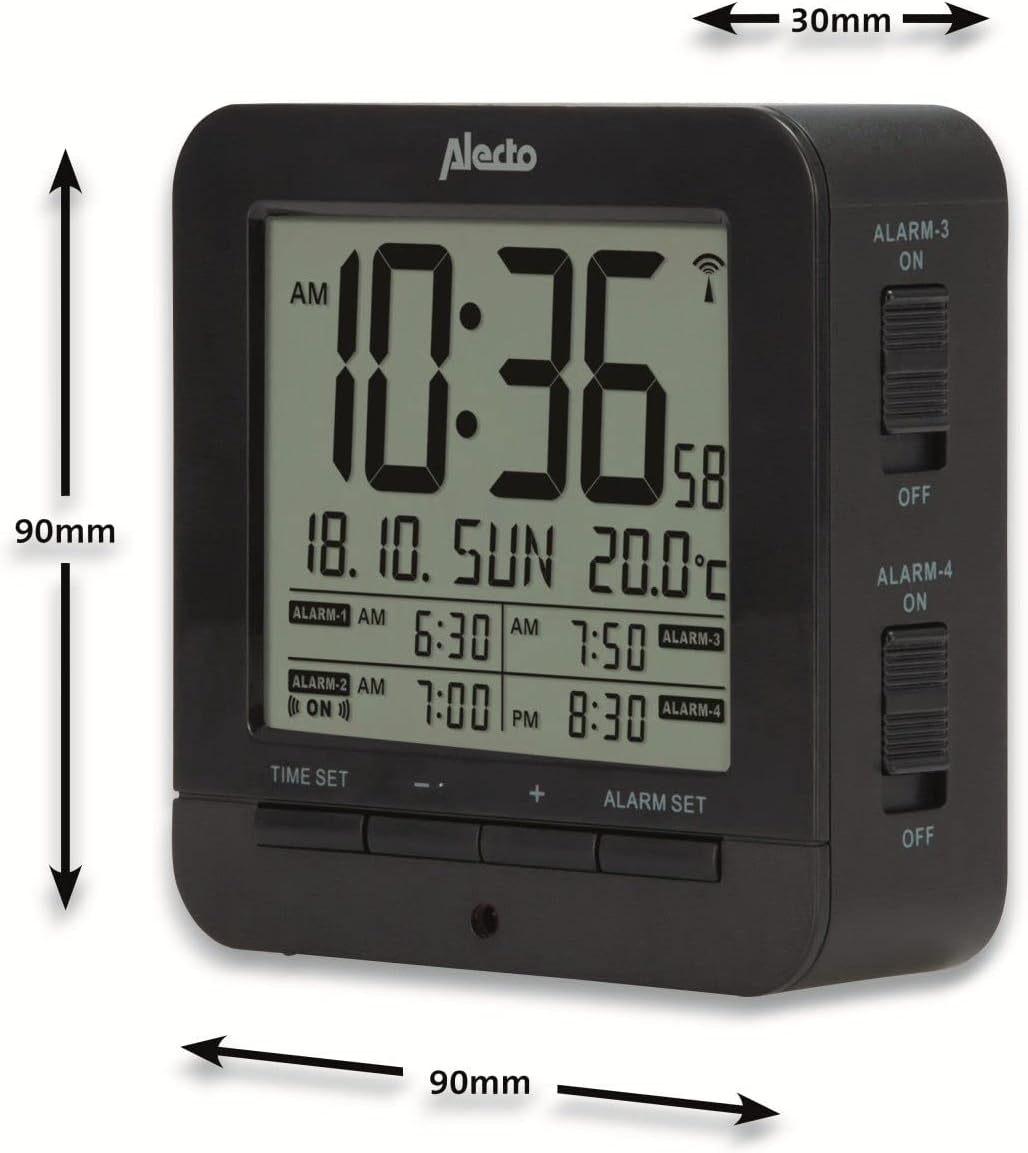
Figure 5: Alecto AK-20 Alarm Clock showing its approximate dimensions: 90mm height, 90mm width, and 30mm depth.
| විශේෂාංගය | විස්තර |
|---|---|
| ආදර්ශ අංකය | AK-20 (A003319) |
| වෙළඳ නාමය | ඇලෙක්ටෝ |
| වර්ණය | කළු |
| ද්රව්ය | ඇක්රිලෝනයිට්රයිල් බියුඩඩීන් ස්ටයිරීන් (ABS) |
| මානයන් (H x W x D) | 9 x 9 x 3 සෙ.මී. (ආසන්න වශයෙන් 3.54 x 3.54 x 1.18 අඟල්) |
| තිර මානයන් | 6.4 x 5.4 සෙ.මී. (ආසන්න වශයෙන් 2.52 x 2.13 අඟල්) |
| බර | ග්රෑම් 231 (ආසන්න වශයෙන් රාත්තල් 0.51) |
| බලශක්ති ප්රභවය | 2 x AA බැටරි (ඇතුළත් කර නැත) |
| සංදර්ශක වර්ගය | ඩිජිටල් |
| විශේෂ ලක්ෂණ | Temperature Display, 4 Alarms, Snooze Function, Backlight, DCF Radio Control |
| උෂ්ණත්ව ඒකක | °C / °F selectable |
| සහාය දක්වන භාෂා | Dutch, French, German, English, Spanish, Italian, Danish, Russian |
වගකීම් සහ සහාය
Alecto products are manufactured to high quality standards. For information regarding warranty terms and conditions, please refer to the documentation provided with your purchase or visit the official Alecto website. For technical support or service inquiries, please contact your retailer or the Alecto customer service department.


