හැඳින්වීම
Thank you for choosing the Parkside 12V 2.4A PLGK 12 A2 X12V Team Charger. This manual provides important information for the safe and proper operation, maintenance, and care of your charger. Please read these instructions thoroughly before first use and keep them for future reference. This charger is designed exclusively for charging Parkside X12V Team series batteries.
සැලසුම
අසුරනවා
Carefully remove all components from the packaging. Ensure all parts are present and undamaged. Dispose of packaging materials responsibly.
බලයට සම්බන්ධ වීම
- Ensure the charger is placed on a stable, non-flammable surface.
- Connect the charger's power cord to a standard electrical outlet. The power cord length is approximately 1.5 meters.
- බල සැපයුම නිවැරදි වෝල්ටීයතාවය සපයන බව තහවුරු කර ගන්න.tage as specified on the charger's rating label.

රූපය: ඉදිරිපස view of the Parkside 12V 2.4A PLGK 12 A2 X12V Team Charger, showing the battery slot and LED indicators.
මෙහෙයුම් උපදෙස්
බැටරියක් ආරෝපණය කිරීම
- චාජරය බල සැපයුමකට සම්බන්ධ කර ඇති බවට වග බලා ගන්න.
- Insert a compatible Parkside X12V Team battery into the charger's slot. The charger is compatible with batteries such as PAPK 12 A1, PAPK 12 A2, PAPK 12 A3, PAPK 12 B1, PAPK 12 B2, PAPK 12 B3, PAPK 12 D1, and PAPK 12 C1.
- චාජරය ස්වයංක්රීයව ආරෝපණ ක්රියාවලිය ආරම්භ කරයි.
- The charging time for a 12V/2Ah battery is approximately 60 minutes. The charger features an automatic charge stop function to prevent overcharging.

රූපය: පැත්ත view of the Parkside 12V 2.4A PLGK 12 A2 X12V Team Charger, illustrating how a battery fits into the charging slot.
LED දර්ශක
The charger is equipped with LED indicators to show the charging status:
- රතු LED: බැටරිය ආරෝපණය වන බව පෙන්නුම් කරයි.
- කොළ LED: බැටරිය සම්පූර්ණයෙන්ම ආරෝපණය වී ඇති බව පෙන්නුම් කරයි.
- දැල්වෙන රතු LED: May indicate a fault or an incompatible battery. Refer to the troubleshooting section.
ගැළපෙන මෙවලම්
This charger is designed for batteries used with various Parkside X12V Team tools, including but not limited to:
- Parkside PAT 12 A1 Cutter
- Parkside PMSA 12 B2 Router
- Parkside POFA 12 A1 Hammer Drill
- Parkside PBHA 12 A1 Angle Grinder
- Parkside PWSA 12 2 B1 Mini Chainsaw
- Parkside PGHSA 12 A1 Multifunctional Garden Tool
- Parkside PKGA 12 A1 Multifunctional Tool
- Parkside PAMFW 12 C3 Drill Driver
- Parkside PBSA 12 C2 Renovation Polisher
- Parkside PAAP 12 A1 Planer
- Parkside PHA 12 A1 Hedge Trimmer
- Parkside PHSA 12 A1 Hedge Trimmer
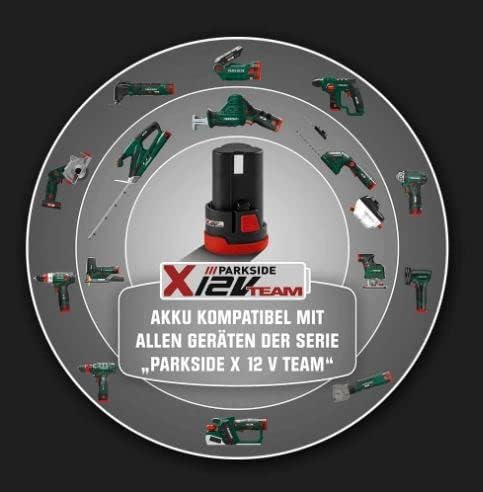
Image: A circular diagram illustrating the wide range of Parkside X12V Team tools that share the same battery system, emphasizing the charger's compatibility.
නඩත්තු කිරීම
පිරිසිදු කිරීම
- Always disconnect the charger from the power supply before cleaning.
- Use a dry, soft cloth to wipe the exterior of the charger.
- Do not use any liquids, solvents, or abrasive cleaning agents, as these can damage the charger.
- Keep the ventilation slots free from dust and debris.
ගබඩා කිරීම
- චාජරය වියළි, දූවිලි රහිත පරිසරයක, සෘජු හිරු එළියෙන් සහ අධික උෂ්ණත්වයන්ගෙන් ඈත්ව ගබඩා කරන්න.
- Ensure the charger is disconnected from the power supply when not in use for extended periods.
දෝෂගවේෂණය
If you encounter issues with your Parkside charger, refer to the following common problems and solutions:
- චාජරය ක්රියාත්මක නොවේ:
- විදුලි රැහැන චාජරයට සහ විදුලි අලෙවිසැලට ආරක්ෂිතව සම්බන්ධ කර ඇත්දැයි පරීක්ෂා කරන්න.
- වෙනත් උපාංගයක් සමඟ පරීක්ෂා කිරීමෙන් විදුලි අලෙවිසැල ක්රියාකාරී බව තහවුරු කර ගන්න.
- ඔබේ විදුලි පුවරුවේ පැටලී ඇති පරිපථ කඩනයන් හෝ පුපුරා ගිය ෆියුස් තිබේදැයි පරීක්ෂා කරන්න.
- Battery not charging (Red LED flashing or no indication):
- බැටරිය චාජරයට නිවැරදිව ඇතුළත් කර ඇති බවට වග බලා ගන්න.
- Confirm that the battery is a compatible Parkside X12V Team series battery.
- The battery might be too hot or too cold. Allow it to reach room temperature before attempting to charge.
- If the issue persists, the battery or charger may be faulty. Do not attempt to repair.
- Unusual noises or smells during charging:
- Immediately disconnect the charger from the power supply and remove the battery.
- Do not use the charger again. Contact customer support or a qualified technician.
පිරිවිතර
| වෙළඳ නාමය | උද්යානය |
| ආකෘතිය | PLG 12 A2 |
| නාමික බලය | 50 ඩබ්ලිව් |
| ආදාන වෙළුමtage | වෝල්ට් 12 |
| ප්රතිදාන වෙළුමtage | 12 වෝල්ට් ඩීසී |
| වත්මන් | 2.4 Ampකලින් |
| Charging Time (12V/2Ah) | ආසන්න වශයෙන්. විනාඩි 60 යි |
| විදුලි රැහැන් දිග | මීටර් 1.5 |
| නිෂ්පාදන මානයන් | 10 x 10 x 5 සෙ.මී |
| නිෂ්පාදන බර | 340 ග්රෑම් |
| අනුකූල වීම | CE, RoHS |
| වරායන් ගණන | 1 |
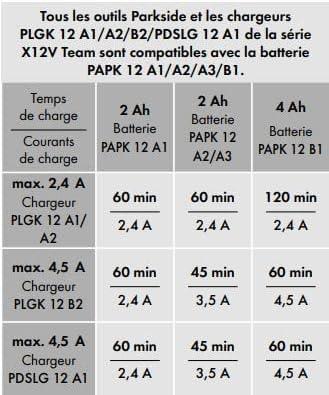
Image: A table detailing charging times for different Parkside 12V batteries (2Ah, 4Ah) with various chargers, including the PLGK 12 A1/A2 model.
වගකීම් සහ සහාය
වගකීම් තොරතුරු
Specific warranty terms and conditions for the Parkside 12V 2.4A PLGK 12 A2 X12V Team Charger should be obtained from your point of purchase or the official Parkside manufacturer's webවෙබ් අඩවිය. ඕනෑම වගකීම් හිමිකම් පෑමක් සඳහා කරුණාකර ඔබේ මිලදී ගැනීමේ සාක්ෂි තබා ගන්න.
පාරිභෝගික සහාය
For technical assistance, spare parts, or service inquiries, please contact the retailer where you purchased the product or refer to the official Parkside customer service channels available in your region. Do not attempt to open or repair the charger yourself, as this will void the warranty and may pose safety risks.