1. හැඳින්වීම
This manual provides essential information for the safe and efficient operation, maintenance, and troubleshooting of your Miele Triflex HX2 Pro Cordless Stick Vacuum Cleaner. Please read it thoroughly before first use and keep it for future reference.
The Miele Triflex HX2 Pro is a versatile cordless stick vacuum cleaner designed for comprehensive home cleaning. It combines powerful suction with a patented 3-in-1 design, offering flexibility for various cleaning tasks.
ප්රධාන ලක්ෂණ:
- Cordless Upright Design: Lightweight and convenient, providing the cleaning power of a whole-home vacuum. Stands upright unaided.
- Patented 3-in-1 Design: Configurable in three ways for cleaning hard floors, carpets, furniture, and hard-to-reach areas.
- Extended Run-time: Up to 120 minutes of run-time with two replaceable VARTA Li-ion batteries and two charging options for uninterrupted cleaning.
- Automatic Floor Detection: The extra-wide electrobrush automatically adapts to the surface, featuring a BrilliantLight LED headlight and an additional Hardfloor Care Tool insert.
- HEPA Lifetime Filter: Maintenance-free filter with 99.999% dust retention capacity, capturing fine dust, allergens, and viruses, suitable for allergy sufferers and pet owners.
2. සැකසීම සහ එකලස් කිරීම
Before first use, ensure all components are present and undamaged. Assembly is straightforward, with parts designed to click securely into place.
2.1 ඇසුරුම් ඉවත් කිරීම සහ සංරචක පරීක්ෂා කිරීම
ඇසුරුම්කරණයෙන් සියලුම අයිතම ප්රවේශමෙන් ඉවත් කරන්න. පහත සඳහන් සංරචක ඇතුළත් කර ඇති බවට වග බලා ගන්න:
- Main PowerUnit (motor, dust bin, handle)
- Electrobrush Multi Floor XXL
- චූෂණ නල
- 2 x VARTA Li-ion Batteries
- ආරෝපණ තටාකය
- Accessory Kit (Crevice Tool, Dusting Brush)
- බිත්ති වරහන
- Hardfloor Care Tool insert
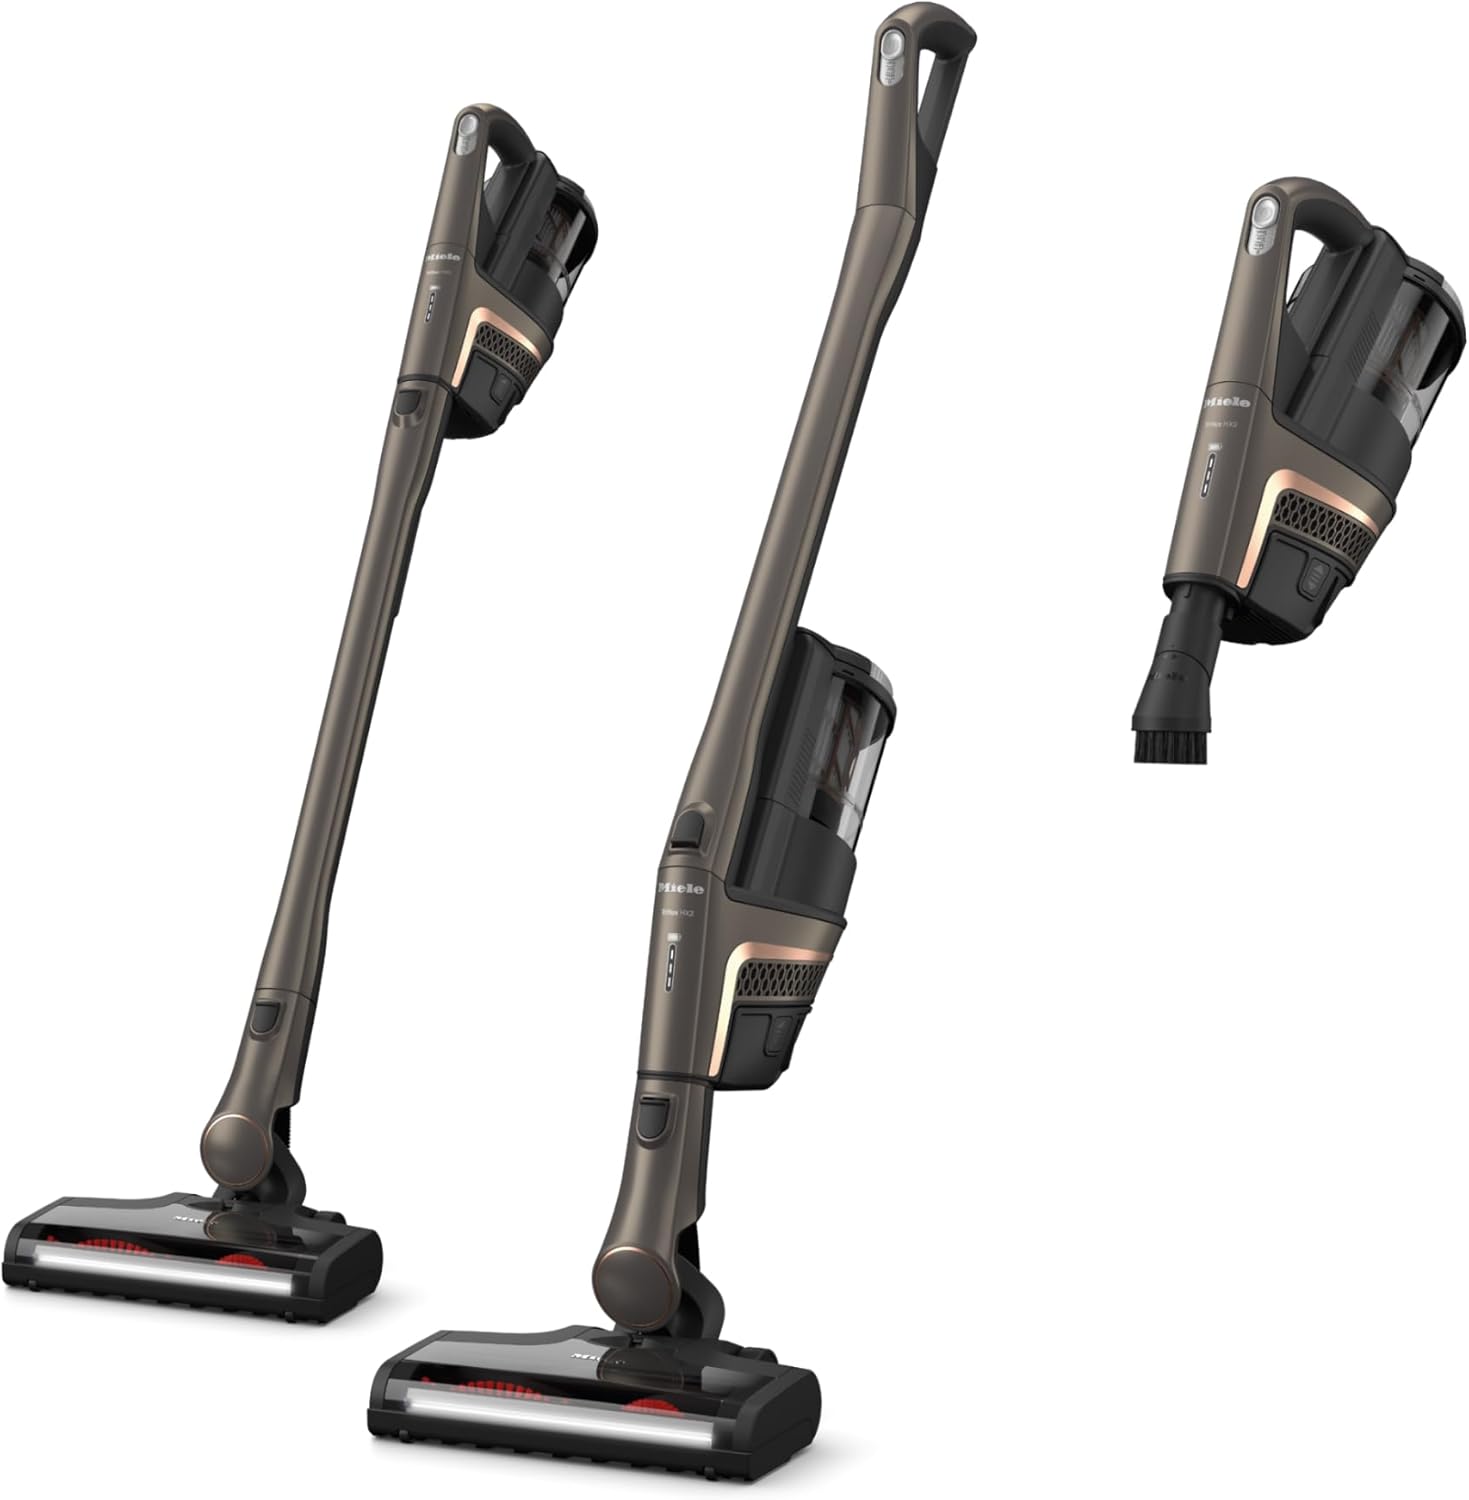
Image: All components of the Miele Triflex HX2 Pro Cordless Stick Vacuum Cleaner.
2.2 මූලික බැටරි ආරෝපණය
Fully charge both Li-ion batteries before first use. This ensures optimal battery life and performance.
- Connect the charging dock to a power outlet.
- Insert a battery into the charging dock. The charging indicator lights will illuminate.
- Allow the battery to charge completely. Charging time is approximately 240 minutes (4 hours) per battery.
- දෙවන බැටරිය සඳහා නැවත කරන්න.

Image: Two replaceable Li-ion batteries and the charging dock.
2.3 වැකුම් ක්ලීනර් එකලස් කිරීම
The Triflex HX2 Pro offers three configurations:
- සුවපහසු ප්රකාරය: PowerUnit at the bottom for ergonomic cleaning of large spaces.
- Reach Mode: PowerUnit at the top for cleaning hard-to-reach areas like ceilings or under furniture.
- සංයුක්ත ප්රකාරය: Handheld function for quick clean-ups.
To assemble, align the desired components (PowerUnit, suction tube, electrobrush) and push them together until they click securely. To change configurations, press the release buttons to detach components.

Image: The Miele Triflex HX2 Pro demonstrating its 3-in-1 design for versatile cleaning.

Image: The vacuum in Comfort Mode, with the PowerUnit at the bottom for ergonomic cleaning.

Image: The vacuum in Reach Mode, with the PowerUnit at the top for extended reach.

Image: The vacuum in Compact Mode, used as a handheld unit for quick clean-ups.
3. මෙහෙයුම් උපදෙස්
3.1 බල ගැන්වීම සහ අක්රිය කිරීම
To turn the vacuum cleaner on or off, press the power button located on the PowerUnit. The vacuum will start in the last used power setting.
3.2 Adjusting Power Settings
The Triflex HX2 Pro features 3 power levels. Use the control method (touch/push button) on the PowerUnit to cycle through the settings:
- සැකසීම 1: For light cleaning and maximum run-time.
- සැකසීම 2: Standard cleaning for everyday dirt.
- සැකසීම 3: Maximum suction for stubborn dirt and deep cleaning.
3.3 Automatic Floor Detection and BrilliantLight
The electrobrush automatically adjusts its speed and suction power based on the floor type (carpet or hard floor). The integrated BrilliantLight LED headlight illuminates the cleaning path, making dust and debris more visible, especially in dimly lit areas or under furniture.

Image: The electrobrush with BrilliantLight illuminating dust under furniture.

Image: The Multifloor XXL Electrobrush designed for all floor types.
3.4 උපාංග භාවිතය
The included accessory kit enhances the vacuum's versatility:
- විදින මෙවලම: පටු හිඩැස්, කොන් සහ දාර සඳහා වඩාත් සුදුසුය.
- දූවිලි බුරුසුව: For delicate surfaces, curtains, and upholstery.
- Hardfloor Care Tool Insert: For sensitive hard wood floors, preventing scratches.
4. නඩත්තු කිරීම
Regular maintenance ensures optimal performance and longevity of your Miele Triflex HX2 Pro.
4.1 දූවිලි බඳුන හිස් කිරීම
Empty the dust bin regularly, ideally after each significant use, to maintain suction power. The dust bin capacity is 1.1 pounds.
- Detach the PowerUnit from the vacuum.
- Position the dust bin over a waste receptacle.
- Open the dust bin release latch and empty the contents.
- Close the dust bin securely until it clicks.
Note: Some users find emptying the bagless dust bin can create a dust cloud. Consider emptying outdoors or into a larger vacuum for minimal dust dispersion.
4.2 Cleaning the HEPA Lifetime Filter
The HEPA Lifetime Filter is designed to be maintenance-free. However, for optimal filtration and air hygiene, periodically check for excessive build-up and gently tap it to dislodge dust if necessary. Do not wash the filter unless specified in the full product manual.

Image: Close-up of the HEPA Lifetime filter, ensuring maximum air hygiene.
4.3 Cleaning the Electrobrush
Periodically check the electrobrush for tangled hair or fibers. Use scissors to carefully cut and remove any obstructions from the brush roll to ensure effective cleaning.
5. දෝශ නිරාකරණය
This section addresses common issues you might encounter with your Miele Triflex HX2 Pro.
| ගැටලුව | විය හැකි හේතුව | විසඳුම |
|---|---|---|
| රික්තය ක්රියාත්මක නොවේ. | බැටරිය ආරෝපණය කර නොමැති හෝ නිසි ලෙස ඇතුළු කර නොමැත. | බැටරිය සම්පූර්ණයෙන්ම ආරෝපණය වී ආරක්ෂිතව ස්ථානයට සවි කර ඇති බවට වග බලා ගන්න. |
| අඩු කළ චූෂණ බලය. | Full dust bin, clogged filter, or obstructed electrobrush. | Empty dust bin, check and clean HEPA filter, remove any blockages from the electrobrush. |
| Short battery run-time. | Battery not fully charged, or operating on highest power setting. | Ensure batteries are fully charged. Use lower power settings for longer run-time. Remember the product comes with two batteries for extended use. |
| Electrobrush not rotating. | Obstruction in brush roll or incorrect assembly. | Check for and remove any tangled hair or debris. Ensure the electrobrush is correctly attached to the suction tube/PowerUnit. |
6. පිරිවිතර
| විශේෂාංගය | විස්තර |
|---|---|
| වෙළඳ නාමය | මයිල් |
| මාදිලියේ නම | HX2 |
| අයිතම ආදර්ශ අංකය | 11827020 |
| වර්ණය | Infinity Grey Pearl Finish |
| ආකෘති සාධකය | ඇලවීම |
| රැහැන් රහිතද? | ඔව් |
| බැටරි වර්ගය | ලිතියම්-අයන (2ක් ඇතුළත්) |
| ධාවන කාලය | Up to 120 minutes (with 2 batteries, on power setting 1 without electrobrush) |
| ආරෝපණ කාලය | Approx. 240 minutes (4 hours) per battery |
| ධාරිතාව | 1.1 Pounds (dust bin) |
| පෙරහන් වර්ගය | HEPA Lifetime Filter |
| විශේෂ ලක්ෂණ | Bagless, HEPA, Headlight, Portable, 3-in-1 Design |
| නිර්දේශිත භාවිතයන් | කාපට්, තද බිම |
| ශබ්ද මට්ටම | 78 dB |
| නිෂ්පාදන මානයන් | 11.02"අඟල් x 10.24"අඟල් x 51.06"උ |
| අයිතමයේ බර | රාත්තල් 16.12 කි |
7. වගකීම් සහ සහාය
For detailed warranty information, please refer to the warranty card included with your product or visit the official Miele website. Miele products are known for their quality and durability, backed by extensive testing.
If you require technical assistance, spare parts, or have questions regarding your Miele Triflex HX2 Pro, please contact Miele Customer Service. Contact details can typically be found on the Miele webඅඩවියේ හෝ නිෂ්පාදන ඇසුරුම්වල.
ඔබට ද නැරඹිය හැකිය Miele Store on Amazon වැඩි විස්තර සහ නිෂ්පාදන උපාංග සඳහා.


