හැඳින්වීම
This manual provides detailed instructions for the safe installation, operation, and maintenance of your Parrot Uncle 60-inch black ceiling fan with integrated LED lighting and remote control. Please read all instructions carefully before beginning installation and retain this manual for future reference.
This ceiling fan is designed for both indoor and outdoor (covered patio) use, featuring a powerful DC motor, reversible blades, and dimmable LED light with adjustable color temperature.

Image: The Parrot Uncle 60-inch black ceiling fan with its remote control, installed in a modern living space.
ආරක්ෂිත තොරතුරු
අවවාදයයි: ගින්න, විදුලි කම්පනය හෝ පුද්ගලික තුවාල ඇතිවීමේ අවදානම අවම කිරීම සඳහා, සෑම විටම මෙම මූලික පූර්වාරක්ෂාවන් අනුගමනය කරන්න:
- ඔබේ විදුලි පංකාව ස්ථාපනය කිරීමට පෙර සියලුම උපදෙස් සහ ආරක්ෂක තොරතුරු කියවා මෙම උපදෙස් සුරකින්න.
- All wiring must be in accordance with national and local electrical codes. Consult a qualified electrician if you are unsure about wiring.
- Before installation, disconnect power by turning off the circuit breakers at the main fuse box or circuit panel.
- ස්ථාපන ස්ථානයේදී විදුලි පංකා තල බාධාවකින් තොරව භ්රමණය වීමට ඉඩ සලසන බවත්, තල බිම සිට අවම වශයෙන් අඩි 7 (මීටර් 2.1) ක් දුරින් ඇති බවත් සහතික කර ගන්න.
- The outlet box and support structure must be securely mounted and capable of reliably supporting a minimum of 35 lbs (15.9 kg). Use only UL/ETL listed outlet boxes marked 'FOR FAN SUPPORT'.
- හානි වූ විදුලි රැහැන් හෝ පේනු සමඟ විදුලි පංකාව ක්රියාත්මක නොකරන්න.
- තලවල මාර්ගයේ වස්තූන් තැබීමෙන් වළකින්න.
- Do not use the fan with a dimmer switch not specifically designed for ceiling fans.
පැකේජයේ අන්තර්ගතය
පහත ලැයිස්තුගත කර ඇති සියලුම සංරචක ඔබේ පැකේජයට ඇතුළත් කර ඇති බව තහවුරු කරගන්න:
- සිවිලිමේ විදුලි පංකා මෝටර් නිවාසය
- ෆෑන් බ්ලේඩ් (කෑලි 6)
- ඒකාබද්ධ LED ආලෝක කට්ටලය
- දුරස්ථ පාලකය
- ඩවුන්රෝඩ්ස් (අඟල් 4 සහ අඟල් 10 විකල්ප)
- සවිකරන වරහන
- දෘඩාංග ඇසුරුම (ඉස්කුරුප්පු, වයර් ඇට, රෙදි සෝදන යන්ත්ර)
- උපදෙස් අත්පොත
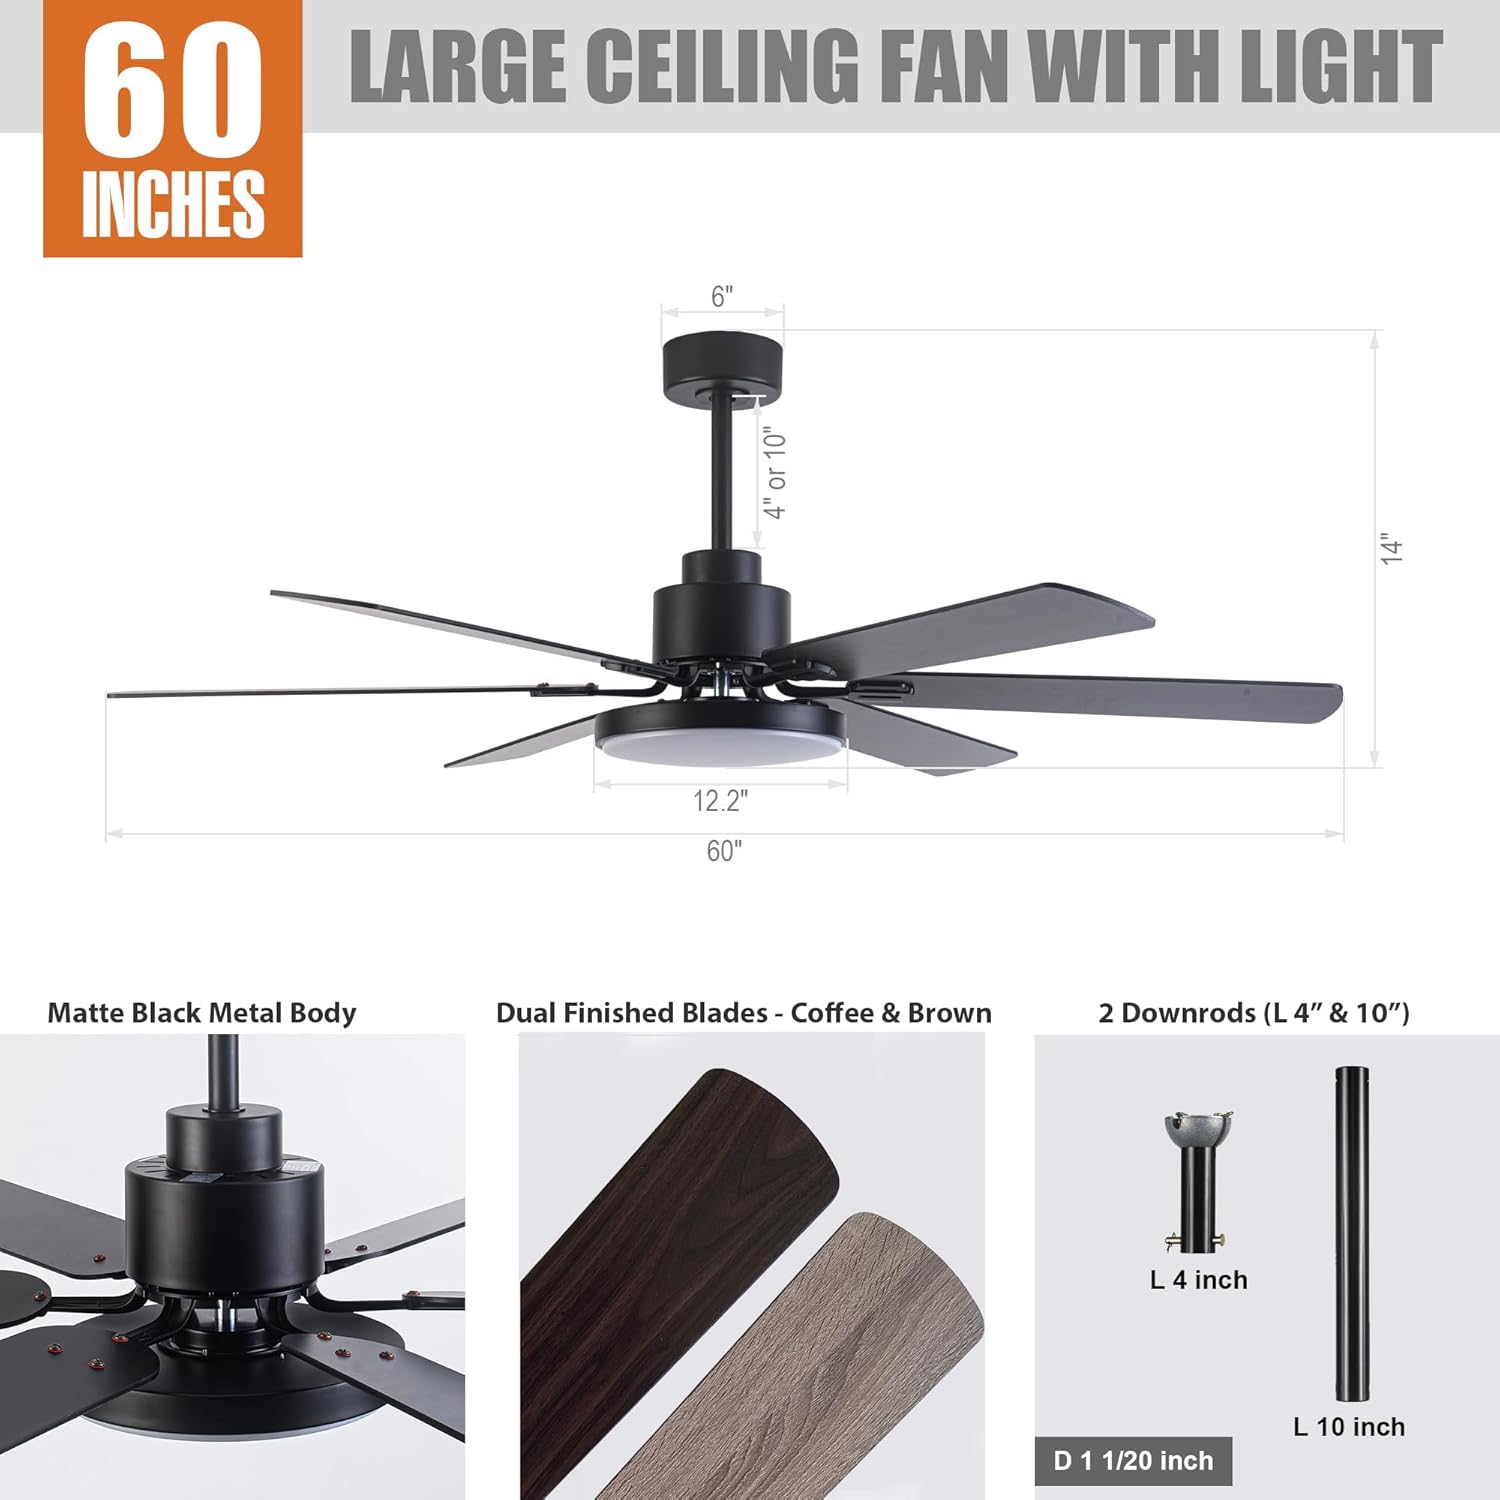
Image: A detailed diagram illustrating the fan's dimensions (60" diameter, 14" height) and key components such as the matte black metal body, dual-finished blades (coffee/brown), and the two included downrods (4" and 10").
පිරිවිතර
| විශේෂාංගය | පිරිවිතර |
|---|---|
| ආදර්ශ අංකය | F8252 |
| වෙළඳ නාමය | ගිරවුන් මාමා |
| ප්රමාණය | අඟල් 60 (විෂ්කම්භය) |
| නිෂ්පාදන මානයන් | 60"අඟල් x 60"අඟල් x 14"උ |
| වර්ණය | කළු |
| ද්රව්ය | Engineered Wood (Blades), Iron (Housing) |
| මෝටර් වර්ගය | DC මෝටර් |
| ආලෝක ප්රභවයේ වර්ගය | ඒකාබද්ධ LED |
| LED Wattage | උපරිම වොට් 24 |
| දීප්තිය | 1500 Lumen |
| වර්ණ උෂ්ණත්වය | 3000K (Warm), 4000K (Natural), 5700K (Bright) |
| පාලන ක්රමය | දුරස්ථ පාලකය |
| විදුලි පංකා වේගය | 6 මට්ටම් |
| විශේෂ ලක්ෂණ | Dimmable Light, Adjustable Color Temperature, Reversible Motor, Timer Function |
| ගෘහස්ථ / එළිමහන් භාවිතය | Indoor, Outdoor (Covered Patio) |
| ස්ථාපන වර්ගය | ඩවුන්රොඩ් කන්ද |
| වෙළුමtage | වෝල්ට් 120 |
| සහතික | ETL ලැයිස්තුගත කර ඇත |
ස්ථාපනය
1. පූර්ව ස්ථාපන චෙක්පත්
- පරිපථ කඩනයෙහි විදුලිය විසන්ධි කර ඇති බවට වග බලා ගන්න.
- Confirm the ceiling outlet box is rated for fan support (minimum 35 lbs).
- Gather all necessary tools: screwdriver, wire strippers, electrical tape, ladder.
2. වරහන සවි කිරීම
Attach the mounting bracket to the ceiling outlet box using the screws provided with the outlet box. Ensure the bracket is securely fastened.
3. Assembling the Downrod and Fan Motor
Select either the 4-inch or 10-inch downrod based on your ceiling height and preference. Feed the fan wires through the downrod. Secure the downrod to the fan motor housing according to the diagrams in the separate installation guide (not included in this manual).

Image: This diagram shows various downrod mounting configurations, including standard downrod mount, extended downrod mount, and sloped ceiling mount (up to 15 degrees), indicating the fan's adaptability to different ceiling types.
4. විදුලි පංකාව එල්ලීම
Carefully lift the fan assembly and hang it from the mounting bracket. This typically involves placing the downrod ball into the bracket's opening.
5. රැහැන් සම්බන්ධතා
Connect the fan's electrical wires to the household wiring according to the color codes (typically black to black, white to white, and green/bare copper to ground). Ensure all connections are secure with wire nuts and electrical tape. The remote receiver will also need to be wired in line with the fan's power supply.
6. විදුලි පංකා තල සවි කිරීම
Attach each fan blade to the motor housing using the provided screws. Ensure all screws are tightened securely.
7. Installing the LED Light Kit
Connect the LED light kit wires to the fan motor's light wires. Secure the LED light kit to the bottom of the fan housing. Some models use magnetic attachment for ease of installation.

රූපය: සමීප ඡායාරූපයක් view of the integrated LED light module, highlighting its sleek design and how it integrates with the fan's body.
මෙහෙයුම් උපදෙස්
Your Parrot Uncle ceiling fan is operated using the included remote control. Ensure the remote has two LR03/AAA 1.5 Volt batteries installed (not included).

Image: The remote control for the fan, showing buttons for fan ON/OFF, light ON/OFF, 6-level fan speed, forward/reverse rotation, light dimmer, light color temperature options (3000K/4000K/5700K), and timer settings (30 min/2 hours).
1. විදුලි පංකා ක්රියාකාරිත්වය
- විදුලි පංකාව සක්රිය/අක්රිය: විදුලි පංකාව සක්රිය හෝ අක්රිය කිරීමට විදුලි පංකා නිරූපක බොත්තම ඔබන්න.
- විදුලි පංකාවේ වේගය: Use buttons 1-6 to select desired fan speed, with 6 being the highest.
- ආපසු හැරවිය හැකි මෝටරය: Press the forward/reverse button to change the direction of blade rotation. This feature allows for downdraft (cooling) in summer and updraft (warm air circulation) in winter.
- ටයිමර් කාර්යය: Press the '30 min' or '2H' button to set the fan to automatically shut off after 30 minutes or 2 hours.

Image: This graphic demonstrates the reversible motor's function, showing clockwise rotation for warm air circulation in winter and counter-clockwise rotation for cooling in summer.
2. සැහැල්ලු ක්රියාකාරිත්වය
- ආලෝකය සක්රිය / අක්රිය: ආලෝකය සක්රිය හෝ අක්රිය කිරීමට විදුලි බුබුළු නිරූපක බොත්තම ඔබන්න.
- සැහැල්ලු ඩිමර්: Use the up/down arrow buttons to adjust the light brightness from 1% to 100%.
- වර්ණ උෂ්ණත්ව ගැලපුම: Press the '3000K', '4000K', or '5700K' buttons to switch between Warm White, Natural White, and Bright White light color temperatures.

Image: This image displays the fan's integrated LED light capabilities, demonstrating the adjustable color temperature settings from 3000 Kelvin (warm light) to 5700 Kelvin (bright light), and its dimmable range from 1% to 100% brightness.
නඩත්තු කිරීම
නිතිපතා නඩත්තු කිරීම ප්රශස්ත ක්රියාකාරිත්වය සහතික කරන අතර ඔබේ සිවිලිමේ විදුලි පංකාවේ ආයු කාලය දීර්ඝ කරයි.
- පිරිසිදු කිරීම: විදුලි පංකාව පිරිසිදු කිරීමට, මෘදු, d රෙදි කැබැල්ලකින් පිස දමන්න.amp රෙදි. උල්ෙල්ඛ පිරිසිදු කරන්නන් හෝ ද්රාවක භාවිතා නොකරන්න, මන්ද මේවා නිමාව හෝ විදුලි සංරචක වලට හානි කළ හැකිය.
- තල පිරිසිදු කිරීම: Dust the fan blades regularly to prevent dust buildup, which can affect fan balance and air circulation.
- තද කිරීමේ ඉස්කුරුප්පු: විදුලි පංකාවේ සහ සවි කරන දෘඩාංගවල ඇති සියලුම ඉස්කුරුප්පු තද බව සහතික කර ගැනීම සඳහා වරින් වර පරීක්ෂා කරන්න. ලිහිල් ඉස්කුරුප්පු ශබ්දය හෝ වෙව්ලීම ඇති කළ හැකිය.
- ලිහිසි තෙල් අවශ්ය නොවේ: විදුලි පංකාවේ මෝටරය ස්ථිරවම ලිහිසි කර ඇති අතර තෙල් දැමීම අවශ්ය නොවේ.
දෝෂගවේෂණය
ඔබේ විදුලි පංකාව සමඟ ගැටලු ඇති වුවහොත්, පහත පොදු ගැටලු සහ විසඳුම් වෙත යොමු වන්න:
| ගැටලුව | විය හැකි හේතුව | විසඳුම |
|---|---|---|
| විදුලි පංකාව ආරම්භ නොවේ | විදුලි පංකාවට විදුලිය නැත; ලිහිල් වයර් සම්බන්ධතා; දුරස්ථ පාලක බැටරිය අඩු හෝ යුගලනය කර නැත. | පරිපථ කඩනය පරීක්ෂා කරන්න; සියලුම වයර් සම්බන්ධතා ආරක්ෂිත බව තහවුරු කරන්න; දුරස්ථ බැටරිය ප්රතිස්ථාපනය කරන්න හෝ දුරස්ථ පාලකය නැවත යුගල කරන්න. |
| විදුලි පංකාව වෙව්ලනවා | Loose blade screws; Loose mounting bracket; Unbalanced blades. | Tighten all blade screws; Ensure mounting bracket is secure; Use a balancing kit (not included) if necessary. |
| ආලෝකය ක්රියා නොකරයි | ආලෝක කට්ටලයට ලිහිල් වයර් සම්බන්ධතාවය; දෝෂ සහිත LED මොඩියුලය. | Check light kit wiring; Contact customer support for LED module replacement if faulty. |
| දුරස්ථ පාලකය ක්රියා නොකරයි | Dead batteries; Remote not paired with receiver; Obstruction between remote and receiver. | Replace batteries; Follow pairing instructions (refer to separate remote manual); Ensure clear line of sight. |
| විදුලි පංකාව ඝෝෂාකාරී ය | ලිහිල් ඉස්කුරුප්පු; මෝටර් ශබ්දය; තල බාධකයකට පහර දීම. | Tighten all screws; Ensure no obstructions; If motor noise persists, contact customer support. |

Image: This graphic highlights the fan's whisper-quiet operation, rated at 35dB, which is comparable to library learning, ensuring minimal disturbance for sleep or daily activities.
වගකීම් සහ සහාය
Parrot Uncle offers a comprehensive warranty and customer support for your ceiling fan:
- 30-Day Free Return and Exchange: ඔබේ මිලදී ගැනීම ගැන ඔබ සෑහීමකට පත් නොවන්නේ නම්, ඔබට දින 30ක් ඇතුළත භාණ්ඩය ආපසු ලබා දීමට හෝ හුවමාරු කිරීමට හැකිය.
- One-Year Free Replacement Parts Service: Enjoy one year of free replacement parts service for any manufacturing defects.
- Lifetime Professional Customer Service: For any questions or assistance, please do not hesitate to reach out to Parrot Uncle's professional customer service team.
සහාය සඳහා, කරුණාකර පිවිසෙන්න Parrot Uncle Store on Amazon නැතහොත් ඔවුන්ගේ පාරිභෝගික සේවය කෙලින්ම අමතන්න.


