හැඳින්වීම
This manual provides comprehensive instructions for the installation, operation, and maintenance of your GeekTale K07 Keypad Door Knob. Please read these instructions carefully before installation and use to ensure proper function and security.
නිෂ්පාදනය අවසන්view
The GeekTale K07 Keypad Door Knob is an electronic smart door lock designed for convenient and secure keyless access. It features a backlit keypad, auto-lock functionality, and anti-peep technology.
ප්රධාන ලක්ෂණ:
- Keyless Access: Supports up to 20 unique access codes (4-8 digits).
- Backlit Keypad: Allows for easy code entry in low-light conditions.
- Auto-Lock: Automatically locks the door after a set period for enhanced security.
- Anti-Peep Technology: Allows entry of random digits before or after your actual code to prevent code exposure.
- Emergency Access: Includes two mechanical keys and a Type-C USB port for emergency power in case of battery depletion.
- Easy Installation: Designed for straightforward installation on most standard doors.

Image: The GeekTale Keypad Smart Lock, highlighting its soft touch buttons and capacity for up to 20 different PIN codes.
පැකේජයේ අන්තර්ගතය
ඔබගේ පැකේජය විවෘත කරන විට, කරුණාකර සියලුම සංරචක ඇති බවට වග බලා ගන්න:
- GeekTale K07 Keypad Door Knob (Exterior and Interior Assemblies)
- අගුල් යාන්ත්රණය
- වැඩ වර්ජන තහඩුව
- සවිකරන ඉස්කුරුප්පු
- 2 x යාන්ත්රික යතුරු
- ස්ථාපන ආකෘතිය
- පරිශීලක අත්පොත (මෙම ලේඛනය)
පිරිවිතර
| විශේෂාංගය | විස්තර |
|---|---|
| වෙළඳ නාමය | GeekTale |
| මාදිලියේ නම | K07 |
| අගුළු වර්ගය | යතුරු පුවරුව |
| ද්රව්ය | ඇලුමිනියම් |
| වර්ණය | මැට් කළු |
| අයිතම මානයන් (L x W x H) | අඟල් 2.91 x 2.72 x 3.72 |
| බලශක්ති ප්රභවය | 4 x AAA Alkaline Batteries (not included) |
| මුරකේත ධාරිතාව | Up to 20 codes (4-8 digits) |
| විශේෂ ලක්ෂණ | Keypad, 20 passcodes, anti-peep code, passage mode & security mode, two mechanical keys, easy installation |
ස්ථාපනය
The GeekTale K07 Keypad Door Knob is designed for easy installation. Please follow these general steps. Refer to the included installation template for precise measurements and drilling instructions if needed.
අවශ්ය මෙවලම්:
- ෆිලිප්ස් හෙඩ් ඉස්කුරුප්පු නියන
- මිනුම් පටිය
- පැන්සල
ස්ථාපන පියවර:
- දොර සකස් කරන්න: Ensure your door has the correct bore holes and backset. The lock fits standard door thicknesses (35mm to 54mm).
- අගුල ස්ථාපනය කරන්න: Insert the latch mechanism into the door edge and secure it with screws. Ensure the latch bolt faces the correct direction for your door swing.
- බාහිර එකලස් කිරීම ස්ථාපනය කරන්න: Place the exterior keypad assembly through the door, aligning the spindle with the latch mechanism.
- අභ්යන්තර එකලස් කිරීම ස්ථාපනය කරන්න: Connect the interior assembly to the exterior assembly, ensuring the cable is properly routed and not pinched. Secure with mounting screws.
- බැටරි ස්ථාපනය කරන්න: Open the battery cover on the interior assembly and insert 4 new AAA alkaline batteries, observing polarity. Close the cover.
- පරීක්ෂණ මෙහෙයුම: After installation, test the mechanical keys and the default passcode (if any) to ensure the lock operates smoothly before closing the door.

Image: Diagram showing the easy installation process and dimensions for the GeekTale Keypad Door Knob, indicating the need for 4 AAA alkaline batteries.
මෙහෙයුම
Unlocking with Passcode:
- එය සක්රිය කිරීමට යතුරු පුවරුව ස්පර්ශ කරන්න.
- Enter your 4-8 digit passcode.
- '#' යතුර ඔබන්න.
- If the code is correct, the lock will unlock. Turn the knob to open the door.
දොර අගුළු දැමීම:
- ස්වයංක්රීය අගුලු දැමීම: The lock will automatically re-lock after a few seconds once the door is closed.
- අතින් අගුලු දැමීම: From the exterior, press the '#' key to manually lock the door. From the interior, simply turn the knob to the locked position.
Anti-Peep Technology:
To prevent others from guessing your passcode, you can enter random digits before or after your actual code. For example, ඔබේ කේතය 1234 නම්, ඔබට 567 ඇතුළත් කළ හැකිය1234890#.
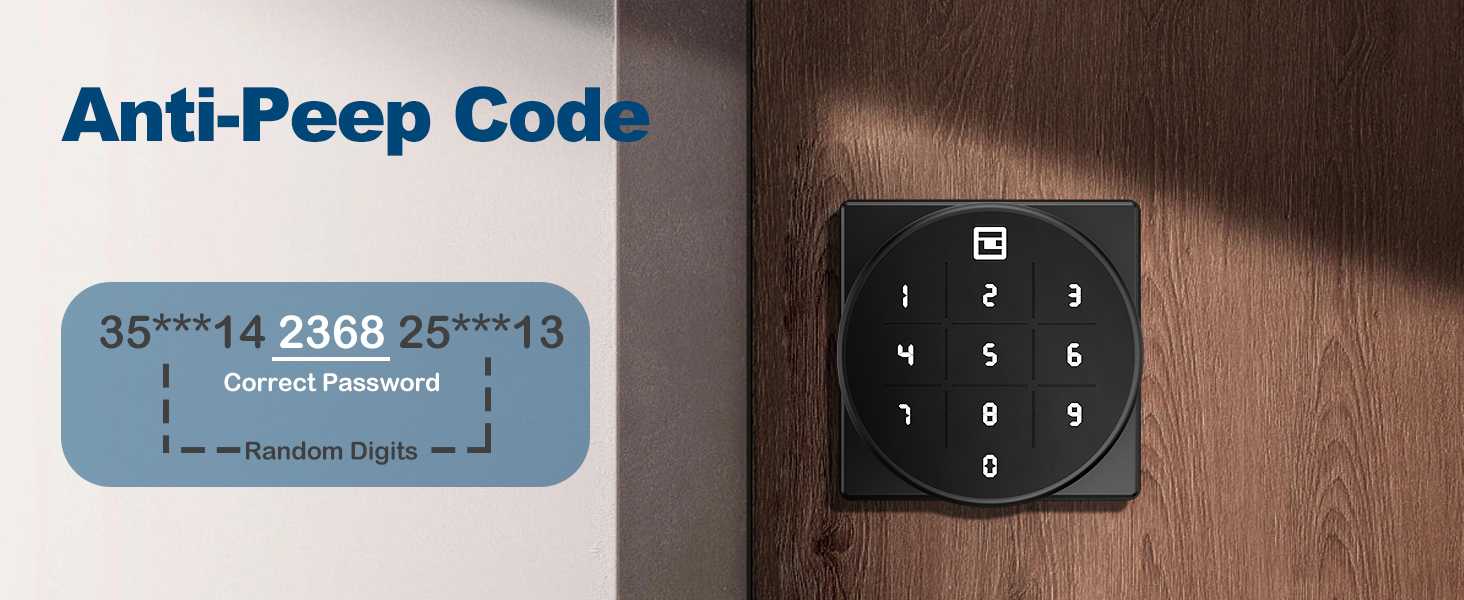
Image: Illustration of the Anti-Peep Code feature, showing how random digits can be added before and after the correct password.
Passage Mode & Security Mode:
The lock supports both passage mode (always unlocked) and security mode (requires passcode). Refer to the programming section for how to switch between these modes.

Image: Visual representation of the door knob in Privacy Mode (locked from inside) and Passage Mode (unlocked for free entry/exit).
Programming Passcodes
Detailed instructions for adding, deleting, and modifying user passcodes will be provided in a separate programming guide or within the full manual. Generally, you will need to enter a master code followed by specific commands to manage user codes.
නඩත්තු කිරීම
බැටරි ආදේශනය:
The lock is powered by 4 AAA alkaline batteries. When the batteries are low, the lock will provide a low battery alert (see Troubleshooting section). To replace batteries:
- අභ්යන්තර එකලස් කිරීමේ බැටරි කවරය ඉවත් කරන්න.
- පැරණි බැටරි ඉවත් කරන්න.
- නිවැරදි ධ්රැවීයතාව (+/-) සහතික කරමින් නව AAA ක්ෂාරීය බැටරි 4ක් ඇතුළු කරන්න.
- බැටරි ආවරණය ප්රතිස්ථාපනය කරන්න.
පිරිසිදු කිරීම:
Wipe the keypad and lock body with a soft, dry cloth. Avoid using abrasive cleaners or solvents that could damage the finish or electronic components.
දෝෂගවේෂණය
| ගැටලුව | විය හැකි හේතුව | විසඳුම |
|---|---|---|
| යතුරු පෑඩ් ඇතුළත් කිරීමට අගුල ප්රතිචාර නොදක්වයි. | මිය ගිය බැටරි. | Replace batteries. Use the mechanical key or emergency USB power if locked out. |
| Low Battery Alert (buzzer beeps twice, indicator flashes green then red). | බැටරි අඩුයි. | Replace all 4 AAA alkaline batteries immediately. |
| Incorrect Password Error (red light flashes). | Incorrect passcode entered. | Re-enter the correct passcode. Ensure no random digits are accidentally included if not using anti-peep. |
| අගුල ස්වයංක්රීයව අගුළු නොදමයි. | Auto-lock feature is disabled or in passage mode. | Refer to programming instructions to enable auto-lock or switch to security mode. |
Emergency Unlock Options:
- යාන්ත්රික යතුර: Use one of the provided mechanical keys to manually unlock the door.
- USB Emergency Power: If batteries are completely dead, connect a Type-C USB power source (e.g., power bank) to the emergency port on the exterior assembly to temporarily power the lock and enter your passcode. This port is for power only, not for charging the internal batteries.
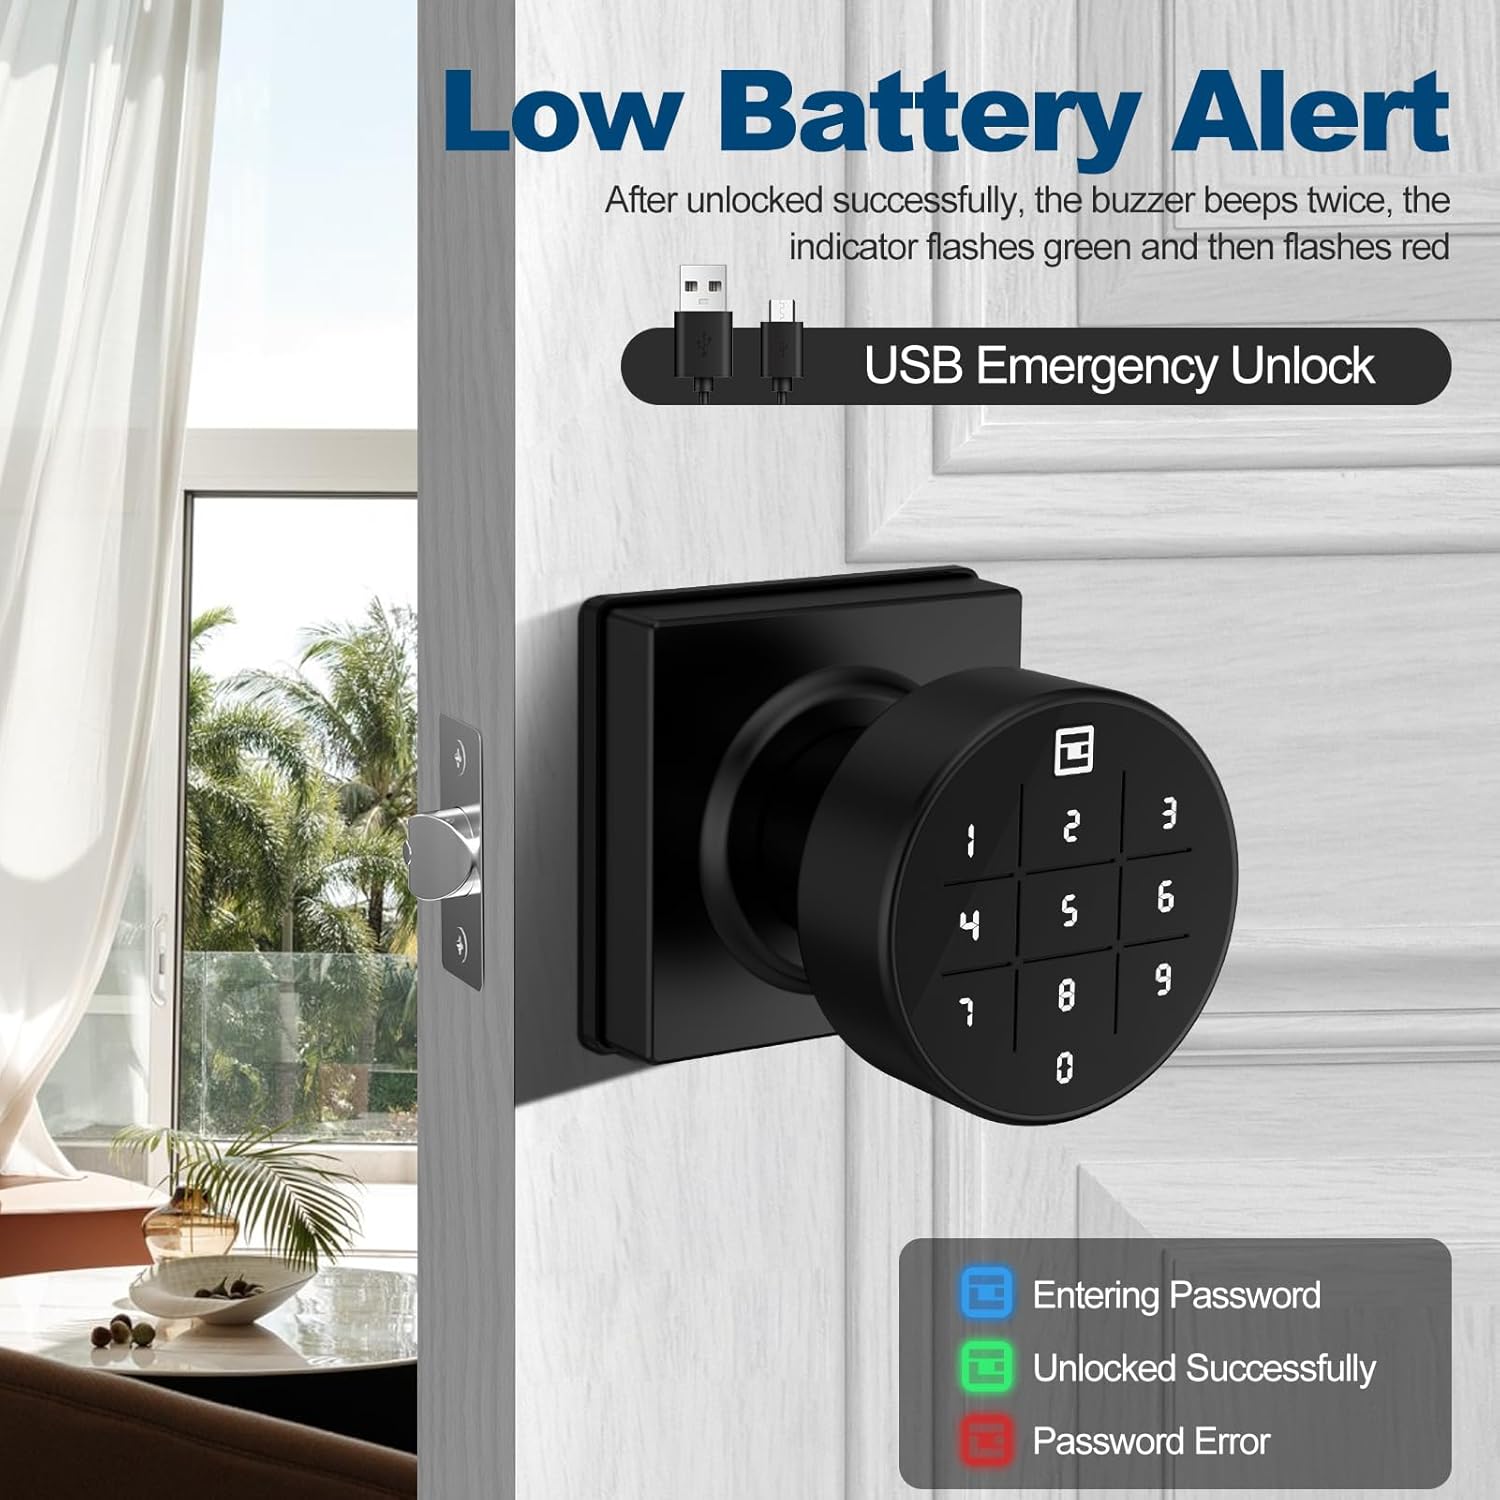
Image: The keypad displaying a low battery alert and indicating the USB emergency unlock port. The image also shows the color codes for entering password (blue), unlocked successfully (green), and password error (red).
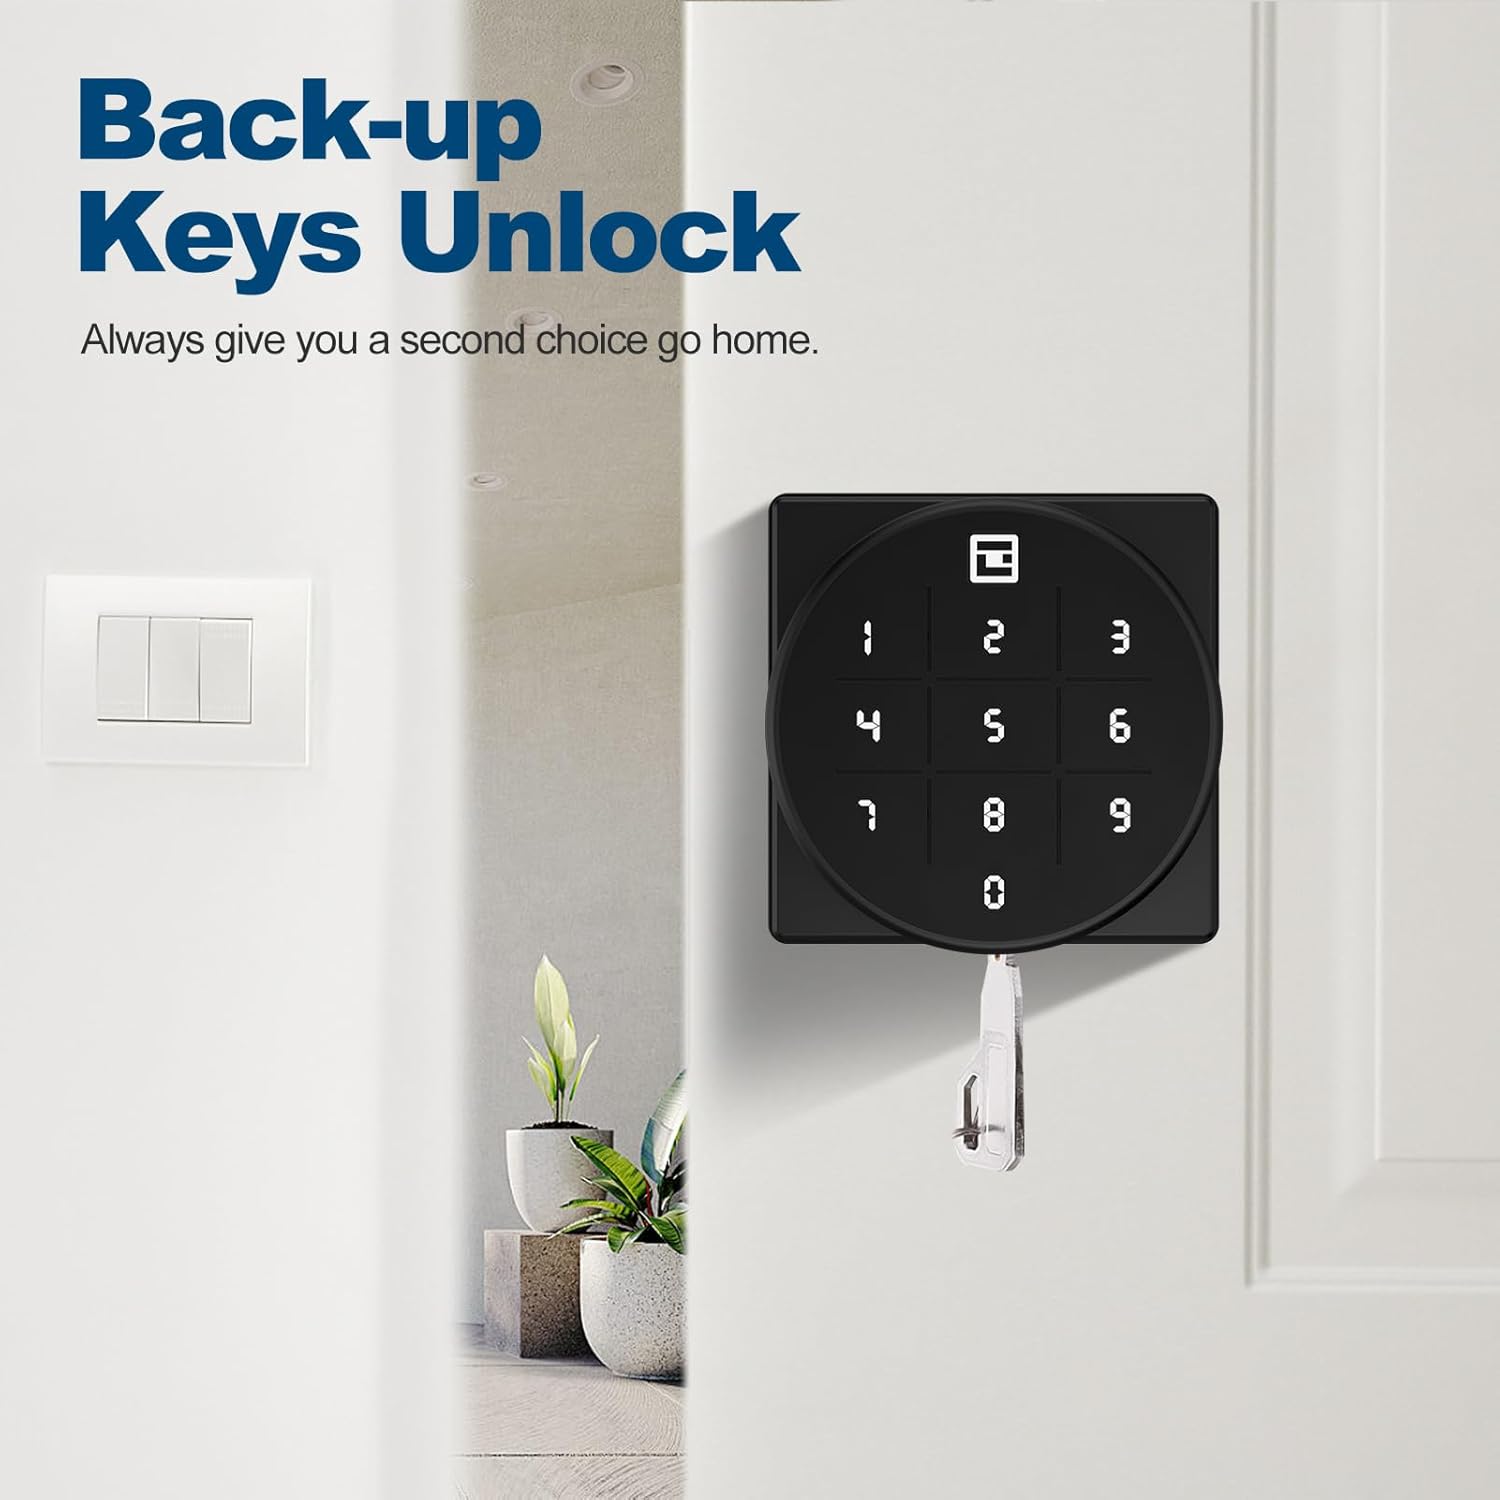
Image: The GeekTale door knob with a mechanical backup key inserted, illustrating the backup unlock option.
වගකීම් සහ සහාය
GeekTale offers a worry-free 30-day hassle-free return policy. For any technical assistance or inquiries, 24-hour technical support is available via email or phone. Please refer to your product packaging or the official GeekTale webසම්බන්ධතා විස්තර සඳහා අඩවිය.


