1. නිෂ්පාදන අවසන්view
The Pulido Fingerprint Door Knob offers a modern and secure keyless entry solution for your home or office. This smart door knob provides two primary methods of unlocking: fingerprint recognition and mobile application control. It is designed for ease of use and enhanced security, storing all user data locally on the device.

Image: The Pulido Fingerprint Door Knob highlighting its fingerprint sensor, app management capability, and power interface.
2. පැකේජ අන්තර්ගතය
ස්ථාපනය ආරම්භ කිරීමට පෙර සියලුම සංරචක පවතින බව කරුණාකර තහවුරු කරගන්න:
- Fingerprint Door Knob (Interior and Exterior Handles)
- අගුල් යාන්ත්රණය
- වැඩ වර්ජන තහඩුව
- සවිකරන ඉස්කුරුප්පු
- ස්ථාපන ආකෘතිය
- පරිශීලක අත්පොත
3. සංරචක හඳුනාගැනීම
Familiarize yourself with the different parts of your Pulido Fingerprint Door Knob:
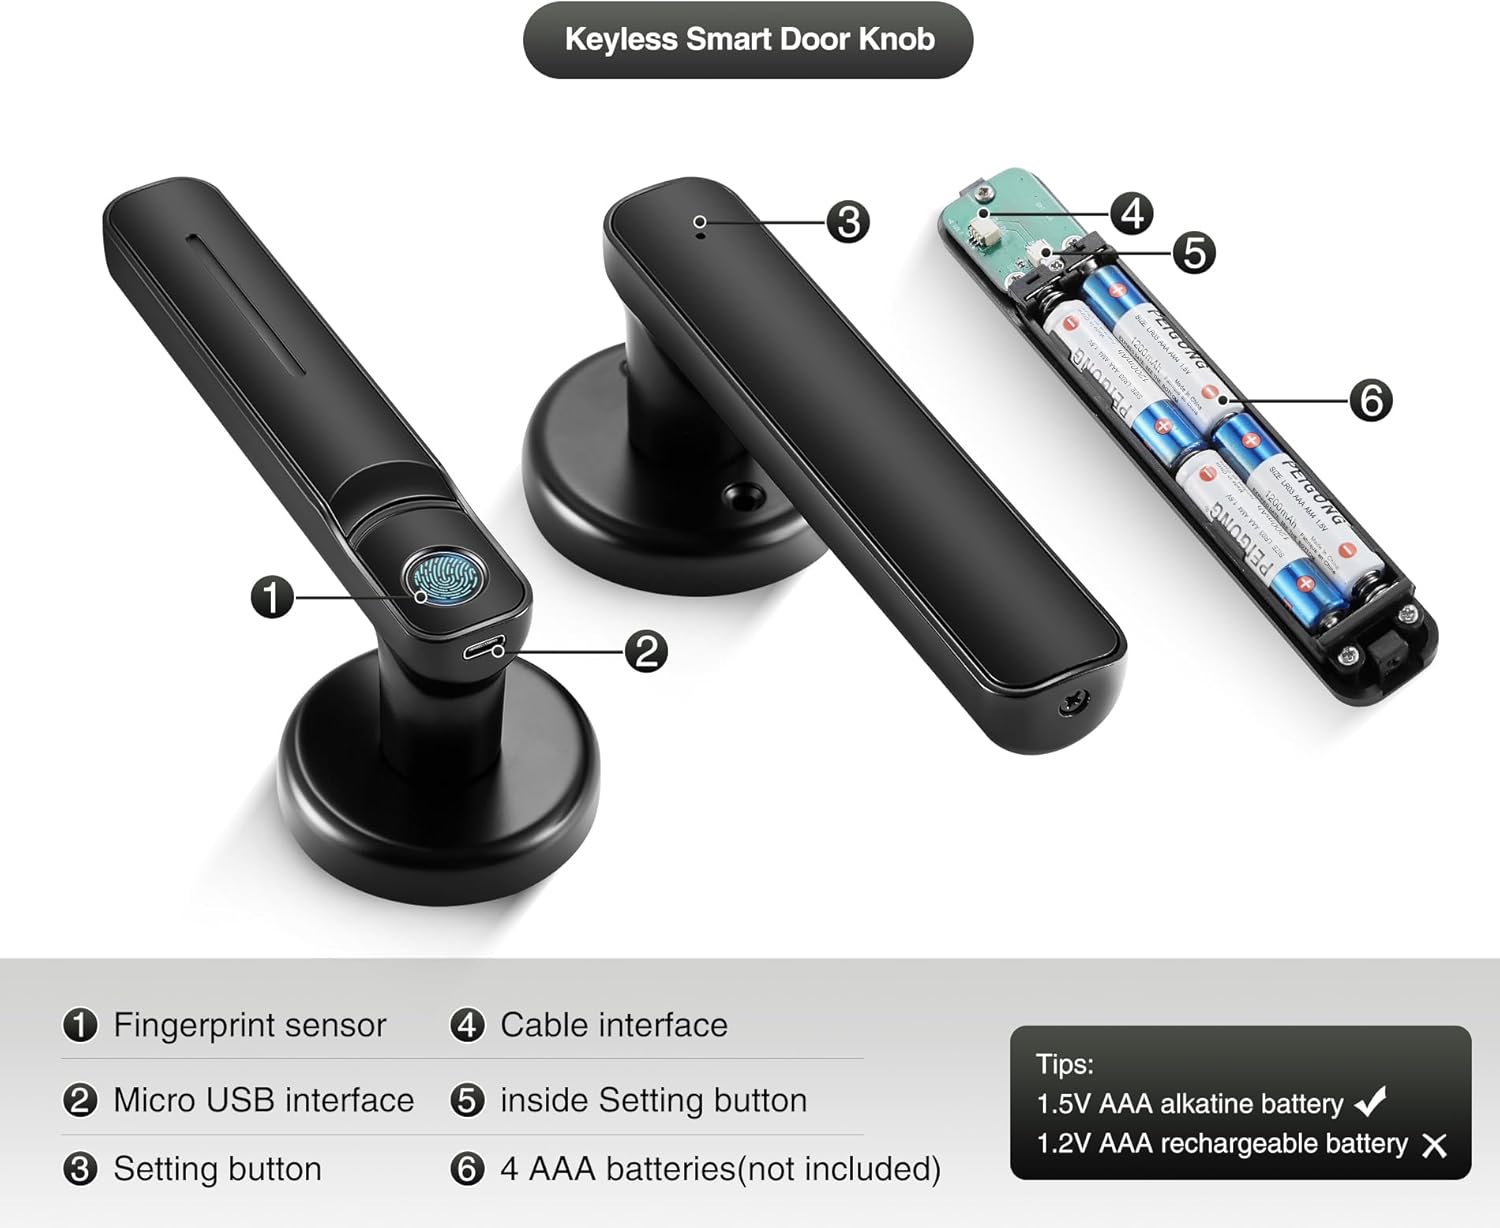
රූපය: විස්තරාත්මක view of the door knob's internal and external components.
- ඇඟිලි සලකුණු සංවේදකය: Used for biometric unlocking.
- මයික්රෝ USB අතුරුමුහුණත: For emergency power supply.
- Setting Button (Exterior): Used for initial setup and pairing.
- කේබල් අතුරුමුහුණත: Connects the exterior and interior components.
- Inside Setting Button: Used for internal settings and resets.
- AAA Batteries Compartment: Holds 4 AAA batteries (not included).
4. ස්ථාපන මාර්ගෝපදේශය
This section provides instructions for installing your new Pulido Fingerprint Door Knob. It is designed to replace standard mechanical door knobs.

Image: Visual representation of replacing a mechanical lock with the smart door knob.
4.1 සකස් කිරීම
- Ensure your door thickness is compatible with the lock.
- Remove any existing door hardware.
- Verify the door bore hole and backset dimensions match the installation template.
4.2 ස්ථාපන පියවර
- අගුල ස්ථාපනය කරන්න: Insert the latch into the door edge and secure it with screws. Ensure the latch bolt faces the correct direction for your door swing.
- ස්ට්රයික් ප්ලේට් එක සවි කරන්න: දොර රාමුව මත ස්ට්රයික් ප්ලේට් එක සවි කරන්න, එය ලැච් බෝල්ට් එක සමඟ පෙළගස්වන්න.
- බාහිර හසුරුව ස්ථාපනය කරන්න: Feed the cable and spindle through the door bore hole from the exterior side.
- අභ්යන්තර හසුරුව ස්ථාපනය කරන්න: Connect the cable from the exterior handle to the interior handle. Align the interior handle with the spindle and mounting posts.
- Secure the Handles: Use the provided screws to firmly attach the interior handle to the exterior handle, ensuring the lock is flush with the door surface.
- බැටරි ඇතුළු කරන්න: Open the battery compartment on the interior handle and insert 4 new AAA alkaline batteries.
- පරීක්ෂණ මෙහෙයුම: After installation, test the mechanical function of the knob to ensure smooth rotation and latch engagement.
5. මූලික සැකසුම සහ යෙදුම් වින්යාසය
To fully utilize your smart door knob, you will need to set it up with the mobile application and register fingerprints.

Image: The mobile application interface demonstrating control over multiple locks.
5.1 යෙදුම් බාගත කිරීම සහ යුගල කිරීම
- යෙදුම බාගන්න: ඒ සඳහා සොයන්න the 'Tuya Smart' or 'Smart Life' app in your smartphone's app store (iOS or Android) and install it.
- ගිණුමක් තනන්න: යෙදුම විවෘත කර නව ගිණුමක් සඳහා ලියාපදිංචි වන්න හෝ ඔබට දැනටමත් ගිණුමක් තිබේ නම් ලොග් වන්න.
- උපාංගය එක් කරන්න: In the app, tap '+' to add a new device. Select 'Door Lock' or 'Smart Lock' from the device categories.
- Pair the Lock: Follow the in-app instructions to put the door knob into pairing mode (usually by pressing and holding the setting button on the exterior handle until an indicator light flashes). The app will detect and connect to the lock via Bluetooth.
5.2 Fingerprint Registration
The lock supports up to 100 user fingerprints. Fingerprint information is stored locally on the lock for security.
- Access Fingerprint Management: In the app, navigate to the settings for your connected door lock and find the 'Fingerprint Management' section.
- ඇඟිලි සලකුණ එක් කරන්න: Select 'Add Fingerprint' and follow the on-screen prompts.
- Scan Fingerprint: Place your finger on the fingerprint sensor multiple times, adjusting the position slightly with each scan, until the app confirms successful registration.
- Repeat for Additional Users: Repeat the process for any other users who require fingerprint access.
6. මෙහෙයුම
Your Pulido Fingerprint Door Knob offers convenient and secure unlocking methods.
6.1 ඇඟිලි සලකුණ සමඟ අගුලු හැරීම

Image: Demonstrating the quick fingerprint unlock feature.
- ඔබගේ ලියාපදිංචි ඇඟිල්ල ඇඟිලි සලකුණු සංවේදකය මත තදින් තබන්න.
- The lock will unlock within 0.5 seconds if the fingerprint is recognized.
- Rotate the door knob to open the door.
6.2 Unlocking with the App
- Open the 'Tuya Smart' or 'Smart Life' app on your smartphone.
- Select the desired door lock from your device list.
- යෙදුම් අතුරුමුහුණත තුළ ඇති 'අගුළු ඇරීම' බොත්තම තට්ටු කරන්න.
- The app also allows you to view unlocking records and manage user access.
6.3 ඡේද ප්රකාරය

Image: The door knob in a hallway, illustrating the Passage Mode feature.
- Passage Mode allows the door to remain unlocked for continuous access without requiring fingerprint or app authentication.
- To activate Passage Mode, open the app, select your door lock, and find the 'Passage Mode' setting.
- Enable Passage Mode as needed. Remember to disable it when you require the door to be locked.
7. බැටරි කළමනාකරණය
The Pulido Fingerprint Door Knob is powered by 4 AAA batteries.
7.1 බැටරි ස්ථාපනය/ප්රතිස්ථාපනය
- Locate the battery compartment on the interior handle (refer to Section 3, Component 6).
- මැදිරි කවරය විවෘත කරන්න.
- Insert 4 new 1.5V AAA alkaline batteries, ensuring correct polarity. Do not use 1.2V rechargeable batteries.
- බැටරි මැදිරි කවරය ආරක්ෂිතව වසා දමන්න.
7.2 අඩු බැටරි අනතුරු ඇඟවීම
- The lock will provide an audible or visual indicator when battery power is low.
- Replace batteries promptly to ensure continuous operation.
7.3 හදිසි බලය
- In case of complete battery depletion, the lock can be temporarily powered via the Micro USB interface (refer to Section 3, Component 2) using a standard power bank or USB charger.
- This allows you to unlock the door and replace the batteries.
8. දෝශ නිරාකරණය
This section addresses common issues you might encounter with your Pulido Fingerprint Door Knob.
8.1 Fingerprint Not Recognized
- පිරිසිදු සංවේදකය: Ensure the fingerprint sensor is clean and free of dirt or moisture.
- නිසි ස්ථානගත කිරීම: Place your finger firmly and completely on the sensor. Try different angles if necessary.
- Re-register Fingerprint: If issues persist, delete the existing fingerprint in the app and re-register it, ensuring a thorough scanning process.
- බහු උත්සාහයන්: The lock allows multiple attempts. If still unsuccessful, use the app to unlock.
8.2 යෙදුම් සම්බන්ධතා ගැටළු
- බ්ලූටූත් සබල කර ඇත: ඔබගේ ස්මාර්ට් ජංගම දුරකතනයේ බ්ලූටූත් සබල කර ඇති බව සහතික කර ගන්න.
- සමීපත්වය: Be within Bluetooth range of the door knob.
- යෙදුම නැවත ආරම්භ කිරීම: යෙදුම වසා නැවත විවෘත කරන්න.
- උපාංගය නැවත යුගල කරන්න: If the app consistently fails to connect, try removing the device from the app and re-pairing it.
- බැටරි පරීක්ෂා කරන්න: Low batteries can affect Bluetooth connectivity.
8.3 Lock Does Not Engage/Disengage
- බැටරි පරීක්ෂා කරන්න: බැටරි අවසන් නොවන බවට වග බලා ගන්න. අවශ්ය නම් ප්රතිස්ථාපනය කරන්න.
- ස්ථාපන පරීක්ෂාව: Verify that the lock was installed correctly and that the spindle and latch mechanism are properly aligned.
- බාධා: Check for any physical obstructions preventing the latch from extending or retracting fully.
9. පිරිවිතර
| විශේෂාංගය | පිරිවිතර |
|---|---|
| ආදර්ශ අංකය | door konb 140 |
| ද්රව්ය | ඇලුමිනියම්, මල නොබැඳෙන වානේ |
| නිෂ්පාදන මානයන් | 5.7"ලීටර් x 2.5"වොට් |
| අයිතමයේ බර | පවුම් 1.61ක් |
| Unlock ක්රම | Fingerprint, Mobile App |
| Fingerprint Recognition Rate | 99% දක්වා |
| අගුළු හැරීමේ වේගය | තත්පර 0.5ක් ඇතුළත |
| පරිශීලක ධාරිතාව | ඇඟිලි සලකුණු 100 දක්වා |
| බල සැපයුම | 4 x 1.5V AAA Alkaline Batteries (not included) |
| හදිසි බලය | මයික්රෝ USB |
10. වගකීම් සහ සහාය
Pulido is committed to providing reliable products and customer satisfaction.
10.1 වගකීම් තොරතුරු
This product includes a free replacement service for මාස 12 යි from the date of purchase for non-human caused damage. Please retain your proof of purchase for warranty claims.
10.2 තාක්ෂණික සහාය
Lifelong technical support is provided for the Pulido Fingerprint Door Knob. If you have any questions, require assistance with installation, setup, or troubleshooting, please contact our customer service team.
For support, please refer to the contact information provided on the product packaging or our official webඅඩවිය.


