නිෂ්පාදනය අවසන්view
The EBTOOLS LGA 1155 Motherboard is designed for desktop PC systems, offering robust performance and extensive connectivity. It features a multiphase power chipset for stable CPU performance and supports 2nd/3rd generation LGA1155 Pin Series Processors. This Mini ITX motherboard provides a high-definition visual experience through its VGA and HD Multimedia Interface outputs.
ප්රධාන ලක්ෂණ ඇතුළත් වේ:
- LGA 1155 CPU ස්ලොට්: Designed for stable performance with compatible processors.
- Multiphase Power: Ensures stable and accurate power delivery to the CPU.
- HD Interfaces: Equipped with VGA and HD Multimedia Interface for digital HD video output.
- Channel DDR3: Features a DDR3 memory slot to enhance motherboard performance.
- පුළුල් සම්බන්ධතාවය: Includes 6 USB2.0 interfaces and 4 SATA2.0 interfaces for various peripherals and storage devices.
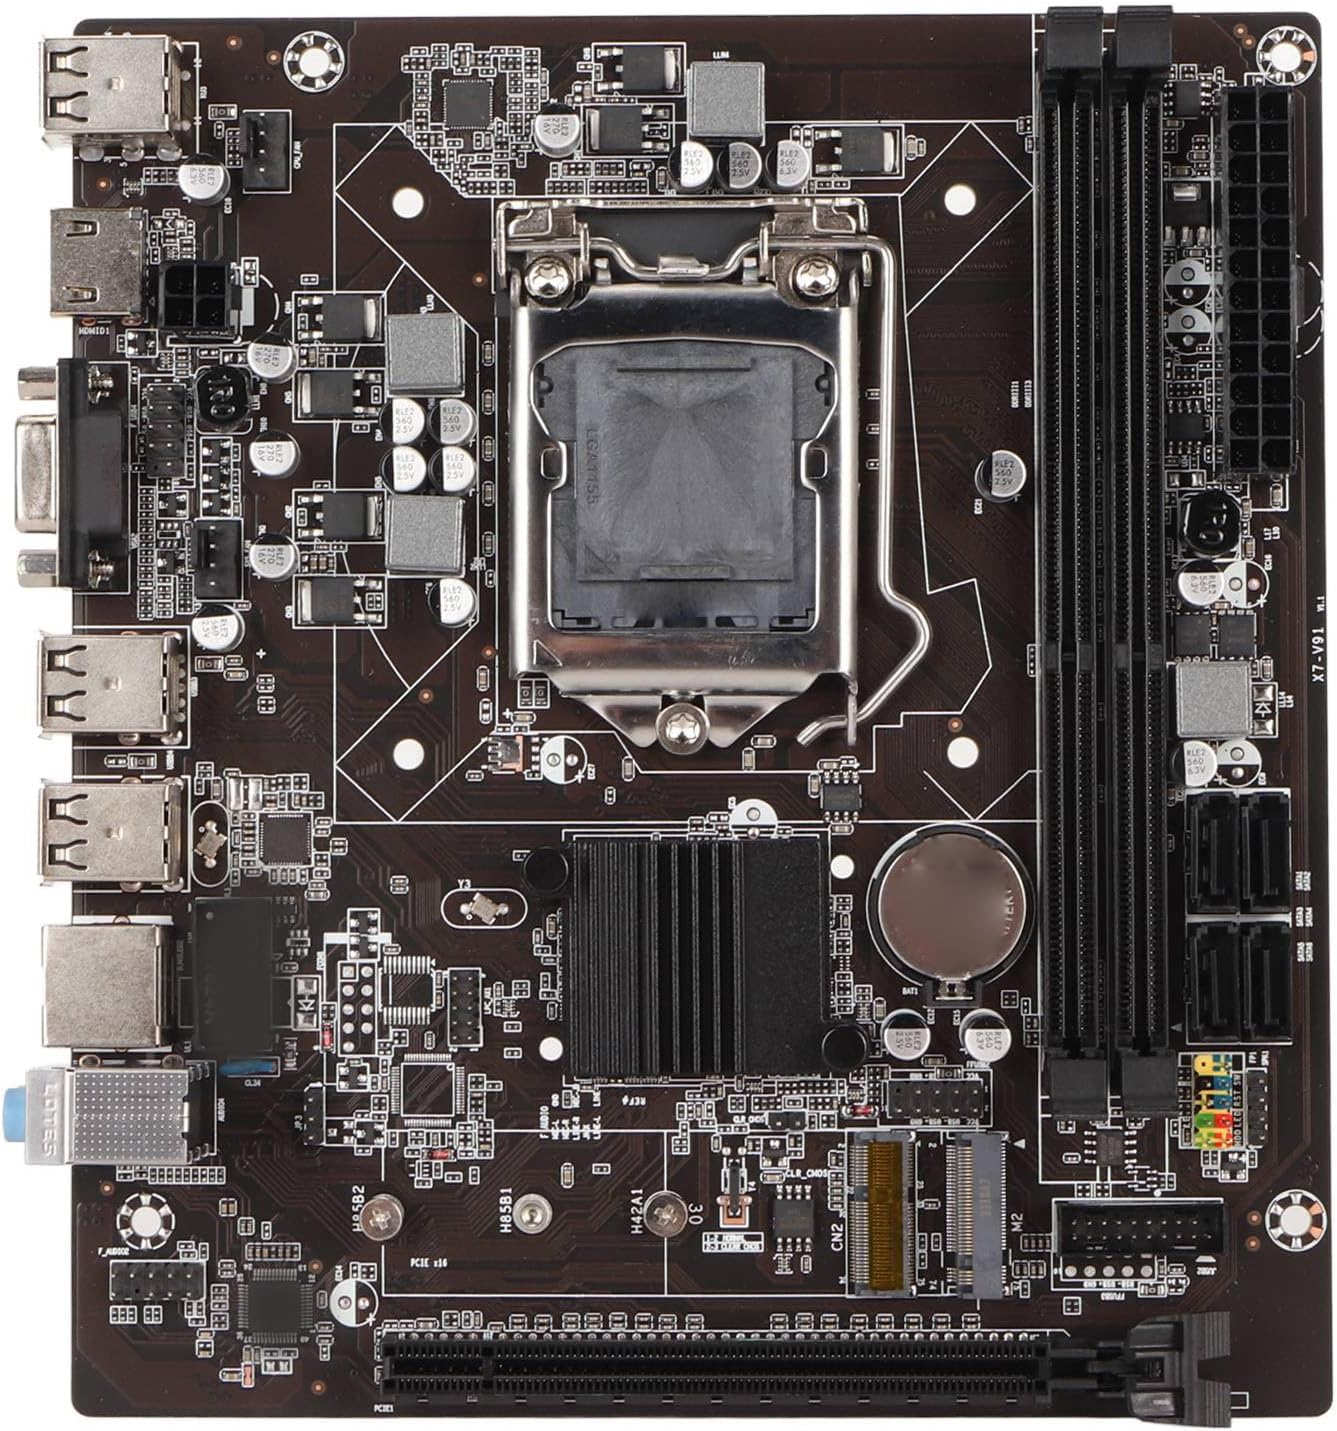
රූපය 1: ඉහළ-පහළ view of the EBTOOLS LGA 1155 Motherboard, showing the CPU socket, RAM slots, and various ports.
සැකසුම සහ ස්ථාපනය
This section provides instructions for installing your EBTOOLS LGA 1155 Motherboard into a compatible PC case and connecting essential components.
පැකේජයේ අන්තර්ගතය
Before beginning installation, ensure all components listed below are present in your package:
- 1 x LGA 1155 Motherboard
- 1 x Metal I/O Plate
- 1 x Connecting Wire (likely SATA data cable)

Figure 2: The motherboard alongside its included metal I/O plate and a connecting wire, typically a SATA data cable.
ස්ථාපන පියවර
- නඩුව සකස් කරන්න: Ensure your PC case is compatible with Mini ITX motherboards. Install the metal I/O plate into the designated slot at the rear of the case.
- CPU ස්ථාපනය කරන්න: Carefully open the CPU socket retention arm. Align the triangular marker on your LGA 1155 processor with the corresponding marker on the motherboard's socket. Gently place the CPU into the socket, ensuring it sits flush. Close the retention arm to secure the CPU.
- CPU සිසිලකය ස්ථාපනය කරන්න: Apply thermal paste to the CPU (if not pre-applied on the cooler). Mount your compatible LGA 1155 CPU cooler according to its manufacturer's instructions.
- RAM ස්ථාපනය කරන්න: Open the clips on the DDR3 memory slots. Align the notch on your DDR3 RAM module with the key in the slot. Press firmly on both ends of the RAM module until the clips snap into place. This motherboard supports 2 x DDR3 slots.
- මවු පුවරුව සවි කරන්න: Carefully place the motherboard into the PC case, aligning the screw holes on the motherboard with the standoffs in the case. Secure the motherboard with screws.
- සම්බන්ධක බලය: Connect the 24-pin ATX power connector from your power supply to the motherboard. Connect the 4-pin or 8-pin CPU power connector (if applicable) to the motherboard.
- ගබඩා උපාංග සම්බන්ධ කරන්න: Use the provided connecting wire (SATA cable) to connect your SATA storage devices (HDD/SSD) to the SATA2.0 ports on the motherboard. This motherboard has 4 SATA2.0 interfaces.
- ඉදිරිපස පැනල් කේබල් සම්බන්ධ කරන්න: Connect the power button, reset button, USB ports, and audio jacks from your PC case's front panel to the corresponding headers on the motherboard. Refer to your case manual for specific pin layouts.
- පුළුල් කිරීමේ කාඩ්පත් ස්ථාපනය කරන්න: If using a dedicated graphics card or other expansion cards, insert them into the PCIE X16 slot or other extended interfaces (1 x , 1 x M.2) as needed.
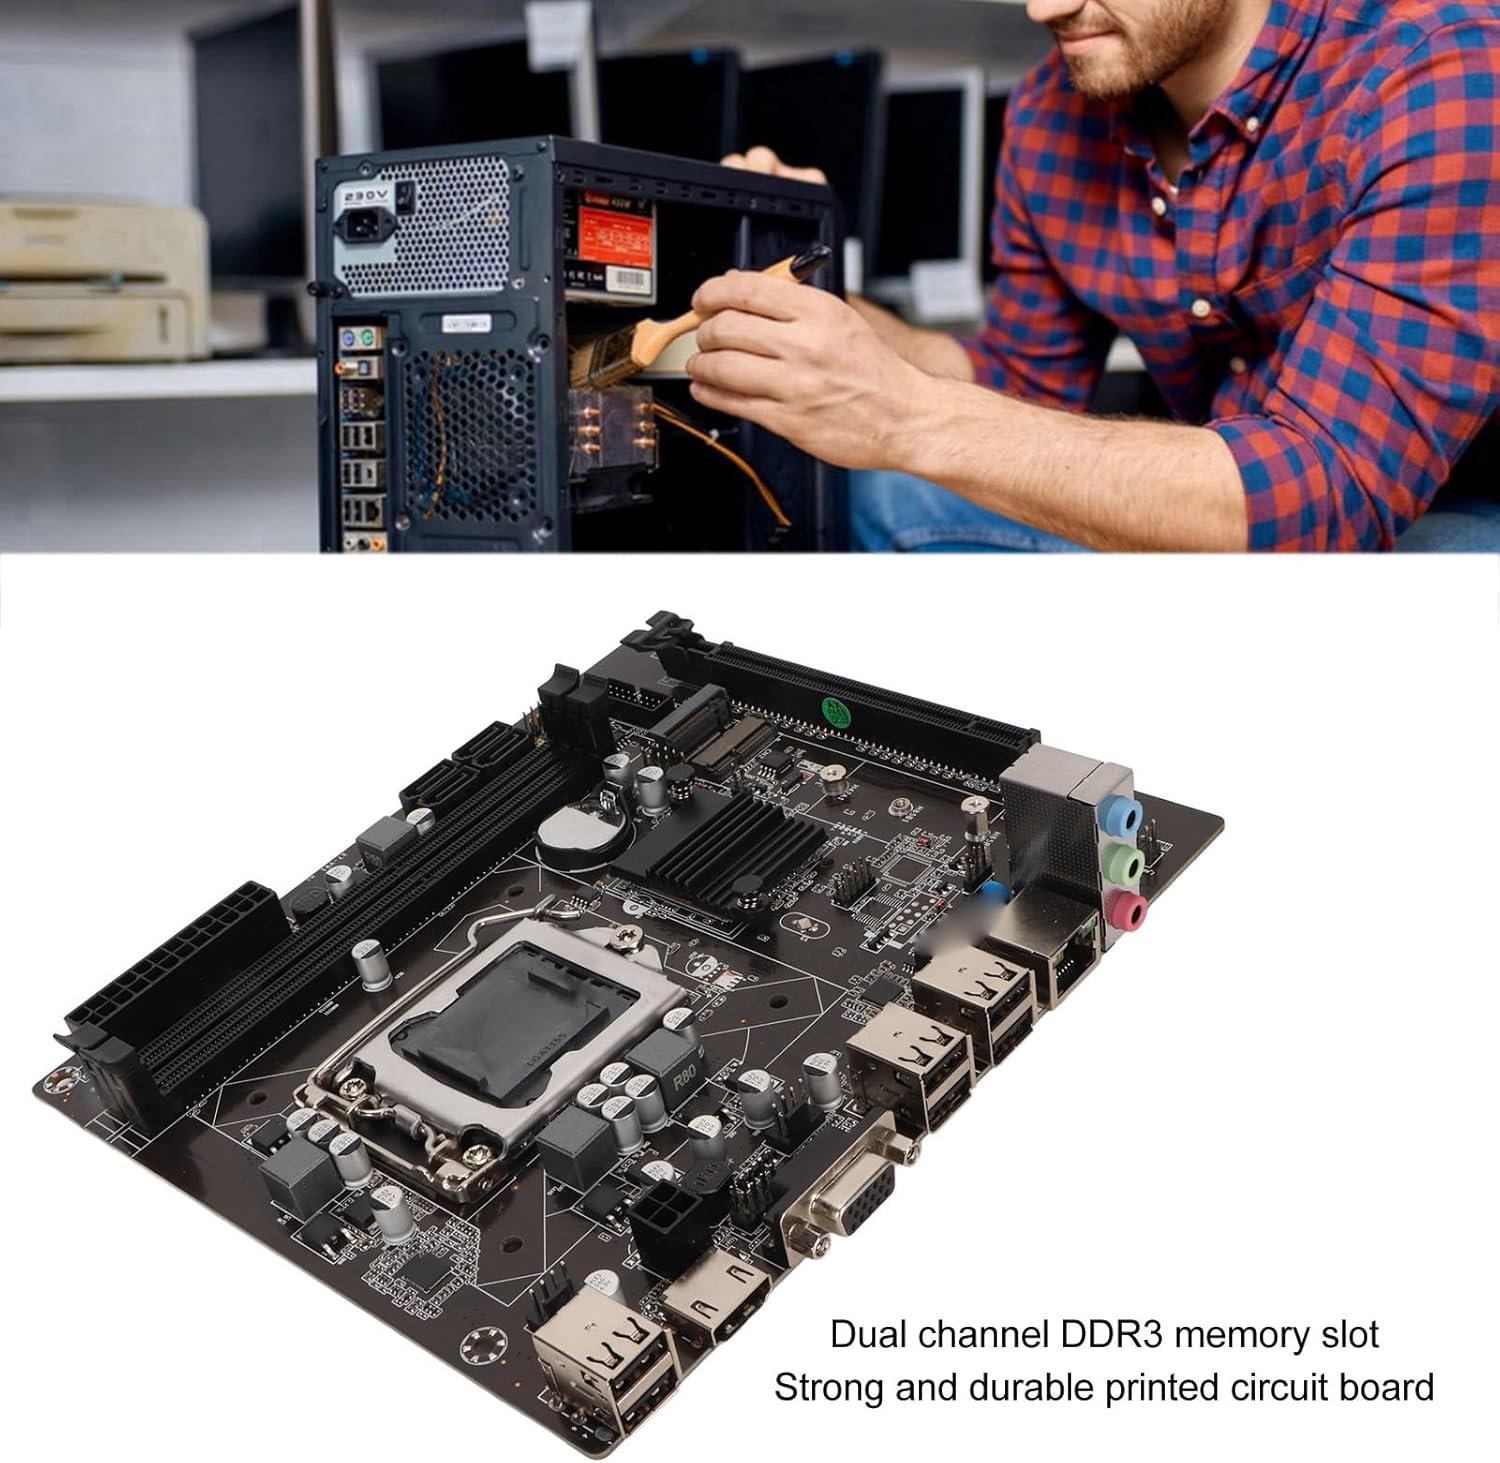
Figure 3: A user performing an installation within a PC case, demonstrating the typical environment for motherboard setup.

රූපය 4: සවිස්තරාත්මක view of the LGA 1155 CPU socket and adjacent DDR3 memory slots, crucial areas for component installation.
මෙහෙයුම් මාර්ගෝපදේශ
Once the motherboard and other components are installed, the system is ready for operation. This motherboard supports various operating systems compatible with 2nd/3rd Gen LGA1155 processors.
BIOS/UEFI වින්යාසය
Upon first boot, you may need to enter the BIOS/UEFI setup to configure boot order, system time, and other settings. Typically, you can access the BIOS by pressing DEL or F2 during the initial boot screen.
ධාවක ස්ථාපනය
After installing your operating system, it is essential to install the necessary drivers for the motherboard's components, including chipset, network card, and integrated graphics (if used). These drivers are usually provided on a CD/DVD with the motherboard or can be downloaded from the manufacturer's webඅඩවිය.
සම්බන්ධතාවය
Utilize the available ports for your peripherals:
- USB 2.0 Ports: For connecting keyboards, mice, external drives, and other USB devices.
- VGA/HD Multimedia Interface: For connecting displays.
- ඊතර්නෙට් වරාය: For wired network connectivity (100M Netword Card).
- ශ්රව්ය ජැක්: For speakers, headphones, and microphones.
නඩත්තු කිරීම
Proper maintenance can extend the lifespan of your motherboard and ensure stable system performance.
- එය පිරිසිදුව තබා ගන්න: Regularly clean dust from inside your PC case, especially from the motherboard and CPU cooler fins, using compressed air. Dust accumulation can lead to overheating.
- නිසි වායු ප්රවාහය සහතික කරන්න: Make sure your PC case has adequate ventilation and that fans are functioning correctly to prevent heat buildup.
- BIOS යාවත්කාලීන කිරීම්: නිෂ්පාදකයාගේ webBIOS/UEFI යාවත්කාලීන කිරීම් සඳහා අඩවිය. යාවත්කාලීන කිරීම් මඟින් අනුකූලතාව, ස්ථාවරත්වය සහ කාර්ය සාධනය වැඩි දියුණු කළ හැකිය. යාවත්කාලීන උපදෙස් ප්රවේශමෙන් අනුගමනය කරන්න.
- ධාවක යාවත්කාලීන: Keep your system drivers updated to ensure optimal performance and compatibility with new software and hardware.
- CMOS බැටරි: CMOS සැකසුම් සඳහා මවු පුවරුව CR2032 බැටරියක් භාවිතා කරයි. ඔබේ පද්ධතිය නිරන්තරයෙන් කාලය නැති කර ගන්නේ නම් හෝ BIOS සැකසුම් නැති වුවහොත්, බැටරිය ප්රතිස්ථාපනය කිරීමට අවශ්ය විය හැකිය.
දෝෂගවේෂණය
This section addresses common issues you might encounter with your motherboard.
- බලය නැත/බූට් නැත:
- සියලුම බල සම්බන්ධතා පරීක්ෂා කරන්න (24-pin ATX, CPU බලය).
- බල සැපයුම ක්රියාකාරී බවත් ක්රියාත්මක කර ඇති බවත් සහතික කර ගන්න.
- Verify front panel power button connection to the motherboard.
- සංදර්ශකය නැත:
- Ensure the monitor is connected to the correct video output (VGA or HD Multimedia Interface).
- Reseat RAM modules. Try booting with one RAM stick if you have multiple.
- Reseat the CPU and check for bent pins (handle with extreme care).
- If using a dedicated graphics card, ensure it is properly seated and has power.
- පද්ධති අස්ථාවරත්වය/බිඳවැටීම්:
- CPU සහ GPU උෂ්ණත්වයන් පරීක්ෂා කරන්න. ප්රමාණවත් සිසිලනය සහතික කර ගන්න.
- දෝෂ සහිත RAM පරීක්ෂා කිරීමට මතක රෝග විනිශ්චය මෙවලම් ක්රියාත්මක කරන්න.
- සියලුම ධාවක නිවැරදිව ස්ථාපනය කර යාවත්කාලීනව ඇති බවට සහතික වන්න.
- Check for loose connections or components.
- හඳුනා නොගත් USB උපාංග:
- Ensure USB drivers are installed.
- විවිධ USB පෝට් උත්සාහ කරන්න.
- Check BIOS settings for USB controller enablement.
පිරිවිතර
Detailed technical specifications for the EBTOOLS LGA 1155 Motherboard:
| විශේෂාංගය | පිරිවිතර |
|---|---|
| අයිතමයේ වර්ගය | LGA 1155 මවු පුවරුව |
| ද්රව්ය | Printed Circuit Board, Metal |
| බිල්ට් බැටරිය | CR2032 x 1 (240mAh) |
| CPU සහාය | 2nd/3rd Gen LGA1155 Pin Series Processors (for Celeron, for , for Core) |
| චිප්සෙට් | H61 Chipset Series |
| මතක තව් | 2 x DDR3 |
| උපරිම මතක ධාරිතාව | 16GB |
| USB අතුරුමුහුණත | 6 x USB2.0, USB Pin x 1 |
| SATA අතුරුමුහුණත | 4 x SATA2.0 |
| ජාල කාඩ්පත | 100M Network Card |
| ග්රැෆික් කාඩ් පත | 1 x PCIE X16 |
| විස්තීරණ අතුරුමුහුණත | 1 x , 1 x M.2 |
| පැකේජ මානයන් | අඟල් 10.2 x 7.83 x 2.05 |
| අයිතමයේ බර | රාත්තල් 1.16 කි |
| ආදර්ශ අංකය | EBTOOLSpxvk7fmb38 |
| ASIN | B0CKVL89BD |

Figure 5: An angled perspective of the motherboard, showcasing its compact Mini ITX form factor and port layout.
වගකීම් සහ සහාය
For warranty information and technical support, please refer to the official EBTOOLS webවෙබ් අඩවියට පිවිසෙන්න හෝ ඔවුන්ගේ පාරිභෝගික සේවය අමතන්න. මිලදී ගැනීමේ සාක්ෂියක් ලෙස ඔබේ මිලදී ගැනීමේ රිසිට්පත තබා ගන්න.
While specific warranty details are not provided in this manual, general product warranties typically cover manufacturing defects for a limited period from the date of purchase.
අමතර ආරක්ෂාවක් සඳහා, පවතින ආරක්ෂණ සැලසුම් සලකා බලන්න:
- අවුරුදු 3ක ආරක්ෂණ සැලැස්ම
- අවුරුදු 4ක ආරක්ෂණ සැලැස්ම
- සම්පූර්ණ ආරක්ෂාව (මාසික සැලැස්ම)
These plans are offered separately and provide extended coverage beyond the standard manufacturer's warranty.
නිෂ්පාදකයා: EBTOOLS
පළමු ලබා ගත හැකි දිනය: 11 ඔක්තෝබර් 2023
නිල නිෂ්පාදන වීඩියෝ
මෙම නිෂ්පාදනය සඳහා විකුණුම්කරුගෙන් නිල නිෂ්පාදන වීඩියෝ කිසිවක් මේ වන විට නොමැත.