1. හැඳින්වීම
Thank you for choosing the Pulido F199B Smart Fingerprint Door Knob Lock. This device provides enhanced security and convenience with multiple unlocking methods. This manual will guide you through the installation, operation, and maintenance of your new smart lock.
The Pulido F199B offers four distinct unlocking modes: fingerprint, access code, IC card, and traditional physical key. It is designed for local data storage, ensuring your information remains secure without cloud dependency.
2 ආරක්ෂිත තොරතුරු
- ස්ථාපනය කිරීමට සහ භාවිතා කිරීමට පෙර සියලු උපදෙස් හොඳින් කියවන්න.
- අගුල ඔබම විසුරුවා හැරීමට හෝ අලුත්වැඩියා කිරීමට උත්සාහ නොකරන්න. සහාය සඳහා පාරිභෝගික සහාය අමතන්න.
- Use only specified battery types. Incorrect battery usage may lead to damage or malfunction.
- Keep physical keys in a secure location outside the property to prevent lockout in case of electronic failure.
- Avoid exposing the lock to extreme temperatures or direct moisture.
3. නිෂ්පාදන අවසන්view
The Pulido F199B is a versatile smart door knob designed for various applications, including homes, studios, and offices. It features a sleek design and robust construction.

Image: The Pulido F199B Smart Fingerprint Door Knob Lock, showcasing its modern design, integrated keypad, fingerprint sensor, and accompanying IC cards and physical keys.
ප්රධාන ලක්ෂණ:
- 4-in-1 Unlocking Modes: Fingerprint, Access Code, IC Card, and Physical Key.
- දේශීය දත්ත ගබඩාව: Stores up to 100 access codes and 100 fingerprints securely on the device.
- Enhanced Fingerprint Sensor: Larger, high-precision sensor with 99% recognition rate and 0.5-second unlock speed.
- Universal Installation: Compatible with both left-handed and right-handed doors without modification.
- හදිසි බලය: Micro USB interface for temporary power supply if batteries deplete.
- ගමන් ප්රකාරය: Allows temporary unrestricted access.

Image: A detailed diagram highlighting the key components of the Pulido F199B Smart Lock, including the mechanical keyhole, IC card reader, fingerprint sensor, Micro USB interface, passage mode setting button, and reset button.
4. පිහිටුවීම සහ ස්ථාපනය
The Pulido F199B is designed for straightforward installation, typically requiring no modification to existing door holes. Ensure you have the necessary tools (screwdriver, measuring tape) before beginning.
ස්ථාපන පියවර:
- දොර සකස් කරන්න: Ensure your door has standard boreholes for a door knob.
- අගුල ස්ථාපනය කරන්න: Insert the latch mechanism into the door edge and secure it with screws.
- බාහිර එකලස් කිරීම ස්ථාපනය කරන්න: Place the exterior handle assembly through the door, ensuring the spindle aligns with the latch.
- අභ්යන්තර එකලස් කිරීම ස්ථාපනය කරන්න: Connect the interior handle assembly to the exterior assembly, ensuring all wires are properly routed and not pinched. Secure with mounting screws.
- බැටරි ඇතුළු කරන්න: Open the battery cover on the interior assembly and insert the required batteries (typically 4 AAA batteries, not included).
- පරීක්ෂණ මෙහෙයුම: After installation, test the mechanical operation of the handle and the electronic functions.

Image: A visual comparison illustrating how the Pulido F199B Smart Lock replaces a general mechanical lock, highlighting its modern design and ease of upgrade.
5. මෙහෙයුම් උපදෙස්
The Pulido F199B offers multiple ways to secure and access your space.
Unlocking Modes:
- ඇඟිලි සලකුණු අගුලු හැරීම: ඔබගේ ලියාපදිංචි ඇඟිල්ල ඇඟිලි සලකුණු සංවේදකය මත තබන්න. ඇඟිලි සලකුණ හඳුනාගත් විට අගුල අගුළු හරිනු ඇත.
- Access Code Unlock: Enter your registered access code on the keypad, followed by the '#' key.
- IC කාඩ් අගුළු ඇරීම: Present a registered IC card to the designated sensor area on the lock.
- Physical Key Unlock: In case of electronic failure or dead batteries, use the provided physical key to unlock the door.
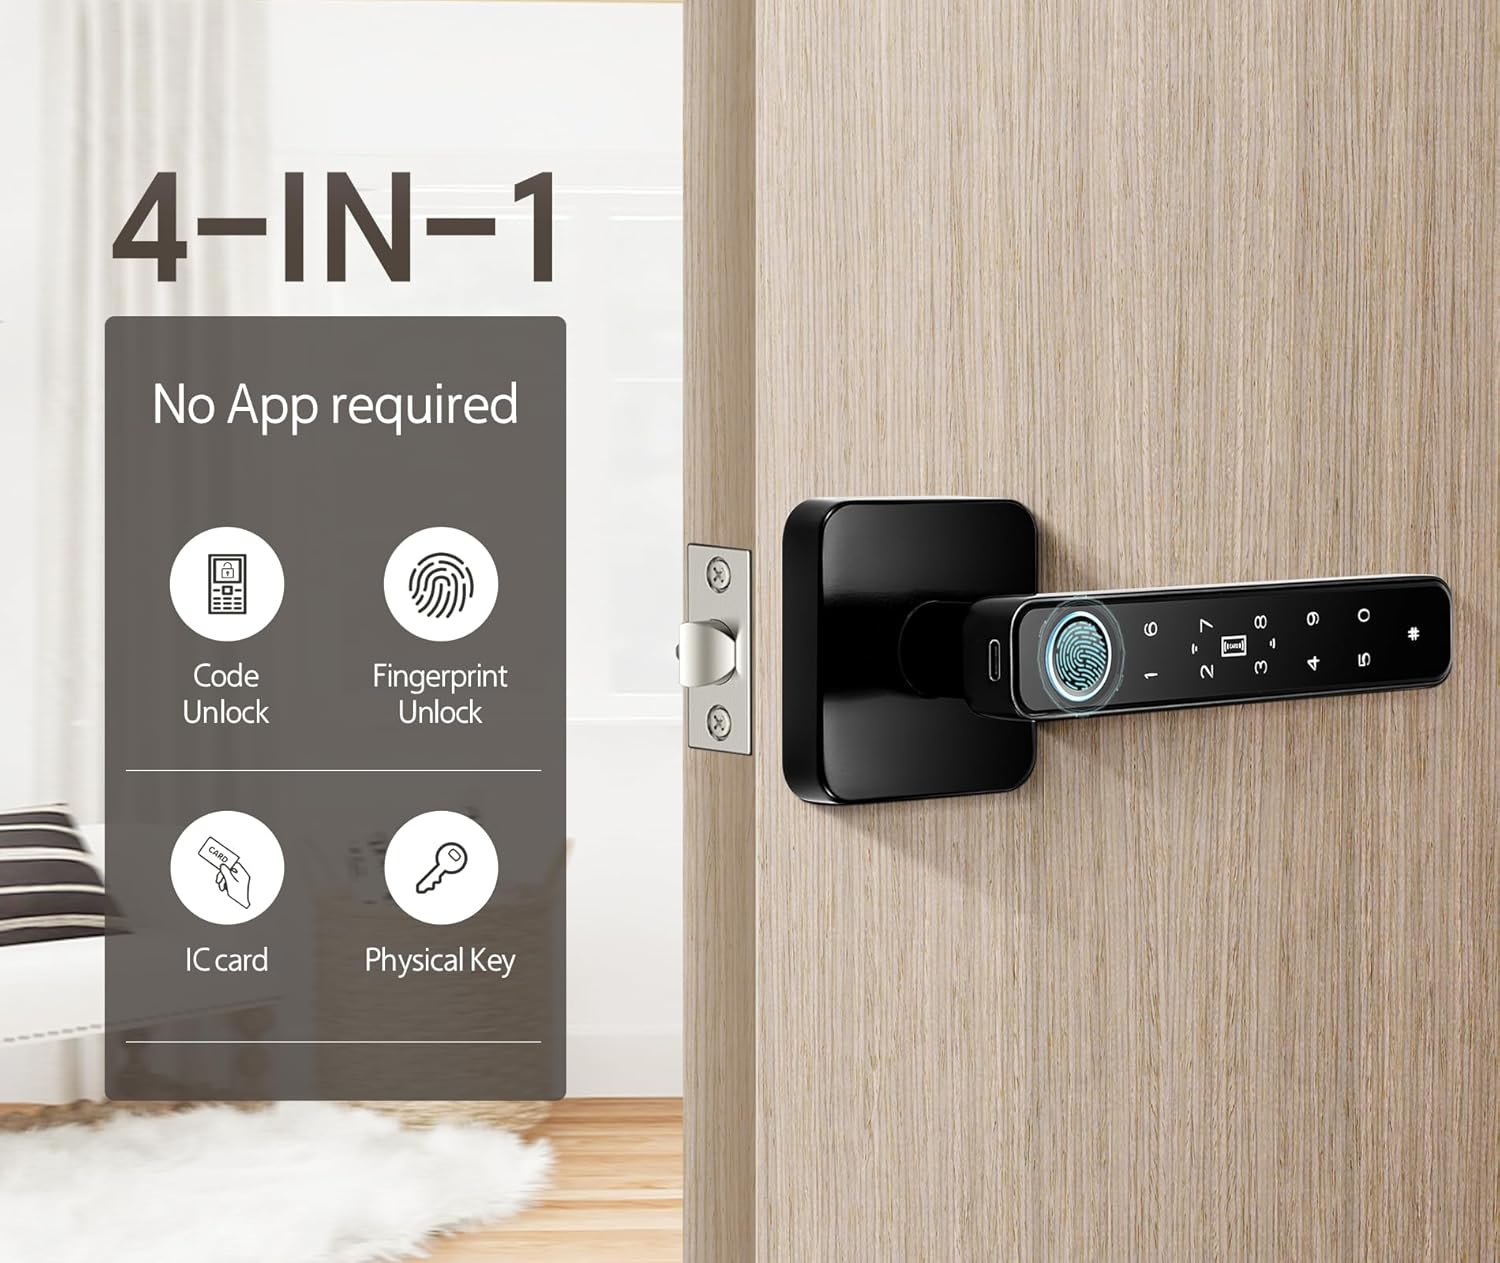
Image: The Pulido F199B Smart Lock illustrating its four unlocking methods: Code Unlock, Fingerprint Unlock, IC Card, and Physical Key.
Programming Fingerprints and Codes:
Refer to the detailed programming instructions included in the packaging for adding and deleting user fingerprints and access codes. This process is typically initiated by pressing a programming button on the interior side of the lock.
ගමන් ප්රකාරය:
To enable Passage Mode, press and hold the Passage Mode setting button (usually located on the interior handle) for 1 second. This allows the door to be opened without requiring a fingerprint or code. Press again for 1 second to disable Passage Mode.

Image: The Pulido F199B Smart Lock demonstrating Passage Mode, where the lock remains unlocked for convenient access.
හදිසි අගුලු හැරීම:
If the batteries are completely depleted, the lock can be temporarily powered via the Micro USB interface located on the exterior handle. Connect a power bank or USB charger to provide temporary power for unlocking. Alternatively, use the physical backup key.

Image: The Pulido F199B Smart Lock showing emergency unlock options, including USB charging capability and the physical backup keyhole.
වීඩියෝ නිරූපණය:
Video: A brief demonstration of the Pulido F199B Smart Door Lock in use, showcasing the fingerprint unlocking function.
6. නඩත්තු කිරීම
- බැටරි ආදේශනය: Replace batteries when the low battery indicator appears or when the lock's response time slows. Use 4 AAA batteries.
- පිරිසිදු කිරීම: Wipe the lock's surface with a soft, dry cloth. Avoid abrasive cleaners or solvents that could damage the finish or electronic components.
- ඇඟිලි සලකුණු සංවේදක සත්කාරය: ප්රශස්ත ක්රියාකාරිත්වය සඳහා ඇඟිලි සලකුණු සංවේදකය පිරිසිදුව හා වියලිව තබා ගන්න.
7. දෝශ නිරාකරණය
- අගුල ප්රතිචාර නොදක්වයි: Check battery levels. If batteries are dead, use the Micro USB emergency power or physical key.
- ඇඟිලි සලකුණ හඳුනා නොගත්: Ensure your finger is clean and dry. Try re-registering your fingerprint. Remove any protective plastic film from the sensor.
- ප්රවේශ කේතය ක්රියා නොකරයි: Verify the code is entered correctly, followed by the '#' key. Ensure the code is still active.
- IC card not working: Ensure the card is properly registered and presented to the correct sensor area.
- Lock beeps continuously: This may indicate low battery. Replace batteries immediately.
වැඩිදුර සහාය සඳහා, කරුණාකර සහාය අංශයේ සම්බන්ධතා තොරතුරු වෙත යොමු වන්න.
8. පිරිවිතර
| වෙළඳ නාමය | පුලිඩෝ |
| ආදර්ශ අංකය | F199B |
| අගුළු හැරීමේ ක්රම | Fingerprint, Access Code, IC Card, Physical Key |
| Fingerprint Recognition Rate | 99% |
| අගුළු හැරීමේ වේගය | තත්පර 0.5 යි |
| පරිශීලක ධාරිතාව | Up to 100 Fingerprints, 100 Access Codes |
| බල සැපයුම | 4 x AAA බැටරි (ඇතුළත් කර නැත) |
| හදිසි බලය | මයික්රෝ USB |
| ද්රව්ය | මල නොකන වානේ |
| නිෂ්පාදන මානයන් | 5.7"ලීටර් x 2.7"වොට් |
| අයිතමයේ බර | රාත්තල් 1.64 (කිලෝග්රෑම් 0.75) |
9. වගකීම් සහ සහාය
Pulido products are manufactured with quality and reliability in mind. For specific warranty details, please refer to the warranty card included with your product.
If you encounter any issues during use or installation, please contact our customer support team. We aim to reply within 8-12 hours.
පාරිභෝගික සහාය: Please refer to the contact information provided in your product packaging or visit the official Pulido webසහාය විකල්ප සඳහා අඩවිය.


