1. හැඳින්වීම
This manual provides comprehensive instructions for the safe and effective operation of the ZOYI ZT303 Digital Multimeter. The ZT303 is a high-precision, auto-ranging measurement tool designed for professionals and enthusiasts, capable of measuring voltage, current, resistance, capacitance, frequency, and duty cycle. Please read this manual thoroughly before use to ensure proper operation and to prevent potential hazards.
2 ආරක්ෂිත තොරතුරු
මීටරයේ ආරක්ෂිත ක්රියාකාරිත්වය සහ සේවය සහතික කිරීම සඳහා, මෙම උපදෙස් අනුගමනය කරන්න. මෙම අනතුරු ඇඟවීම් පිළිපැදීමට අපොහොසත් වීමෙන් දරුණු තුවාල හෝ මරණය සිදුවිය හැකිය.
- මිනුම් සිදු කිරීමට පෙර මීටරය නිවැරදි ක්රියාකාරිත්වයේ සහ පරාසයේ ඇති බව සැමවිටම සහතික කර ගන්න.
- මීටරය හානි වී ඇති බව පෙනේ නම් හෝ පරීක්ෂණ ලූඩ් වලට හානි සිදුවී ඇත්නම් එය භාවිතා නොකරන්න.
- ශ්රේණිගත කළ පරිමාවට වඩා වැඩි ගණනක් යොදන්න එපාtage, මීටරයේ සලකුණු කර ඇති පරිදි, පර්යන්ත අතර හෝ ඕනෑම පර්යන්තයක් සහ පෘථිවි බිම් අතර.
- වෙළුම සමඟ වැඩ කිරීමේදී අතිශයින්ම පරෙස්සම් වන්නtages 30V AC RMS, 42V උපරිම, හෝ 60V DC ට වැඩි. මෙම වෙළුම්tagකම්පන උවදුරක් ඇති කරයි.
- කාර්යයන් වෙනස් කිරීමට පෙර පරිපථයෙන් පරීක්ෂණ ඊයම් විසන්ධි කරන්න.
- Remove the test leads from the meter before opening the battery cover.
- Do not operate the meter with the battery cover removed.
- දේශීය සහ ජාතික ආරක්ෂක කේතයන් පිළිපදින්න.
3. නිෂ්පාදන අවසන්view
The ZOYI ZT303 Digital Multimeter features a clear display, a rotary switch for function selection, and various input jacks for test leads.

රූපය 3.1: ඉදිරිපස view of the ZOYI ZT303 Digital Multimeter, showing the display, rotary switch, and input terminals.
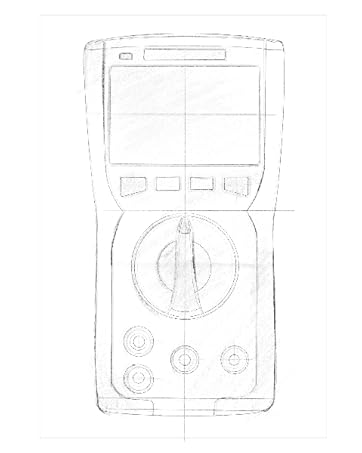
Figure 3.2: Technical drawing illustrating the internal layout or design elements of the ZOYI ZT303 Digital Multimeter.
3.1. සංරචක
- LCD සංදර්ශකය: මිනුම් කියවීම්, ඒකක සහ ක්රියාකාරී දර්ශක පෙන්වයි.
- ක්රියාකාරී බොත්තම්: For selecting specific modes (e.g., RANGE, REL, MAX/MIN, Hz, SELECT, HOLD).
- රොටරි ස්විචය: Used to select the desired measurement function (e.g., V~, V-, A~, A-, Ω, NCV).
- ආදාන ජැක්:
- COM ජැක්: Common terminal for all measurements. Connect the black test lead here.
- VHzΩCAP Diode Jack: වෙළුම සඳහා ආදානයtage, frequency, resistance, capacitance, and diode/continuity tests. Connect the red test lead here for these functions.
- mAµA Jack: මිලි සඳහා ආදානයampඊරේ සහ ක්ෂුද්රampere current measurements. Connect the red test lead here for these functions.
- 10A Jack: 10 සඳහා ආදානය Ampere current measurements. Connect the red test lead here for high current measurements.
4. පිහිටුවීම
4.1. බැටරි ස්ථාපනය
- Ensure the multimeter is powered off and disconnect all test leads.
- ඒකකයේ පිටුපස බැටරි මැදිරි කවරය සොයා ගන්න.
- රැඳවුම් ඉස්කුරුප්පු ඇණ (ය) ගලවා කවරය ඉවත් කරන්න.
- Insert new batteries (e.g., 2 x AAA or 9V, refer to the battery compartment for specific type) observing the correct polarity.
- බැටරි කවරය ප්රතිස්ථාපනය කර එය ඉස්කුරුප්පු ඇණ (ය) සමඟ සුරක්ෂිත කරන්න.
4.2. පරීක්ෂණ මඟ පෙන්වීම් සම්බන්ධ කිරීම
සෑම විටම කළු පරීක්ෂණ ඊයම් COM ජැක් එකට සම්බන්ධ කරන්න. මිනුම් ශ්රිතය මත පදනම්ව රතු පරීක්ෂණ ඊයම් සුදුසු ආදාන ජැක් එකට සම්බන්ධ කරන්න:
- වෙළුම සඳහාtage, Resistance, Capacitance, Frequency, Diode, and Continuity: Connect the red lead to the VHzΩCAP Diode කොස්
- For mA/µA Current: Connect the red lead to the mAµA කොස්
- For 10A Current: Connect the red lead to the 10A කොස්
5. මෙහෙයුම් උපදෙස්
5.1. බලය සක්රිය / අක්රිය කරන්න
Turn the rotary switch from the "OFF" position to any desired measurement function to power on the meter. To power off, turn the rotary switch back to the "OFF" position.
5.2. ස්වයංක්රීය පරාසය
The ZT303 features auto-ranging, which automatically selects the appropriate measurement range. For manual range selection, press the RANGE බොත්තම.
5.3 DC/AC වෙළුමtagඊ මැනීම (V)
- භ්රමක ස්විචය වෙත සකසන්න V~ (AC වෙළුමtage) හෝ V- (DC Voltage) තනතුර.
- Connect the black test lead to the COM jack and the red test lead to the VHzΩCAP Diode jack.
- Connect the test probes across the circuit or component to be measured.
- වෙළුම කියවන්නtagLCD සංදර්ශකය මත e අගය.
5.4. DC/AC Current Measurement (A, mA, µA)
අවවාදයයි: Never connect the meter in parallel to a voltagධාරාව මැනීමේදී e ප්රභවය. මෙය මීටරයට සහ පරිපථයට හානි කළ හැකිය.
- භ්රමණ ස්විචය සුදුසු ධාරා පරාසයකට සකසන්න (A~, A-, mAµA~, mAµA-).
- Connect the black test lead to the COM jack. Connect the red test lead to the mAµA jack for low current or the 10A jack for high current.
- ධාරාව මැනිය යුතු පරිපථය විවෘත කර මීටරය භාරය සමඟ ශ්රේණිගතව සම්බන්ධ කරන්න.
- LCD සංදර්ශකයේ වත්මන් අගය කියවන්න.
5.5. ප්රතිරෝධක මිනුම (Ω)
අවවාදයයි: ප්රතිරෝධය මැනීමට පෙර පරිපථය ක්රියා විරහිත කර ඇති බවත් සියලුම ධාරිත්රක විසර්ජනය කර ඇති බවත් සහතික කර ගන්න.
- භ්රමක ස්විචය වෙත සකසන්න Ω (Ω) තනතුර.
- Connect the black test lead to the COM jack and the red test lead to the VHzΩCAP Diode jack.
- Connect the test probes across the component to be measured.
- LCD සංදර්ශකයේ ප්රතිරෝධක අගය කියවන්න.
5.6. Capacitance Measurement (F)
අවවාදයයි: මීටරයට හානි වීම වැළැක්වීම සඳහා මැනීමට පෙර ධාරිත්රකය සම්පූර්ණයෙන්ම විසර්ජනය වී ඇති බවට වග බලා ගන්න.
- භ්රමක ස්විචය වෙත සකසන්න CAP position (often shared with Ω or Diode, use SELECT button if needed).
- Connect the black test lead to the COM jack and the red test lead to the VHzΩCAP Diode jack.
- ධාරිත්රක පර්යන්ත හරහා පරීක්ෂණ පරීක්ෂණ සම්බන්ධ කරන්න.
- LCD සංදර්ශකයේ ධාරණ අගය කියවන්න.
5.7. Frequency/Duty Cycle Measurement (Hz/%)
- භ්රමක ස්විචය වෙත සකසන්න Hz /% position (often shared with voltage or other functions, use SELECT button if needed).
- Connect the black test lead to the COM jack and the red test lead to the VHzΩCAP Diode jack.
- සංඥා මූලාශ්රය හරහා පරීක්ෂණ පරීක්ෂණ සම්බන්ධ කරන්න.
- Read the frequency or duty cycle value on the LCD display.
5.8. Diode Test and Continuity Test
- භ්රමක ස්විචය වෙත සකසන්න ඩයෝඩය/අඛණ්ඩතාවය තනතුර. භාවිතා කරන්න තෝරන්න button to toggle between diode test and continuity test.
- Connect the black test lead to the COM jack and the red test lead to the VHzΩCAP Diode jack.
- ඩයෝඩ පරීක්ෂණය: Connect the red probe to the anode and the black probe to the cathode of the diode. A forward voltage drop will be displayed. Reverse the probes; an "OL" (Overload) reading indicates a good diode.
- අඛණ්ඩ පරීක්ෂණය: Connect the probes across the circuit or component. A continuous beep and a low resistance reading indicate continuity.
5.9. සම්බන්ධතා නොවන වෙළුමtage (NCV) හඳුනාගැනීම
- භ්රමක ස්විචය වෙත සකසන්න NCV තනතුර.
- Move the top part of the meter close to the conductor or outlet.
- The meter will emit an audible beep and/or flash an LED indicator when AC voltage අනාවරණය වේ.
5.10. දත්ත රඳවා ගැනීමේ කාර්යය
ඔබන්න අල්ලා ගන්න button to freeze the current reading on the display. Press it again to release the hold function.
5.11. MAX/MIN Function
ඔබන්න උපරිම/මිනි button to enter MAX/MIN recording mode. The meter will display the maximum or minimum reading detected since the mode was activated. Press again to cycle between MAX, MIN, and current reading. Hold to exit.
5.12. Relative Measurement (REL)
ඔබන්න REL button to store the current reading as a reference value. Subsequent measurements will be displayed as the difference from this reference value. Press again to exit relative mode.
6. නඩත්තු කිරීම
6.1 පිරිසිදු කිරීම
දැන්වීම සමඟ නඩුව පිස දමන්නamp රෙදි සහ මෘදු ඩිටර්ජන්ට්. උල්ෙල්ඛ හෝ ද්රාවක භාවිතා නොකරන්න. භාවිතයට පෙර මීටරය සම්පූර්ණයෙන්ම වියළී ඇති බවට වග බලා ගන්න.
6.2. බැටරි ප්රතිස්ථාපනය
When the low battery indicator appears on the display, replace the batteries as described in Section 4.1. Prompt replacement ensures accurate readings and proper operation.
6.3. ෆියුස් ප්රතිස්ථාපනය
If the current measurement function fails, the fuse may need replacement. Refer to the specific fuse ratings printed near the input jacks or inside the battery compartment. Fuse replacement typically involves opening the back case (after removing batteries) and carefully replacing the blown fuse with one of the identical type and rating. If unsure, consult a qualified technician.
7. දෝශ නිරාකරණය
| ගැටලුව | විය හැකි හේතුව | විසඳුම |
|---|---|---|
| සංදර්ශකයක් නැත හෝ අඳුරු සංදර්ශකයක් නැත | අඩු හෝ මිය ගිය බැටරි | Replace batteries (Section 4.1) |
| "OL" (අධික බර) දර්ශනය වේ | Measurement exceeds selected range or meter's maximum capacity | Select a higher range (if in manual range) or ensure measurement is within meter's limits. |
| වැරදි කියවීම් | Incorrect function selected, poor test lead connection, or damaged test leads | Verify function, check lead connections, inspect and replace damaged leads. |
| ධාරා මිනුම ක්රියා නොකරයි | පිපිරුණු ෆියුස් | Replace fuse (Section 6.3) |
8. පිරිවිතර
| විශේෂාංගය | විස්තර |
|---|---|
| වෙළඳ නාමය | ZOYI |
| ආදර්ශ අංකය | ZT303 |
| නිෂ්පාදන මානයන් | අඟල් 4.53 x 1.97 x 7.68 |
| අයිතමයේ බර | අවුන්ස 14.11 (ග්රෑම් 399.98) |
| බලශක්ති ප්රභවය | බැටරි බලයෙන් |
| වර්ණය | නිල් |
| ප්රදර්ශනය කරන්න | Digital LCD, 19999 Counts (typical for ZT303 series) |
| පරාසයක | ස්වයංක්රීය/අත්පොත පරාසය |
| විශේෂ ලක්ෂණ | True RMS, NCV, Data Hold, Backlight, MAX/MIN, REL |
Note: Detailed electrical specifications (e.g., voltage/current ranges, accuracy) are typically printed on the device or included in a separate specification sheet.
9. වගකීම් සහ සහාය
Warranty information for the ZOYI ZT303 Digital Multimeter is typically provided at the point of purchase or within the product packaging. For specific warranty terms, technical support, or service inquiries, please refer to the official ZOYI webඅඩවියට හෝ ඔබේ බලයලත් අලෙවිකරු අමතන්න.
වැඩිදුර සහාය සඳහා, පිවිසෙන්න: ZOYI Official Flagship Store on Amazon


