1. නිෂ්පාදන අවසන්view
The 8Bitdo 18 Key Retro Mechanical Numpad is a versatile input device designed for both PC numpad functionality and standard calculator operations. It features a retro aesthetic, hot-swappable mechanical switches, and multiple connectivity options.

රූපය: ඉදිරිපස view of the 8Bitdo 18 Key Retro Mechanical Numpad, C64 Edition, showcasing එහි රෙට්රෝ නිර්මාණය සහ LED සංදර්ශකය.
2. පැකේජ අන්තර්ගතය
සැකසීමට පෙර, කරුණාකර සියලුම අයිතම පැකේජයේ ඇති බවට වග බලා ගන්න:
- 8Bitdo 18 Key Retro Mechanical Numpad
- 2.4G රැහැන් රහිත ඇඩැප්ටරය
- USB-C කේබලය
- උපදෙස් අත්පොත

Image: The 8Bitdo Numpad alongside its packaging and included accessories, such as the 2.4G adapter and USB-C cable.
3. සැකසුම සහ සම්බන්ධතාවය
3.1 අංක පෑඩ් එක ආරෝපණය කිරීම
The numpad is equipped with a rechargeable Lithium Polymer battery. A full charge takes approximately 4 hours and provides up to 160 hours of use.
- Connect the supplied USB-C cable to the numpad's USB-C port.
- කේබලයේ අනෙක් කෙළවර USB බල ප්රභවයකට සම්බන්ධ කරන්න (උදා: පරිගණක USB පෝට් එක, USB බිත්ති ඇඩැප්ටරය).
- LED දර්ශකය ආරෝපණ තත්ත්වය පෙන්වන අතර සම්පූර්ණයෙන්ම ආරෝපණය වූ විට නිවා දමයි.

රූපය: පැත්ත view of the numpad, highlighting the USB-C charging port and the magnetic compartment for the 2.4G adapter.
3.2 සම්බන්ධතා විකල්ප
The numpad supports three connection methods: Bluetooth, 2.4G Wireless, and Wired USB-C.
3.2.1 බ්ලූටූත් සම්බන්ධතාවය
- අංක පෑඩයේ මාදිලි ස්විචය 'BT' ලෙස සකසන්න.
- On your Windows or Android device, go to Bluetooth settings and enable Bluetooth.
- Press and hold the Bluetooth pairing button on the numpad (usually indicated by a Bluetooth icon) until the LED starts blinking rapidly.
- Select '8Bitdo Retro Numpad' from the list of available devices on your computer or phone.
- The LED will become solid when connected.
3.2.2 2.4G රැහැන් රහිත සම්බන්ධතාවය
- Locate the 2.4G wireless adapter stored in the magnetic compartment on the numpad's side.
- Set the mode switch on the numpad to '2.4G'.
- Plug the 2.4G wireless adapter into an available USB port on your PC.
- The numpad should automatically connect. The LED indicator will become solid.

Image: A hand demonstrating the insertion of the 2.4G wireless adapter into its magnetic storage compartment on the numpad.
3.2.3 රැහැන්ගත USB-C සම්බන්ධතාවය
- Set the mode switch on the numpad to 'OFF' or 'BT'/'2.4G' (wired connection will override wireless).
- Connect the USB-C cable from the numpad to a USB port on your PC.
- The numpad will be recognized as a standard USB input device.
3.3 ගැළපුම
The 8Bitdo Retro Mechanical Numpad is compatible with:
- Windows 10 (1803) and above
- Android 9.0 සහ ඉහළ
4. අංක පෑඩ් ක්රියාත්මක කිරීම
4.1 Switching Between Numpad and Calculator Modes
The device functions as both a PC numpad and a standalone calculator. Use the dedicated mode switch or button (often labeled 'CAL' or a similar icon) to toggle between these modes.

Image: A user operating the 8Bitdo Numpad in Standard Calculator Mode, demonstrating its use as a standalone calculator.
4.2 වින්ඩෝස් කැල්කියුලේටර යෙදුම් කෙටිමඟ
A dedicated shortcut button is available to instantly launch the Windows Calculator application on your PC. Refer to the numpad's control panel for the specific button.
4.3 ස්වාධීන පාලන පැනලය
The numpad features an independent control panel with a turn dial and buttons for effortless operations. These controls manage connectivity modes, power, and potentially other functions.
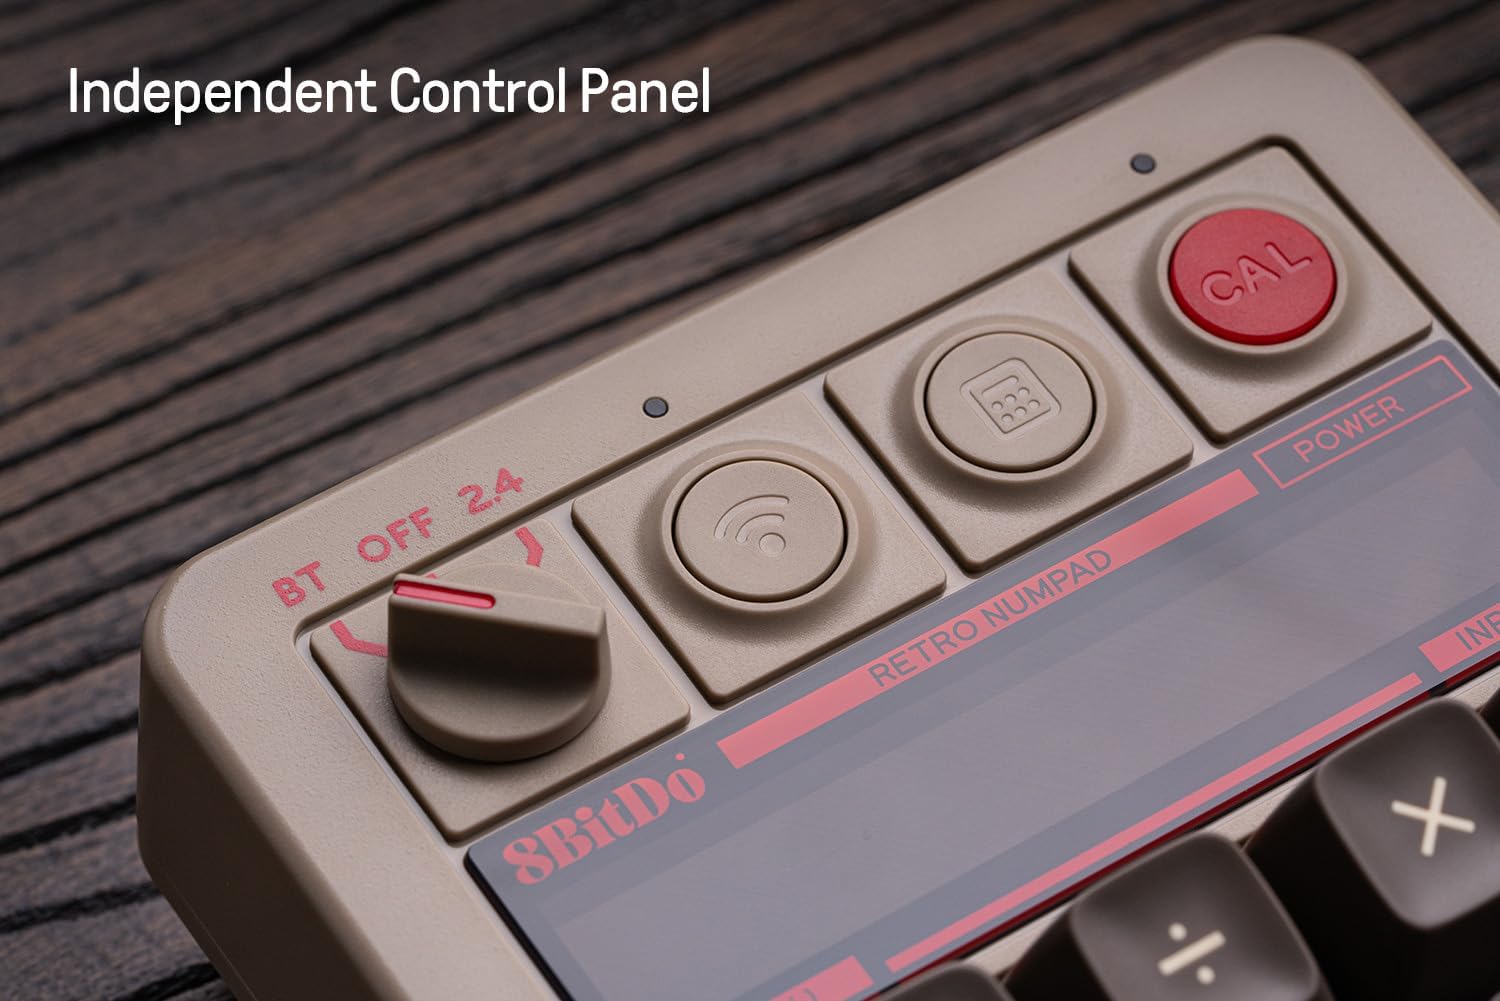
රූපය: සමීප රූපය view of the numpad's independent control panel, showing the mode switch, wireless/Bluetooth buttons, and the calculator shortcut button.
4.4 Retro LED Display
The numpad incorporates a nine-digit seven-segment LED display, providing clear and visible numerical output for calculator mode and status indicators.
4.5 Hot-swappable PCB and Switches
The numpad features a hot-swappable PCB, allowing users to easily change the mechanical switches without soldering. It comes equipped with Kailh Box White switches V2.

රූපය: විස්තරාත්මක view of the hot-swappable PCB, showing a keycap and switch removed to illustrate the ease of switch replacement.
4.6 N-key Rollover
The numpad supports N-key rollover, ensuring that every key press is registered accurately, even when multiple keys are pressed simultaneously.
4.7 යතුරු කැප්
The C64 Edition features double-shot ABS keycaps with an SA profile, providing durability and a distinct tactile feel.
5. නඩත්තු කිරීම
5.1 පිරිසිදු කිරීම
To maintain the numpad's appearance and functionality:
- පිටත කොටස පිස දැමීමට මෘදු වියළි රෙද්දක් භාවිතා කරන්න.
- මුරණ්ඩු අපිරිසිදුකම සඳහා, තරමක් dampරෙදි කැබැල්ල වතුරෙන් හෝ මෘදු පිරිසිදු කිරීමේ ද්රාවණයකින් පිස දමන්න. සැර රසායනික ද්රව්ය වලින් වළකින්න.
- යතුරු කැප් අතර ඇති දූවිලි හා සුන්බුන් ඉවත් කිරීමට සම්පීඩිත වාතය භාවිතා කරන්න.
5.2 යතුරු කැප් සහ ස්විච ප්රතිස්ථාපනය
Due to the hot-swappable design, keycaps and switches can be replaced. Use a keycap puller and switch puller (not included) for safe removal and installation. Ensure the new switches are compatible with the PCB.
5.3 බැටරි සත්කාර
බැටරි ආයු කාලය වැඩි කිරීම සඳහා:
- බැටරිය නිතර නිතර සම්පූර්ණයෙන්ම විසර්ජනය කිරීමෙන් වළකින්න.
- Store the numpad in a cool, dry place when not in use for extended periods.
- Charge the battery at least once every three months if unused.
6. දෝශ නිරාකරණය
6.1 සම්බන්ධතා ගැටළු
- No Connection (Bluetooth/2.4G): Ensure the numpad is charged and the mode switch is set correctly. Re-pair Bluetooth or re-insert the 2.4G adapter. Try a different USB port for the 2.4G adapter.
- අතරමැදි සම්බන්ධතාවය: Reduce distance between numpad and device. Avoid sources of interference (e.g., other wireless devices).
- Wired Connection Not Recognized: Try a different USB-C cable or USB port on your PC. Ensure the cable is fully inserted.
6.2 සංදර්ශක ගැටළු
- හිස් බව පෙන්වන්න: Ensure the numpad is powered on and charged. If in PC numpad mode, the display may show less information. Switch to calculator mode to verify.
- වැරදි අකුරු: Restart the numpad. If persistent, check for firmware updates.
6.3 Key Input Problems
- ප්රතිචාර නොදක්වන යතුරු: Check for debris under keycaps. If hot-swappable, ensure switches are fully seated.
- Double Input/Missed Input: මෙය දෝෂ සහිත ස්විචයක් පෙන්නුම් කළ හැකිය. බලපෑමට ලක් වූ ස්විචය ප්රතිස්ථාපනය කිරීමට උණුසුම්-ස්වාප් කළ හැකි විශේෂාංගය භාවිතා කරන්න.
6.4 බැටරිය ආරෝපණය නොවේ
- Ensure the USB-C cable is functional and properly connected.
- වෙනස් USB බල ප්රභවයක් උත්සාහ කරන්න.
- ගැටලුව දිගටම පවතින්නේ නම්, පාරිභෝගික සහාය අමතන්න.
7. පිරිවිතර
| විශේෂාංගය | විස්තර |
|---|---|
| මාදිලියේ නම | C64 Edition |
| යතුරු ගණන | 18 |
| ස්විචයන් | Kailh Box White switches V2 (Hot-swappable) |
| යතුරු කැප් | Double-shot ABS (C64 edition) |
| සම්බන්ධතාවය | Bluetooth, 2.4G Wireless, Wired USB-C |
| ගැළපුම | Windows (10 and above), Android (9.0 and above) |
| බැටරි වර්ගය | ලිතියම් පොලිමර් |
| බැටරි ආයු කාලය | Up to 160 use hours |
| ආරෝපණ කාලය | ආසන්න වශයෙන්. පැය 4 යි |
| ප්රදර්ශනය කරන්න | Nine-digit seven-segment LED |
| මානයන් | අඟල් 7.91 x 7.05 x 2.36 |
| අයිතමයේ බර | රාත්තල් 1.3 කි |
8. වගකීම් තොරතුරු
8Bitdo products typically come with a limited manufacturer's warranty. For specific details regarding the warranty period and terms for your 8Bitdo 18 Key Retro Mechanical Numpad, please refer to the warranty card included in your product packaging or visit the official 8Bitdo webඅඩවිය.
9. සහාය
For further assistance, firmware updates, or to download the 8Bitdo Ultimate Software V2 (for firmware updates only), please visit the official 8Bitdo support webඅඩවිය:
You may also contact 8Bitdo customer service through their website for technical support or inquiries.


