1. Introduction to Your EUHOMY Bread Maker
The EUHOMY Bread Maker Machine is designed to simplify your bread-making process. With 13 versatile programs, adjustable loaf sizes (1LB, 1.5LB, 2LB), and three crust color settings (light, medium, dark), you can easily create a variety of homemade breads, doughs, jams, cakes, and even yogurt. This manual provides essential information for safe and effective use of your appliance.

Image: The EUHOMY Bread Maker Machine, showcasing its sleek design and a freshly baked loaf of bread.
2. වැදගත් ආරක්ෂණ
Before using your EUHOMY Bread Maker, please read and follow these basic precautions to ensure safety and optimal performance:
- Always read all instructions thoroughly before operation.
- පරිමාව සහතික කරන්නtage of your wall outlet matches the rating plate of the appliance.
- Do not operate the appliance with a damaged cord or plug. If the appliance malfunctions or is dropped, contact customer support.
- විදුලි කම්පනයෙන් ආරක්ෂා වීමට, ලණුව, පේනු හෝ නිවාස ජලයේ හෝ වෙනත් දියරයක ගිල්වන්න එපා.
- භාවිතයේ නොමැති විට, කොටස් පැළඳීමට හෝ ඉවත් කිරීමට පෙර සහ පිරිසිදු කිරීමට පෙර උපකරණය අලෙවිසැලෙන් විසන්ධි කරන්න.
- ලණුව මේසයේ හෝ උණුසුම් මතුපිටක එල්ලා තැබීමට ඉඩ නොදෙන්න.
- උපකරණ නිෂ්පාදකයා විසින් නිර්දේශ නොකළ උපාංග ඇමුණුම් භාවිතා කිරීම තුවාල වීමට හේතු විය හැක.
- උපකරණය අවුරුදු 8 සහ ඊට වැඩි දරුවන්ට සහ අඩු කායික, සංවේදී හෝ මානසික හැකියාවන් හෝ අත්දැකීම් සහ දැනුම නොමැති පුද්ගලයින්ට උපකරණය ආරක්ෂිත ආකාරයකින් භාවිතා කිරීම සම්බන්ධයෙන් අධීක්ෂණය හෝ උපදෙස් ලබා දී ඇති අතර ඒවාට සම්බන්ධ උපද්රවයන් අවබෝධ කර ගෙන තිබේ නම් භාවිතා කළ හැකිය. . ළමයින් උපකරණය සමඟ සෙල්ලම් නොකළ යුතුය. ළමයින් අවුරුදු 8 ට වැඩි සහ අධීක්ෂණය කරන්නේ නම් මිස පිරිසිදු කිරීම සහ පරිශීලක නඩත්තු කිරීම සිදු නොකළ යුතුය.
- උපකරණය සහ එහි ලණුව අවුරුදු 8 ට අඩු දරුවන්ට ළඟාවිය නොහැකි ලෙස තබා ගන්න.
- උණුසුම් වායුවක් හෝ විදුලි දාහකයක් මත හෝ ඒ අසල හෝ රත් වූ උඳුනක තබන්න එපා.
- පිළිස්සීමේදී යන්ත්රයේ චලනය වන හෝ කැරකෙන කොටස් ස්පර්ශ නොකරන්න.
- Never switch on the appliance without the bread pan properly placed in the chamber and filled with ingredients.
3. නිෂ්පාදන සංරචක සහ උපාංග
Your EUHOMY Bread Maker comes with all necessary components and accessories to get you started:

රූපය: විස්තරාත්මක view of the bread maker and its accessories, including the non-stick pan, measuring cup, measuring spoon, stirring rod, hook, oven mitt, manual, and recipe book.
- ප්රධාන ශරීරය: The stainless steel casing houses the heating element, motor, and control panel.
- පාන් පෑන්: A removable non-stick pan for mixing and baking. Features a quick-release design.
- ඇනීමේ පැඩලය: Attaches to the shaft inside the bread pan for mixing and kneading dough.
- Automatic Fruit & Nut Dispenser: Located in the lid, it automatically adds ingredients at the optimal time during the cycle.
- මිනුම් කෝප්පය: නිරවද්ය ද්රව මිනුම් සඳහා.
- මිනුම් හැන්දක්: For measuring smaller quantities of ingredients.
- කොක්ක: බේක් කළ පාන් වලින් ඇනීමේ පැඩලය ඉවත් කිරීමට භාවිතා කරයි.
- Oven Mitt: For safe handling of the hot bread pan.
- උපදෙස් අත්පොත: This guide for detailed operation.
- වට්ටෝරු පොත: A collection of recipes to get you started.
4. සැකසුම සහ පළමු භාවිතය
Follow these steps for initial setup and your first bread-making experience:
- ඇසුරුම්: ඇසුරුම්කරණයෙන් සියලුම කොටස් සහ උපාංග ප්රවේශමෙන් ඉවත් කරන්න.
- පිරිසිදු: Wash the bread pan, kneading paddle, and fruit & nut dispenser with warm, soapy water. Rinse thoroughly and dry all parts. Wipe the exterior of the bread maker with a damp රෙදි.
- එකලස් කරන්න: Insert the kneading paddle onto the shaft at the bottom of the bread pan. Place the bread pan into the main unit and twist it clockwise until it locks securely into place.
- බල ගැන්වීම: Plug the bread maker into a grounded electrical outlet. A short beep will sound, and the default program (BASIC, 2:53) will display on the LCD screen.
Visual Guide: Unboxing and Setup
වීඩියෝ: ඉවරයිview of the EUHOMY Bread Maker, including unboxing, identifying components, and initial setup steps.
5. මෙහෙයුම් උපදෙස්
පාලක පැනලය අවසන්view

Image: The digital control panel, showing the LCD display, Menu, Knead, Time (+/-), Loaf, Color, Start/Stop, and Confirm buttons.
- LCD සංදර්ශකය: Shows program number, remaining time, loaf size, and crust color.
- මෙනු බොත්තම: Press to cycle through the 13 available programs.
- KNEAD Button: Initiates a kneading cycle independently.
- TIME +/- බොත්තම්: Adjust the delay timer for deferred baking.
- LOAF බොත්තම: Selects the desired loaf size (1LB, 1.5LB, 2LB).
- වර්ණ බොත්තම: Chooses the crust color (Light, Medium, Dark).
- START/STOP බොත්තම: තෝරාගත් වැඩසටහන ආරම්භ කරයි හෝ විරාම කරයි.
- CONFIRM Button: Press and hold for 3 seconds to end a program.
ලබා ගත හැකි වැඩසටහන්
Your bread maker offers 13 programs for various baking needs:
| නැත. | වැඩසටහන | විස්තරය |
|---|---|---|
| 1 | මූලික | For white and mixed breads, the most common setting. |
| 2 | ප්රංශ | For light breads made from fine flour, typically with a crispier crust. |
| 3 | සම්පූර්ණ තිරිඟු | For breads containing a large proportion of whole wheat flour. |
| 4 | ඉක්මන් | For rapid baking, producing a loaf in a shorter time. |
| 5 | ස්වීට් | බ්රයෝච් වැනි ඉහළ සීනි ප්රමාණයක් අඩංගු පාන් සඳහා. |
| 6 | ULTRA FAST-1 | Fastest baking cycle for smaller loaves. |
| 7 | ULTRA FAST-2 | Fastest baking cycle for larger loaves. |
| 8 | පිටි ගුලිය | Prepares dough for pizza, pasta, or rolls to be baked in a conventional oven. |
| 9 | ජෑම් | ගෙදර හැදූ ජෑම් සහ මාමලේඩ් සෑදීම සඳහා. |
| 10 | කේක් | For baking cakes and quick breads. |
| 11 | සැන්ඩ්විච් | සැහැල්ලු හා සිනිඳු සැන්ඩ්විච් පාන් සඳහා. |
| 12 | පිළිස්සීම | Only bakes the dough, useful for pre-made dough or additional baking time. |
| 13 | යෝගට් | ගෙදර හැදූ යෝගට් සකස් කිරීම සඳහා. |
Loaf Size and Crust Color Selection

Image: Visual representation of the available loaf sizes (1.1lb, 1.65lb, 2.2lb) and crust colors (Dark, Medium, Light).
- රොටි ප්රමාණය: Press the LOAF button to toggle between 1LB (500g), 1.5LB (750g), and 2LB (1000g) options.
- කබොල වර්ණය: Press the COLOR button to select Light, Medium, or Dark crust.
Automatic Fruit & Nut Dispenser
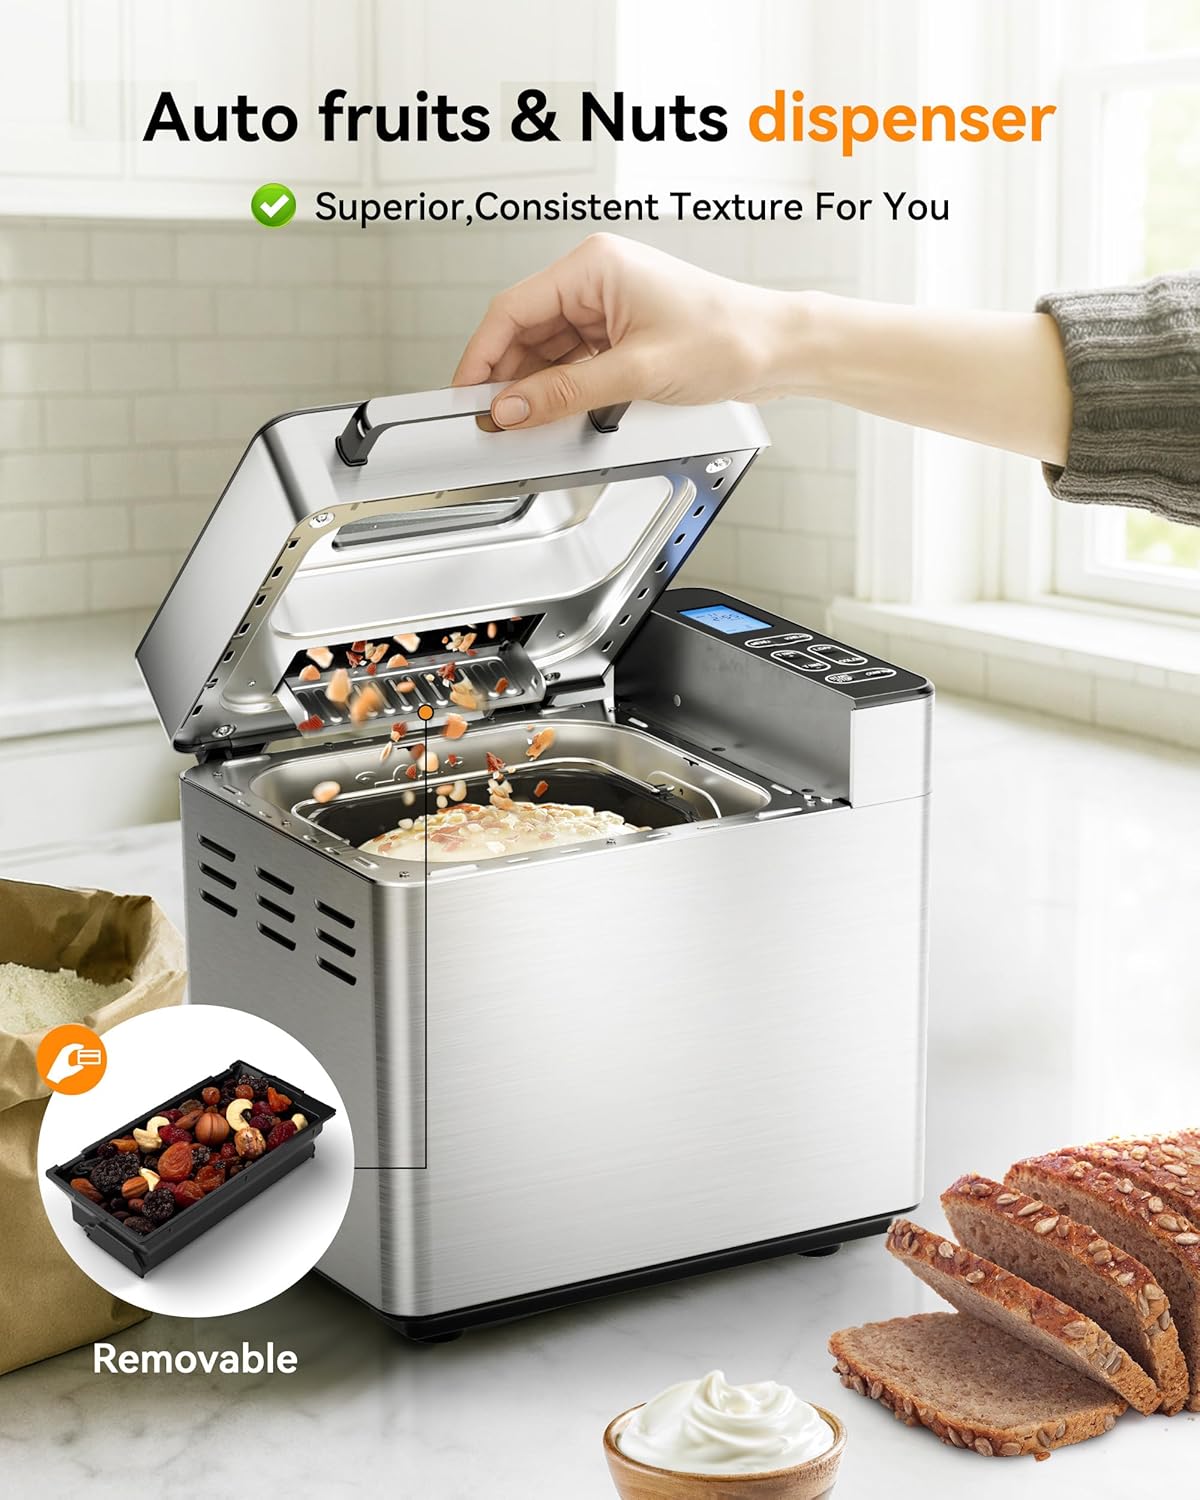
Image: The automatic dispenser for fruits and nuts, designed to release ingredients at the optimal time during the kneading cycle.
The bread maker features an automatic dispenser for fruits, nuts, or other mix-ins. Simply open the dispenser compartment located on the top lid, add your desired ingredients, and close it. The machine will automatically release them into the dough at the appropriate stage of the program, ensuring even distribution.
Delay Timer and Keep Warm Function

Image: The delay timer feature, allowing users to set a delayed start for up to 13 hours, and the 1-hour keep warm function.
- පැය 13ක ප්රමාද ටයිමරය: Use the TIME +/- buttons to set a delayed start time for your bread. This allows you to wake up to freshly baked bread or have it ready after work.
- පැය 1ක් උණුසුම්ව තබා ගන්න: After baking is complete, the bread maker automatically switches to a 1-hour keep warm cycle to maintain the bread's temperature.
- මිනිත්තු 15 ක බලය Outagඊ මතකය: In case of a short power interruption, the machine will resume operation within 15 minutes without losing its settings.
6. Making Bread: A Step-by-Step Guide
Making a basic loaf of bread is simple with your EUHOMY Bread Maker:
- අමුද්රව්ය එකතු කරන්න: Place all liquid ingredients (water, oil) into the bread pan first. Then add dry ingredients (salt, sugar, dry milk, flour). Finally, add the yeast on top of the dry ingredients, ensuring it does not come into direct contact with the liquids initially. Refer to your recipe book for precise measurements and order.
- වැඩසටහන තෝරන්න: Close the lid. Press the MENU button to select your desired program (e.g., BASIC).
- Choose Loaf Size & Crust: Press the LOAF button to select the desired loaf size (e.g., 1.5LB). Press the COLOR button to choose your preferred crust color (e.g., Medium).
- ෙබ්කිං කිරීම ආරම්භ කරන්න: Press the START/STOP button to begin the baking cycle. The machine will automatically mix, knead, rise, and bake the bread.
- Cool & Serve: Once the cycle is complete and the machine beeps, carefully remove the bread pan using oven mitts. Invert the pan onto a cooling rack to release the bread. Allow the bread to cool for at least 20 minutes before slicing for best results.
Visual Guide: Bread Making Process
Video: A demonstration of the bread-making process, from adding ingredients to removing the finished loaf.
7. Making Yogurt: A Step-by-Step Guide
Your EUHOMY Bread Maker can also make delicious homemade yogurt:
- අමුද්රව්ය සකස් කරන්න: Pour 1 liter of whole milk into the bread pan. Add 100ml (100g) of live yogurt (or a yogurt-specific strain) as a starter. Stir gently to combine.
- වැඩසටහන තෝරන්න: Place the bread pan into the machine. Close the lid. Press the MENU button to select program 13 (YOGURT).
- පැසවීම ආරම්භ කරන්න: Press the START/STOP button. The machine will maintain the optimal temperature for 8 hours to ferment the yogurt.
- Chill & Serve: Once the cycle is complete, remove the bread pan. Transfer the yogurt to a container and refrigerate for at least 4 hours to chill and thicken before serving.
Visual Guide: Yogurt Making Process
Video: A demonstration of how to prepare homemade yogurt using the bread maker's dedicated program.
8. නඩත්තු කිරීම සහ පිරිසිදු කිරීම
නිසි පිරිසිදු කිරීම සහ නඩත්තු කිරීම ඔබේ පාන් සාදන්නාගේ ආයු කාලය දීර්ඝ කරයි:
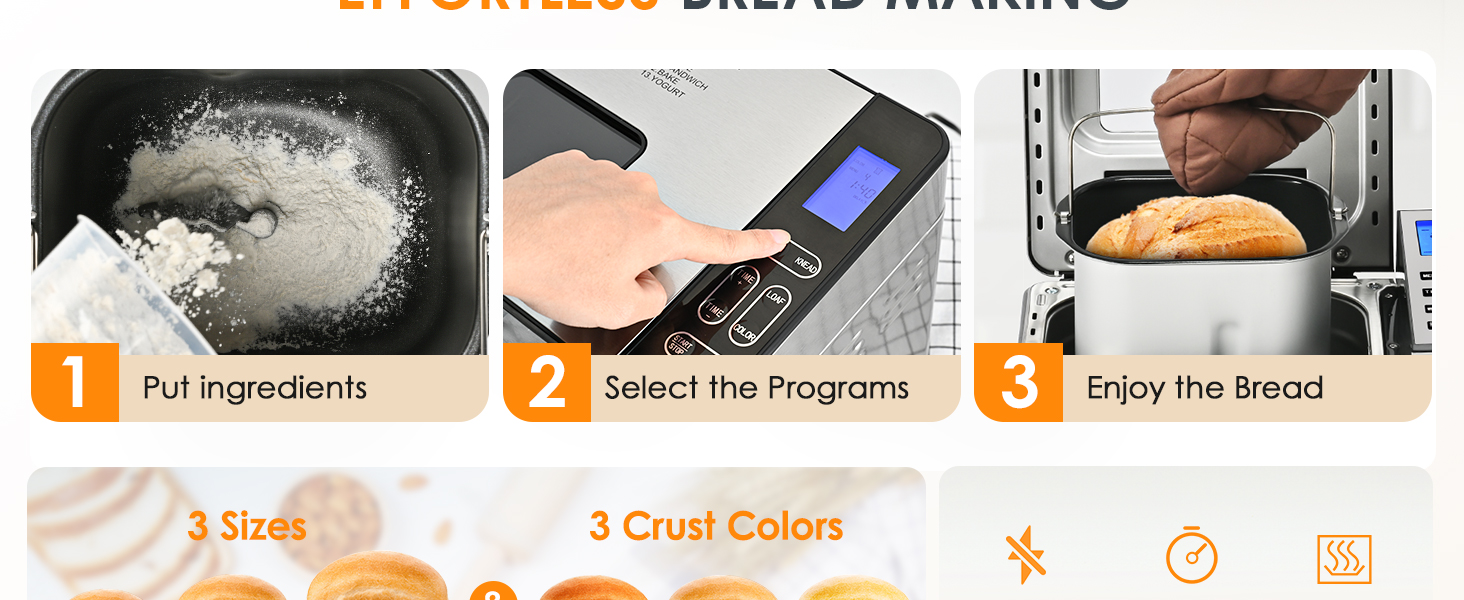
Image: A person cleaning the non-stick bread pan, highlighting its easy-to-clean surface.
- Bread Pan & Kneading Paddle: The non-stick coating prevents sticking for effortless cleaning. Use warm water for best results. Both the pot and nut dispenser are dishwasher-safe.
- බාහිර: මෘදු, d සමඟ උපකරණයේ බාහිර කොටස පිස දමන්නamp රෙදි. උල්ෙල්ඛ පිරිසිදු කරන්නන් භාවිතා නොකරන්න හෝ ඒකකය ජලයේ ගිල්වන්න එපා.
- පළතුරු සහ ඇට වර්ග බෙදාහරින්නා: The dispenser is removable and dishwasher-safe for easy cleaning.
- ගබඩා: පාන් සාදන්නා සිසිල් වියළි ස්ථානයක ගබඩා කිරීමට පෙර සියලුම කොටස් පිරිසිදු හා වියලි බවට වග බලා ගන්න.
9. දෝශ නිරාකරණය
If you encounter any issues with your bread maker, refer to the table below for common problems and solutions:
| ගැටලුව | විය හැකි හේතුව | විසඳුම |
|---|---|---|
| පාන් වැඩිය නැගෙන්නේවත් වැඩිය නැගෙන්නේවත් නැහැ. | වැරදි යීස්ට් ප්රමාණය, කල් ඉකුත් වූ යීස්ට් හෝ වැරදි ජල උෂ්ණත්වය. | Ensure yeast is fresh and active. Use recommended water temperature (68-77°F for regular, 113-122°F for Ultra Fast). Adjust yeast quantity as per recipe. |
| පාන් ඉතා ඝන හෝ බරයි. | Too much flour, too little liquid, or incorrect program selected. | Measure ingredients precisely (weighing is recommended). Ensure correct liquid-to-flour ratio. Select appropriate program for your recipe. |
| පාන් වල හිරවෙලා තියෙන අනන පැඩලය. | සුලභ සිදුවීමක්. | Use the provided hook tool to carefully remove the kneading paddle after the bread has cooled. |
| Settings do not change or machine is unresponsive. | Program may be locked or an error occurred. | Ensure the machine is not in a locked state. Try pressing and holding the 'Confirm' button for 3 seconds to reset or end the current program. Unplug and replug the machine. |
| Fruit/nut dispenser does not release ingredients. | Dispenser may be blocked or not properly loaded. | Ensure ingredients are not stuck. Clean the dispenser thoroughly. Check if the selected program supports automatic dispensing. |
| Bread is too moist on the bottom. | Bread left in pan too long after baking. | Remove bread from the pan promptly after the baking cycle is complete and place on a cooling rack. |
10. තාක්ෂණික පිරිවිතර
- වෙළඳ නාමය: යුහෝමි
- ආදර්ශ අංකය: 2 lbs Bread Maker
- නිෂ්පාදන මානයන්: 9.3"D x 9.3"W x 13"H
- වට්tage: වොට් 650 යි
- වැඩසටහන් ගණන: 13
- රොටි ප්රමාණයන්: 1LB, 1.5LB, 2LB
- කබොල වර්ණ: සැහැල්ලු, මධ්යම, අඳුරු
- වර්ණය: රිදී, කළු
- අයිතමයේ බර: රාත්තල් 9.92 කි
- UPC: 850067168553
11. වගකීම් සහ සහාය
Your EUHOMY Bread Maker is backed by a one-year warranty, ensuring peace of mind with your purchase. For any questions, concerns, or support needs, please do not hesitate to contact our customer service team.
පාරිභෝගික සහාය ඊමේල්: support@homyd.com
Our team is available 24/7 to address your inquiries and provide assistance.