හැඳින්වීම
Thank you for choosing the Neoteck Digital Indicator and Dial Test Indicator set. This manual provides essential information for the safe and effective operation, setup, and maintenance of your precision measuring instruments. Please read this manual thoroughly before use and retain it for future reference.
ආරක්ෂිත තොරතුරු
- Always handle the instruments with care to avoid damage to precision components.
- Keep the instruments clean and free from dust, oil, and other contaminants.
- Do not expose the digital indicator to extreme temperatures, humidity, or direct sunlight.
- Avoid dropping or subjecting the instruments to strong impacts.
- Ensure the magnetic base is securely attached to a ferromagnetic surface before mounting any indicator.
- When replacing batteries, use the correct type and observe polarity.
පැකේජයේ අන්තර්ගතය
පහත ලැයිස්තුගත කර ඇති සියලුම අයිතම ඔබේ පැකේජයේ ඇති බව තහවුරු කරගන්න:
- 1 x Digital Dial Indicator (0-25.4 mm / 0-1 inch)
- 1 x Rear Cover for Digital Indicator
- 2 x 1.5V LR44 Batteries (one pre-installed, one spare)
- 1 x 0-0.03" Dial Test Indicator
- 1 x Magnetic Base Holder
- 1 x ප්ලාස්ටික් ගබඩා නඩුව
- 2 x Steel Dovetail Clamps
- 1 x උපදෙස් අත්පොත (මෙම ලේඛනය)

Image: The Neoteck Digital Indicator, spare batteries, and the protective storage case included in the package.
නිෂ්පාදනය අවසන්view
Digital Indicator Components
- සංදර්ශකය: Large LCD for clear measurement readings.
- Inch/mm Button: Toggles between imperial (inches) and metric (millimeters) units.
- OFF/ON බොත්තම: උපාංගය සක්රිය හෝ අක්රිය කරයි.
- ZERO බොත්තම: Resets the display to zero at any position.
- ස්පින්ඩල්: The movable rod that contacts the workpiece.
- සම්බන්ධතා ස්ථානය: The tip of the spindle, typically M2.5 screw thread for interchangeability.
- බැටරි මැදිරිය: Located on the rear, for LR44 battery.

රූපය: විස්තරාත්මක view of the digital indicator showing the LR44 battery compartment, M2.5 screw thread contact point, and unit conversion display.
Magnetic Base and Holder Components
- චුම්බක පදනම: Features two solid magnet surfaces with an ON/OFF control switch.
- සක්රිය / අක්රිය පාලනය: Lever to activate or deactivate the magnetic force.
- Adjustable Holder Arm: Flexible, sturdy, and precise rotary joint for positioning the indicator.
- Fine-Tuning Knob: For precise adjustments of the indicator's position.
- Clampයාන්ත්රණය: Designed to securely hold digital or dial indicators with a 3/8 inch (9.52mm) clamping diameter.

Image: The magnetic base showing the ON/OFF control lever and illustrating its strong magnetic pull.

Image: The adjustable holder arm of the magnetic base, detailing its dimensions and the 3/8 inch clamping diameter.
සැලසුම
1. Installing/Replacing Digital Indicator Battery
- Locate the battery compartment on the rear of the digital indicator.
- Gently slide open the battery cover.
- Insert one LR44 1.5V battery, ensuring the correct polarity (+/-).
- බැටරි කවරය ආරක්ෂිතව වසා දමන්න.
2. Attaching Indicator to Magnetic Base
- Ensure the magnetic base's ON/OFF switch is in the 'OFF' position.
- cl එක ලිහිල් කරන්නamping screw on the adjustable holder arm.
- Insert the stem of either the digital indicator or the dial test indicator into the clamp. Clamping diameter is 3/8 inch (9.52mm).
- cl එක තද කරන්නamping screw to secure the indicator firmly.
- For the dial test indicator, use the provided steel dovetail clamps if necessary for alternative mounting angles.
Image: The clamping mechanism of the magnetic base, illustrating the 3/8 inch diameter for indicator stems.
3. Securing the Magnetic Base
- Place the magnetic base on a clean, flat ferromagnetic surface.
- Move the ON/OFF control switch to the 'ON' position to activate the magnetic force. Ensure the base is firmly attached before proceeding.
- Adjust the flexible arm using the rotary joints and fine-tuning knob to position the indicator as required for your measurement.

Image: The magnetic base with its ON/OFF switch in the 'ON' position, demonstrating its secure attachment capability.
මෙහෙයුම් උපදෙස්
Using the Digital Indicator
- බල ගැන්වීම: ඔබන්න අක්රිය / සක්රිය button to turn on the digital indicator.
- ඒකක පරිවර්තනය: ඔබන්න අඟල්/මි.මී button to switch between inches and millimeters as needed.
- ශුන්ය සැකසුම: Bring the contact point into initial contact with the reference surface or workpiece. Press the ZERO button to set the display to zero. This establishes your reference point for relative measurements.
- මිනුම් ගැනීම: Move the indicator's contact point along the surface to be measured. The display will show the displacement from the zero point.
- විදුලිය විසන්ධි කිරීම: ඔබන්න අක්රිය / සක්රිය button again to turn off the indicator. Note: The digital indicator does not remember the zero setting position after auto-off or manual power-off.
Image: The digital indicator display demonstrating unit conversion between inches and millimeters, and the zero setting function.
Using the Dial Test Indicator
- සවි කිරීම: Secure the dial test indicator to the magnetic base using the clampයාන්ත්රණය.
- ස්ථානගත කිරීම: Adjust the flexible arm to bring the contact point of the dial test indicator into contact with the workpiece.
- ශුන්ය සැකසීම: Rotate the outer bezel of the dial to align the '0' mark with the needle. This sets your reference point.
- මිනුම් ගැනීම: Move the indicator along the surface. The needle will show the deviation from the zero point.
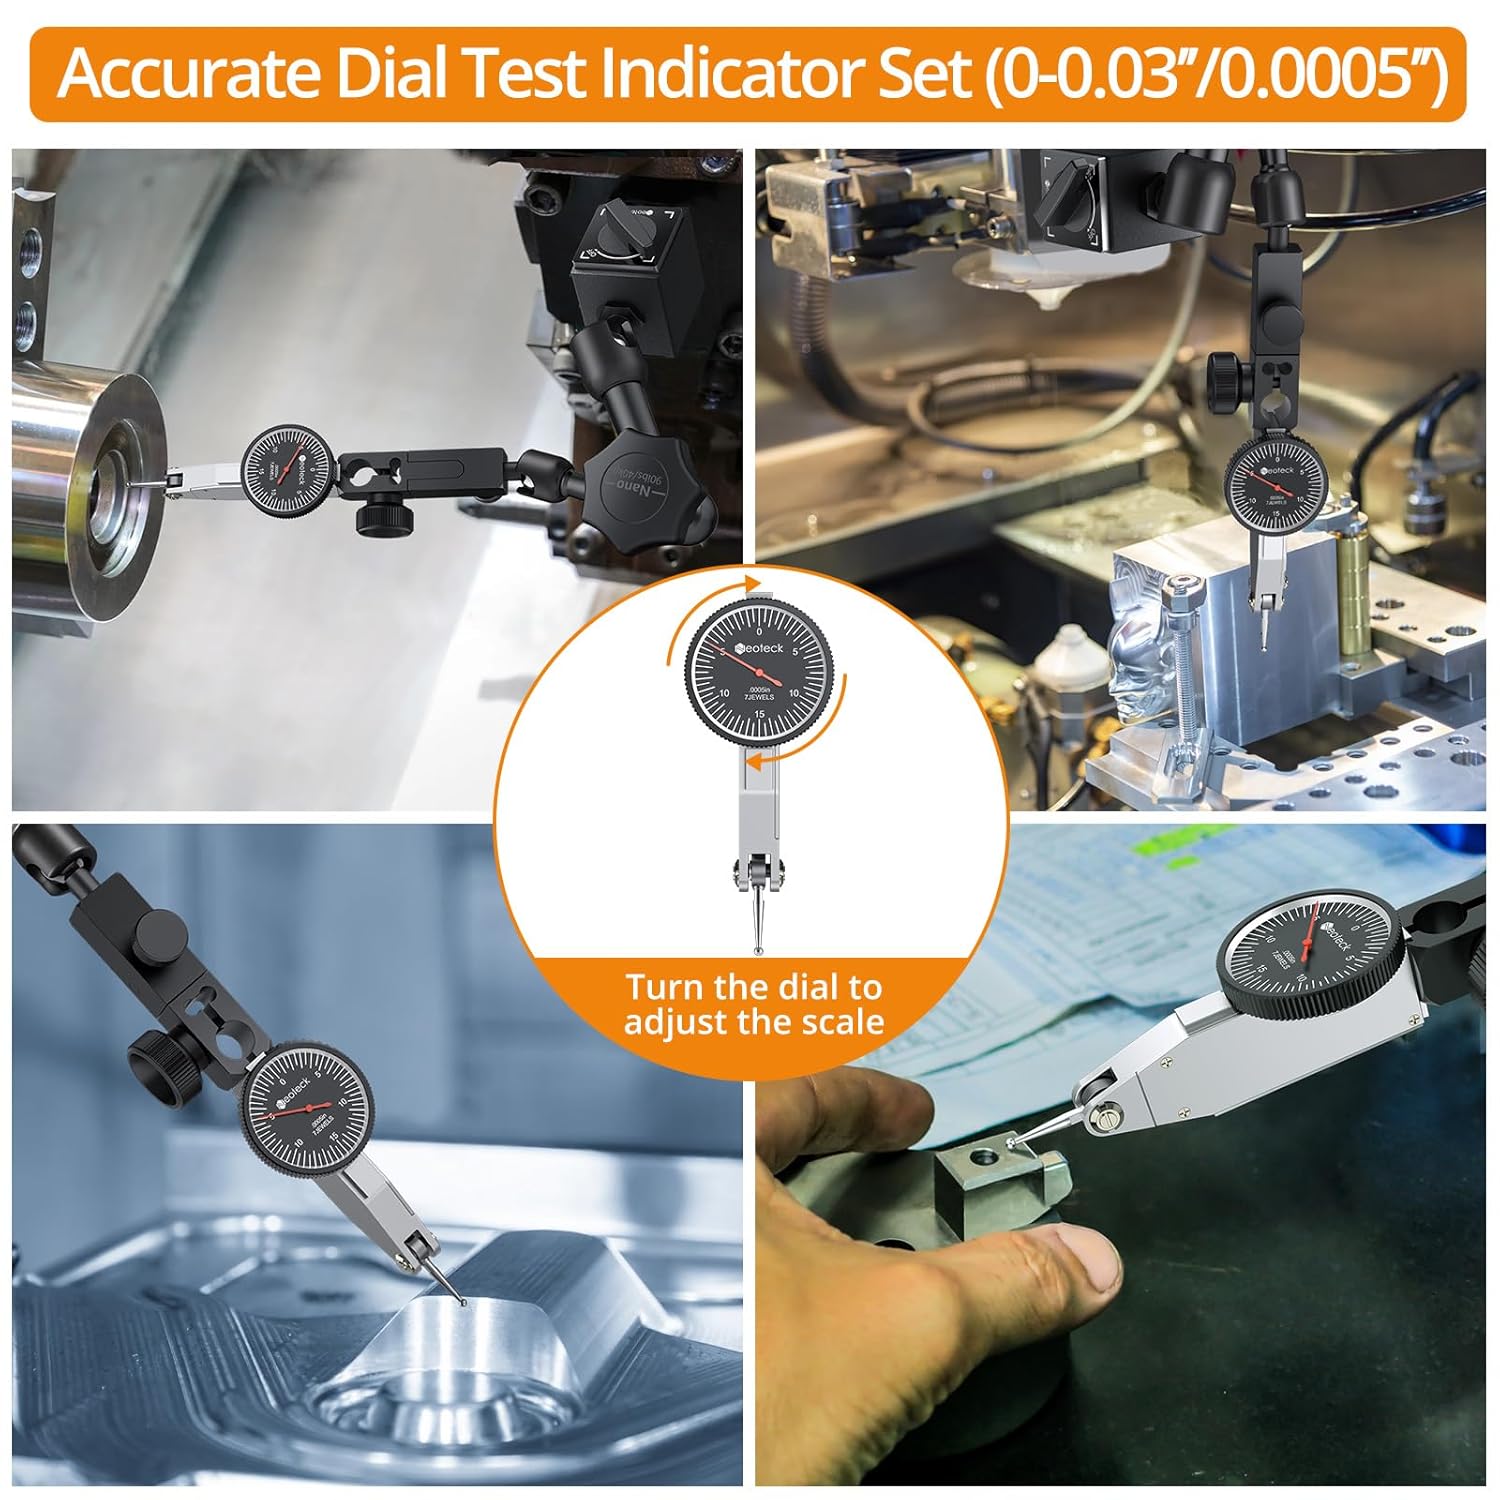
Image: The dial test indicator in various measurement scenarios, highlighting the ability to turn the dial to adjust the scale for zeroing.
යෙදුම්
The Neoteck Digital Indicator and Dial Test Indicator are versatile tools suitable for various precision measurement tasks, including:
- Machine setup (e.g., CNC Lathes)
- Measuring runout and flatness
- Aligning components (e.g., 3D printer beds, table saw blades)
- General dimensional inspection

රූපය: උදාamples of the digital indicator being used in practical applications such as on a CNC Lathe, a 3D printer, and a table saw for precise measurements.
නඩත්තු කිරීම
පිරිසිදු කිරීම
- Wipe the instruments with a soft, dry, lint-free cloth after each use.
- මුරණ්ඩු අපිරිසිදුකම සඳහා, රෙදි කැබැල්ලක් සැහැල්ලුවෙන් භාවිතා කරන්න dampened with isopropyl alcohol. Avoid harsh chemicals or abrasive cleaners.
- Ensure no liquid enters the electronic components of the digital indicator.
ගබඩා කිරීම
- Store the instruments in their protective plastic case when not in use.
- Keep them in a dry environment, away from direct sunlight and extreme temperatures.
- Ensure the magnetic base is in the 'OFF' position during storage to prevent accidental attraction to other metal objects.
දෝෂගවේෂණය
| ගැටලුව | විය හැකි හේතුව | විසඳුම |
|---|---|---|
| Digital indicator display is blank or flickering. | අඩු හෝ මිය ගිය බැටරිය; වැරදි බැටරි ස්ථාපනය. | නිවැරදි ධ්රැවීයතාව සහතික කරමින් LR44 බැටරිය ප්රතිස්ථාපනය කරන්න. |
| Inaccurate or inconsistent readings from digital indicator. | Dirty contact point or spindle; instrument not zeroed correctly; environmental factors (temperature changes). | Clean the contact point and spindle. Re-zero the instrument. Allow instrument to acclimate to ambient temperature. |
| චුම්භක පාදය ආරක්ෂිතව අල්ලා නොගැනීම. | ON/OFF switch in 'OFF' position; dirty base surface; non-ferromagnetic surface; thin metal surface. | Ensure switch is 'ON'. Clean base and mounting surface. Use on a ferromagnetic surface at least 30mm thick for maximum pull. |
| Indicator wobbles on the magnetic base arm. | Clamping screw not tightened sufficiently. | cl එක තද කරන්නamping screw on the adjustable holder arm. |
පිරිවිතර
ඩිජිටල් දර්ශකය
- මිනුම් පරාසය: 0 - 25.4 mm (0 - 1 inch)
- විභේදනය: 0.01 mm (අඟල් 0.0005)
- බැටරි වර්ගය: 1 x LR44 1.5V (included)
- Contact Point Thread: M2.5
පරීක්ෂණ දර්ශකය අමතන්න
- මිනුම් පරාසය: 0 - 0.03 inch
- විභේදනය: අඟල් 0.0005
Magnetic Base Holder
- Maximum Tensile Force: 90 lbs (40 kg) (Requires metal working surface/surface with thickness of 30mm and above for max pull)
- Lower Arm Dimensions: අඟල් 2.6 (සෙ.මී. 6.6)
- Upper Arm Dimensions: අඟල් 2.7 (සෙ.මී. 7)
- Total Height (approx.): අඟල් 5.7 (සෙ.මී. 13.6)
- Clamping Diameter: අඟල් 3/8 (මි.මී. 9.52)
වගකීම් සහ සහාය
Neoteck products are manufactured to high-quality standards. For any questions, technical support, or warranty inquiries, please contact Neoteck customer service through the retailer where the product was purchased or visit the official Neoteck webසම්බන්ධතා තොරතුරු සඳහා අඩවිය.


