1. හැඳින්වීම
Thank you for choosing the VEVOR Commercial Slushy Machine, Model XN240B. This instruction manual provides essential information for the safe and efficient operation, maintenance, and troubleshooting of your new appliance. Please read this manual thoroughly before initial use and retain it for future reference.

Figure 1: VEVOR Commercial Slushy Machine (Model XN240B)
2. වැදගත් ආරක්ෂක උපදෙස්
To ensure safe operation and prevent damage, always adhere to the following safety guidelines:
- යන්ත්රය ක්රියාත්මක කිරීමට පෙර සියලුම උපදෙස් කියවන්න.
- බල සැපයුම පරිමාවට ගැලපෙන බව සහතික කර ගන්නtage යන්ත්රයේ ශ්රේණිගත කිරීමේ ලේබලයේ දක්වා ඇත.
- තෙත් දෑතින් හෝ තෙත් තත්වයන් යටතේ යන්ත්රය ක්රියාත්මක නොකරන්න.
- යන්ත්රය ක්රියාත්මක වන අතරතුර ළමයින් සහ අනවසර පුද්ගලයින් යන්ත්රයෙන් ඈත් කර තබන්න.
- පිරිසිදු කිරීමට හෝ නඩත්තු කිරීමට පෙර සෑම විටම යන්ත්රය විසන්ධි කරන්න.
- ප්රධාන ඒකකය ජලයේ හෝ වෙනත් ද්රව වල ගිල්වන්න එපා.
- Ensure adequate ventilation around the machine to prevent overheating.
- Only use liquid ingredients. Solid ingredients can damage the machine.
- Maintain a sugar content of 13-25% for optimal slush consistency. Insufficient sugar can lead to ice block formation.
- For alcoholic beverages, ensure alcohol content is below 13% to prevent freezing issues.
3. නිෂ්පාදන අවසන්view
The VEVOR Commercial Slushy Machine (Model XN240B) is designed for efficient production of various frozen and cold beverages. It features a durable stainless steel body and food-grade PC tanks.
3.1 සංරචක
- ද්විත්ව 12L ටැංකි: Transparent tanks for simultaneous preparation of two different beverages.
- පාලන පුවරුව: User-friendly interface for mode selection, temperature control, and cleaning.
- Dispensing Faucets: Spring-loaded, anti-drip design for easy serving.
- Augers/Stirrers: Internal components that continuously mix and freeze the liquid.
- බිංදු තැටි: Removable trays at the bottom to catch spills and facilitate cleaning.
- වාතාශ්රය ග්රිල්: Three-sided design for efficient heat dissipation.
- රබර් අඩි: Provide stability and prevent slipping during operation.
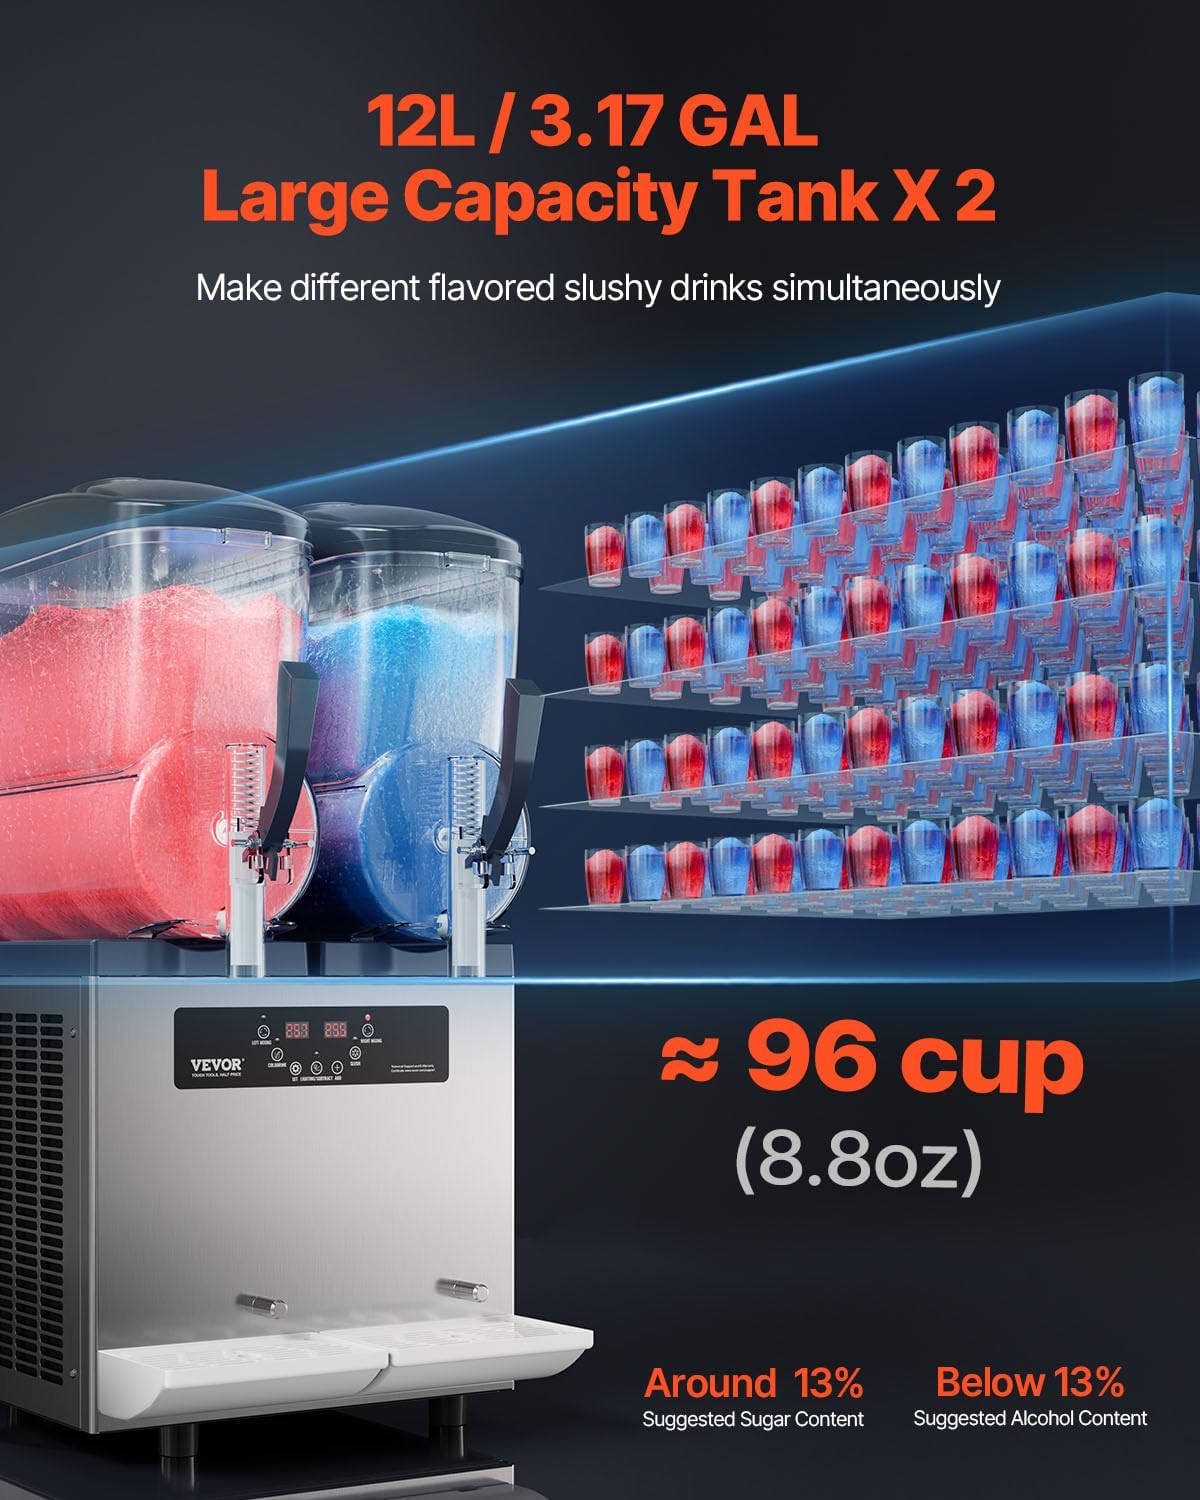
Figure 2: Main components of the Slushy Machine

රූපය 3: පාලක පැනලය අවසන්view
4. පිහිටුවීම
4.1 ඇසිරීම සහ ස්ථානගත කිරීම
- යන්ත්රය එහි ඇසුරුම් වලින් ප්රවේශමෙන් ඉවත් කරන්න.
- Place the machine on a stable, level surface. Ensure there is sufficient space (at least 20 cm) around the machine for proper ventilation.
- Allow the unit to stand upright for at least 2 hours after unboxing before plugging it in. This allows the refrigerant to settle for optimal performance.
4.2 මූලික පිරිසිදු කිරීම
Before first use, thoroughly clean all parts that will come into contact with beverages:
- Remove the tanks, augers, and dispensing faucets (refer to Section 6.2 for disassembly).
- Wash all removable parts with warm, soapy water. Rinse thoroughly and dry completely.
- දැන්වීමකින් ප්රධාන ඒකකයේ බාහිර කොටස පිස දමන්නamp රෙදි.
- Reassemble all parts, ensuring seals are correctly seated.
5. මෙහෙයුම
5.1 අමුද්රව්ය එකතු කිරීම
- Ensure the machine is clean and all parts are correctly assembled.
- ටැංකියේ පියන විවෘත කරන්න.
- Pour your prepared liquid mixture into the tank. Do not exceed the 'MAX' fill line. For slushy mode, fill only up to 1L to allow for expansion.
- Close the tank lid securely.

Figure 4: Adding ingredients to the tank
5.2 පාලන පැනලය භාවිතා කිරීම
The control panel allows you to select different modes and adjust settings:
- බල බොත්තම: Press to turn the machine on/off.
- Mixing Button: Activates/deactivates the stirring function in the tanks.
- සිසිල් පාන මාදිලිය: Sets the temperature for cold beverages (e.g., 3-5°C / 37.4-41°F).
- ස්ලෂ් ප්රකාරය: Sets the temperature for frozen slush (e.g., -3 to -1°C / 26.6-30.2°F for non-alcoholic, -15 to -6°C / 5-21.2°F for alcoholic).
- උෂ්ණත්ව ගැලපුම (+/-): Use to fine-tune the temperature for desired consistency.
- ආලෝකකරණය: Turns internal tank lighting on/off.
Press the desired mode button (Slush or Cold Drink). The machine will begin the cooling and mixing process. Monitor the temperature on the digital display.
5.3 පාන වර්ග බෙදා හැරීම
Once the desired consistency is reached (typically 20-40 minutes for slush, depending on ingredients and ambient temperature):
- Place a cup under the dispensing faucet.
- Pull the dispensing handle down to release the beverage.
- Release the handle to stop dispensing.

Figure 5: Dispensing a frozen drink
5.4 උපදෙස් වීඩියෝ
Video: VEVOR Slushie Machine Operation Guide. This video demonstrates the basic operation of the VEVOR Slushie Machine, including adding ingredients and dispensing drinks.
Video: VEVOR Commercial Slushy Machine 12L Frozen Drink Maker. This video provides a detailed overview of the 12L VEVOR Commercial Slushy Machine, including its features and usage.
6. නඩත්තු කිරීම
6.1 ස්වයංක්රීය පිරිසිදු කිරීම
The machine features a one-button automatic cleaning function:
- Empty the tanks of any remaining beverage.
- Fill the tanks with clean water.
- Press the 'Clean' button on the control panel. The augers will rotate to clean the tanks.
- Drain the water through the dispensing faucets. Repeat if necessary.
6.2 Thorough Cleaning and Disassembly
For thorough cleaning, especially after prolonged use, disassemble the tanks and components:
- යන්ත්රය ක්රියා විරහිත කර විසන්ධි කරන්න.
- Remove the dispensing faucets by unscrewing the retaining nut, then pulling out the handle, drain valve, and spring.
- Lift the bottom of the tank slightly and shake it left and right to detach it from the main unit. Carefully pull the tank forward to remove it.
- Take off the outer spiral, auger, sealing ring, and drain pan in turn.
- Wash all disassembled parts with warm, soapy water. Use a soft brush for hard-to-reach areas. Rinse thoroughly and dry completely.
- Clean the main unit's exterior with a damp රෙදි.
- Before reassembly, apply food-grade lubricant (e.g., cooking oil or provided lubricant) to the sealing rings to ensure smooth operation and prevent leaks.
- Reassemble all components in reverse order, ensuring each part is securely in place.

Figure 6: Removable drip trays for easy cleaning
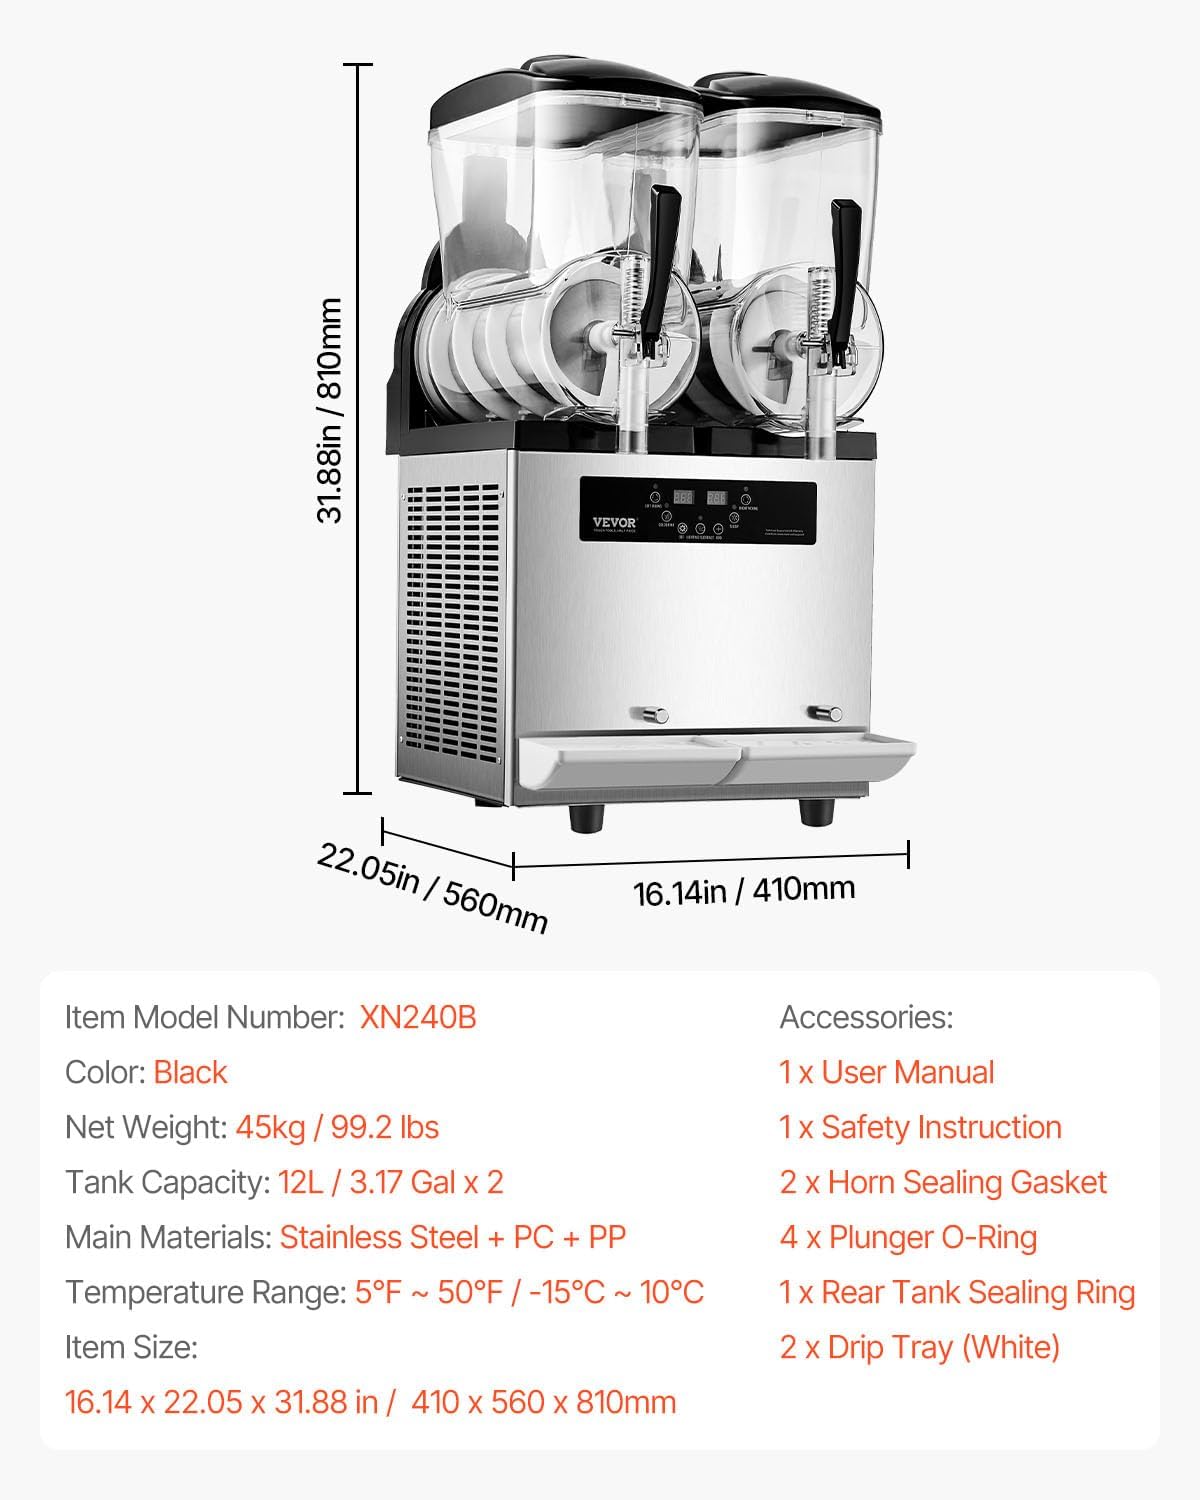
Figure 7: Anti-drip faucet design
Video: Operation of FOHERE Commercial Slushie Machine. This video demonstrates the operation and disassembly for cleaning of a similar commercial slushie machine.
Video: Commercial Slushy Machine. This video shows the setup and cleaning process for a commercial slushy machine.
7. දෝශ නිරාකරණය
| ගැටලුව | විය හැකි හේතුව | විසඳුම |
|---|---|---|
| යන්ත්රය ක්රියාත්මක නොවේ | No power, power switch off | Check power connection, ensure switch is on. |
| Liquid not freezing / Slush too thin | Insufficient sugar content, too much alcohol, incorrect temperature setting | Ensure sugar content is 13-25%. Reduce alcohol content if above 13%. Adjust temperature to a lower setting. |
| Stirrer making rubbing noise | Liquid too thin | Add 1-2 tablespoons of sugar, syrup, or honey per cup to thicken the mixture. |
| Ice block formation | Insufficient sugar content | Add more sugar or concentrate to the mix. |
| Error Code 'LLL' | අඩු වෙළුමtagඊ අනතුරු ඇඟවීම | මෙහෙයුම් පරිමාව පරීක්ෂා කරන්නtagඊ. වෙළුම නම්tage is regular, contact customer support. |
| Leakage from faucet | Improperly seated seal, worn seal | Disassemble and reassemble faucet, ensuring seals are correctly seated. Replace worn seals if necessary. |
8. පිරිවිතර
| විශේෂාංගය | විස්තර |
|---|---|
| ආදර්ශ අංකය | XN240B |
| නිෂ්පාදන මානයන් | අඟල් 38.98 x 23.7 x 19.69 |
| අයිතමයේ බර | රාත්තල් 99.2 කි |
| ටැංකි ධාරිතාව | 2 x 12L / 3.17 GAL |
| උෂ්ණත්ව පරාසය | 5 ~ 50°F / -15 ~ 10°C |
| ප්රධාන ද්රව්ය | Stainless Steel + Food-grade PC + PP |

රූපය 8: නිෂ්පාදන මානයන් සහ ප්රධාන ලක්ෂණ
9. වගකීම් සහ සහාය
VEVOR is committed to providing quality products and excellent customer service. For warranty information, technical support, or any inquiries regarding your VEVOR Commercial Slushy Machine, please refer to the contact information provided in your product packaging or visit the official VEVOR webඅඩවිය.
වගකීම් හිමිකම් සඳහා මිලදී ගැනීමේ සාක්ෂියක් ලෙස කරුණාකර ඔබගේ මිලදී ගැනීමේ රිසිට්පත තබා ගන්න.


