1. හැඳින්වීම
Thank you for choosing the Allsmartlife 50-inch Flush Mount Ceiling Fan with Lights. This manual provides essential information for the safe installation, operation, and maintenance of your new ceiling fan. Please read these instructions thoroughly before beginning installation and retain them for future reference.
වැදගත් ආරක්ෂක තොරතුරු
- Always disconnect power at the main fuse box or circuit breaker before installation or servicing.
- සියලුම රැහැන් ජාතික සහ දේශීය විදුලි කේතවලට අනුකූල විය යුතුය. ඔබ රැහැන් ඇදීම ගැන හුරුපුරුදු නැතිනම්, සුදුසුකම් ලත් විදුලි කාර්මිකයෙකුගෙන් විමසන්න.
- ස්ථාපන අඩවියට විදුලි පංකාවේ බරට (ආසන්න වශයෙන් රාත්තල් 13.5) සහාය විය හැකි බවට වග බලා ගන්න.
- හානියට පත් තල හෝ නිවාස සමඟ විදුලි පංකාව ක්රියාත්මක නොකරන්න.
- Keep hands, clothing, and other objects away from the fan blades when the fan is in operation.

Figure 1: Allsmartlife 50-inch Flush Mount Ceiling Fan with Remote Control

Figure 2: Ceiling Fan in a Bedroom Setting
2. පැකේජ අන්තර්ගතය
පහත ලැයිස්තුගත කර ඇති සියලුම සංරචක ඔබේ පැකේජයට ඇතුළත් කර ඇති බව තහවුරු කරගන්න. කිසියම් කොටසක් අස්ථානගත වී හෝ හානි වී ඇත්නම්, කරුණාකර පාරිභෝගික සහාය අමතන්න.
- සිවිලිමේ විදුලි පංකා මෝටර් නිවාසය
- විදුලි පංකා තල (5)
- ඒකාබද්ධ LED ආලෝක කට්ටලය
- දුරස්ථ පාලකය
- Wall Mount Bracket for Remote
- සවි කිරීමේ දෘඩාංග (ඉස්කුරුප්පු, වයර් ඇට, ආදිය)
- උපදෙස් අත්පොත

Figure 3: Fan Dimensions and Blade Options
3. ස්ථාපන මාර්ගෝපදේශය
Your Allsmartlife ceiling fan comes with pre-assembled parts to simplify installation. For detailed visual instructions, search for installation videos using the model number DY1172X on Google.
සාමාන්ය ස්ථාපන පියවර:
- විදුලිය විසන්ධි කිරීම: ආරම්භ කිරීමට පෙර, පරිපථ කඩනයේදී ස්ථාපන ප්රදේශයට බල සැපයුම අක්රිය කර ඇති බවට වග බලා ගන්න.
- සවිකරන වරහන් ස්ථාපනය: Secure the mounting bracket to the ceiling junction box. Ensure the junction box is adequately supported for the fan's weight.
- රැහැන් ඇදීම: Connect the fan's electrical wires to the household wiring according to the provided wiring diagram in the full manual. Use appropriate wire nuts.
- රසික එකලස් කිරීම: විදුලි පංකා මෝටර නිවාසය සවිකරන වරහනට අමුණන්න.
- බ්ලේඩ් ඇමුණුම: විදුලි පංකා තල පහ මෝටර් නිවාසයට ආරක්ෂිතව සවි කරන්න.
- ආලෝක කට්ටල ස්ථාපනය: ඒකාබද්ධ LED ආලෝක කට්ටලය සම්බන්ධ කර ස්ථාපනය කරන්න.
- බල පුනස්ථාපනය: ස්ථාපනය අවසන් වූ පසු සහ සියලු සම්බන්ධතා ආරක්ෂිත වූ පසු, පරිපථ කඩනයේ බලය ප්රතිස්ථාපනය කරන්න.

Figure 4: Aerodynamic Blade Design and Canopy Features
4. මෙහෙයුම් උපදෙස්
Your ceiling fan is controlled by the included remote control. Ensure the remote has fresh batteries installed.
දුරස්ථ පාලන කාර්යයන්:
- විදුලි පංකාව සක්රිය/අක්රිය: විදුලි පංකාව සක්රිය හෝ අක්රිය කරයි.
- විදුලි පංකා වේගය (1-6): විදුලි පංකා වේගය 1 (අඩුම) සිට 6 (ඉහළම) දක්වා සකසයි.
- ආලෝකය සක්රිය / අක්රිය: Controls the integrated LED light independently.
- Color Temperature (3CCT): Cycles through 3000K (Warm White), 4000K (Natural White), and 6500K (Daylight White).
- දීප්තිය ගැලපීම: Increases or decreases light brightness from 10% to 100%.
- නින්ද ප්රකාරය: Activates a patented mode that varies fan frequency to simulate natural wind.
- ඉදිරියට/ආපසු: සෘතුමය භාවිතය සඳහා තල භ්රමණ දිශාව වෙනස් කරයි.
- ටයිමරය (1H/3H/6H): පැය 1, 3, හෝ 6 කට පසු විදුලි පංකාව ස්වයංක්රීයව නිවා දැමීමට සකසයි.

Figure 5: Remote Control Functionality Overview
Seasonal Operation (Forward/Reverse):
- ගිම්හාන මාදිලිය (පහළට වායු ප්රවාහය): Press the reverse button to set blades to rotate counter-clockwise, creating a downward breeze for cooling.
- ශීත මාදිලිය (ඉහළට වායු ප්රවාහය): Press the reverse button again to set blades to rotate clockwise, drawing warm air up and distributing it evenly without creating a direct draft.

Figure 6: Summer and Winter Airflow Modes
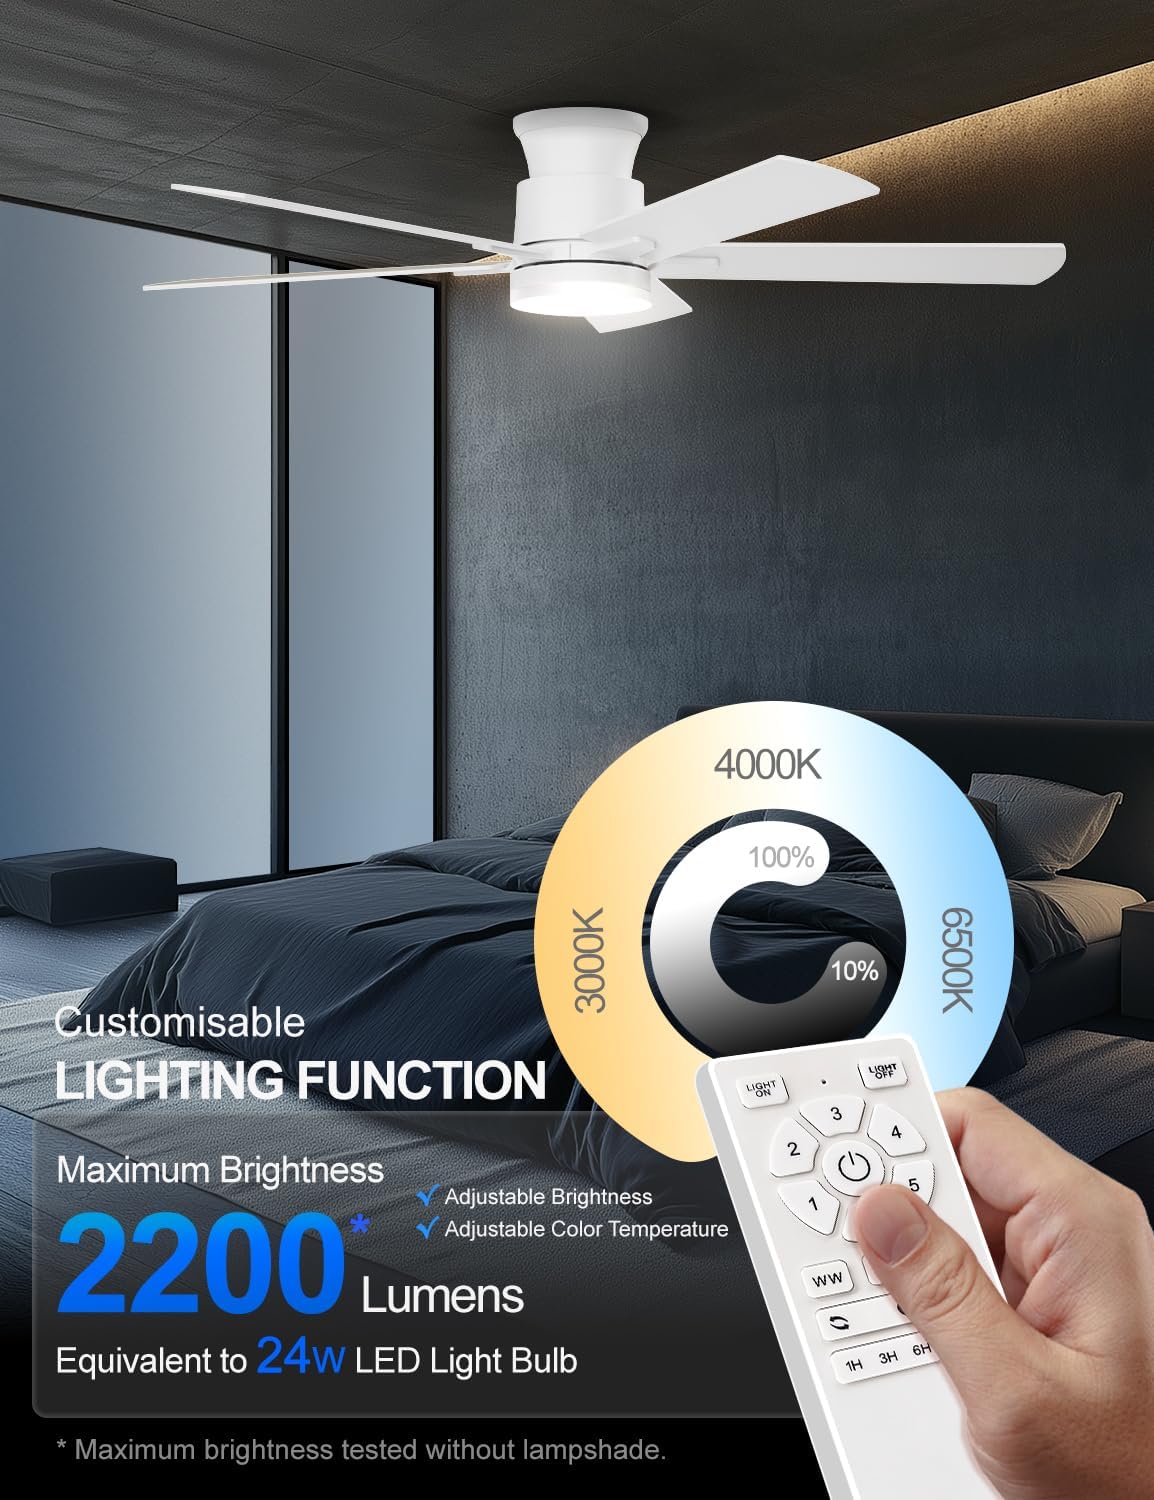
Figure 7: Customizable Lighting Functions
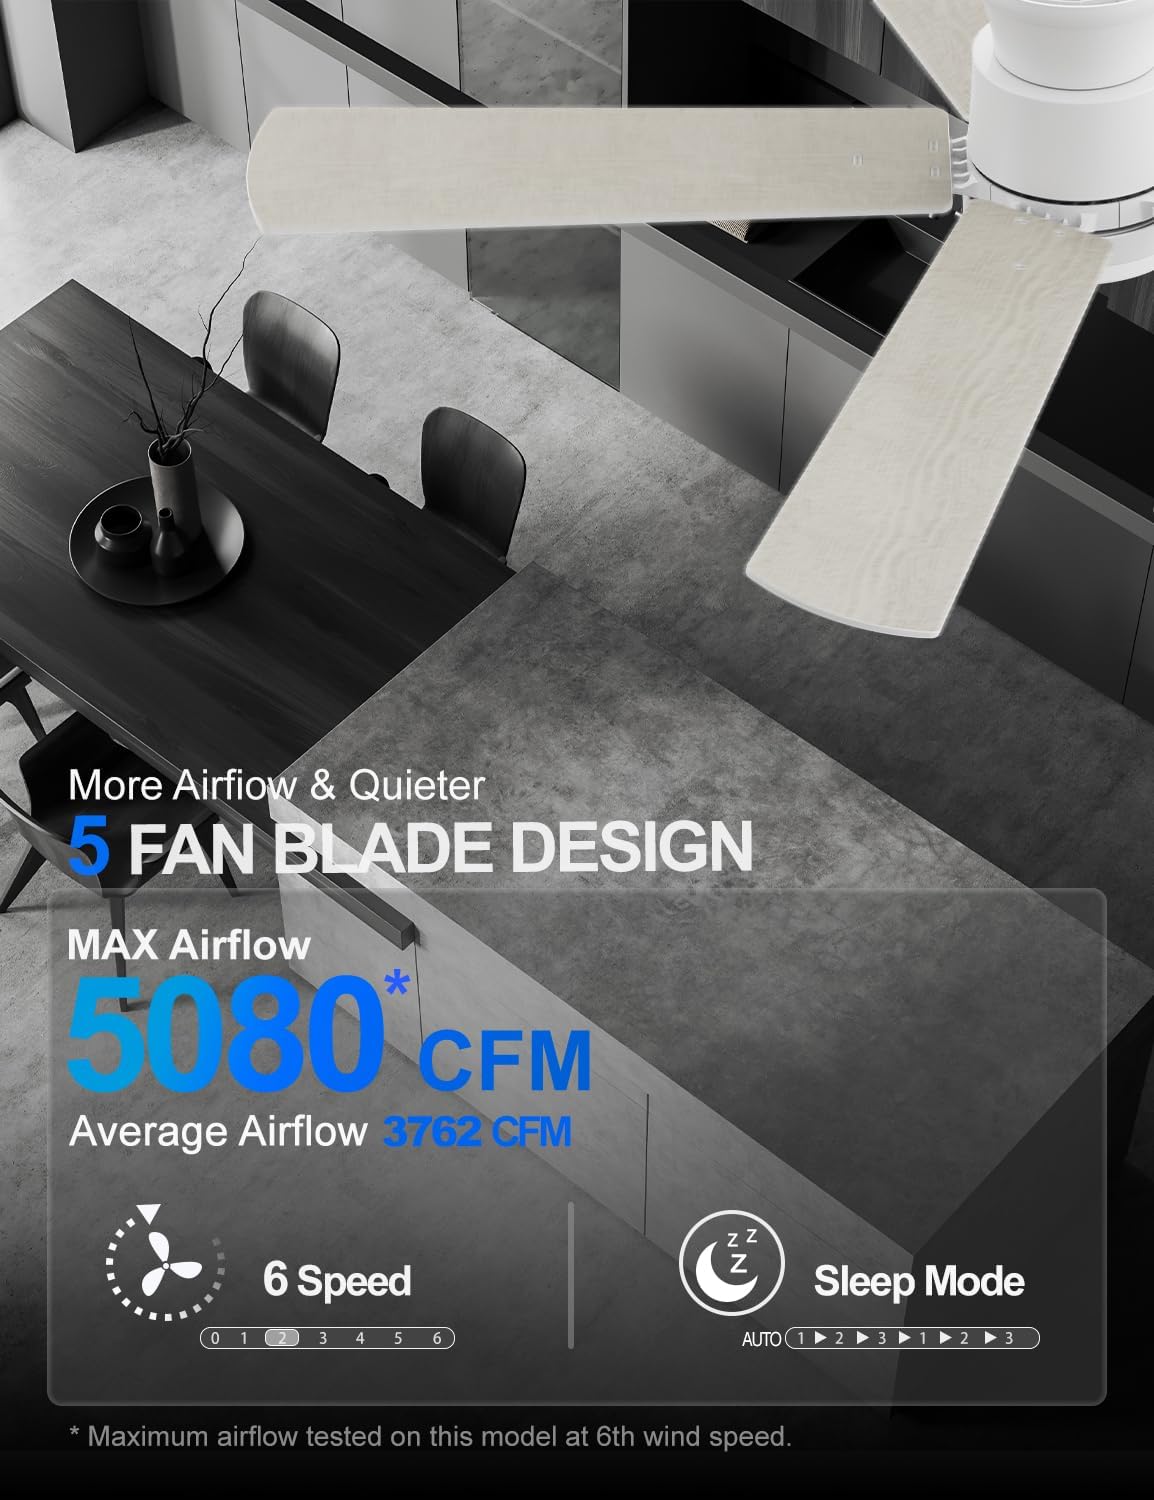
Figure 8: Airflow and Sleep Mode Features
5. නඩත්තු කිරීම
නිතිපතා නඩත්තු කිරීම ප්රශස්ත ක්රියාකාරිත්වය සහතික කරන අතර ඔබේ සිවිලිමේ විදුලි පංකාවේ ආයු කාලය දීර්ඝ කරයි.
- පිරිසිදු කිරීම: වරින් වර විදුලි පංකා තල සහ මෝටර් නිවාස මෘදු, d පිරිසිදු කරන්නෙකු භාවිතයෙන් පිරිසිදු කරන්න.amp රෙදි. උල්ෙල්ඛ පිරිසිදු කරන්නන් හෝ ද්රාවණ භාවිතා නොකරන්න.
- තල පරීක්ෂාව: Check fan blades for any cracks or damage. Replace damaged blades immediately.
- තද බව පරීක්ෂා කිරීම: Ensure all screws and connections are tight at least once a year.
- ආලෝක ප්රභවය: ඒකාබද්ධ LED ආලෝක ප්රභවය දිගුකාලීන භාවිතය සඳහා නිර්මාණය කර ඇති අතර සාමාන්යයෙන් ප්රතිස්ථාපනය අවශ්ය නොවේ.
6. දෝශ නිරාකරණය
ඔබේ විදුලි පංකාව සමඟ ගැටළු ඇති වුවහොත්, පහත පොදු ගැටළු සහ විසඳුම් වෙත යොමු වන්න:
| ගැටලුව | විය හැකි හේතුව | විසඳුම |
|---|---|---|
| විදුලි පංකාව ආරම්භ නොවේ | බල සැපයුමක් නැත ලිහිල් වයර් සම්බන්ධතා දුරස්ථ පාලක බැටරිය ක්රියා විරහිතයි | පරිපථ කඩනය/ෆියුස් පරීක්ෂා කරන්න Verify all wiring connections are secure දුරස්ථ පාලක බැටරි ප්රතිස්ථාපනය කරන්න |
| ආලෝකය ක්රියා නොකරයි | Light switch off ලිහිල් වයර් සම්බන්ධතාවය දුරස්ථ පාලක බැටරිය ක්රියා විරහිතයි | Ensure light is turned on via remote Check light kit wiring දුරස්ථ පාලක බැටරි ප්රතිස්ථාපනය කරන්න |
| විදුලි පංකාව වෙව්ලනවා | ලිහිල් තල ඉස්කුරුප්පු අසමතුලිත තල ලිහිල් සවි කිරීම් වරහන | සියලුම බ්ලේඩ් ඉස්කුරුප්පු තද කරන්න Ensure blades are evenly weighted and installed Check mounting bracket for secure installation |
| දුරස්ථ පාලකය ප්රතිචාර නොදක්වයි | බැටරිය මැරිලා දුරස්ථ පාලකය යුගල කර නැත (අදාළ නම්) රිමෝට් සහ රිසීවරය අතර බාධාව | බැටරි ප්රතිස්ථාපනය කරන්න Refer to pairing instructions in the full manual පැහැදිලි දෘෂ්ටි රේඛාවක් සහතික කරන්න |
7. නිෂ්පාදන පිරිවිතර
| විශේෂාංගය | විස්තර |
|---|---|
| වෙළඳ නාමය | Allsmartlife |
| මාදිලියේ නම | 1172X |
| ප්රමාණය | අඟල් 50 |
| වර්ණය | නැවුම් සුදු |
| නිෂ්පාදන මානයන් | 50"D x 50"W x 10.5"H |
| අයිතමයේ බර | රාත්තල් 13.5 කි |
| මෝටර් වර්ගය | බුරුසු රහිත DC මෝටරය |
| බ්ලේඩ් ගණන | 5 |
| විදුලි පංකා වේගය | 6 |
| වායු ප්රවාහ ධාරිතාව | විනාඩියකට ඝන අඩි 3762 (CFM) |
| ආලෝක වර්ගය | ඒකාබද්ධ LED |
| දීප්තිය | Up to 2200 lumens (10%-100% adjustable) |
| වර්ණ උෂ්ණත්වය | 3000K (උණුසුම් සුදු), 4000K (ස්වාභාවික සුදු), 6500K (දිවා ආලෝකය සුදු) |
| පාලන ක්රමය | දුරස්ථ පාලකය |
| වෙළුමtage | වෝල්ට් 120 |
| වට්tage | වොට් 32 යි |
| ගෘහස්ථ / එළිමහන් භාවිතය | Indoor, Outdoor (with specific humidity and rain exposure guidelines) |
| සහතික කිරීම | ETL |

Figure 9: DC Brushless Motor Noise Comparison

Figure 10: Room Size Recommendation Guide

Figure 11: Guidelines for Outdoor Use
8. වගකීම් සහ සහාය
Allsmartlife offers a lifetime of free replacement service for parts. If you require any assistance, have questions, or need to claim warranty service, please contact our customer support team. We are committed to providing prompt and effective solutions.
For further support, please refer to the contact information provided with your purchase or visit the official Allsmartlife webඅඩවිය.