1. හැඳින්වීම
This manual provides detailed instructions for the setup, operation, and maintenance of the waveshare ESP32-S3 1.8inch Knob Display Development Board. This high-performance, highly integrated MCU board is designed for various interactive applications, featuring an ESP32-S3 dual-core processor, a 1.8-inch capacitive touch display, and extensive wireless connectivity options.

රූපය 1.1: ඉදිරිපස view of the waveshare ESP32-S3 1.8inch Knob Display Development Board, showcasing its circular display and blue textured knob.
2. පැකේජ අන්තර්ගතය
පහත ලැයිස්තුගත කර ඇති සියලුම අයිතම ඔබේ පැකේජයට ඇතුළත් කර ඇති බව තහවුරු කරගන්න. කිසියම් අයිතමයක් අස්ථානගත වී හෝ හානි වී ඇත්නම්, කරුණාකර පාරිභෝගික සහාය අමතන්න.
- ESP32-S3-Knob-Touch-LCD-1.8-EN × 1
- Back cover × 1
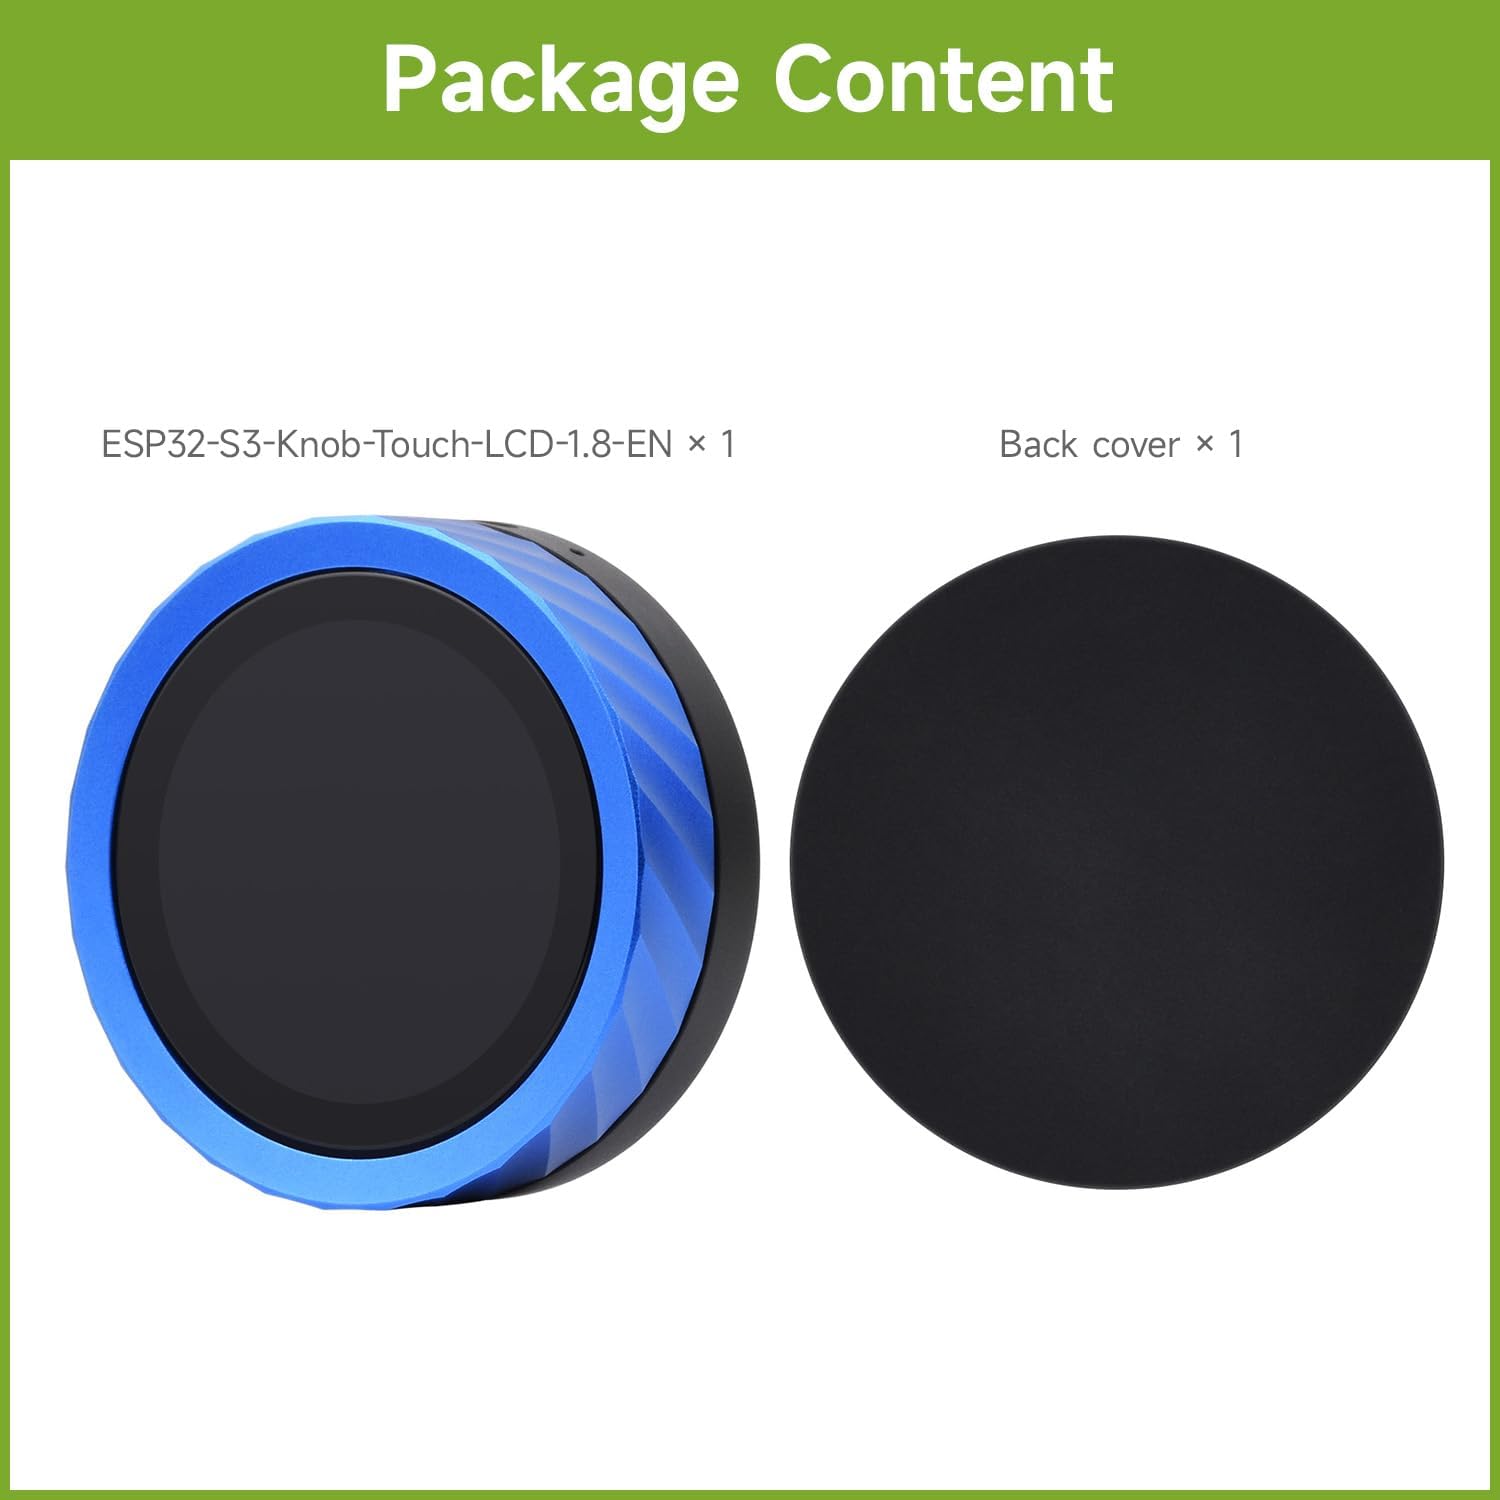
Image 2.1: The package includes the ESP32-S3 Knob Display Development Board and a separate back cover.
3 ප්රධාන ලක්ෂණ
The waveshare ESP32-S3 1.8inch Knob Display Development Board offers a range of advanced features:
- අඟල් 1.8 ක ධාරිත්රක ස්පර්ශ තිරය: Provides excellent touch sensitivity for interactive applications.
- ESP32-S3 Chip: High-performance dual-core processing with hardware support for AI and machine learning tasks.
- Dual Wireless Connectivity: Integrated Wi-Fi and Bluetooth 5.0 for seamless IoT and remote control applications.
- Audio and Voice Integration: Equipped with an audio decoder and microphone for voice recognition and audio playback.
- නම්යශීලී බල සැපයුම: Can be powered via USB Type-C or a 3.7V lithium battery.
- CNC Process Metal Case: කල් පවතින හා සෞන්දර්යාත්මකව හිතකරයිasing enclosure.

Image 3.1: Visual representation of the board highlighting its multi-functional knob screen, wireless connection, and CNC metal case, along with icons for Pomodoro Timer, Bluetooth, Volume Control, Video Playback, Digital Photo Frame, AIDA64 Wireless Aux Display, Audio Spectrum, E-book, and CNC Process.
4. තාක්ෂණික පිරිවිතර
Detailed technical specifications for the ESP32-S3 1.8inch Knob Display Development Board:
| විශේෂාංගය | විස්තර |
|---|---|
| සංදර්ශක පැනලය | IPS |
| සංදර්ශක ප්රමාණය | අඟල් 1.8 |
| විභේදනය | 360 × 360 |
| සංදර්ශක වර්ණය | 262K |
| දීප්තිය | 600cd/m² |
| පරස්පර අනුපාතය | 1200:1 |
| සන්නිවේදන අතුරුමුහුණත | QSPI |
| රියදුරු අයි.සී | ST77916 |
| ස්පර්ශ වර්ගය | ධාරිත්රක |
| IC ස්පර්ශ කරන්න | CST816 |
| රැහැන් රහිත සම්බන්ධතාව | 2.4GHz Wi-Fi (802.11 b/g/n) and Bluetooth 5 (LE) |
| ෆ්ලෑෂ් මතකය | 16MB |
| PSRAM | 8MB |
| ශ්රව්ය උපකරණ | Audio decoder chip, microphone |
| බල සැපයුම | USB Type-C or 3.7V Lithium Battery |

Image 4.1: A visual table detailing the LCD specifications and examples of application scenarios for the development board.
5. යෙදුම් අවස්ථා
The versatility of the ESP32-S3 Knob Display Development Board allows for a wide range of applications:
- බහු ප්රතිදාන: Can function as an information output unit for both display and audio, enabling rich interaction in image and sound.
- Human-machine Interface (HMI): Serves as a medium for interaction and information exchange between the system and the user.
- බහු ආදාන: Supports touch and voice recognition, allowing for custom equipment control projects.
- LVGL GUI Development: Utilizes the LVGL open-source graphics library for creating embedded GUIs with visual effects and low memory requirements.
6. මූලික සැකසුම
To begin using your waveshare ESP32-S3 1.8inch Knob Display Development Board, follow these general steps:
- බල සම්බන්ධතාවය: Connect the board to a power source using a USB Type-C cable. Alternatively, if using a 3.7V lithium battery, ensure it is properly connected to the battery header.
- මෘදුකාංග පරිසරය: Set up your development environment. This typically involves installing the ESP-IDF (Espressif IoT Development Framework) or Arduino IDE with ESP32 board support.
- ධාවක ස්ථාපනය: Install necessary USB-to-UART drivers for your operating system to enable communication with the board.
- Firmware Upload: Upload your desired firmware or example code to the board via the USB Type-C port. Refer to the official Waveshare Wiki for detailed programming guides and examples.
- මූලික පරීක්ෂණය: After uploading, the display should power on and show the programmed interface. Test the knob and touch functionalities.
For detailed programming instructions and resources, please visit the Waveshare Wiki.
7. මෙහෙයුම් උපදෙස්
The ESP32-S3 Knob Display Development Board is designed for intuitive interaction. Its primary control mechanisms include the rotary knob and the capacitive touchscreen.
7.1. Smart Rotary Knob and Touch Display
The integrated rotary knob and touch display allow for versatile control and interaction:
- බුද්ධිමය පාලනය: Rotate the knob to navigate menus, adjust values, or scroll through content. The capacitive touch screen allows for direct interaction with on-screen elements.
- Pomodoro Timer Themes: Supports various Pomodoro Timer themes for productivity and playful applications.

Image 7.1: Demonstrates the smart rotary knob display in use, showing different interface themes and intuitive control with fingertips.
7.2. Media Playback and Display Functions
- Smartphone Bluetooth Connection for Music Playback: Connect your smartphone via Bluetooth to play music. The board supports audio output via a 3.5mm jack. You can upload lyrics and covers, and control volume by sliding the knob.
Note: The product does not have a built-in speaker. An external speaker must be connected via the 3.5mm audio jack for music playback.
- Seamless Left-Right Swipe: Utilize swipe gestures to switch between photos or videos, functioning as a digital photo frame or video player.
- විද්යුත් පොත් කියවීම: Supports TXT file reading, allowing you to swipe through stories directly on the display.
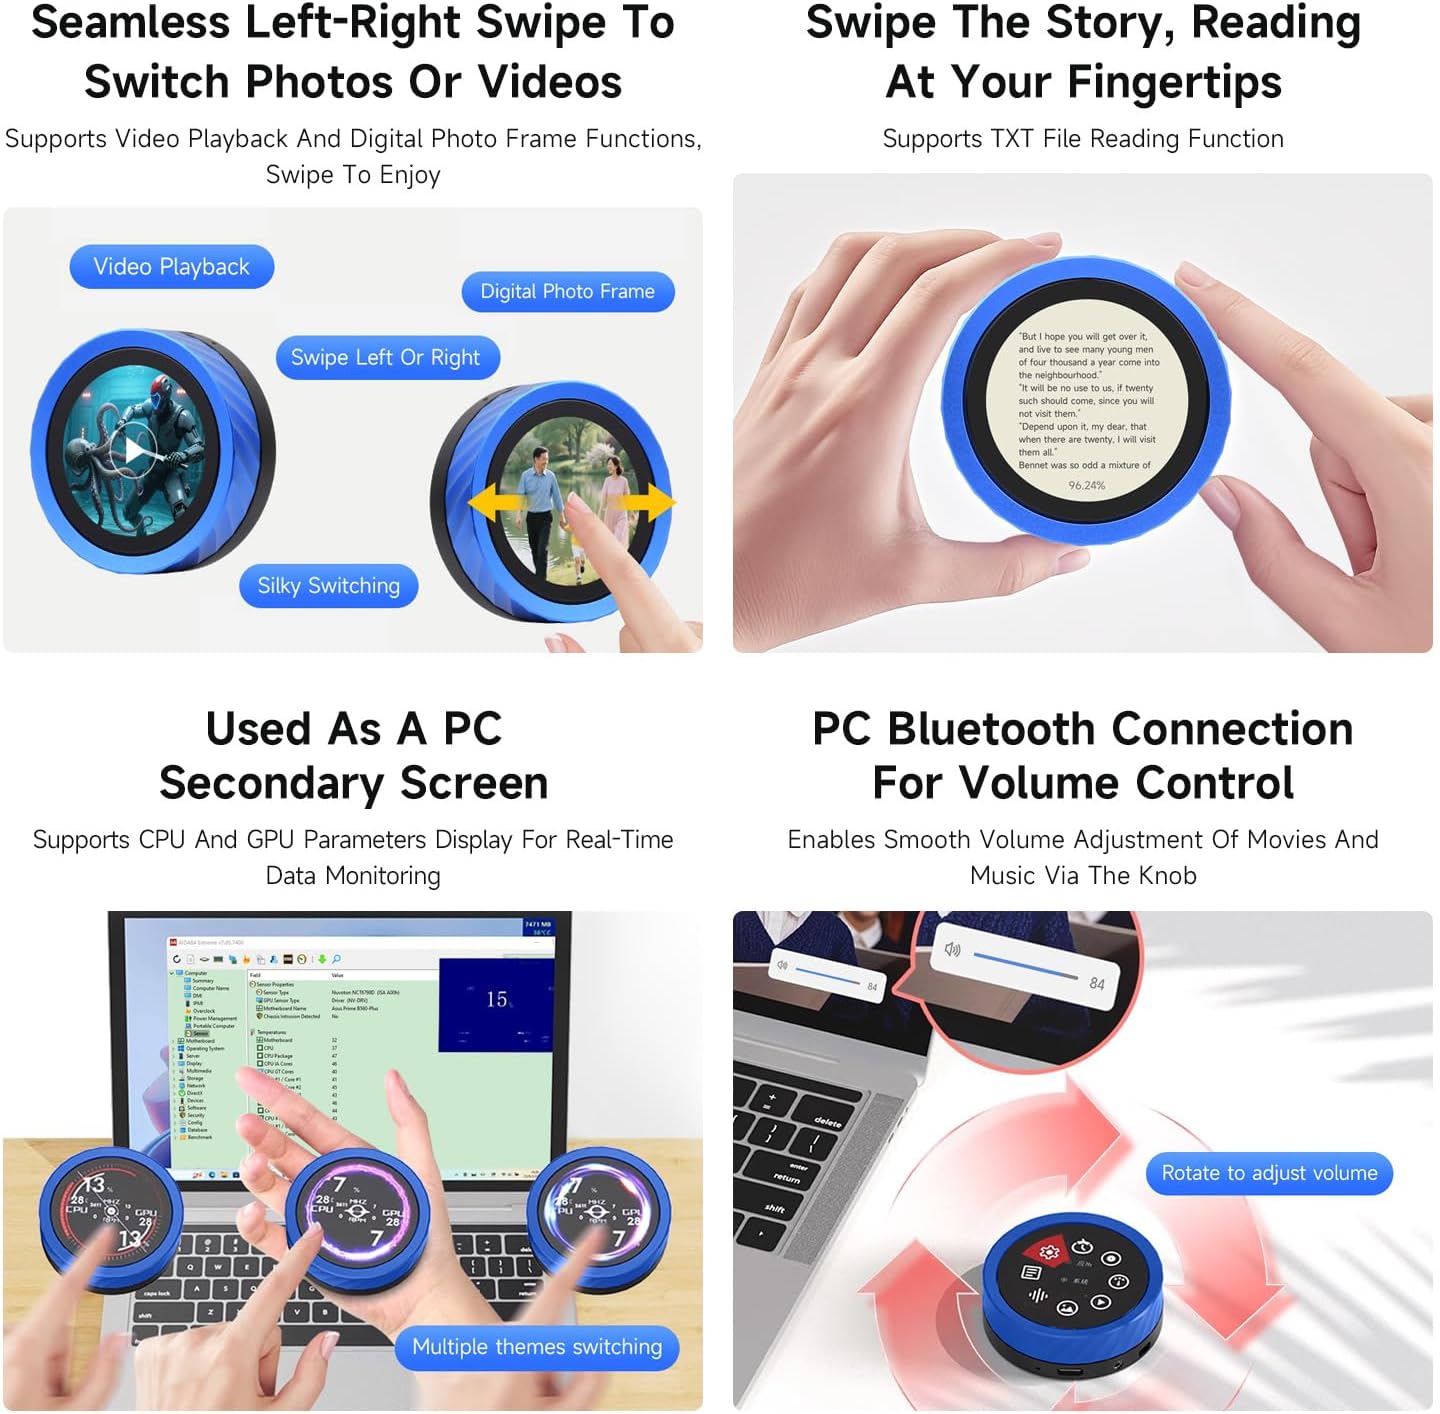
Image 7.2: Illustrates the precision-machined CNC metal case and the board's capability to connect to a smartphone via Bluetooth for music playback, requiring an external speaker.
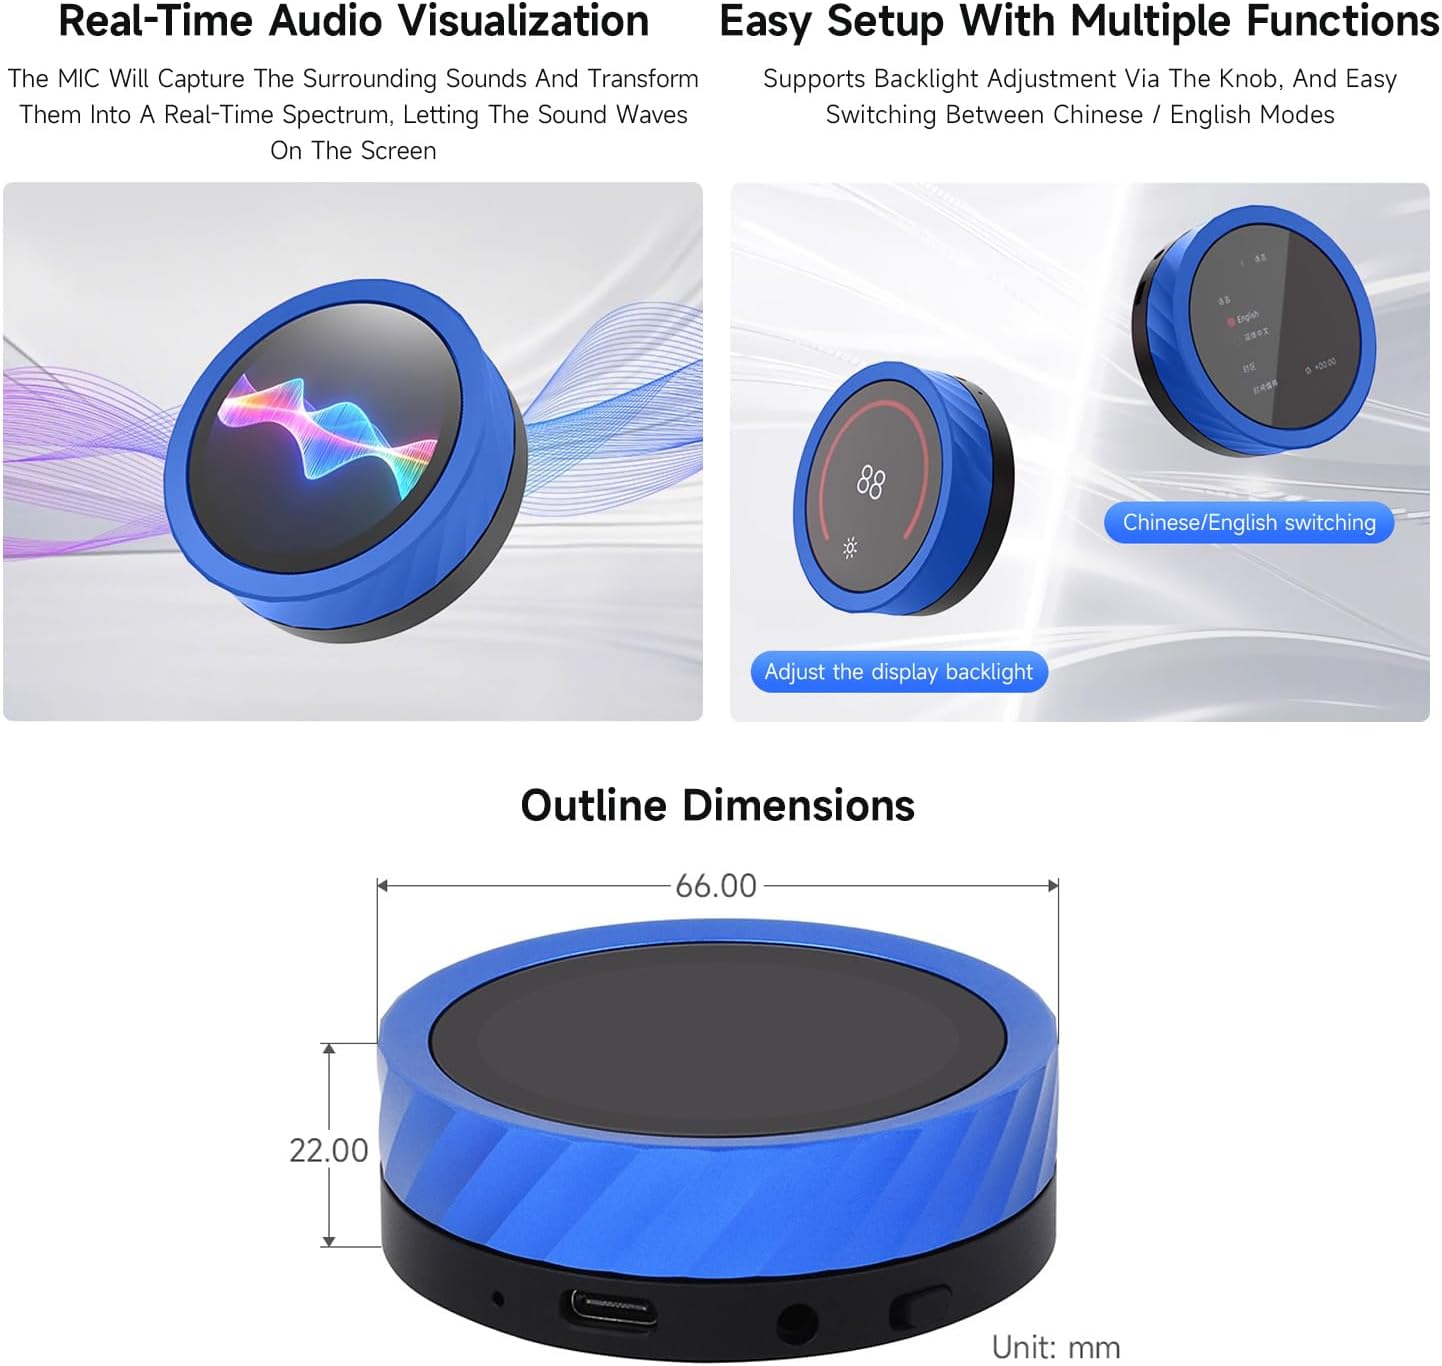
Image 7.3: Shows the left-right swipe functionality for switching between video playback and digital photo frames, and the display reading a text file.
7.3. PC Integration
- PC Secondary Screen: Can be used to display CPU and GPU parameters for real-time data monitoring.
- PC Bluetooth Volume Control: Connect to your PC via Bluetooth to smoothly adjust movie and music volume using the rotary knob.
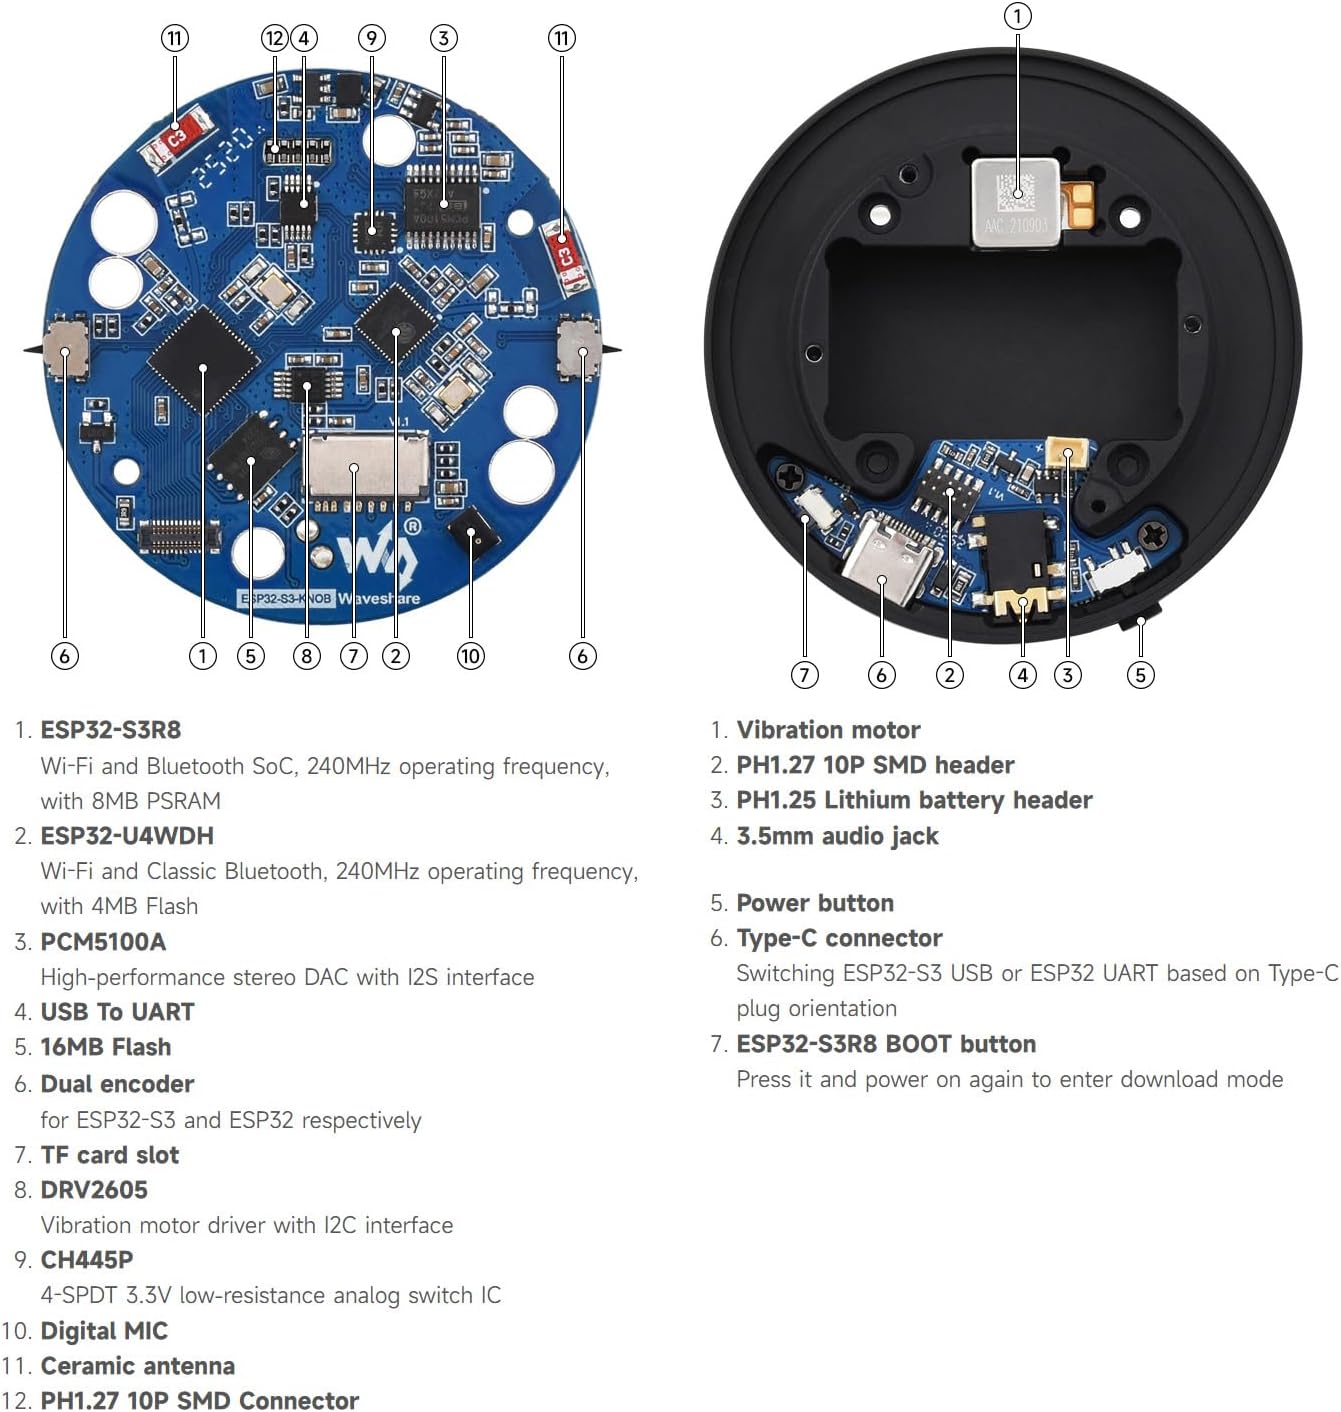
Image 7.4: Depicts the board functioning as a secondary PC screen for monitoring system parameters and controlling PC volume via Bluetooth.
7.4. Audio Visualization and Setup
- Real-Time Audio Visualization: The built-in microphone captures surrounding sounds and transforms them into a real-time spectrum displayed on the screen.
- Easy Setup with Multiple Functions: Supports backlight adjustment via the knob and easy switching between Chinese and English display modes.

Image 7.5: Shows the real-time audio spectrum visualization feature and the ease of adjusting backlight and switching languages using the knob.
8. Board Components Overview
Understanding the components of the development board is crucial for advanced usage and troubleshooting.

Image 8.1: An annotated diagram showing the internal components of the board, including the ESP32-S3R8, ESP32-U4WDH, PCM5100A, USB to UART, 16MB Flash, Dual encoder, TF card slot, DRV2605, CH445P, Digital MIC, Ceramic antenna, and PH1.27 10P SMD Connector.
Key components and their functions:
- කම්පන මෝටරය: ස්පර්ශ ප්රතිපෝෂණ සපයයි.
- PH1.27 10P SMD header: Connector for external components.
- PH1.25 Lithium battery header: 3.7V ලිතියම් බැටරියක් සම්බන්ධ කිරීම සඳහා.
- 3.5mm ශ්රව්ය ජැක්: බාහිර කථිකයන් හෝ හෙඩ්ෆෝන් සම්බන්ධ කිරීම සඳහා.
- බල බොත්තම: Controls power on/off.
- Type-C සම්බන්ධකය: Used for power supply, data transfer (USB to UART), and firmware uploading. Supports switching between ESP32-S3 USB or ESP32 UART based on Type-C plug orientation.
- ESP32-S3R8 BOOT button: Press and power on again to enter download mode for firmware updates.
- ESP32-S3R8: Wi-Fi and Bluetooth SoC, 240MHz operating frequency, with 8MB PSRAM.
- ESP32-U4WDH: Wi-Fi and Classic Bluetooth, 240MHz operating frequency, with 4MB Flash.
- PCM5100A: High-performance stereo DAC with I2S interface.
- USB To UART: අනුක්රමික සන්නිවේදනය සඳහා.
- 16MB Flash: Storage for firmware and data.
- Dual encoder: For ESP32-S3 and ESP32 respectively, likely referring to the rotary knob's encoder.
- TF කාඩ්පත් තව්: පුළුල් කළ හැකි ගබඩා කිරීම සඳහා.
- DRV2605: Vibration motor driver with I2C interface.
- CH445P: 4-SPDT 3.3V low-resistance analog switch IC.
- Digital MIC: For audio input and voice recognition.
- Ceramic antenna: රැහැන් රහිත සන්නිවේදනය සඳහා.
9. Outline Dimensions
The physical dimensions of the waveshare ESP32-S3 1.8inch Knob Display Development Board are as follows:

Image 9.1: Technical drawing showing the top and side view dimensions of the board, with a diameter of 66.00 mm and a height of 22.00 mm.
- විෂ්කම්භය: 66.00 මි.මී
- උස: 22.00 මි.මී
10. නඩත්තු කිරීම
Proper maintenance ensures the longevity and optimal performance of your development board:
- පිරිසිදු කිරීම: සංදර්ශකය පිරිසිදු කිරීමට මෘදු, වියළි රෙද්දක් භාවිතා කරන්න සහ සීasinඋල්ෙල්ඛ පිරිසිදු කරන්නන් හෝ ද්රාවක භාවිතා කිරීමෙන් වළකින්න.
- ගබඩා: Store the board in a cool, dry environment, away from direct sunlight and extreme temperatures.
- හැසිරවීම: Handle the board with care to avoid physical damage to components or the display.
- ස්ථිරාංග යාවත්කාලීන කිරීම්: Regularly check the Waveshare Wiki for firmware updates to ensure you have the latest features and bug fixes.
11. දෝශ නිරාකරණය
If you encounter issues with your ESP32-S3 Knob Display Development Board, refer to the following common problems and solutions:
| ගැටලුව | විය හැකි හේතුව / විසඳුම |
|---|---|
| පුවරුව ක්රියාත්මක නොවේ. |
|
| සංදර්ශකය හිස් හෝ ප්රතිචාර නොදක්වයි. |
|
| Cannot upload firmware. |
|
| Bluetooth or Wi-Fi not connecting. |
|
| Knob or touch input not working. |
|
For more advanced troubleshooting and community support, please refer to the official Waveshare Wiki or contact Waveshare technical support.
12. වගකීම් සහ සහාය
Waveshare products typically come with a standard manufacturer's warranty. For specific warranty terms and conditions, please refer to the documentation included with your purchase or visit the official Waveshare webඅඩවිය.
For technical support, additional resources, and community forums, please visit the official Waveshare Wiki:
https://www.waveshare.com/wiki/ESP32-S3-Knob-Touch-LCD-1.8-EN
You can also contact Waveshare customer service directly through their official webඋදව් සඳහා අඩවිය.


