1. හැඳින්වීම
This manual provides detailed instructions for the installation, operation, and maintenance of your ORICO 5-Bay RAID External Hard Drive Enclosure (Model 9958RU3). This device is designed to accommodate up to five 2.5-inch or 3.5-inch SATA HDDs/SSDs, supporting a total capacity of up to 110TB (22TB per disk). It features a USB 3.0 Type-A interface for data transfer and supports various RAID modes including RAID 0, 1, 3, 5, 10, JBOD, Clone, and ClearMode.
The enclosure is built with an all-aluminum alloy housing and an integrated cooling fan to ensure efficient heat dissipation and stable performance. Please read this manual thoroughly before using the product to ensure proper setup and operation.
2. නිෂ්පාදන අවසන්view
2.1 පැකේජයේ අන්තර්ගතය
සියලුම අයිතම පැකේජයේ ඇති බව තහවුරු කරගන්න:
- 1 x ORICO 5-Bay DAS Enclosure
- 1 x ඉස්කුරුප්පු නියනක්
- 1 x බල කේබලය
- 1 x Data Cable (USB 3.0 Type-A)
- 1 x ඉස්කුරුප්පු ඇසුරුම
- 1 x පරිශීලක අත්පොත
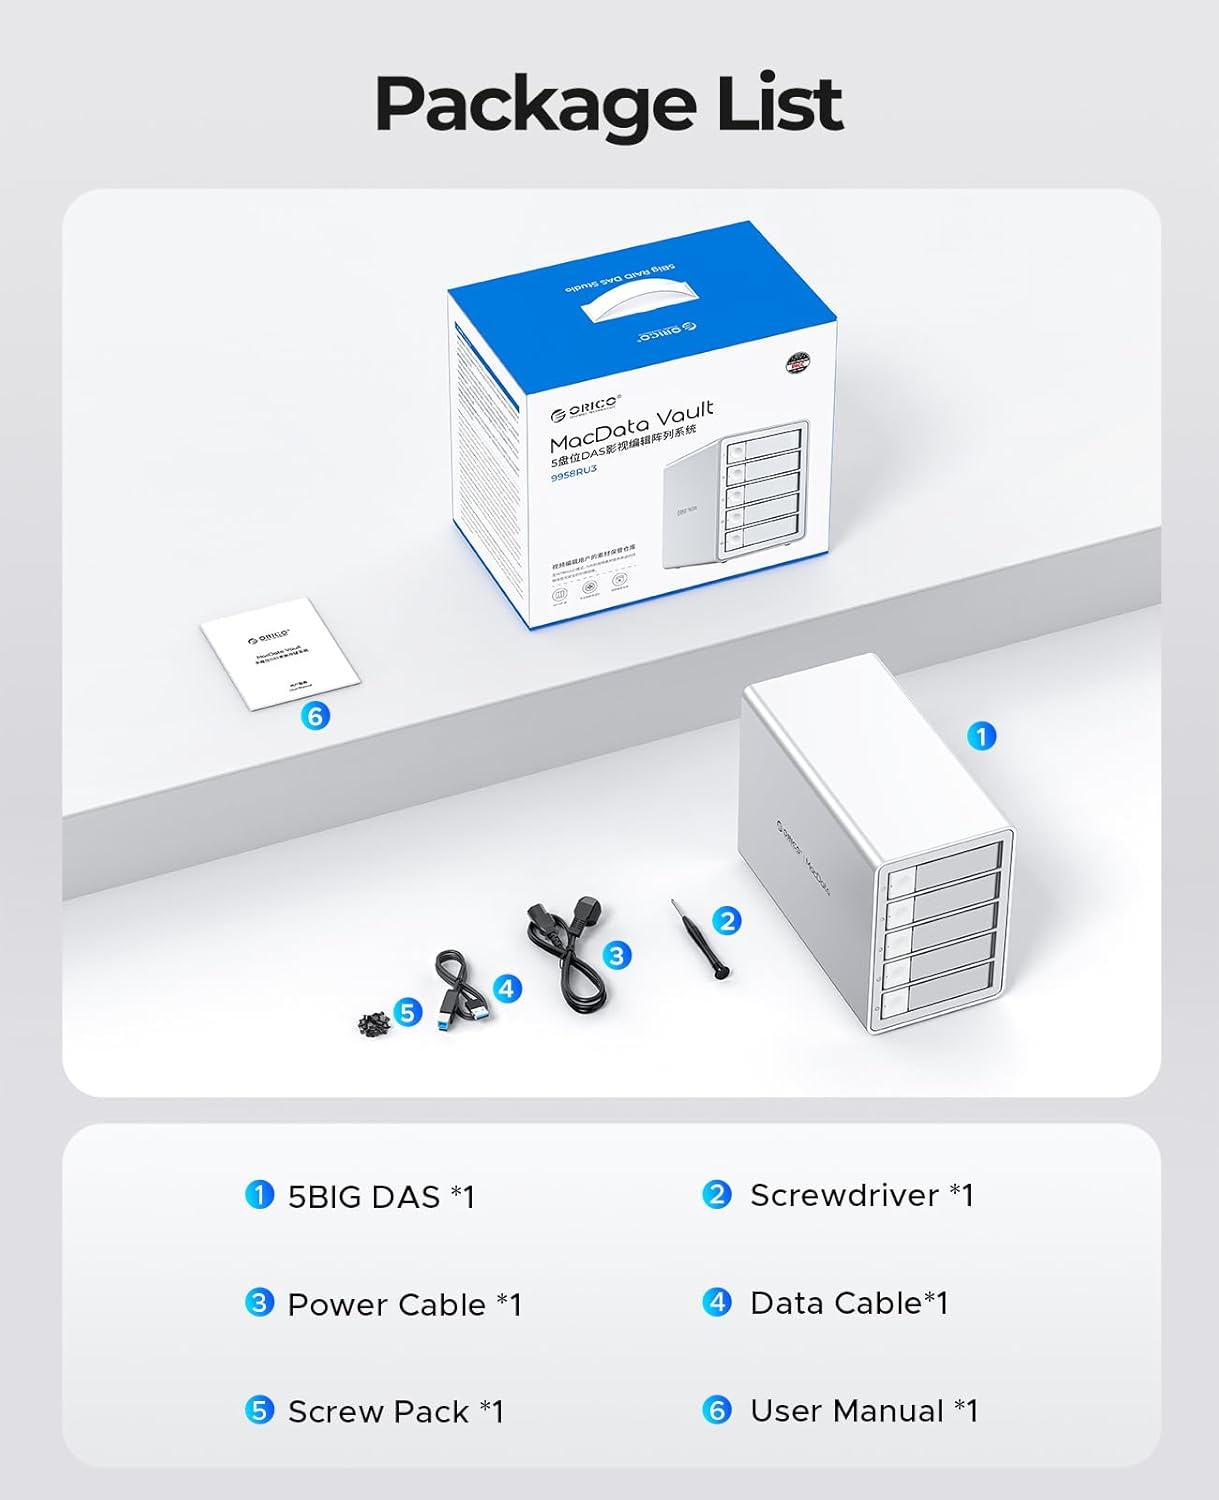
Image: Contents of the ORICO 5-Bay RAID Enclosure package, showing the enclosure, cables, screwdriver, screw pack, and user manual.
2.2 උපාංග විශේෂාංග
- Massive Storage: Supports up to 5 x 22TB drives for a total of 110TB capacity.
- අධිවේගී දත්ත හුවමාරුව: USB 3.0 interface provides transfer speeds up to 5Gbps (235MB/s).
- Multiple RAID Modes: Supports RAID 0, 1, 3, 5, 10, JBOD, Clone, and ClearMode for flexible data management.
- කාර්යක්ෂම තාප විසුරුවා හැරීම: All-aluminum alloy housing with an 80mm silent cooling fan and strategically placed vents.
- ආරක්ෂිත ආරක්ෂාව: Independent safety locking mechanism for drive bays and built-in 150W power supply with overcurrent, short circuit, static, and overheat protection.
- ස්මාර්ට් නින්ද ප්රකාරය: Automatically enters hibernation after 10 minutes of data-free interaction to reduce wear and power consumption.
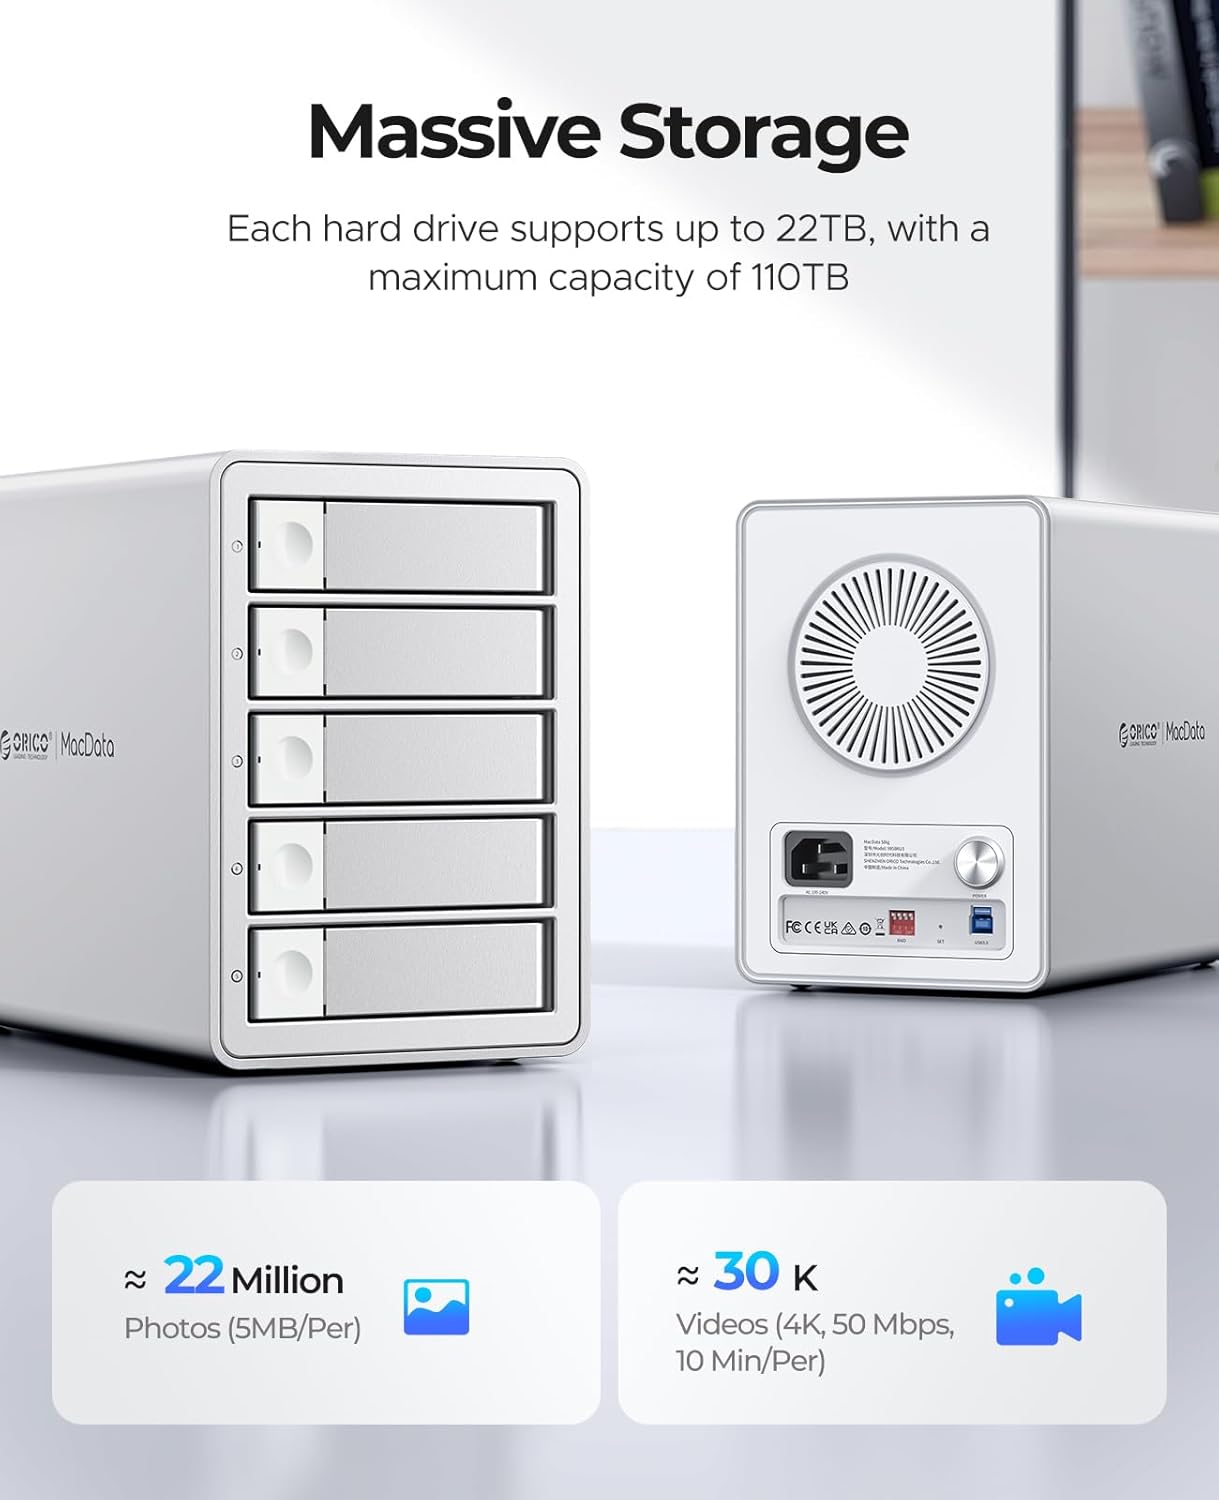
රූපය: ඉදිරිපස සහ පසුපස view of the ORICO 5-Bay RAID Enclosure, highlighting its massive storage capacity and rear panel features.
3. පිහිටුවීම
3.1 දෘඪ තැටි ස්ථාපනය
Follow these steps to install 2.5-inch or 3.5-inch SATA HDDs/SSDs into the enclosure:
- Press the door button located on the left side of the drive bay to open and release the drive tray.
- Pull out the hard drive bracket (tray) from the enclosure.
- Place your 2.5-inch SSD/HDD or 3.5-inch HDD into the bracket. Align the screw holes on the drive with the fixing holes on the bracket.
- Use the provided screwdriver and screws to secure the hard drive firmly into the bracket.
- Slide the loaded bracket back into the empty drive bay until it clicks into place. Ensure the safety locking mechanism engages.
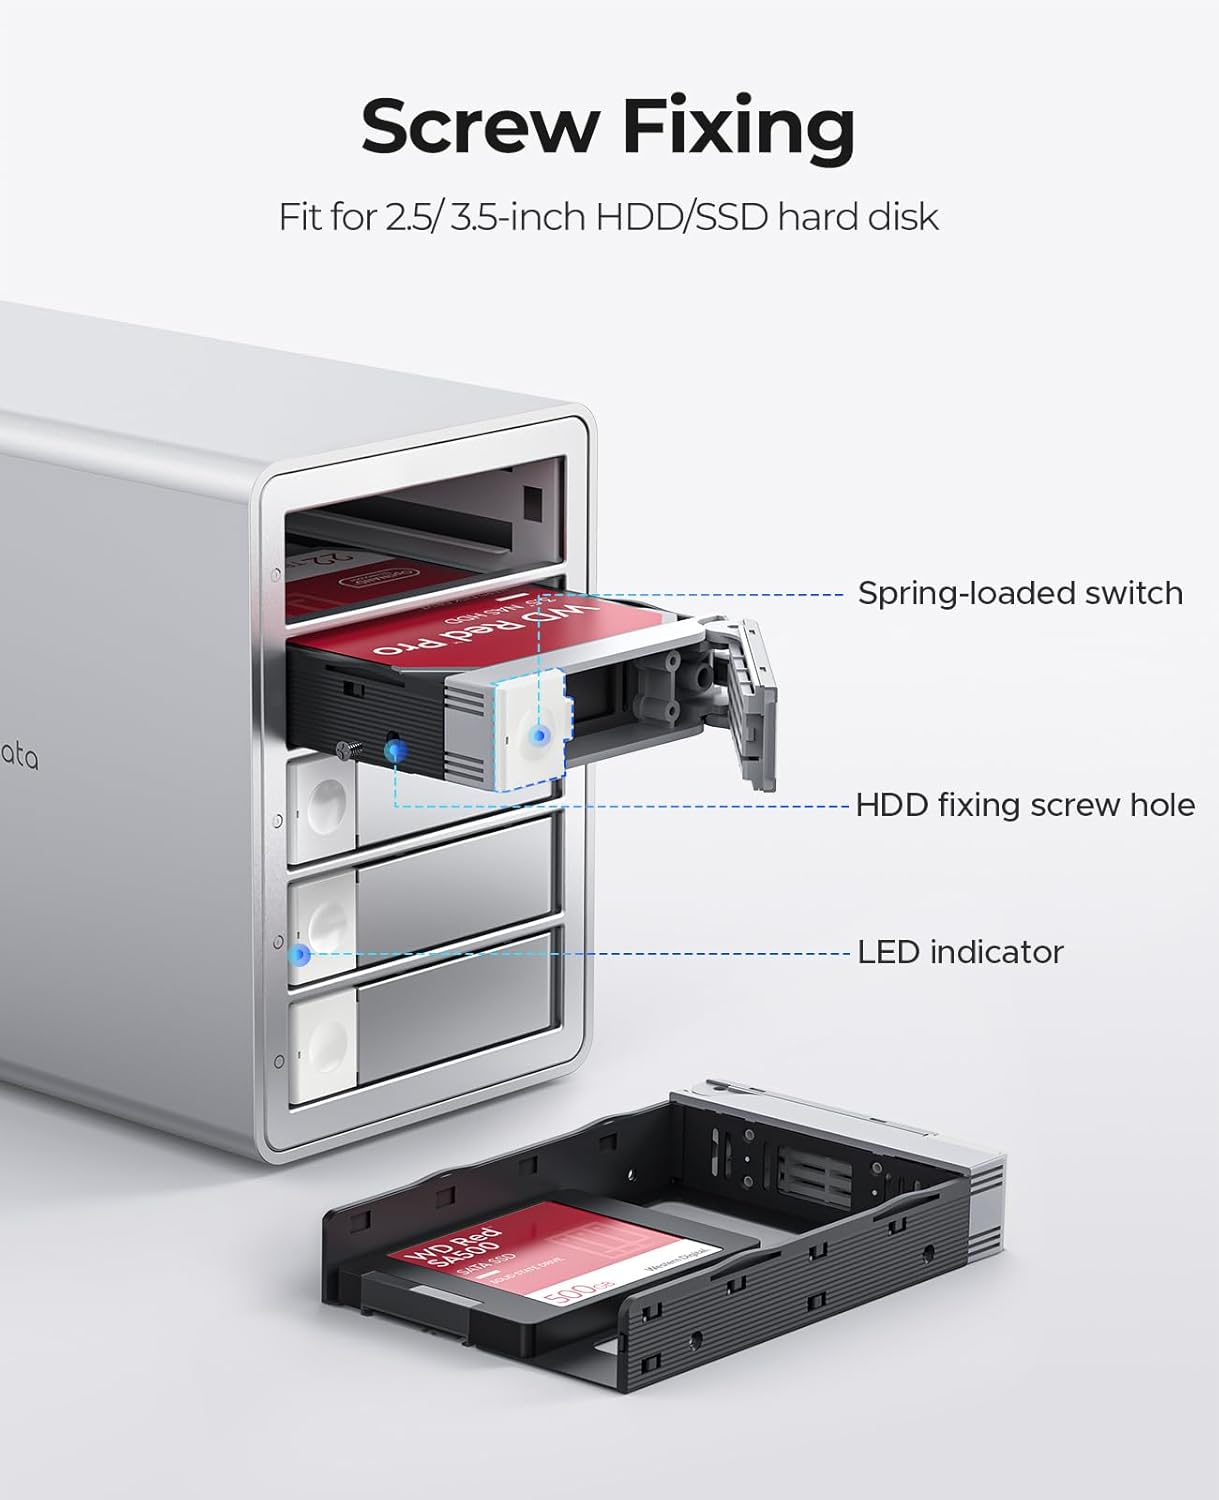
රූපය: විස්තරාත්මක view of installing a hard drive into the ORICO enclosure's tray, showing the screw fixing points and LED indicator.

Image: Step-by-step visual guide for installing hard drives into the ORICO 5-Bay RAID Enclosure.
3.2 පරිගණකයකට සම්බන්ධ වීම
- Connect the provided USB 3.0 data cable from the enclosure's USB port to an available USB 3.0 (or higher) port on your computer.
- Connect the power cable to the enclosure's power input and then to a power outlet.
- Press the power button on the rear of the enclosure to turn it on. The LED indicators on the front panel will illuminate.
The enclosure is universally compatible with Windows, macOS, and Linux operating systems, and can be connected to desktops, laptops, and tablets.

Image: Illustrates the universal compatibility of the ORICO 5-Bay RAID Enclosure with various devices and operating systems.
4. ක්රියාත්මක වීම
4.1 RAID Mode Configuration
The ORICO 9958RU3 supports various RAID modes configured via DIP switches on the rear panel. WARNING: Always back up all data before changing the RAID mode, as this process will erase all data on the drives.
To configure RAID:
- Ensure the enclosure is powered off and disconnected from the computer.
- Locate the DIP switches on the rear panel.
- Set the DIP switches according to the desired RAID mode as shown in the diagram below.
- Connect the enclosure to your computer and power it on.
- Initialize and format the new RAID volume through your operating system's disk management utility.
| RAID මාදිලිය | ඩීඅයිපී ස්විච් 1 | ඩීඅයිපී ස්විච් 2 | ඩීඅයිපී ස්විච් 3 | ඩීඅයිපී ස්විච් 4 |
|---|---|---|---|---|
| වැටලීම 0 | ON | අක්රියයි | අක්රියයි | අක්රියයි |
| RAID 1/10 | අක්රියයි | ON | අක්රියයි | අක්රියයි |
| වැටලීම 3 | අක්රියයි | අක්රියයි | ON | අක්රියයි |
| වැටලීම 5 | අක්රියයි | අක්රියයි | අක්රියයි | ON |
| SPAN (Big) | ON | ON | අක්රියයි | අක්රියයි |
| Normal/Clear | ON | අක්රියයි | ON | අක්රියයි |
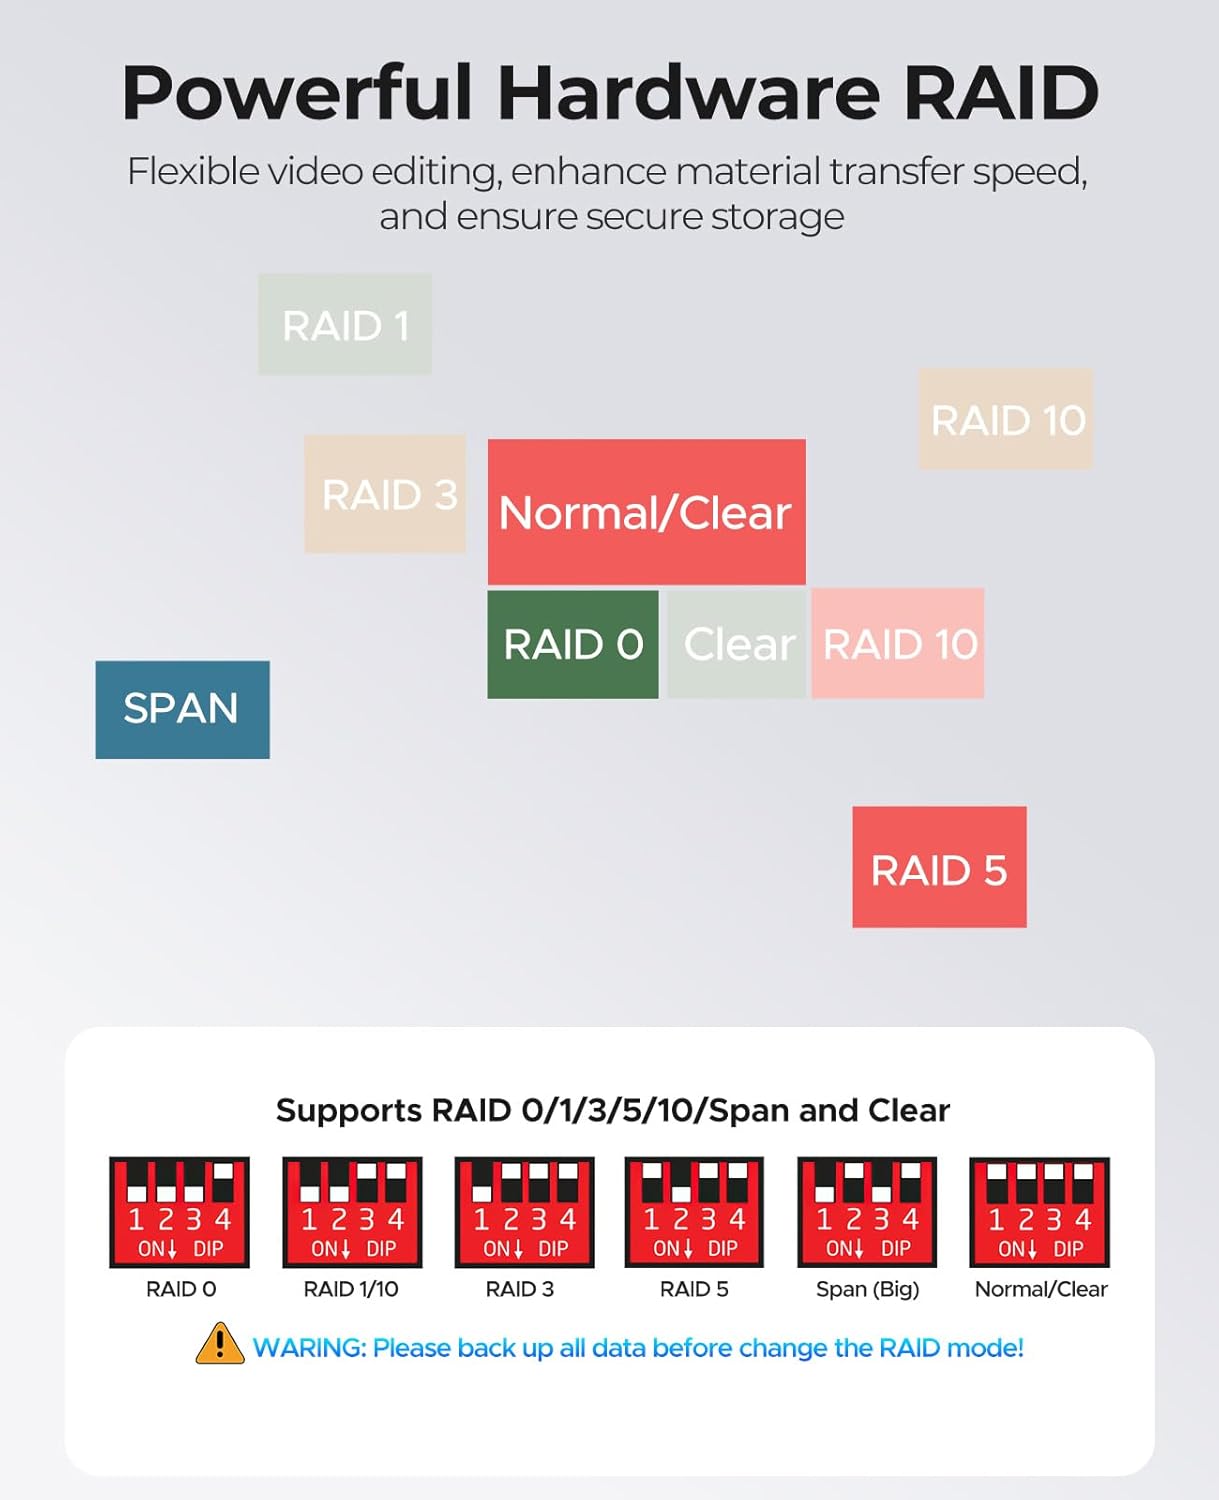
Image: Diagram illustrating the DIP switch settings for various RAID modes (0, 1, 3, 5, 10, JBOD, Clone, ClearMode) on the ORICO 5-Bay RAID Enclosure.
4.2 දත්ත හුවමාරුව
Once the enclosure is connected and the drives are formatted, you can transfer files to and from the enclosure like any other external storage device. The USB 3.0 interface supports data transfer speeds up to 5Gbps, facilitating efficient backup and management of large fileවීඩියෝ සහ වීඩියෝ.

Image: Depicts the ORICO 5-Bay RAID Enclosure connected to a computer, highlighting its 5Gbps transmission speed for data transfer.
4.3 ස්මාර්ට් නින්ද ප්රකාරය
The enclosure features a Smart Sleep Mode. If there is no data interaction for 10 minutes, the device will automatically enter hibernation. This feature helps to reduce hard drive wear and power consumption, extending the lifespan of your drives.

Image: The ORICO 5-Bay RAID Enclosure on a desk, with an icon indicating its Smart Sleep Mode functionality.
5. නඩත්තු කිරීම
5.1 සාමාන්ය රැකවරණය
- සෘජු හිරු එළියෙන් සහ අධික උෂ්ණත්වයන්ගෙන් ඈත්ව, පිරිසිදු, වියළි පරිසරයක කොටුව තබා ගන්න.
- Avoid exposing the device to liquids or excessive dust.
- මෘදු වියළි රෙද්දකින් බාහිර පිරිසිදු කරන්න. රළු රසායනික ද්රව්ය හෝ උල්ෙල්ඛ පිරිසිදු කරන්නන් භාවිතා නොකරන්න.
5.2 තාපය විසුරුවා හැරීම
The enclosure is designed with an all-aluminum alloy housing and an 80mm silent cooling fan to ensure optimal thermal performance. To maintain efficient heat dissipation:
- Ensure the front and rear ventilation vents are not obstructed.
- Allow adequate space around the enclosure for airflow.

රූපය: පසුපස view of the ORICO 5-Bay RAID Enclosure, highlighting the 80mm silent fan and heat dissipation vents.
6. දෝශ නිරාකරණය
If you encounter issues with your ORICO 5-Bay RAID Enclosure, please refer to the following common solutions:
- උපාංගය අනාවරණය නොවීය:
- Ensure the power cable is securely connected and the enclosure is powered on.
- Verify the USB data cable is properly connected to both the enclosure and your computer.
- ඔබේ පරිගණකයේ තිබෙන වෙනත් USB පෝට් එකකට සම්බන්ධ වීමට උත්සාහ කරන්න.
- Check your computer's Disk Management (Windows) or Disk Utility (macOS) to see if the drives are recognized but uninitialized/unformatted.
- මන්දගාමී දත්ත හුවමාරු වේගය:
- Ensure you are using a USB 3.0 port on your computer. Connecting to a USB 2.0 port will result in slower speeds.
- Check the health of your hard drives. Degraded drives can impact performance.
- ඔබේ පරිගණකයේ ධාවක යාවත්කාලීන දැයි තහවුරු කරගන්න.
- RAID Configuration Issues:
- Double-check the DIP switch settings against the manual for your desired RAID mode.
- Remember that changing RAID modes will erase data. If you changed modes without backing up, data recovery may not be possible.
- For RAID rebuilds (e.g., in RAID 5), replace the faulty disk with a new disk of equal or larger capacity while the device is powered off. Then power on and use the RAID management software (downloadable from ORICO's official website) to monitor the rebuild process. Hot-swapping is not supported for RAID rebuilds.
- Drives Not Appearing After Installation:
- Ensure drives are securely seated in their trays and the trays are fully inserted into the bays.
- Check the drive's health. A faulty drive may not be recognized.
If these steps do not resolve your issue, please contact ORICO customer support.
7. පිරිවිතර
| විශේෂාංගය | පිරිවිතර |
|---|---|
| ආදර්ශ අංකය | 9958RU3 |
| දෘඪ තැටි ආකෘති සාධකය | 2.5 / 3.5 Inches SATA HDD/SSD |
| උපරිම සහාය දක්වන උපාංග ගණන | 5 |
| මතක ගබඩා ධාරිතාව | Up to 110 TB (5 x 22TB) |
| දෘඩාංග අතුරුමුහුණත | USB 3.0 Type-A (compatible with USB 3.2 Gen 2x2) |
| දත්ත හුවමාරු අනුපාතය | Up to 5Gbps (235 Megabytes Per Second) |
| සහාය දක්වන RAID මාතයන් | RAID 0, 1, 3, 5, 10, JBOD, Clone, ClearMode |
| බල සැපයුම | බිල්ට් 150W |
| ගැළපෙන උපාංග | ඩෙස්ක්ටොප්, ලැප්ටොප්, ටැබ්ලටය |
| අනුකූල මෙහෙයුම් පද්ධති | වින්ඩෝස්, මැකෝස්, ලිනක්ස් |
| අයිතමයේ බර | රාත්තල් 10.43 කි |
| පැකේජ මානයන් | අඟල් 13.3 x 12.6 x 8.5 |
| නිෂ්පාදකයා | SHENZHEN ORICO TECHNOLOGIES CO.,LTD |
8. වගකීම් සහ සහාය
8.1 වගකීම් තොරතුරු
ORICO products typically come with a limited warranty covering manufacturing defects. Please refer to the warranty card included in your package or visit the official ORICO website for specific warranty terms and conditions applicable to your region. Keep your purchase receipt as proof of purchase for warranty claims.
8.2 පාරිභෝගික සහාය
For technical assistance, troubleshooting, or any product-related inquiries, please contact ORICO customer support:
- විද්යුත් තැපෑල: supports@orico.com.cn
- නිල Webඅඩවිය: Visit the ORICO official website for FAQs, driver downloads, and additional support resources.


