1. හැඳින්වීම
The Rongta F81S Tattoo Stencil Printer is a portable, wireless thermal printer designed for creating high-definition tattoo stencils. It offers compatibility with Android, iOS, Windows, and macOS devices, providing a versatile solution for tattoo artists and beginners. This manual provides detailed instructions for setup, operation, and maintenance to ensure optimal performance.
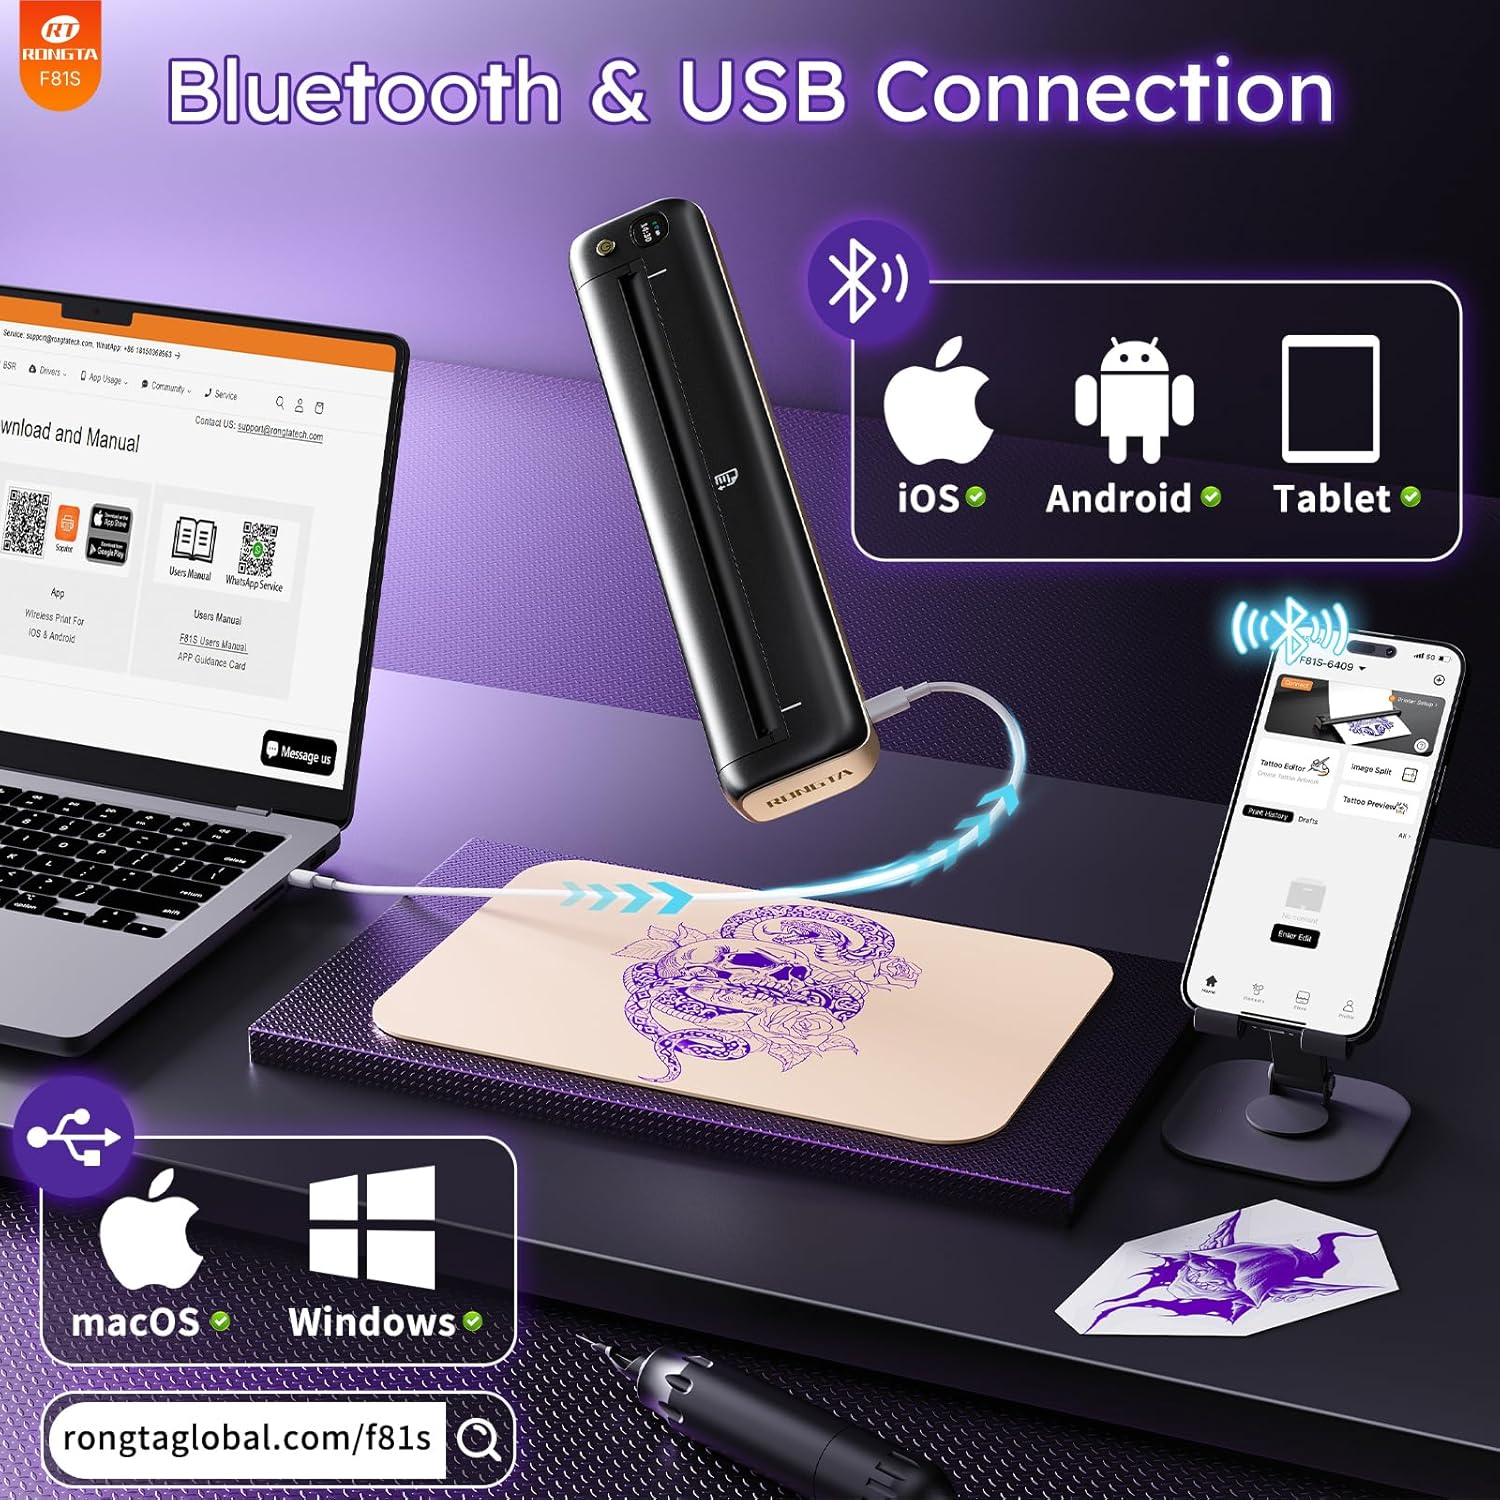
Image: The Rongta F81S Tattoo Stencil Printer, a compact and portable device.
2 ආරක්ෂිත තොරතුරු
- Use only the original USB cable for charging.
- Ensure the printer is placed on a stable, flat surface during operation.
- Do not expose the printer to extreme temperatures, direct sunlight, or moisture.
- දරුවන්ට ළඟා විය නොහැකි ලෙස තබා ගන්න.
- Only use tattoo transfer paper with this device; thermal paper is not supported.
- If the print head overheats, the app will pause printing. Allow the device to cool down for at least ten minutes before resuming.
3. පැකේජ අන්තර්ගතය
ඔබගේ පැකේජයේ සියලුම අයිතම ඇති බව තහවුරු කරගන්න:
- Rongta F81S Tattoo Stencil Printer
- USB Type-C ආරෝපණ කේබලය
- 5pcs Tattoo Transfer Papers
- පරිශීලක අත්පොත
- ගබඩා මල්ල

Image: Contents of the Rongta F81S Tattoo Stencil Printer package, including the printer, transfer paper, and cables.
4. නිෂ්පාදන අවසන්view
Familiarize yourself with the main components of your Rongta F81S printer:
- බල බොත්තම: මුද්රණ යන්ත්රය සක්රිය/අක්රිය කරයි.
- LCD පැනලය: Displays status indicators (e.g., battery, Bluetooth connection).
- Paper Input Slot: Where tattoo transfer paper is inserted.
- කඩදාසි ප්රතිදානය: Where printed stencils exit.
- Flip Cover: Protects the print head and paper path.
- Type-C Charging Port: USB ආරෝපණ කේබලය සම්බන්ධ කිරීම සඳහා.
- සිදුර යළි පිහිටුවන්න: For factory reset if needed.
- මුද්රණ ශීර්ෂය: The thermal component responsible for printing.
වීඩියෝ: ඉවරයිview of the F81S tattoo printer's components and app download process.
5. පිහිටුවීම
5.1. මුද්රණ යන්ත්රය ආරෝපණය කිරීම
- Connect the provided USB Type-C cable to the printer's charging port.
- කේබලයේ අනෙක් කෙළවර සුදුසු USB බල ඇඩැප්ටරයකට (ඇතුළත් කර නැත) හෝ පරිගණකයේ USB පෝට් එකකට සම්බන්ධ කරන්න.
- The LCD panel will indicate charging status. Ensure the printer is fully charged before first use.
Video: Demonstrates how to charge the F81S tattoo printer using the Type-C charging port.
5.2. Loading Tattoo Transfer Paper
- Separate the tattoo transfer paper: remove the protective sheet and tear off the yellow backing sheet, leaving the white tracing sheet and blue carbon sheet.
- Insert the transfer paper into the paper input slot with the white paper facing up. The printer will automatically feed the paper into position.

Image: Step-by-step guide on how to prepare and load tattoo transfer paper into the printer.
5.3. App Download and Bluetooth Connection (iOS/Android)
- Download the "SoPrint" app from the Google Play Store (for Android) or the Apple App Store (for iOS).
- ඔබගේ ජංගම උපාංගයේ බ්ලූටූත් සබල කර ඇති බව සහතික කර ගන්න.
- Open the SoPrint app and follow the on-screen instructions to connect to your F81S printer via Bluetooth. The printer's name will typically appear as "F81S-XXXX".

Image: Instructions for downloading the SoPrint app and connecting the printer via Bluetooth to a mobile device.
5.4. USB Connection and Driver Installation (Windows/macOS)
For PC (Windows) and Mac (macOS) devices, a wired USB connection is required. Bluetooth is not supported for PC connections.
- Connect the F81S printer to your computer using the provided USB cable.
- Download and install the appropriate drivers for your operating system (Windows or macOS) from the official Rongta webඅඩවිය: rongtaglobal.com/f81s.
- ධාවක ස්ථාපනය සම්පූර්ණ කිරීම සඳහා තිරයේ ඇති උපදෙස් අනුගමනය කරන්න.

Image: Steps for connecting the F81S printer to a PC or laptop via USB and installing necessary drivers.
Video: Demonstrates the USB connection process for macOS devices.
Video: Demonstrates the USB connection process for Windows devices.
6. මුද්රණ යන්ත්රය ක්රියාත්මක කිරීම
6.1. Printing with the SoPrint App
- Open the SoPrint app and ensure your printer is connected via Bluetooth.
- Select "Tattoo Editor" or "Image Split" to import or create your tattoo design.
- Use the app's editing functions to zoom, rotate, adjust size, orientation, and layout of your design. The "Tattoo Preview" function allows you to see the actual effect before printing.
- Once satisfied with the design, tap the print icon. Adjust print density and number of copies if necessary.
- Tap "Print Immediately" to start printing your stencil.

Image: A user operating the Rongta F81S printer to create a tattoo stencil.
Video: A comprehensive guide on how to use the F81S Tattoo Printer with the mobile app.
6.2. Transferring Stencil to Skin
- Clean the skin area thoroughly with a wipe or alcohol.
- Apply a small, even amount of tattoo transfer gel to the cleaned skin area.
- Carefully place the printed tattoo stencil (white tracing sheet) onto the prepared skin.
- Press gently for 5-10 seconds, then slowly peel off the white tracing paper. The stencil should now be transferred to the skin.

Image: Visual steps for preparing the skin and transferring the tattoo stencil.
7. නඩත්තු කිරීම
- මුද්රණ යන්ත්රයේ බාහිර පෙනුම මෘදු, වියළි රෙද්දකින් නිතිපතා පිරිසිදු කරන්න.
- Keep the paper input and output slots free from dust and debris.
- Avoid touching the print head directly to prevent damage.
- භාවිතයේ නොමැති විට මුද්රණ යන්ත්රය සිසිල් වියළි ස්ථානයක ගබඩා කරන්න.
8. දෝශ නිරාකරණය
- මුද්රණ යන්ත්රය සම්බන්ධ නොවේ: Ensure Bluetooth is on (for mobile) or USB drivers are installed (for PC/Mac). Restart the printer and your device.
- දුර්වල මුද්රණ ගුණාත්මකභාවය: Ensure you are using Rongta tattoo paper. Clean the print head if necessary. For best results, print monochrome and simple tattoo designs.
- කඩදාසි තදබදය: Gently pull out any jammed paper from the input or output slots. Ensure paper is loaded correctly.
- මුද්රණ යන්ත්රය අධික ලෙස රත් වීම: If the app indicates overheating, pause printing and allow the printer to cool down for at least 10 minutes.
9. පිරිවිතර
| විශේෂාංගය | විස්තර |
|---|---|
| මාදිලියේ නම | F81S |
| වෙළඳ නාමය | රොන්ග්ටා |
| මුද්රණ තාක්ෂණය | තාප |
| සම්බන්ධතා තාක්ෂණය | බ්ලූටූත්, USB |
| උපරිම කළු සහ සුදු මුද්රණ විභේදනය | 203 dpi |
| උපරිම මාධ්ය ප්රමාණය | 216 මි.මී |
| උපරිම ආදාන පත්ර ධාරිතාව | 210 sheets (on a full charge) |
| නිෂ්පාදන මානයන් | 10.43"D x 1.06"W x 2.17"H (ආසන්න වශයෙන් 10.55 x 1.18 x 2.28 අඟල්) |
| අයිතමයේ බර | අවුන්ස 15.9 (දළ වශයෙන් ග්රෑම් 450) |
| බැටරි | Internal rechargeable battery (1 AAA batteries required listed in specs is likely an error) |
| විශේෂ ලක්ෂණය | අතේ ගෙන යා හැකි |
| වර්ණය | කළු |
10. වගකීම් සහ සහාය
For warranty information, technical support, or service inquiries, please contact Rongta customer support. Refer to the contact details provided on the official Rongta webඅඩවියේ හෝ ඔබේ නිෂ්පාදන ඇසුරුම්වල.
නිල සහාය Webඅඩවිය: rongtaglobal.com
විද්යුත් තැපෑල: support@rongtatech.com
WhatsApp: +86 18150388963


