හැඳින්වීම
This manual provides detailed instructions for the safe and efficient use of your artfone G6 Pro 4G Senior Flip Phone. Please read this manual thoroughly before operating the device and keep it for future reference.

Image: The artfone G6 Pro 4G flip phone, showcasing its dual LCD screens and large keypad.
පෙට්ටියේ ඇති දේ
සියලුම අයිතම පැකේජයේ ඇති බව තහවුරු කරගන්න:
- 1 x artfone G6 Pro Senior Flip Phone
- 1 x 1300 mAh බැටරිය
- 1 x USB ආරෝපණ කේබලය
- 1 x Charging Head (Power Adapter)
- 1 x ආරෝපණ තටාකය
- 1 x User Manual (English, German, French, Spanish, Italian)

Image: All components included in the artfone G6 Pro package: the phone, battery, USB cable, power adapter, charging dock, and user manual.
සැලසුම
1. Installing the SIM Card, Micro SD Card, and Battery
- දුරකථනයේ පිටුපස කවරය ඉවත් කරන්න.
- Insert your Nano SIM card(s) into the designated slot(s). Ensure the gold contacts face downwards.
- If desired, insert a Micro SD card (up to 64GB) into the Micro SD slot for expanded storage.
- Insert the 1300mAh battery, aligning the contacts correctly.
- ආරක්ෂිතව ස්ථානයට ක්ලික් වන තුරු පිටුපස කවරය ප්රතිස්ථාපනය කරන්න.
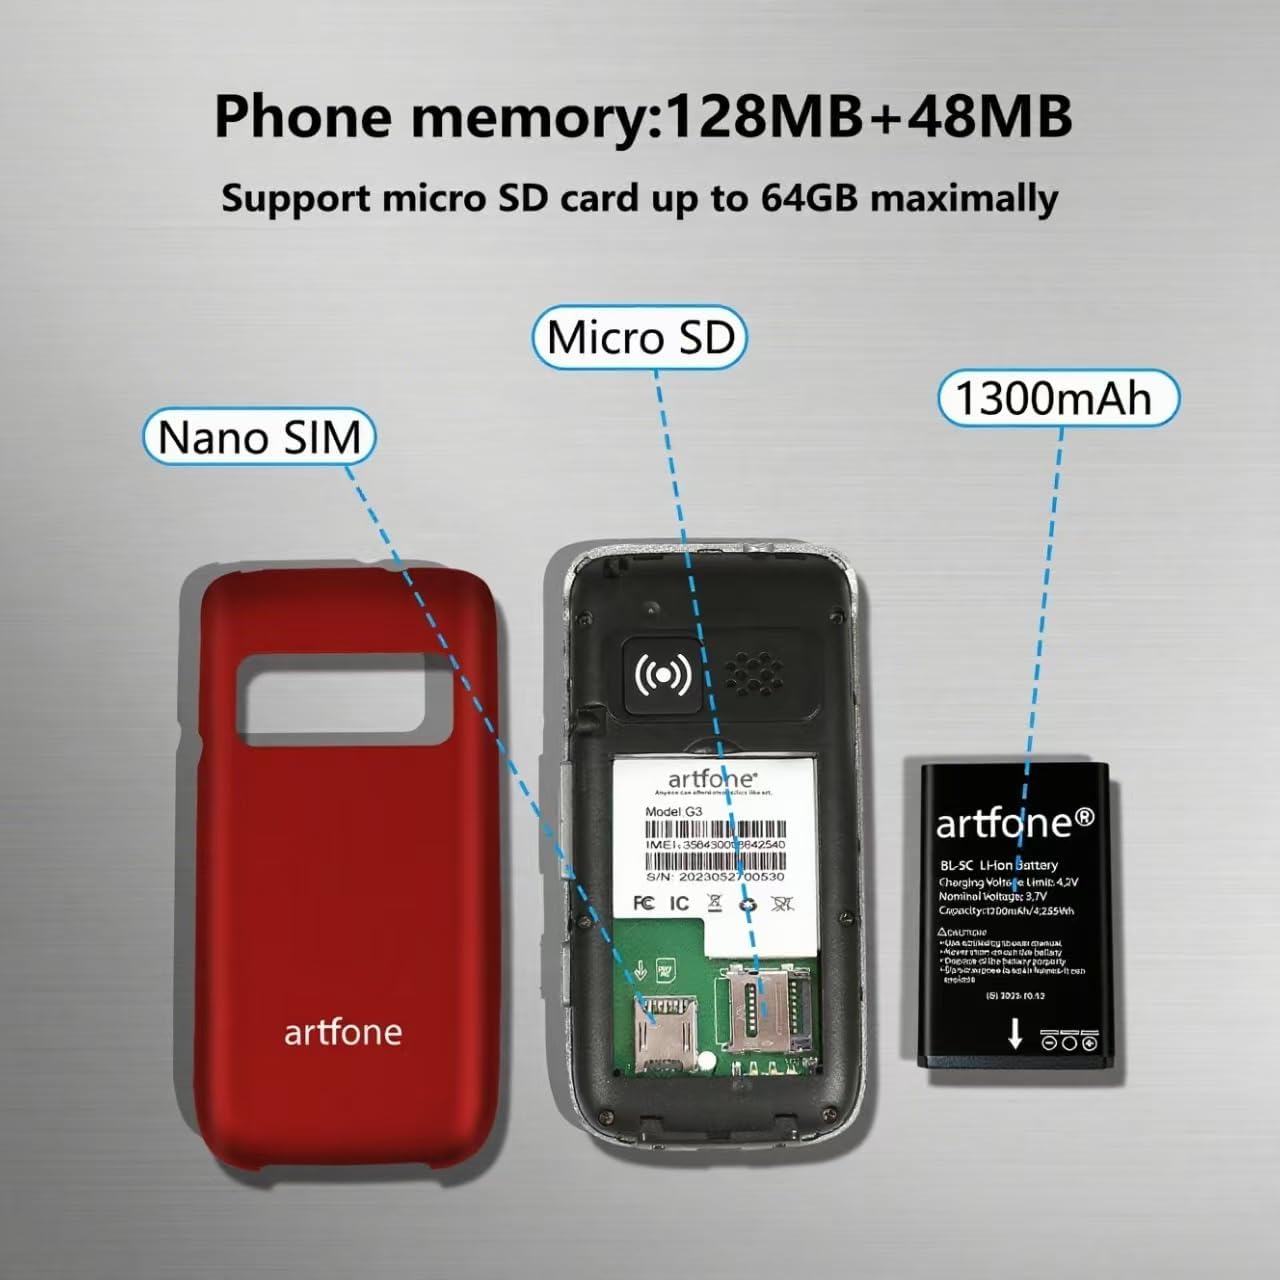
රූපය: පුපුරා ගිය එකක් view of the artfone G6 Pro, showing the back cover removed, revealing slots for Nano SIM and Micro SD cards, and the 1300mAh battery.
2. මූලික අයකිරීම
Before first use, fully charge the phone. You can charge it using the provided charging dock or directly via the USB-C cable.
- ආරෝපණ තටාකය භාවිතා කිරීම: Connect the USB cable to the charging head, then plug it into a power outlet. Place the phone into the charging dock. The phone will indicate charging status.
- සෘජු ආරෝපණය: Connect the USB-C cable directly to the phone's charging port and the other end to the charging head, then plug into a power outlet.
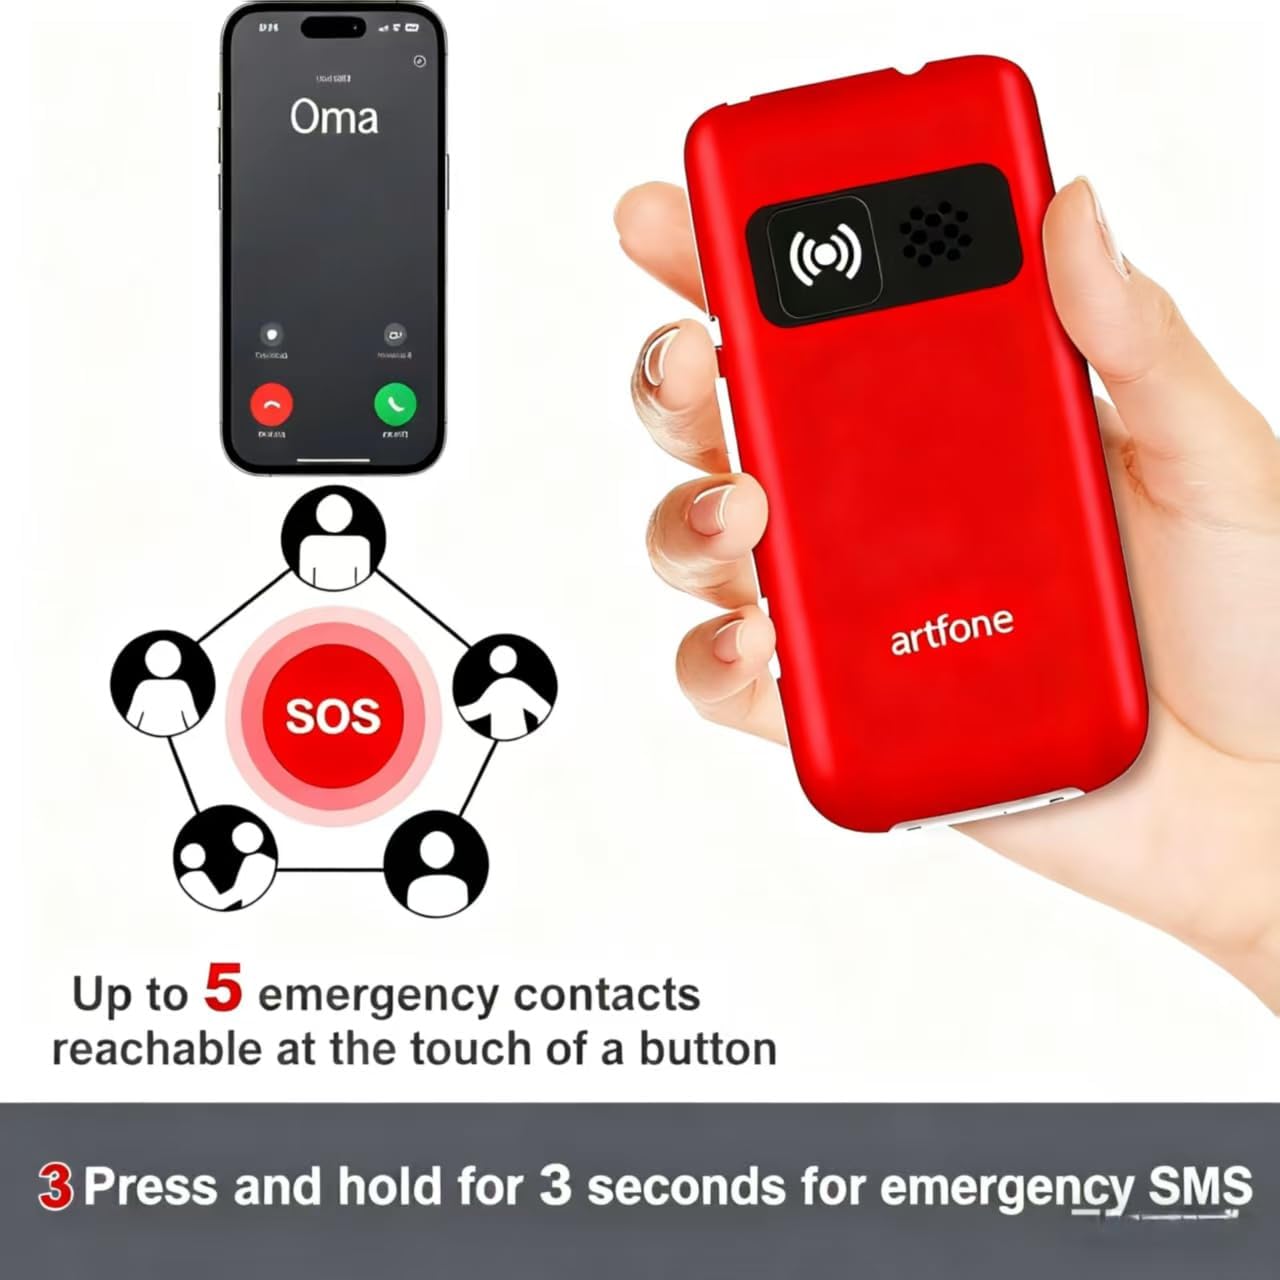
Image: The artfone G6 Pro phone placed in its charging dock, connected to a power source.
මෙහෙයුම් උපදෙස්
1. බලය සක්රිය / අක්රිය කරන්න
- බල ගැන්වීමට: රතු පැහැති End Call/Power බොත්තම ඔබා අල්ලාගෙන සිටින්න (
 ) තිරය දැල්වෙන තුරු.
 - බලය අක්රිය කිරීමට: Press and hold the red End Call/Power button until the power-off options appear, then select 'Power Off'.
2. ඇමතුම් ලබා ගැනීම සහ ලබා ගැනීම
- ඇමතුමක් ගැනීම: Dial the number using the large keypad and press the green Call button ().
- ඇමතුමක් ලැබීම: Open the flip to answer, or press the green Call button. Close the flip or press the red End Call button to end a call.
- පරිමාව සකස් කිරීම: Use the volume buttons on the side of the phone during a call.

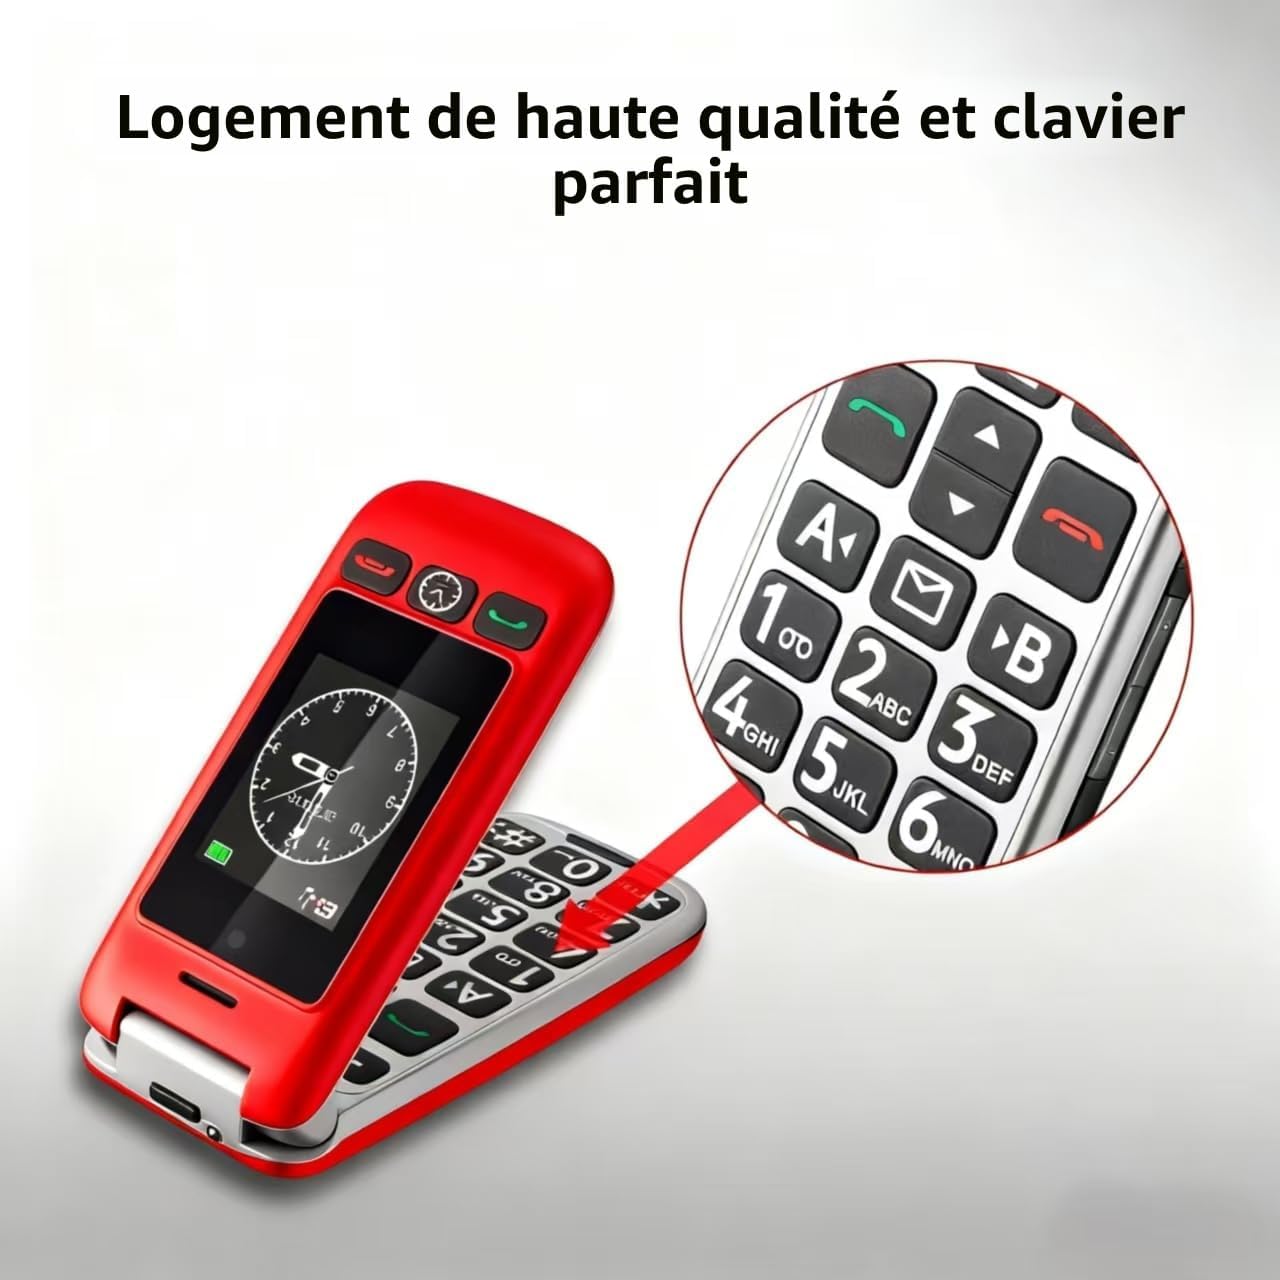
Image: A close-up of the artfone G6 Pro's large, backlit keypad, designed for easy dialing.
3. Dual Screen Features
The artfone G6 Pro features a 2.4-inch internal screen and a 1.8-inch external screen.
- The external screen displays time, date, battery status, and caller ID without opening the phone.
- Press and hold the dedicated time announcement button (often located on the side or front) for 2 seconds to hear the current time spoken aloud.

Image: The artfone G6 Pro displaying the time on its external screen, with an illustration of the time announcement feature.
4. SOS හදිසි කාර්යය
The SOS button provides quick access to emergency contacts.
- SOS අංක සැකසීම: Navigate to the 'SOS Settings' in the phone's menu to program up to 5 emergency contact numbers.
- SOS සක්රිය කිරීම: In an emergency, press and hold the SOS button on the back of the phone for 3 seconds. The phone will automatically call the programmed numbers in sequence until one answers. It will also send an emergency SMS to these contacts.

Image: The artfone G6 Pro with its SOS button highlighted, illustrating how it connects to up to 5 emergency contacts.
5. ස්පීඩ් ඩයල්
Assign frequently called numbers to speed dial keys (A, B, 1-9) for quick access.
- Setting Speed Dial: Go to 'Settings' > 'Speed Dial' to assign contacts to specific keys.
- වේග ඩයල් එක භාවිතයෙන්: Press and hold the assigned key (e.g., 'A' or '1') to call the stored contact.
6. වෙනත් විශේෂාංග
- කැමරාව: Access the camera through the main menu to take basic photos.
- එෆ්එම් රේඩියෝ: Plug in headphones (3.5mm jack) to use the FM radio function.
- ෆ්ලෑෂ් ලයිට්: Activate the flashlight via a dedicated side switch or through the menu.
- පරිශීලක අතුරුමුහුණත: The phone features a simple, user-friendly interface with clear icons for easy navigation.

Image: A visual representation of the artfone G6 Pro's menu, showing large, clear icons for Contacts, Tools, Message, SOS, Calendar, Settings, Internet, Multimedia, and Call logs.

Image: A composite image illustrating the flashlight, FM radio, and 3.5mm headphone jack features of the artfone G6 Pro.
නඩත්තු කිරීම
- දුරකථනය වියළිව තබා ගන්න. තෙතමනය ඉලෙක්ට්රොනික පරිපථවලට හානි කළ හැකිය.
- Do not expose the phone to extreme temperatures. High temperatures can shorten the life of electronic devices and warp or melt certain plastics.
- දුරකථනය පිරිසිදු කිරීම සඳහා රළු රසායනික ද්රව්ය, පිරිසිදු කිරීමේ ද්රාවක හෝ ශක්තිමත් ඩිටර්ජන්ට් භාවිතා නොකරන්න. මෘදු, පිරිසිදු කිරීමේ රෙදි කැබැල්ලකින් එය පිස දමන්න.amp රෙදි.
- දුරකථනය මෘදු ලෙස හසුරුවන්න. බිම හෙළන්න, තට්ටු කරන්න හෝ සොලවන්න එපා. රළු ලෙස හැසිරවීම අභ්යන්තර පරිපථ පුවරු සහ සියුම් යාන්ත්ර විද්යාව බිඳ දැමිය හැකිය.
- Only use original or certified compatible batteries, chargers, and accessories.
දෝෂගවේෂණය
| ගැටලුව | විය හැකි හේතුව | විසඳුම |
|---|---|---|
| දුරකථනය ක්රියාත්මක නොවේ | බැටරිය අඩුයි හෝ නිවැරදිව ස්ථාපනය කර නැත. | බැටරිය ආරෝපණය කරන්න. බැටරිය නිවැරදිව ඇතුළු කර ඇති බවට වග බලා ගන්න. |
| ඇමතුම් ගැනීමට හෝ ලබා ගැනීමට නොහැකිය. | No SIM card, SIM card not properly inserted, or no network signal. | Ensure SIM card is inserted correctly. Check network coverage. Contact your service provider. |
| Poor call quality / Low volume | Weak signal, speaker blocked, or volume too low. | Move to an area with better signal. Ensure speaker is not obstructed. Adjust call volume using side buttons. |
| බැටරිය ඉක්මනින් බැස යයි | නිතර භාවිතය, පසුබිම් යෙදුම්, හෝ පැරණි බැටරිය. | තිරයේ දීප්තිය අඩු කරන්න. භාවිතයට නොගත් යෙදුම් වසා දමන්න. බැටරිය පැරණි නම් එය ප්රතිස්ථාපනය කිරීම ගැන සලකා බලන්න. |
| SOS ශ්රිතය ක්රියා නොකරයි | SOS numbers not programmed or incorrect. | Verify and correctly program the emergency contact numbers in SOS settings. |
මෙම විසඳුම් උත්සාහ කිරීමෙන් පසුවත් ගැටලුව පවතින්නේ නම්, කරුණාකර පාරිභෝගික සහාය අමතන්න.
පිරිවිතර
- ආකෘතිය: artfone G6 Pro
- ජාල තාක්ෂණය: 4G, 3G, 2G
- මෙහෙයුම් පද්ධතිය: artfone Mocor RTOS
- ප්රධාන තිරය: අඟල් 2.4
- බාහිර තිරය: අඟල් 1.8
- මතකය: 128 MB + 48 MB
- පුළුල් කළ හැකි ගබඩාව: 64GB දක්වා මයික්රෝ එස්ඩී කාඩ් පත
- SIM කාඩ්පත් වර්ගය: නැනෝ සිම්
- බැටරි: 1300mAh ලිතියම්-අයන
- කතා කරන වේලාව: පැය 5-6 දක්වා
- පොරොත්තු කාලය: දින 10 දක්වා
- සම්බන්ධතාවය: බ්ලූටූත්
- ආරෝපණ වරාය: USB Type-C
- විශේෂ ලක්ෂණ: SOS Button, Large Keys, Dual Screen, Charging Dock, FM Radio, Flashlight, Camera
වගකීම් සහ සහාය
වගකීම් තොරතුරු
The artfone G6 Pro comes with a වසර 2ක නිෂ්පාදකයාගේ වගකීමක් මිලදී ගත් දින සිට. මෙම වගකීම් සහතිකය සාමාන්ය භාවිතය යටතේ ද්රව්ය හා වැඩ කිරීමේ දෝෂ ආවරණය කරයි. අනිසි භාවිතය, අනතුරු, අනවසර වෙනස් කිරීම් හෝ සාමාන්ය ඇඳීම් සහ ඉරීම් නිසා සිදුවන හානිය එය ආවරණය නොකරයි.
පාරිභෝගික සහාය
For technical assistance, warranty claims, or further inquiries, please refer to the contact information provided in your product packaging or visit the official artfone webවෙබ් අඩවිය. සහාය සම්බන්ධ කර ගැනීමේදී කරුණාකර ඔබේ නිෂ්පාදන ආකෘතිය සහ මිලදී ගැනීමේ විස්තර සූදානම් කර තබා ගන්න.