1. හැඳින්වීම
This manual provides detailed instructions for the installation, operation, and maintenance of your MSI PRO B850-S WIFI6E ATX Motherboard. Designed for AMD Ryzen 9000, 8000, and 7000 series processors, this motherboard features an AM5 socket, DDR5 memory support, PCIe 4.0 x16, M.2 Gen5, Wi-Fi 6E, and 2.5G LAN. Please read this manual thoroughly before proceeding with installation to ensure proper setup and optimal performance.
2 ආරක්ෂිත තොරතුරු
මවු පුවරුවට හානි වීම හෝ ඔබටම තුවාල වීම වැළැක්වීම සඳහා පහත සඳහන් ආරක්ෂක පියවරයන් සැමවිටම නිරීක්ෂණය කරන්න:
- විද්යුත් ස්ථිතික විසර්ජන (ESD) පූර්වාරක්ෂාවන්: Always wear an anti-static wrist strap or frequently touch a grounded metal object before handling the motherboard or any components. ESD can severely damage electronic components.
- විදුලිය විසන්ධි කිරීම: කිසියම් සංරචකයක් ස්ථාපනය කිරීමට හෝ ඉවත් කිරීමට පෙර බල සැපයුම බිත්ති අලෙවිසැලෙන් විසන්ධි කර ඇති බවට වග බලා ගන්න.
- පරිස්සමින් හැසිරවීම: Hold the motherboard by its edges. Avoid touching sensitive components, pins, or circuit traces.
- වාතාශ්රය: Ensure adequate ventilation within your PC case to prevent overheating.
- සංරචක අනුකූලතාව: Verify that all components (CPU, RAM, GPU, PSU) are compatible with this motherboard.
3. පැකේජ අන්තර්ගතය
Carefully unpack your motherboard and check for the following items:
- MSI PRO B850-S WIFI6E Motherboard
- Wi-Fi ඇන්ටෙනාව
- SATA දත්ත කේබල්
- M.2 SSD ඉස්කුරුප්පු/ස්ථාවරයන්
- Quick Installation Guide / User Manual (this document)
- ධාවක CD/USB (ඇතුළත් කර ඇත්නම්)

4. මවු පුවරු පිරිසැලසුම
ඔබේ මවු පුවරුවේ ඇති විවිධ සංරචක සහ සම්බන්ධක පිළිබඳව ඔබව හුරු කරවන්න.

4.1. CPU Socket (AM5)
The central component for your AMD Ryzen processor. Ensure correct orientation before installation.

4.2. DDR5 Memory Slots
Four DDR5 DIMM slots are available for high-speed memory modules. Refer to the motherboard's QVL (Qualified Vendor List) for compatible memory kits.

4.3. PCIe Slots
The motherboard features a fortified PCIe 4.0 x16 slot for graphics cards and additional PCIe slots for expansion cards.

4.4. M.2 Slots
Includes one M.2 Gen5 x4 128Gbps slot and one M.2 Gen4 x4 64Gbps slot, both with M.2 Shield Frozr heatsinks to prevent thermal throttling.

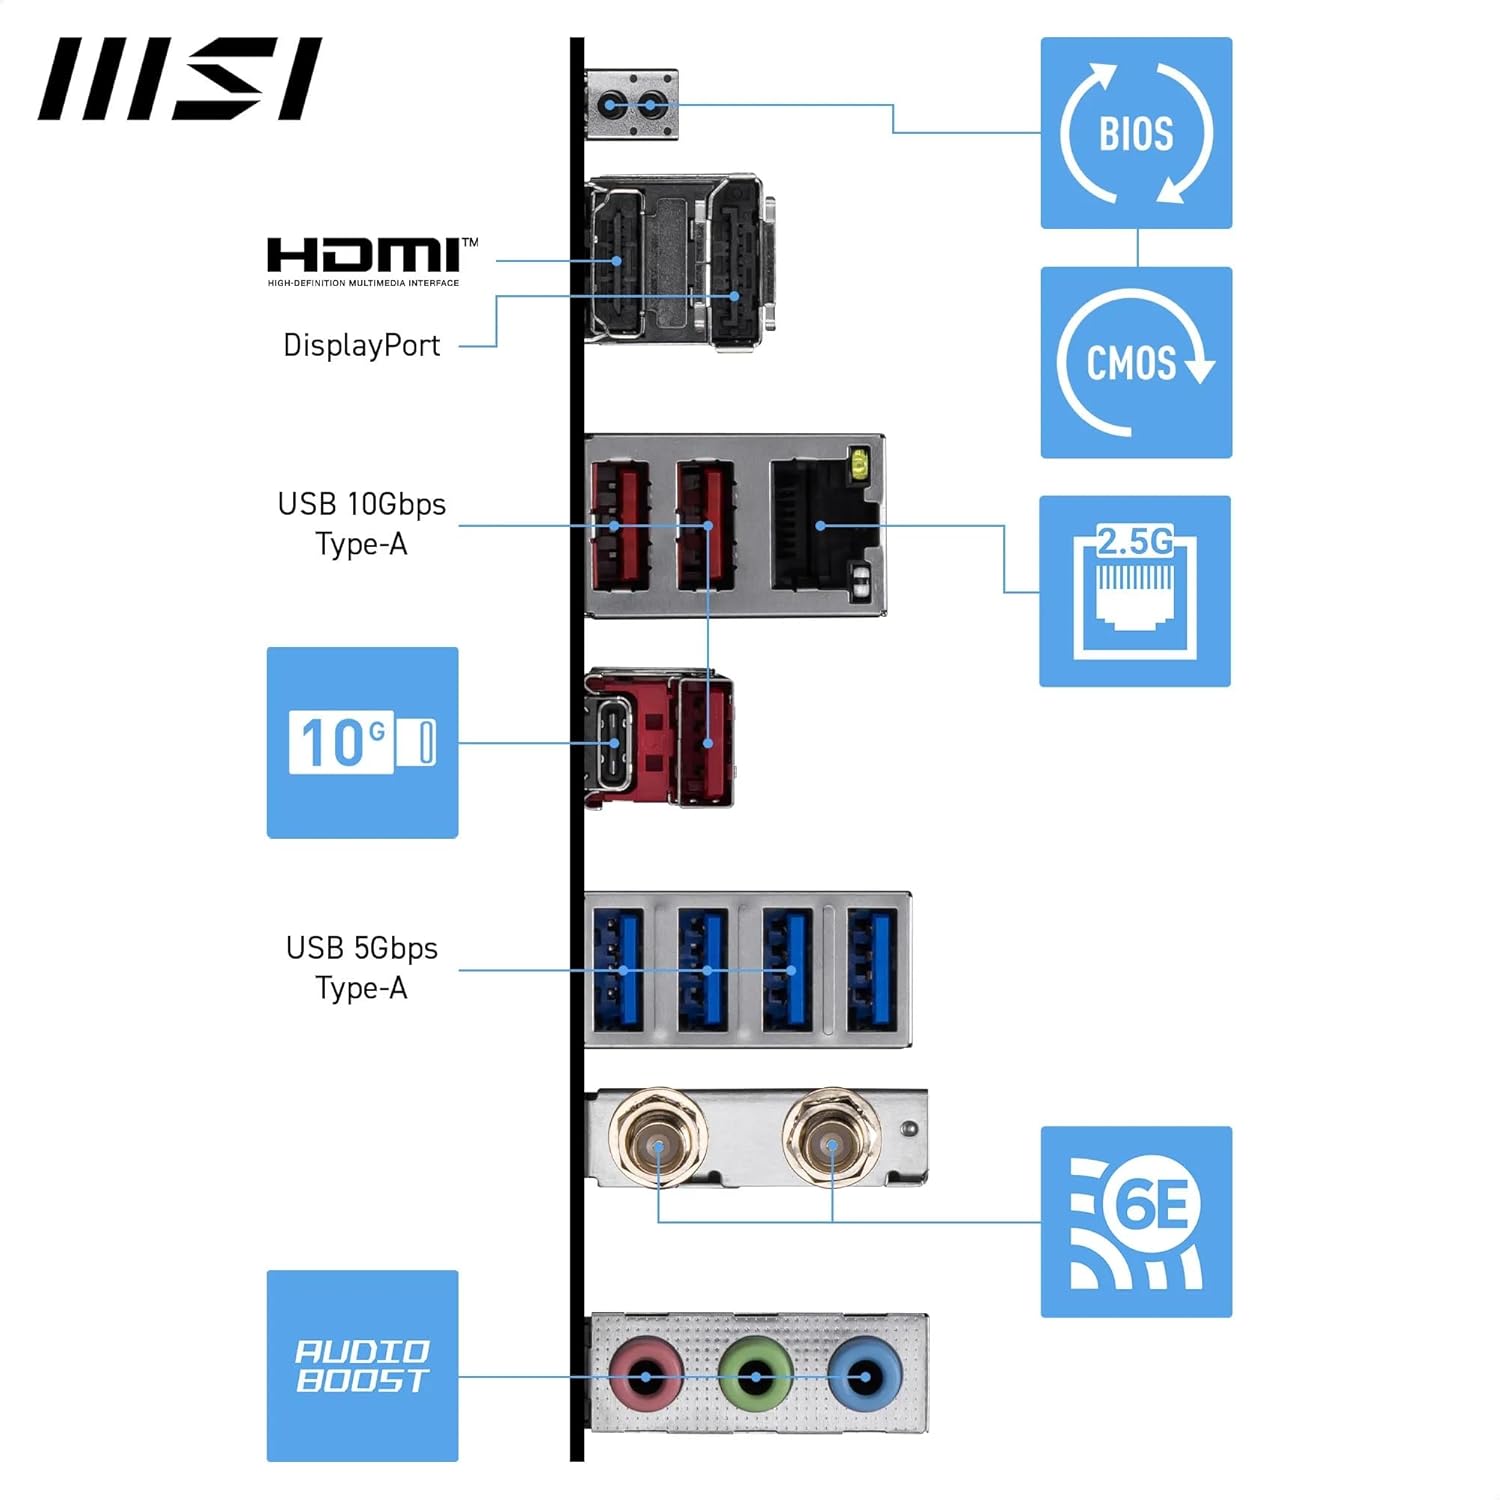
4.5. පසුපස I/O පැනලය
The rear panel provides various ports for external devices, including USB, LAN, Wi-Fi antenna connectors, and audio jacks.
5. ස්ථාපන මාර්ගෝපදේශය
Follow these steps carefully to install your motherboard and components.
5.1. CPU ස්ථාපනය
- මවු පුවරුවේ AM5 සොකට් එක සොයා ගන්න.
- CPU රඳවා ගැනීමේ ලීවරය විවෘත කරන්න.
- Carefully align the CPU with the socket, ensuring the golden triangle on the CPU matches the triangle on the socket. Do not force the CPU into the socket.
- Gently lower the CPU into place.
- CPU එක සුරක්ෂිත කිරීම සඳහා රඳවා ගැනීමේ ලීවරය වසා දමන්න.
- Apply thermal paste and install your CPU cooler according to its instructions.
5.2. මතක (RAM) ස්ථාපනය
- DDR5 DIMM ස්ලොට් දෙකෙහිම ක්ලිප් විවෘත කරන්න.
- DIMM ස්ලොට් එකේ ඇති යතුර සමඟ DDR5 මතක මොඩියුලයේ නොච් එක පෙළගස්වන්න.
- ක්ලිප් නිසි තැනට එන තුරු මතක මොඩියුලය ස්ලොට් එකට තදින් ඇතුළු කරන්න. ක්ලිප් දෙකම වසා ඇති බවට වග බලා ගන්න.
- For dual-channel operation, install memory modules into the recommended slots (refer to your motherboard manual for specific slot pairing).
5.3. M.2 SSD ස්ථාපනය
- මවු පුවරුවේ M.2 ස්ලොට් සොයා ගන්න.
- Remove the M.2 Shield Frozr heatsink by unscrewing its retention screws.
- M.2 SSD එක සුළු කෝණයකින් ස්ලොට් එකට ඇතුළු කරන්න.
- Gently push down the M.2 SSD and secure it with the provided M.2 screw or EZ M.2 clip.
- Reattach the M.2 Shield Frozr heatsink and tighten its screws.

5.4. PCIe Card Installation (Graphics Card)
- Open the retention clip at the end of the PCIe 4.0 x16 slot.
- Align your graphics card with the slot and press it down firmly until it seats correctly and the retention clip snaps into place.
- ඔබේ පරිගණක කවරයට ග්රැෆික් කාඩ්පත ඉස්කුරුප්පු භාවිතයෙන් සුරක්ෂිත කරන්න.
- ඔබගේ බල සැපයුමෙන් අවශ්ය ඕනෑම PCIe බල කේබල් ග්රැෆික් කාඩ්පතට සම්බන්ධ කරන්න.
5.5. බල සැපයුම් සම්බන්ධතා
- Connect the 24-pin ATX main power connector from your power supply to the corresponding header on the motherboard.
- Connect the dual 8-pin CPU power connectors (EPS12V) from your power supply to the CPU power headers on the motherboard.
5.6. ඉදිරිපස පැනල් සම්බන්ධතා
Connect your PC case's front panel cables (power button, reset button, USB ports, audio jacks, LED indicators) to the corresponding headers on the motherboard. Refer to the motherboard diagram for exact locations.
5.7. පසුපස පැනල් සම්බන්ධතා
Install the I/O shield into your PC case. Connect your monitor, keyboard, mouse, and other peripherals to the appropriate ports on the rear I/O panel.
6. ඔබේ මවු පුවරුව ක්රියාත්මක කිරීම
6.1. පළමු ආරම්භය සහ BIOS/UEFI සැකසුම
- සියලුම සංරචක එකලස් කිරීමෙන් පසු, ඔබේ මොනිටරය, යතුරුපුවරුව සහ මූසිකය සම්බන්ධ කරන්න.
- ඔබේ පද්ධතිය ක්රියාත්මක කරන්න.
- ඔබන්න DEL BIOS/UEFI සැකසුම් උපයෝගීතාවයට ඇතුළු වීමට ආරම්භයේදී නැවත නැවතත් යතුර ඔබන්න.
- In the BIOS, you can configure boot order, enable/disable features, set memory profiles (XMP/EXPO), සහ පද්ධති තත්ත්වය නිරීක්ෂණය කරන්න.
6.2. ධාවක ස්ථාපනය
After installing your operating system, it is crucial to install the latest drivers for your motherboard's components. These include:
- චිප්සෙට් ධාවක
- LAN Drivers (Realtek 2.5G LAN)
- Wi-Fi/Bluetooth Drivers (Wi-Fi 6E, Bluetooth 5.3)
- Audio Drivers (7.1 HD Audio with Audio Boost)
- Graphics Drivers (for integrated graphics if applicable, or your dedicated GPU)
Drivers can be found on the official MSI webඔබේ නිශ්චිත මවු පුවරු ආකෘතිය සඳහා අඩවිය.
6.3. මෙහෙයුම් පද්ධති ස්ථාපනය
Follow the instructions provided by your operating system (e.g., Windows 11) for installation. Ensure your bootable USB drive or DVD is selected as the primary boot device in the BIOS/UEFI.
7. නඩත්තු කිරීම
7.1 පිරිසිදු කිරීම
- Regularly clean dust from inside your PC case using compressed air.
- Ensure fans (CPU cooler, case fans) are free of obstructions.
- පිරිසිදු කිරීමට පෙර ඔබේ පරිගණකය සැමවිටම විසන්ධි කර විසන්ධි කරන්න.
7.2. BIOS/Firmware Updates
Periodically check the MSI website for BIOS/UEFI updates. Updates can improve stability, add support for new CPUs, or fix bugs. Follow MSI's specific instructions for BIOS flashing carefully to avoid damaging the motherboard.
7.3. ධාවක යාවත්කාලීන කිරීම්
Keep your drivers updated to ensure optimal performance and compatibility with new software and hardware. Download drivers only from the official MSI website or component manufacturers.
8. දෝශ නිරාකරණය
ඔබට ගැටළු ඇති වුවහොත්, පහත පොදු දෝශ නිරාකරණ පියවර සලකා බලන්න:
- බලය නැත: Check all power connections (24-pin ATX, 8-pin CPU, GPU PCIe power). Ensure the power supply switch is on.
- සංදර්ශකය නැත: Verify monitor connection, ensure graphics card is seated correctly, and try reseating RAM modules. If your CPU has integrated graphics, try connecting to the motherboard's video output.
- පද්ධති අස්ථාවරත්වය/බිඳවැටීම්: Check RAM seating, ensure CPU cooler is properly installed, and verify component temperatures. Update drivers and BIOS.
- Boot Issues: Check boot order in BIOS. Ensure storage drives are properly connected.
- ජාල සම්බන්ධතා ගැටළු: Verify LAN cable connection or Wi-Fi antenna installation. Reinstall network drivers.
For more complex issues, consult the detailed troubleshooting section in the full digital manual available on the MSI support website or contact MSI technical support.
9. පිරිවිතර
| විශේෂාංගය | පිරිවිතර |
|---|---|
| වෙළඳ නාමය | MSI |
| මාදිලියේ නම | PROB850SWIFI6E |
| CPU සොකට් | සොකට් AM5 |
| අනුකූල සකසනයන් | AMD Ryzen 9000/ 8000/ 7000 Series Desktop Processors |
| චිප්සෙට් වර්ගය | AMD B850 |
| RAM මතක තාක්ෂණය | DDR5 |
| මතක තව් | 4 x DDR5 DIMM SMT slots |
| Max Memory Speed (OC) | 8200+ MT/s |
| ග්රැෆික් කාඩ් අතුරුමුහුණත | PCI Express 4.0 (1 x PCIe 4.0 x16 slot) |
| M.2 සම්බන්ධක | 1 x M.2 Gen5 x4 128Gbps, 1 x M.2 Gen4 x4 64Gbps |
| LAN | රියල්ටෙක් 2.5 ජී LAN |
| රැහැන් රහිත සම්බන්ධතාව | Wi-Fi 6E, බ්ලූටූත් 5.3 |
| USB පෝට් (පසුපස) | USB 10Gbps Type-C, USB 5Gbps Type-A |
| ශ්රව්ය උපකරණ | 7.1 HD Audio with Audio Boost |
| ආකෘති සාධකය | ATX |
| මානයන් (LxWxH) | අඟල් 10.7 x 13.6 x 2.9 |
| අයිතමයේ බර | රාත්තල් 3.2 කි |
| වේදිකාව | වින්ඩෝස් 11 |
10. වගකීම් සහ සහාය
10.1. වගකීම් තොරතුරු
Your MSI PRO B850-S WIFI6E Motherboard comes with a limited warranty. Please refer to the warranty card included with your product or visit the official MSI webඔබේ කලාපයට විශේෂිත වූ සවිස්තරාත්මක වගකීම් නියමයන් සහ කොන්දේසි සඳහා අඩවිය.
10.2 තාක්ෂණික සහාය
For technical assistance, driver downloads, BIOS updates, or further troubleshooting, please visit the official MSI support webඅඩවිය:
You may also contact MSI customer service directly through their webපුද්ගලාරෝපිත සහාය සඳහා අඩවිය.


