1. හැඳින්වීම
Thank you for choosing the GYMAX Outdoor Trampoline. This manual provides essential information for the safe assembly, operation, and maintenance of your trampoline. Please read all instructions carefully before assembly and use to ensure safety and prolong the life of your product. This trampoline is designed for recreational use and is available in 8FT, 10FT, and 12FT sizes.

රූපය 1: ඉවරයිview of the GYMAX Outdoor Trampඔලීන්.
2 ආරක්ෂිත තොරතුරු
Your safety is paramount. This trampoline complies with ASTM and CPSIA standards for reliable use. Adhere to the following safety guidelines:
- වැඩිහිටි අධීක්ෂණය: Always ensure adult supervision when children are using the trampඔලීන්.
- වරකට එක ජම්පරයක්: To prevent collisions and injuries, only one person should jump on the trampoline at any given time.
- බර සීමාවන්: Do not exceed the specified static and dynamic weight capacities for your trampoline size. Refer to the 'Specifications' section for details.
- නිෂ්කාශනය: Ensure adequate overhead and surrounding clearance from structures, trees, and other obstacles.
- පරීක්ෂාව: නිතිපතා පරීක්ෂා කරන්න trampoline for damaged, worn, or missing parts before each use. Do not use if any components are compromised.
- සංවෘත දැල: සෑම විටම tr භාවිතා කරන්නampoline with the enclosure net properly installed and secured.
- පෙරළීම් හෝ ස්ටන්ට් නැත: Avoid dangerous maneuvers like flips, which can lead to serious injury.
- කාලගුණික තත්ත්වයන්: tr භාවිතා නොකරන්නampතද සුළං, වැසි හෝ වෙනත් අහිතකර කාලගුණික තත්ත්වයන් යටතේ ඔලයින්.

Image 2: Children enjoying the trampoline safely, highlighting ASTM and CPSIA compliance.
3. පෙට්ටියේ ඇති දේ
ඇසුරුම් ඉවත් කිරීමෙන් පසු, පහත ලැයිස්තුගත කර ඇති සියලුම සංරචක පවතින බවත් හානි වී නොමැති බවත් තහවුරු කර ගන්න:
- Trampoline Frame Components
- පැනීම මැට්
- Springs (42/54/72 pcs depending on size)
- කොටු කිරීමේ දැල
- Net Poles with Foam Sleeves
- Spring Cover Pad
- ඉණිමඟ
- පරිශීලක මාර්ගෝපදේශය (මෙම ලේඛනය)
- Assembly Hardware and Tools (if applicable)
4. සැකසීම සහ එකලස් කිරීම
Assembly requires at least two adults. Follow the steps below for proper installation. Refer to the included user guide for detailed diagrams.
4.1 රාමු එකලස් කිරීම
- Connect the galvanized steel frame tubes to form the circular base. Ensure all connections are secure.
- Attach the curved outward-facing legs to the main frame. These legs provide enhanced stability.
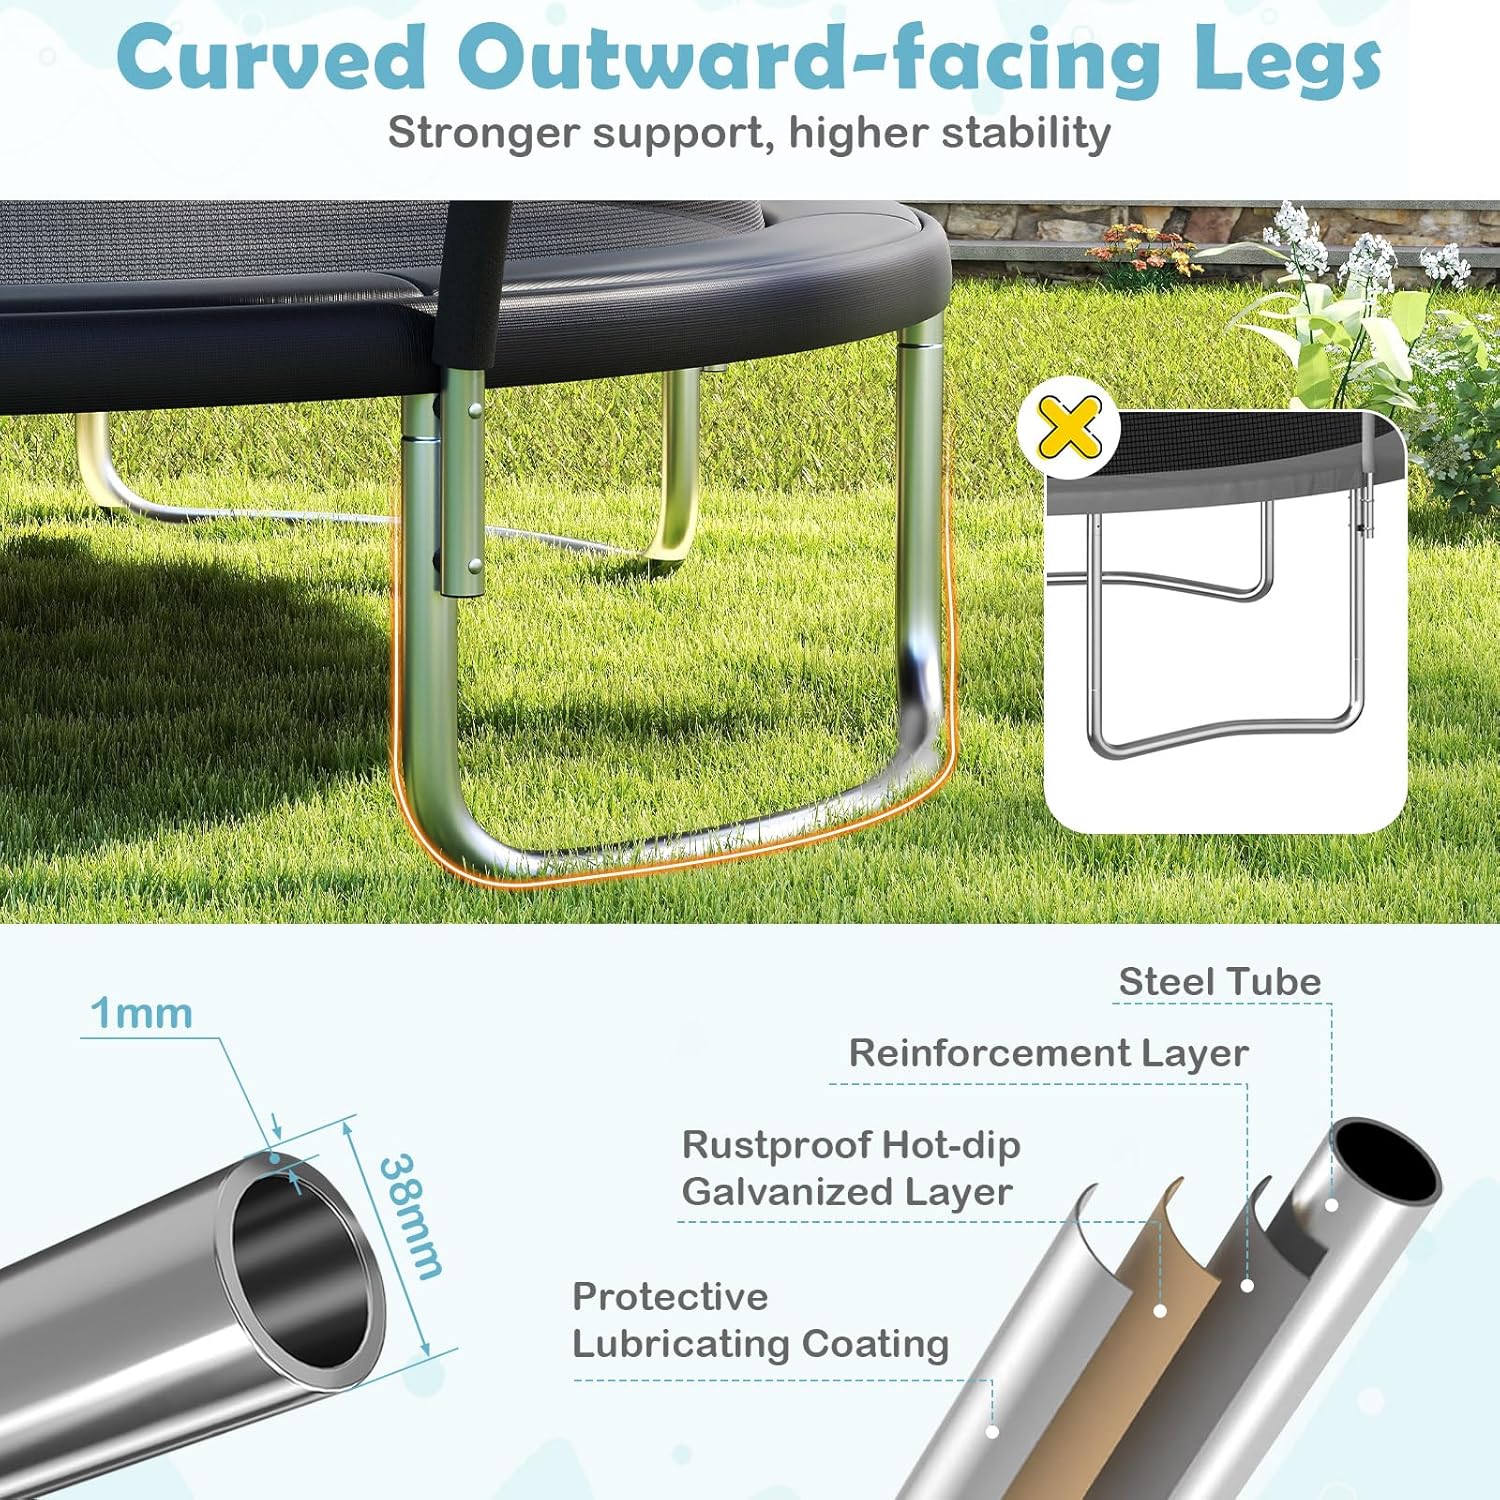
Image 3: Detail of the curved outward-facing legs for stronger support and higher stability.
4.2 Jumping Mat and Spring Installation
- Lay the 8-row stitched PP jumping mat evenly within the frame.
- Attach the high-tensile springs from the frame to the mat's V-rings using the provided spring tool. Install springs symmetrically to ensure even tension.

Image 4: Illustration of the high-tensile springs providing an excellent bouncing experience.

Image 5: Detail of the 8-row stitched PP jumping mat, highlighting its tear-resistant and sun-protective qualities.
4.3 Enclosure Net and Pole Installation
- Assemble the curved net poles and slide the anti-collision foam sleeves onto each pole.
- Secure the net poles to the trampoline frame. The curved design ensures a safe distance from the jumping area.
- Drape the high-density enclosure net over the poles and secure it at the bottom to the jumping mat using the included string for a seamless design, preventing contact with springs and poles.
- Ensure the double-sided zipper door with safety buckle is fully functional.

Image 6: Curved net poles with anti-collision foam sleeves ensure a safe distance from the jumping area.

Image 7: The seamless design, achieved by tying the net to the mat, prevents contact with poles and springs.
4.4 Ladder Attachment
- Attach the heavy-duty, non-slip ladder to the trampoline frame for easy and secure access.

Image 8: Key safety and convenience features including the double-sided zipper, safety buckle, thick padded spring cover, and non-slip ladder.
5. මෙහෙයුම් උපදෙස්
ආරක්ෂිත සහ විනෝදජනක අත්දැකීමක් සහතික කිරීම සඳහා, මෙම මෙහෙයුම් මාර්ගෝපදේශ අනුගමනය කරන්න:
- ඇතුල්වීම සහ පිටවීම: Always use the ladder to enter and exit the trampoline. Do not jump off the trampබිම මත ඔලයින්.
- අධීක්ෂණය: Children must always be supervised by a responsible adult.
- තනි පරිශීලක: එක් අයෙකු පමණක් tr හි සිටිය යුතුය.ampගැටීම් වැළැක්වීම සඳහා එකවර ඔලයින්.
- Proper Jumping: Jump in the center of the mat. Avoid jumping too high or attempting complex maneuvers.
- No Objects: Do not bring sharp objects, toys, or other items onto the trampඔලීන්.
- පාවහන්: Bare feet or trampoline socks are recommended. Avoid shoes that can damage the mat.
6. නඩත්තු කිරීම
Regular maintenance will ensure the longevity and safety of your trampඔලීන්.
- සාමාන්ය පරීක්ෂාව: Before each use, check all nuts, bolts, springs, and frame connections for tightness and wear. Ensure the enclosure net, jumping mat, and spring cover are free from tears or damage.
- පිරිසිදු කිරීම: Clean the jumping mat and enclosure net with mild soap and water. Rinse thoroughly and allow to air dry. Avoid harsh chemicals.
- Spring Cover: Ensure the thick padded spring cover is always in place to protect users from springs and the frame.
- කාලගුණ ආරක්ෂණය: In harsh weather conditions (heavy snow, strong winds), consider disassembling and storing the trampoline indoors, or at least securing it to prevent damage.
- ආදේශන කොටස්: If any part becomes damaged, replace it immediately with genuine GYMAX replacement parts. Do not use the trampoline with damaged components.
7. දෝශ නිරාකරණය
මෙම කොටසින් ඔබට මුහුණ දීමට සිදුවිය හැකි පොදු ගැටළු සාකච්ඡා කෙරේ:
- කිවිසුම් ශබ්දය: Check all frame connections and spring attachments. Apply a silicone-based lubricant to joints if necessary.
- Uneven Bounce: Ensure all springs are correctly attached and evenly tensioned. Inspect the jumping mat for any stretching or damage.
- Net Sagging: Verify that the enclosure net is properly secured to the poles and the bottom of the mat. Check for any loose straps or ties.
- Ladder Instability: Ensure the ladder is correctly hooked onto the frame and that all steps are secure.
මෙහි ලැයිස්තුගත කර නොමැති ගැටළු වලට මුහුණ දෙන්නේ නම් හෝ වැඩිදුර සහාය අවශ්ය නම්, කරුණාකර පාරිභෝගික සහාය අමතන්න.
8. පිරිවිතර
The following table details the specifications for the different GYMAX Outdoor Trampoline models:
| විශේෂාංගය | 8 FT Model | 10 FT Model | 12 FT Model |
|---|---|---|---|
| සමස්ත විෂ්කම්භය | අඩි 8 | අඩි 10 | අඩි 12 |
| සමස්ත උස | අඩි 7.8 | අඩි 8 | අඩි 8.8 |
| කකුලේ උස | 23.5" | 27" | 35" |
| Static Weight Capacity | රාත්තල් 880 | රාත්තල් 880 | රාත්තල් 1100 |
| Dynamic Weight Capacity | රාත්තල් 220 | රාත්තල් 220 | රාත්තල් 265 |
| ශුද්ධ බර | රාත්තල් 76 | රාත්තල් 99 | රාත්තල් 119 |
| උල්පත් ගණන | 42 | 54 | 72 |
| ද්රව්ය | Galvanized Steel, PE, EPE, PVC | ||
| අනුකූල වීම | ASTM, CPSIA | ||
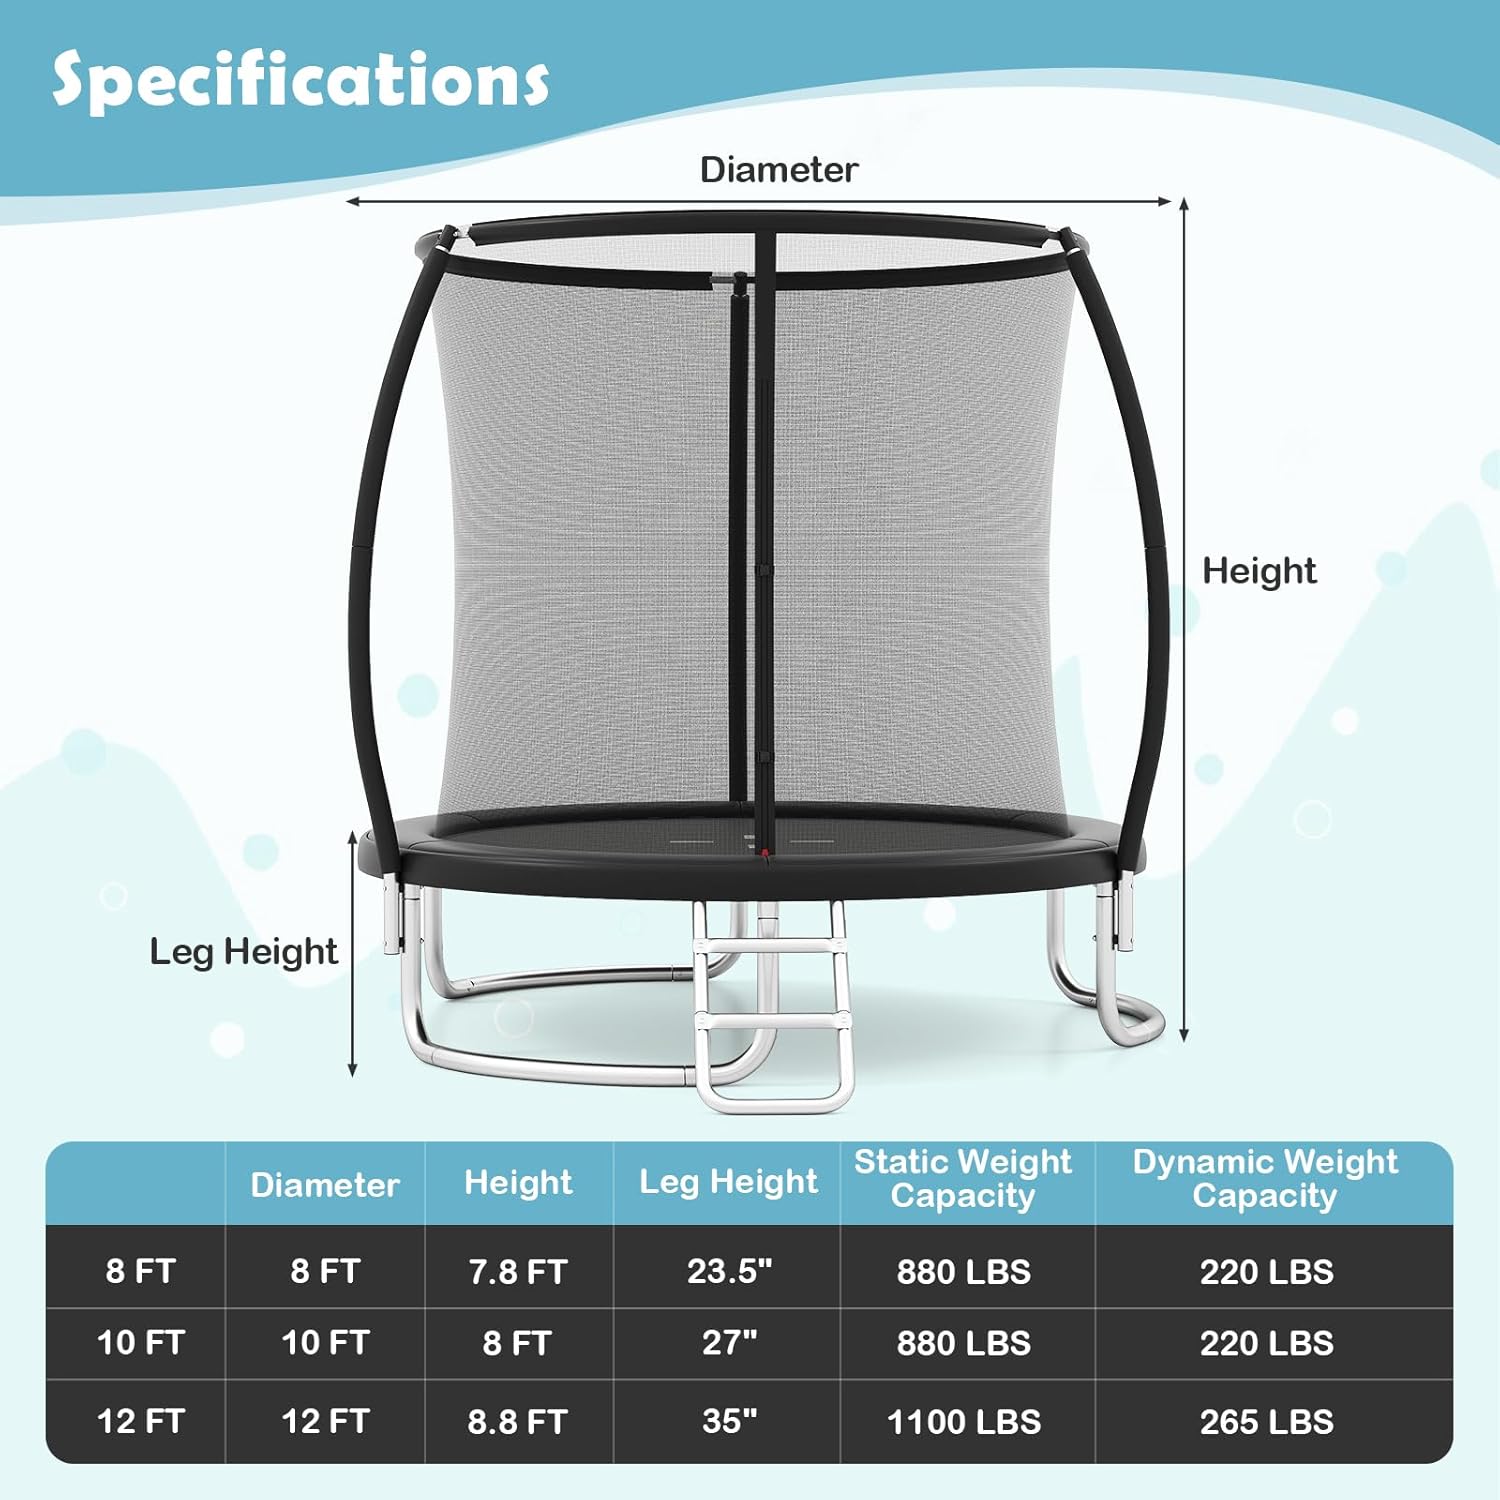
Image 9: Visual representation of trampoline dimensions and weight capacities across different sizes.
9. වගකීම් තොරතුරු
The GYMAX Outdoor Trampඔලයින් සමඟ පැමිණේ a දින 90 වගකීමක් from the date of purchase. This warranty covers manufacturing defects under normal use. It does not cover damage resulting from misuse, accidents, improper assembly, lack of maintenance, or normal wear and tear. Please retain your proof of purchase for warranty claims.
10. පාරිභෝගික සහාය
For any questions, concerns, or assistance with your GYMAX Outdoor Trampoline, please contact our customer support team. Refer to your purchase documentation for specific contact details or visit the official GYMAX webඅඩවිය.